
Popular categories
Looking for a yarn?


|
|
Meet the Sun |
|
 |
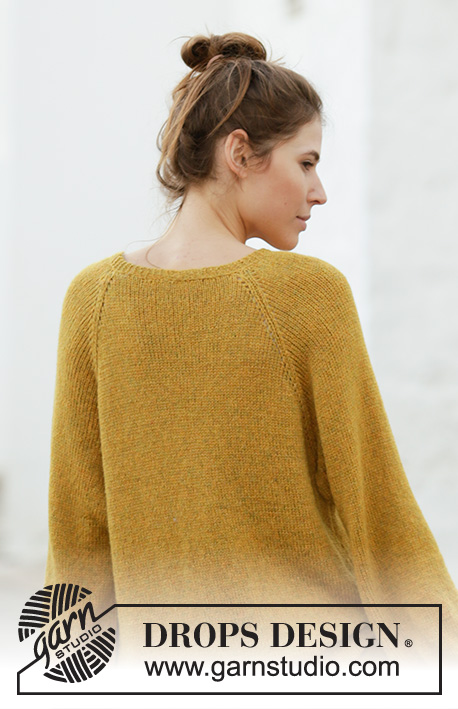 |
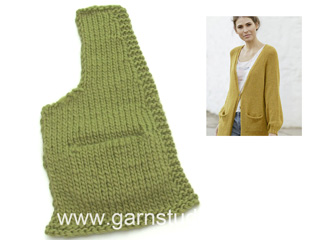
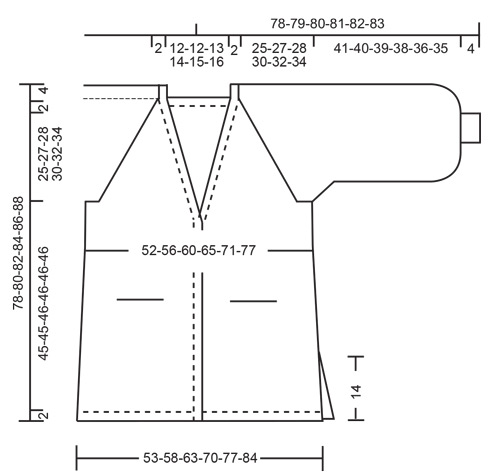
Knitted long jacket with balloon sleeves and raglan in DROPS Sky. The piece is worked top down with V-neck, pockets and split in sides. Sizes S - XXXL.
DROPS 200-6 |
|
|
------------------------------------------------------- EXPLANATIONS FOR THE PATTERN: ------------------------------------------------------- RIDGE/GARTER STITCH (worked back and forth): Knit all rows. 1 ridge in height = Knit 2 rows. INCREASE/DECREASE TIP (evenly spaced): To work out how to increase/decrease evenly, count the total number of stitches on needle (e.g. 72 stitches), minus bands (e.g. 10 stitches) and divide the remaining stitches by the number of increases/decreases to be made (e.g. 4) = 15.5. In this example, increase by making 1 yarn over after alternately each 15th and 16th stitch. On the next row (wrong side) purl the yarn overs twisted to avoid holes. Do not increase on bands. When decreasing, work alternately each 14th and 15th stitch and each 15th and 16th stitch together. RAGLAN: All increases are worked from the right side! Increase to raglan in each transition between body and sleeves as follows: Work until there is 1 stitch left before the marker thread, make 1 yarn over, knit 2 (marker thread sits between these 2 stitches), make 1 yarn over (= 2 stitches increased). On the next row (wrong side) purl the yarn overs twisted to avoid holes. Then work the new stitches in stocking stitch. A total of 8 stitches increased on each increase-row. V-NECK: All increases are worked from the right side! Make 1 yarn over inside the 5 band stitches and knit 1 stitch (= 1 stitch increased). On the next row (wrong side) purl the yarn over twisted to avoid a hole. Then work the new stitch in stocking stitch. A total of 2 stitches increased on each increase-row. BUTTONHOLES: Work buttonholes on the right band (when garment is worn). Work from the right side when there are 4 stitches left on the row as follows: Make 1 yarn over, knit 2 together and knit 2. On the next row (wrong side), knit the yarn over to leave a hole. The first buttonhole is worked when the increases for the V-neck are finished. Then the second buttonhole is worked after 9 cm in all sizes. INCREASE TIP (for sides of body): Work until there are 2 stitches left before the marker thread, make 1 yarn over, knit 4 (marker thread sits in the middle of these 4 stitches), make 1 yarn over. On the next round work the yarn overs twisted to avoid holes. Then work the new stitches in stocking stitch. KNITTING TIP (for bands/neck): Knit up from the right side 62-62-66-66-68-70 stitches along the whole neck (not over bands) with a new needle. When working the bands, knit together 1 stitch from the band and 1 stitch from the new needle until half the stitches have been worked (= mid back). Work the remaining stitches together with the band on the opposite side. ------------------------------------------------- START THE PIECE HERE: ------------------------------------------------------- JACKET - SHORT OVERVIEW OF THE PIECE: Yoke and body are worked back and forth with circular needle from mid front, top down. One half of both pockets are worked before the yoke so that they can be worked into the piece. Pockets worked back and forth. Sleeves are worked in the round with short circular needle/double pointed needles, top down. Then the bands/neck are worked back and forth and sewn on to finish. POCKETS (first half): Cast on 28-28-30-30-32-32 stitches (including 1 edge stitch in each side) with double pointed needle/circular needle size 4 mm and Sky. Work stocking stitch with 1 edge stitch in GARTER STITCH – read description above, on each side. REMEMBER THE KNITTING TENSION! When the piece measures 12-12-13-13-14-14 cm cast off the edge stitches = 26-26-28-28-30-30 stitches. Place stitches on 1 thread and work 1 more pocket in the same way. Lay the pockets to one side and work yoke. The other half of the pocket is worked and assembled when the jacket is finished. YOKE: Cast on 72-74-76-76-78-80 stitches (including 5 band stitches on each side towards mid front) with circular needle size 3.5 mm and Sky. Purl 1 row from the wrong side with 5 band stitches in garter stitch on each side towards mid front. Knit 1 row where you increase 4-4-4-4-8-8 stitches evenly spaced – read INCREASE/DECREASE TIP = 76-78-80-80-86-88 stitches. Change to circular needle size 4 mm and purl 1 row from the wrong side with 5 band stitches in garter stitch on each side towards mid front. Insert 4 marker threads in the piece (without working the stitches) as follows: First marker thread is inserted after the first 7 stitches (= front piece), second after the next 16 stitches (= sleeve), third after the next 30-32-34-34-40-42 stitches (= back piece) and the fourth marker thread is inserted after the next 16 stitches (= sleeve). There are 7 stitches left after the last marker thread (= front piece). Continue with stocking stitch and 5 band stitches in garter stitch on each side – AT THE SAME TIME on the first row from the right side increase to RAGLAN in each transition between body and sleeves – read description above. Continue to increase to raglan every 2nd row (i.e. each row from the right side) until you have increased a total of 30-34-35-39-41-44 times on each side of the 4 marker threads. AT THE SAME TIME on row 6 (i.e. 3rd row from the right side) increase to V-NECK on each side towards mid front – read description above, as follows: Increase every 6th row a total of 13-14-13-15-10-9 times and then every 4th row a total of 0-0-2-0-8-10 times (= a total of 13-14-15-15-18-19 stitches increased in each side towards mid front). After the last increase to raglan the piece measures approx. 21-24-25-28-29-31 cm from the cast-on edge. Continue working without further raglan increases until the piece measures 25-27-28-30-32-34 cm, but continue to increase to V-neck as before. The next row from the right side is worked as follows: Work as far as the first marker thread, work 5-4-5-6-7-8 stitches after the marker thread (= front piece), place the next 66-76-76-82-84-88 stitches on 1 thread for sleeve, cast on 10-10-12-12-14-16 new stitches on the needle (= in side under sleeve), work 100-108-114-124-136-146 stitches (= back piece), place the next 66-76-76-82-84-88 stitches on 1 thread for sleeve, cast on 10-10-12-12-14-16 new stitches on the needle (= in side under sleeve), work as far as the fourth marker thread (= 5-4-5-6-7-8 stitches) and work to end of row (= front piece). Body and sleeves are continued separately. THE PIECE IS NOW MEASURED FROM HERE! BODY: Insert 1 marker thread in each side, in the middle of the 10-10-12-12-14-16 stitches cast on under each sleeve. Allow the marker threads to follow your work onwards; they will be used when increasing in the sides. Continue with stocking stitch, 5 band stitches in garter stitch on each side and increasing to V-neck as before. When the increases to V-neck are finished there are 230-246-262-282-310-334 stitches on the needle. The piece measures approx. 3-3-3-2-1-0 cm from the division (V-neck measures approx. 28-30-31-32-33-34 cm from the cast-on edge). Now work the first BUTTONHOLE on right band, read description above. When the piece measures 5 cm from the division increase 1 stitch on each side of both marker threads – read INCREASE TIP = 4 stitches increased. Increase like this every 0-20-12-7-5-4 cm a total of 1-2-3-5-6-7 times = 234-254-274-302-334-362 stitches. AT THE SAME TIME, when piece measures approx. 16-16-17-17-17-17 cm from the division, work next row from the right side as follows: Work the first 17-17-19-19-21-21 stitches, place the next 26-26-28-28-30-30 stitches on 1 thread (other half of the pocket will be worked here later), work the 26-26-28-28-30-30 stitches from the thread on the one pocket (make sure you continue from the right side of the pocket), work until there are 43-43-47-47-51-51 stitches left on the row, place the next 26-26-28-28-30-30 stitches on 1 thread (other half of the pocket will be worked here later), work the 26-26-28-28-30-30 stitches from the other pocket (make sure you continue from the right side of the pocket) and work the last 17-17-19-19-21-21 stitches on the row. Continue with stocking stitch and 5 band stitches in garter stitch on each side until the piece measures 32-32-33-33-33-33 cm from the division. Now divide the piece at the marker threads in the sides. BACK PIECE: = 112-122-132-146-162-176 stitches. Work stocking stitch with 4 edge stitches in garter stitch on each side until the piece measures 45-45-46-46-46-46 cm from the division. Change to circular needle size 3.5 mm and work 3 ridges. Loosely cast off; to avoid the cast-off edge being tight you can cast off with needle size 4 mm. The jacket measures approx. 76-78-80-82-84-86 cm from the shoulder. RIGHT FRONT PIECE: = 61-66-71-78-86-93 stitches. Work stocking stitch with 5 band stitches in garter stitch towards mid front and 4 edge stitches in garter stitch towards the side. Work until the piece measures 45-45-46-46-46-46 cm from the division. Change to circular needle size 3.5 mm and work 3 ridges. Loosely cast off; to avoid the cast-off edge being tight you can cast off with needle size 4 mm. The jacket measures approx. 76-78-80-82-84-86 cm from the shoulder. LEFT FRONT PIECE: Work as for the right front piece. SLEEVE: Place the 66-76-76-82-84-88 stitches from the thread on the one side of the piece on short circular needle/double pointed needles size 4 mm and knit up 1 stitch in each of the 10-10-12-12-14-16 stitches cast on under the sleeve = 76-86-88-94-98-104 stitches. Insert 1 marker in the middle of the 10-10-12-12-14-16 stitches under the sleeve; this is the beginning of the round. Start here and work stocking stitch in the round. When the piece measures 41-40-39-38-36-35 cm from the division (shorter measurements in larger sizes due to longer yoke) work 1 round where you decrease 32-38-36-42-42-44 stitches evenly spaced – remember INCREASE/DECREASE TIP = 44-48-52-52-56-60 stitches. Change to double pointed needles size 3.5 mm. Work rib (= knit 2 / purl 2) for 4 cm. Loosely cast off with knit over knit and purl over purl, but to avoid the cast-off edge being tight you can cast off with a needle size 4 mm. Work the other sleeve in the same way. BAND/NECK: Knit up from the right side 1 stitch in each of the 5 band stitches on the right front piece with needle size 3.5 mm. Work the 5 band stitches in garter stitch back and forth. If you wish the band can be worked together with the neck – read KNITTING TIP. When the band measures approx. 14-14-15-15-16-16 cm cast off. Work the band on the left front piece in the same way. Sew the 2 bands together mid back and then sew them to the neck of the jacket. POCKETS: Work back and forth with circular needle. Place the 26-26-28-28-30-30 stitches from the thread on the right front piece on needle size 4 mm. On the first row cast on 1 edge stitch on each side = 28-28-30-30-32-32 stitches. Work stocking stitch with 1 edge stitch in garter stitch on each side until the pocket measures 12-12-13-13-14-14 cm; loosely cast off. Work the pocket on the left front piece in the same way. ASSEMBLY: Sew the pockets inside the 1 edge stitch around the whole pocket. Then fasten to the inside of the jacket with one small neat stitch in each of the bottom corners (the stitches should not show on the right side of the jacket). Sew buttons onto left front piece. |
|
|
|
|
Have you made this or any other of our designs? Tag your pictures in social media with #dropsdesign so we can see them! Do you need help with this pattern?You'll find tutorial videos, a Comments/Questions area and more by visiting the pattern on garnstudio.com. © 1982-2024 DROPS Design A/S. We reserve all rights. This document, including all its sub-sections, has copyrights. Read more about what you can do with our patterns at the bottom of each pattern on our site. |
|


With over 40 years in knitting and crochet design, DROPS Design offers one of the most extensive collections of free patterns on the internet - translated to 17 languages. As of today we count 304 catalogues and 11422 patterns - 11422 of which are translated into English (UK/cm).
We work hard to bring you the best knitting and crochet have to offer, inspiration and advice as well as great quality yarns at incredible prices! Would you like to use our patterns for other than personal use? You can read what you are allowed to do in the Copyright text at the bottom of all our patterns. Happy crafting!
Comments / Questions (56)
På str M får jeg ikke antall masker til og stemme npg jeg skal være ferdig med raglan. Etter og ha økt 34 ganger og jeg begynner på inndelig til erme så har jeg ikke nåkk masker på pinnen. Når jeg er ferdig med raglan skal jeg ha 210 masker men indelingen tilsvarer 268 masker.
16.02.2024 - 10:11DROPS Design answered:
Hej Allison, det kommer an på hvor langt du er kommet med udtagningerne til V-hals. Det er derfor vi ikke skriver hvor mange masker du skal bruge i selve inddelingen. Men vi skriver hvor mange masker du skal have på bagstykket og på hver ærme, resten skal gå til forstykkerne i hver side :)
23.02.2024 - 11:13Passe osa xxxl suurusel v-kaeluse juhend arusaamatu. Kas esimene kasvatus on 6. real 9. korda? SAMAL AJAL kasvata 6. real (kolmandal töö parempoolsel real) V-KAELUSE jaoks esiosa keskel – loe ülevalt, järgmiselt: kasvata igal 6. real kokku 13-14-15-15-18-19 korda, siis igal 4. ringil kokku 0-0-2-0-8-10 korda (= kokku 13-14-15-15-18-19 korda mõlemal esiserval).
10.01.2024 - 11:56DROPS Design answered:
Tere Kersti! Just nii ongi! Viga parandatud, tänan teatamast! Head kudumist!
26.01.2024 - 18:11Ich würde gerne den Stricktipp Halsblende umsetzen, aber ich verstehe diesen anhand der textlichen Beschreibung nicht. Gibt es hierzu vielleicht irgendwo ein Video. Bei Youtube wurde ich nicht fündig. Viele Grüsse Angela
05.11.2023 - 14:26DROPS Design answered:
Liebe Angela, zuerst fassen Sie je 1 Masche aus den 5 Blenden Maschen (= in die Anschlagskante am Anfang vom jedem Vorderteil), dann stricken Sie 15, 15 oder 16 cm krausrechts, abketten. genauso beim 2. Vorderteil stricken, die abgeketteten Maschen zusammennähen dann diese Blende am Halsausschnitt annähen - vielleicht kann dann Ihnen dieses Video helfen. Viel Spaß beim stricken!
06.11.2023 - 08:36Ik ben nu voor de tweede keer deze vest aan het breien, nadat ik hem eerst uit hebt gehaald, omdat ik zag, naarmate de vest langer werd, de voorbies helemaal naar binnen ging, opnieuw geprobeerd, brei op alle kanten recht, maar nu weer hetzelfde probleem, hoe kan dit?
09.10.2023 - 18:53DROPS Design answered:
Dag Monica,
Bedoel je dat de bies omkrult? Dit kun je oplossen door, als je het werk helemaal klaar hebt , de bies voorzichtig op te persen met het strijkijzer. De hiervoor heel voorzicht met het strijkijzer op het werk met een natte katoenen (thee)doek ertussen. Let erop dat je dit heel voorzichtig doet en het strijkijzer beslist niet te lang op het werk drukt.
11.10.2023 - 18:58Ich glaube das Einstricken der Tasche bei 13 cm ab Armausschnitt kann nicht sein und passt auch nicht zu der Skizze. Ich denke die Taschen müssen wesentlich tiefer sitzen. Können Sie das bitte noch korrigieren. Viele Grüsse Angela
17.09.2023 - 21:59DROPS Design answered:
Liebe Frau Fischer, Anleitung wurde korrigiert - die Tasche wird 17 cm nach der Verteilung gearbeitet. Viel Spaß beim stricken!
29.09.2023 - 11:34Hallo ik snap niet wat er bedoeld wordt bij de achterpand, er staat brei 4 kantsteken in ribbelsteek aan elke kant, dit is niet de voorbies? Of is dit de onderkant, in ribbelsteek? Zelfde staat ook bij de rechtervoorpand . Worden deze los van elkaar gebreid? ( linker en rechter voorpand) Mvg
07.05.2023 - 16:36DROPS Design answered:
Dag Monica,
Dit zijn 4 ribbelsteken naast de split aan de onderkant aan beide kanten.
08.05.2023 - 20:42Bonsoir J ai une question par rapport au nombre de mailles a glisser sur un fil pour la manche Le nombre de maille pour la manche est de pour la taille XL : 16(initiales) + 2*39 (augmentation donc le total est de 94 mailles Pourquoi on ne glisse que 82 mailles Merci
09.04.2023 - 00:41DROPS Design answered:
Bonjour Amrane, une partie des mailles augmentées pour les manches va être attribuée au devant/au dos, autrement dit, sur les 94 mailles des manches, vous aurez les 6 premières mailles pour le devant gauche (le dos) et les 6 dernières mailles pour le dos (le devant droit). Bon tricot!
11.04.2023 - 12:22Størrelse XL: Er det riktig at det bare skal strikkes 13 cm etter deling til armer og bol når lommene strikkes?
20.03.2023 - 09:33DROPS Design answered:
Hei Lisbeth. Det stemmer, men ønsker du lommene lengre ned, kan du fint strikke noen cm til. mvh DROPS Design
20.03.2023 - 14:24Hallo, ist es richtig, dass nach13 cm ab Teilung die Taschen gearbeitet werden? Das erscheint mir sehr weit oben , ist ja kurz unterhalb Brust. Dankeschön
11.02.2023 - 19:54Ik heb net de pas voor de 2e x gebreid. Ik kreeg de verdeling van de pas niet goed, ik kwam 10st tekort in de rug. Ik moest ergens iets verkeerds gedaan of geteld hebben, dacht ik, dus uitgetrokken en opnieuw begonnen. Maar nu zit ik voor de 2e x met hetzelfde probleem, Ik kom 10st tekort in de rug (136 ipv 146). Opzet en meerderingen zijn ok, lengte is ok, behalve die 10st. Wat loopt er mis? (Ik brei de grootste maat).
24.07.2022 - 12:49DROPS Design answered:
Dag Denise,
Na het meerderen voor de raglan en het meerderen voor de v-hals heb je in totaal 478 steken op de naald. Je breit eerst tot 8 steken na de markeerdraad (als ik goed geteld heb zijn dit 78 steken. Dan zet je de 88 steken voor de mouw op een hulpdraad. (je houd dan nog 8 steken over voor de volgende markeerdraad tussen de mouw en het achterpand). Dan brei je die 8 steken plus de steken tussen de markeerdraad voor het achterpand (dit zijn er 130) plus 8 steken na de markeerdraad, dus in totaal 146 steken. Vervolgens zet je de steken voor de volgende mouw op een hulpdraad, enzovoorts.
31.08.2022 - 14:29