
Popular categories
Looking for a yarn?


Comments / Questions (45)
![]() MARCEAU wrote:
MARCEAU wrote:
Bonjour, Je ne trouve pas le modèle de diagramme A1 ! Suis-je bigleuse ou bien ? Merci d'avance
13.01.2024 - 21:30DROPS Design answered:
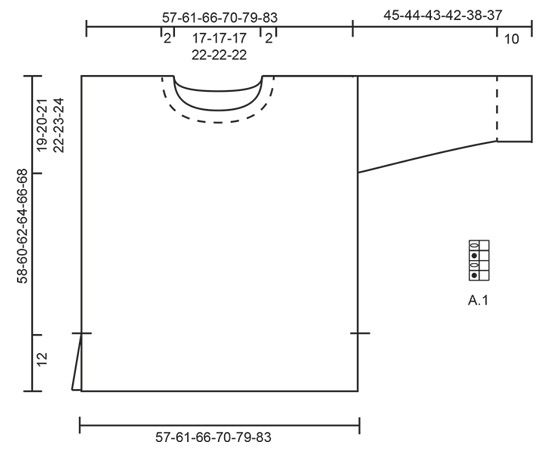
Bonjour Mme Marceau, le diagramme A.1 se trouve à côté du schéma des mesures, c'est un petit diagramme dessiné sur 2 mailles et 4 rangs. Bon tricot!
15.01.2024 - 09:20
![]() MICHELA GHEDINA wrote:
MICHELA GHEDINA wrote:
Stò eseguendo il lavoro con ferri normali. Non riesco ad eseguire il falso punto inglese, potete spiegarmi come fare? ho guardato il tutorial ma è diverso...
18.11.2022 - 22:01DROPS Design answered:
Buonasera Michela, quale passaggio le risulta difficile?. Buon lavoro!
24.11.2022 - 19:56
![]() Janine Pickhover wrote:
Janine Pickhover wrote:
This has to be the most badly written pattern I have ever read! truly appalling. I write patterns for a living and simply could not decipher it! I'm not sure if it has lost something in translation but NEVER again will I buy Drops yarns to use with Garnstudio patterns. awful!
02.02.2022 - 18:34
![]() Ulla wrote:
Ulla wrote:
Vil trøjen få det samme udtryk hvis man laver den i brushed alpaca silk for at den ikke skal være så tung.
16.09.2021 - 11:48
![]() Lucía wrote:
Lucía wrote:
Muchas gracias! 👍
26.01.2021 - 18:24
![]() Lucía wrote:
Lucía wrote:
Falta el diagrama A1
25.01.2021 - 20:47DROPS Design answered:
Hola Lucia, esta a la derecha del esquema de medidas. Buen trabajo!
25.01.2021 - 20:53
![]() Katrin wrote:
Katrin wrote:
Die Abnahme an der linken Schulter vorn ist mir unverständlich. Wenn ich im falschen Patent nach oben stricke, wie soll ich dann in der Hinreihe abnehmen.
02.04.2020 - 19:09DROPS Design answered:
Liebe Katrin, an der linken Schulter stricken Sie die Hinreihe wie folgt: stricken Sie die Maschen wie zuvor bis noch 3 Maschen übrig bleiben, stricken Sie die 2 nächsten Maschen rechts zusammen, und schliessen Sie mit 1 Randmasche krausrechts. Die Rückreihe wie zuvor stricken und diese 2 Reihen insgesamt 4 Mal wiederholen (= 4 Abnhamen). Viel Spaß beim stricken!
03.04.2020 - 07:37
![]() Jeanette wrote:
Jeanette wrote:
Could this be knitted in single strand worsted? If so. what adjustments would be needed? Thank you
27.01.2020 - 20:56DROPS Design answered:
Dear Jeanette, if you use a thinner yarn the tension will be completely different, then pattern should have to be entirely recalculated in width (number of stitches) and height (number of rows). For this kind of adjustement you are welcome to contact the store where you bought the yarn or any knitting forum. Happy knitting!
28.01.2020 - 10:34
![]() Marjo Bodewes wrote:
Marjo Bodewes wrote:
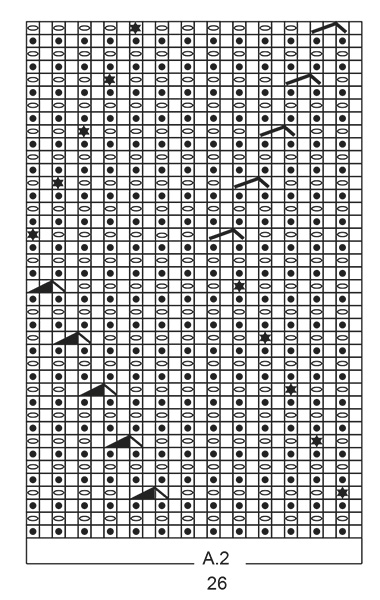
Goedenavond, In het telpatroon A2 staat bij de 4e pen een ster. In de beschrijving komt deze niet voor Kunt u mij vertellen wat deze ster betekent. Alvast mijn dank,
29.09.2019 - 19:21DROPS Design answered:
Dag Marjo,
Deze staat uitgelegd naast de ster bij de lijst met symboolverklaringen.
03.10.2019 - 16:24
![]() Veronique wrote:
Veronique wrote:
Bonjour, Pourquoi des fausses cotes anglaises ? Le faire en vraies cotes anglaises changerait quoi? et faire le dos et le devant en circulaire eviterait de faire les coutures de cotés...
02.06.2019 - 18:21DROPS Design answered:
Bonjour Véronique, c'est ainsi que la styliste a conçu ce modèle, vous pouvez naturellement tout à fait le modifier à votre guise. Bon tricot!
03.06.2019 - 10:17
|
|||||||||||||||||||
Autumn Blush#autumnblushsweater |
|||||||||||||||||||
|
|
|||||||||||||||||||
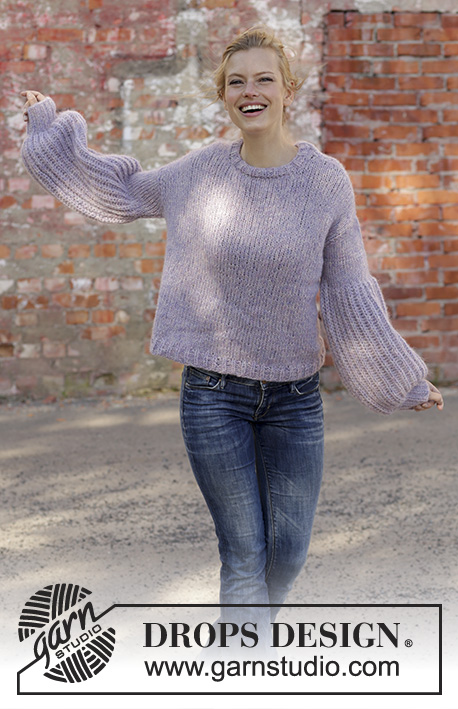
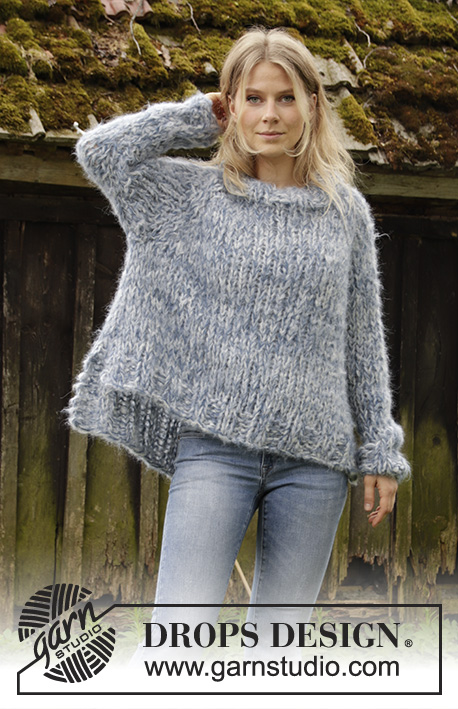
Knitted sweater with false English rib and displacements in DROPS Snow. Size: S - XXXL
DROPS 194-22 |
|||||||||||||||||||
|
---------------------------------------------------------- EXPLANATION FOR THE PATTERN: ---------------------------------------------------------- GARTER STITCH (back and forth): 1 ridge = knit 2 rows. PATTERN: See diagrams A.1 and A.2. Diagrams show all rows in pattern seen from the right side. INCREASE TIP: All increases are done from the right side. Work 1 edge stitch in garter stitch, knit 1, 1 yarn over (= 1 stitch increased), knit until 2 stitches remain, 1 yarn over (= 1 stitch increased), knit 1 and finish with 1 edge stitch in garter stitch (= 2 stitches increased in total). Knit yarn overs twisted on next row to avoid holes. ---------------------------------------------------------- START THE PIECE HERE: ---------------------------------------------------------- SWEATER - SHORT OVERVIEW OF THE PIECE: Worked back and forth. Finish front and back piece separately. Work sleeves back and forth on needle. FRONT PIECE: Cast on 78-84-90-96-108-114 stitches (including 1 edge stitch in each side) on circular needle size 9 mm / US 13 with Snow. Work first row as follows from right side: Work 1 edge stitch in GARTER STITCH – read explanation above, * knit 1, purl 2 together *, work from *-* until 2 stitches remain, finish with knit 1 and 1 edge stitch in garter stitch = 53-57-61-65-73-77 stitches. Then work as follows from wrong side (read diagrams from left towards right): Work 1 edge stitch in garter stitch, A.1 (= 2 stitches) over the next 12-14-16-18-22-24 stitches, A.2 (= 26 stitches), A.1 over the next 13-15-17-19-23-25 stitches and finish with 1 edge stitch in garter stitch. I.e. pattern begins and ends with 1 knit stitch in false English rib inside 1 edge stitch in garter stitch in each side of piece, seen from right side. Continue pattern like this. REMEMBER THE GAUGE! When piece measures 48-50-50-52-52-54 cm / 18⅞"-19⅝"-19⅝"-20⅜"-20⅜"-21 ¼" (approx. 10-10-12-12-14-14 cm / 3⅞"-3⅞"-4⅝"-4⅝"-5 ½"-5 ½" remain), work A.1 over all stitches (i.e. pattern continues straight up without displacements). On next row from right side bind off the middle 11-11-11-15-15-15 stitches for neck with knit over knit and purl over purl (1 yarn over and 1 knit stitch = 1 stitch) = 21-23-25-25-29-31 stitches on each shoulder. Stitch closest to the neck on each shoulder should now be a purl stitch from right side. Now finish each shoulder separately. RIGHT SHOULDER: On next row from the neck (= right side) work as follows: Work 1 stitch in garter stitch, slip yarn over and 1 stitch off the needle as if to knit together, purl 1, pass yarn over and stitch over stitch worked (= 1 stitch decreased), work the rest of row as before. Decrease like this on every row from right side 4 times in total = 17-19-21-21-25-27 stitches. Work until piece measures 58-60-62-64-66-68 cm / 22¾"-23⅝"-24⅜"-25¼"-26"-26¾" in total. On next row from right side bind off. Knit together yarn overs and knit stitches while binding off and purl the purl stitches while binding off. LEFT SHOULDER: Work as right shoulder by decrease for neck at the end of every row from right side as follows: Work as before until 3 stitches remain (yarn over is not counted as stitch), knit purl stitch, yarn over and knit stitch together (= 1 stitch decreased) and finish with 1 stitch in garter stitch. BACK PIECE: Cast on 78-84-90-96-108-114 stitches (including 1 edge stitch in each side) on circular needle size 9 mm / US 13 with Snow. Work first row as follows from right side: Work 1 edge stitch in garter stitch, * knit 1, purl 2 together *, work from *-* until 2 stitches remain, finish with knit 1 and 1 edge stitch in garter stitch = 53-57-61-65-73-77 stitches. Then work as follows from wrong side (read diagram from left towards right): Work 1 edge stitch in garter stitch, A.1 until 1 stitch remains and finish with 1 edge stitch in garter stitch. I.e. pattern begins and ends with 1 knit stitch in false English rib inside 1 edge stitch in garter stitch in each side of piece, seen from right side. Continue pattern like this. When piece measures 54-56-58-60-62-64 cm / 21¼"-22"-22¾"-23⅝"-24⅜"-25¼" / 21¼"-22"-22¾"-23⅝"-24⅜"-25¼" (approx. 4 cm / 1½" remain), bind off the middle 19-19-19-23-23-23 stitches for neck with knit over knit and purl over purl (1 yarn over and 1 knit stitch = 1 stitch) = 17-19-21-21-25-27 stitches on each shoulder. Stitch closest to the neck on each shoulder should now be a purl stitch from right side. Now finish each shoulder separately. RIGHT SHOULDER: Work pattern as before 1 stitch in garter stitch closest to the neck until piece measures 58-60-62-64-66-68 cm / 22¾"-23⅝"-24⅜"-25¼"-26"-26¾" in total. Bind off on next row from right side. Knit together yarn overs and knit stitches while binding off and purl the purl stitches while binding off. LEFT SHOULDER: Work as right shoulder. SLEEVE: Cast on 35-35-38-38-41-41 stitches on circular needle size 9 mm / US 13 with Snow. Work first row as follows from right side: Work 1 edge stitch in garter stitch, * knit 1, purl 2 together *, work from *-* until 1 stitch remains, finish 1 edge stitch in garter stitch = 24-24-26-26-28-28 stitches. Then work as follows from wrong side (read diagram from left towards right): Work 1 edge stitch in garter stitch, A.1 until 1 stitch remains and finish with 1 edge stitch in garter stitch. Continue like this until piece measures 10 cm / 4", adjust to finish with last row from right side. Now work piece in stockinette stitch with 1 edge stitch in garter stitch in each side of piece. When piece measures 12 cm / 4¾", increase 1 stitch inside 1 edge stitch and 1 stitch in each side of piece - read INCREASE TIP! Increase like this every 4-3½-3½-3-2½-2 cm 8-9-9-10-10-11 times in total = 40-42-44-46-48-50 stitches. Bind off when piece measures 45-44-43-42-38-37 cm / 17⅝"-17 ¼"-16⅞"-16 ½"-14⅞"-14 ½". Make another sleeve the same way. ASSEMBLY: Sew the shoulder seams. Sew in sleeves (= approx. 19-20-21-22-23-24 cm / 7½"-8"-8¼"-8¾"-9"-9½" down from shoulder seams) and sew sleeve seams and side seams inside 1 edge stitch until approx. 12 cm / 4¾" remain (= vent). NECK EDGE: Pick up approx. 44 to 56 stitches along neck edge (make sure to avoid a tight edge, pick up more stitches if needed), adjust so that number of stitches is divisible by 2. Work rib (= knit 1/purl 1). Work 2 rounds in total, then bind off with knit over knit and purl over purl. |
|||||||||||||||||||
Diagram explanations |
|||||||||||||||||||
|
|||||||||||||||||||
 |
|||||||||||||||||||
 |
|||||||||||||||||||
Have you finished this pattern?Tag your pictures with #dropspattern #autumnblushsweater or submit them to the #dropsfan gallery. Do you need help with this pattern?You'll find 24 tutorial videos, a Comments/Questions area and more by visiting the pattern on garnstudio.com. © 1982-2026 DROPS Design A/S. We reserve all rights. This document, including all its sub-sections, has copyrights. Read more about what you can do with our patterns at the bottom of each pattern on our site. |
|||||||||||||||||||


With over 40 years in knitting and crochet design, DROPS Design offers one of the most extensive collections of free patterns on the internet - translated to 17 languages. As of today we count 324 catalogs and 12290 patterns - 12280 of which are translated into English (US/in).
We work hard to bring you the best knitting and crochet have to offer, inspiration and advice as well as great quality yarns at incredible prices! Would you like to use our patterns for other than personal use? You can read what you are allowed to do in the Copyright text at the bottom of all our patterns. Happy crafting!
Post a comment to pattern DROPS 194-22
We would love to hear what you have to say about this pattern!
If you want to leave a question, please make sure you select the correct category in the form below, to speed up the answering process. Required fields are marked *.