
Popular categories
Looking for a yarn?


Comments / Questions (70)
![]() Ann Connell wrote:
Ann Connell wrote:
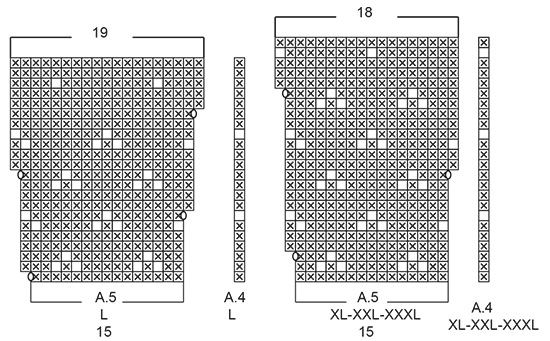
Help I am stuck in understanding pattern for sheep happens. After sheep are done, the grass says knit star 15 increase up to 19 stitches. Leaving you up to 418+ 12 for edge. Pattern says 407? Why I have I too many stitches
31.05.2021 - 17:50DROPS Design answered:
Dear Mrs Connell, are you working size XL? Then diagram A.5 is first worked over 15 sts and increases to 18 sts, this means there are 341 sts before diagrams and you work: 5 front band sts, A.4 (= 1 st), the 15 sts in A.5 a total of 22 times (= 330 sts), 5 front band sts = 5+1+330+5=341 sts and after diagams: 5 sts + 1 st + 18 sts x 22 + 5 sts = 407sts. Hope this will help.
01.06.2021 - 08:11
![]() Linda wrote:
Linda wrote:
Hvordan strikker jeg modellen i str 4xl?
15.04.2021 - 12:17DROPS Design answered:
Hej Linda, brystmålet på xxxl = 142 cm, og det får du hvis du følger strikkefastheden som står i opskriften. Du kan få hjælp og tips i garnbutikken om hvordan du kan gøre jakken større. God fornøjelse!
19.04.2021 - 15:40
![]() Jackie Nelson wrote:
Jackie Nelson wrote:
Can I purchase 194-1 anywhere?
07.01.2021 - 00:21DROPS Design answered:
Dear Mrs Nelson, we only provide the free pattern to this jacket - maybe your DROPS store can help you - don't hesitate to ask them, even per mail or telephone.
07.01.2021 - 10:28
![]() Anne R Jones wrote:
Anne R Jones wrote:
On page 4: cast on 104 (medium size) including 5 band stitches. Do I CO 114 stitches?
23.07.2020 - 22:27DROPS Design answered:
Dear Mrs Jones, the 5 band sts are included, this means you cast on 104 sts and work as follows: 5 sts in garter st, rib K2/P2 over the next 92 sts, K2, 5 sts in garter st. Happy knitting!
29.07.2020 - 09:27
![]() Anne R Jones wrote:
Anne R Jones wrote:
On page 4: cast on 104 (medium size) including 5 band stitches. Do I CO 114 stitches?
23.07.2020 - 22:25DROPS Design answered:
Dear Anne, You CO 104 stitches (the 5 band stitches are included in the total) Happy Knitting!
24.07.2020 - 11:56
![]() Elke Vennix wrote:
Elke Vennix wrote:
Ik ben dit vest aan het breien, ik moet aan A1 tot A3 beginnen maar snap niet de verdeling van voorpand, mouw, achterkant. Is erg onduidelijk ik de beschrijving. Kan iemand mij aub helpen.
13.06.2020 - 16:11DROPS Design answered:
Dag Elke,
Als je de pas aan het breien bent met A.1 t/m A.3 hoef je nog niet te letten op de verdeling van de mouwen en de panden, je hoeft alleen de telpatronen te volgen en de biezen te breien zoals aangegeven in de beschrijving. Nadat A.1 t/m A.3 in de hoogte zijn gebreid brei je verder met alleen grijs en dan wordt ook het werk gesplits (zoals beschreven staat onder het laatste stuk bij de PAS).
18.06.2020 - 11:15
![]() Alice Ableman wrote:
Alice Ableman wrote:
There is a glaring error in your pattern, or the photo of the model is backwards. Using the pattern for the sheep, the large on faces to the left while the photo the large sheep faces to the right.
24.02.2020 - 15:19DROPS Design answered:
Dear Mrs Ablemna, the large sheep (= A.3) is shown on the left front piece on the picture, and it will be also worked on the left front piece in the written pattern: working top down, you start with left front piece and work diagram A.2 a total of 2 times (= 2 "standard" sheep), then A.3 (= 1 large sheep) and finishes with A.2 = "standard" sheep on the right front piece. Happy knitting!
24.02.2020 - 15:56
![]() Christel wrote:
Christel wrote:
Ik begrijp in de pas niet hoe er gemeerderd wordt, ik brei maat Xl na de boord moet je meerdere naar 145 steken dat is duidelijk. Maar dan er staat A1 = 1 steek enz enz dan als je verder leest hebben ze bij maat xl gemeerderd tot 333 steken . Waar moeten die gemeerderd worden
27.01.2020 - 10:21DROPS Design answered:
Dag Christel,
De meerderingen staan in de telpatronen aangegeven in de vorm van omslagen die je op de volgende naald gedraaid breit. (laatste symbool in de lijst bij de telpatronen). Als je de naalden van de telpatronen in de hoogte hebt gebreid, dan staan er 333 steken op de naald.
10.02.2020 - 21:54
![]() LILLIAN MARIT GJERDENE wrote:
LILLIAN MARIT GJERDENE wrote:
Hei. Skal strikke denne , men mottaker vil ikke ha sauene på mønsteret. Det må vel gå greit å kutte ut de. Så lurte jeg på om det er mulig å strikke denne på rundpinne. Sette av til stolpemasker øverst og legge opp noen vrangmasker som en klipper opp etter til slutt og strikke stolper og sy på til slutt, som en gjør på kofter når en begynner nederst. Hater å strikke frem og tilbake
17.10.2019 - 18:54DROPS Design answered:
Hei Lillian. Det går fint, bare husk å økningene i "sauemønstret", uten å strikke sauene. God Fornøyelse!
21.10.2019 - 09:24
![]() Ирина wrote:
Ирина wrote:
Good evening! Is it necessary to knitt the whoule diagramma with 2 colores in cardigan? It will be enough then 50 gr of white colore for cardigan? Also i dont understsnd: when im knitting with 2 colores i have to stop befor this Rille (5 m), how then to get up on further row with white colore? I haven't find any video or explanation of this. and it would be good to see this model on the back side if its possible. Waiting for your reply. Irina
02.10.2019 - 20:58DROPS Design answered:
Dear Irina, if your tension is right, then you should have enough yarn as required for your size. White yarn is used as shown in diagrams. When you have worked a row with white and white won't be used for next row, let the yarn where it is (just as for stripes), you will then use it on next row with white (make sure to not tighten yarn to avoid tightening work in height). Happy knitting!
03.10.2019 - 09:08
|
||||||||||||||||
Sheep Happens! Cardigan#sheephappenscardigan |
||||||||||||||||
 |
 |
|||||||||||||||
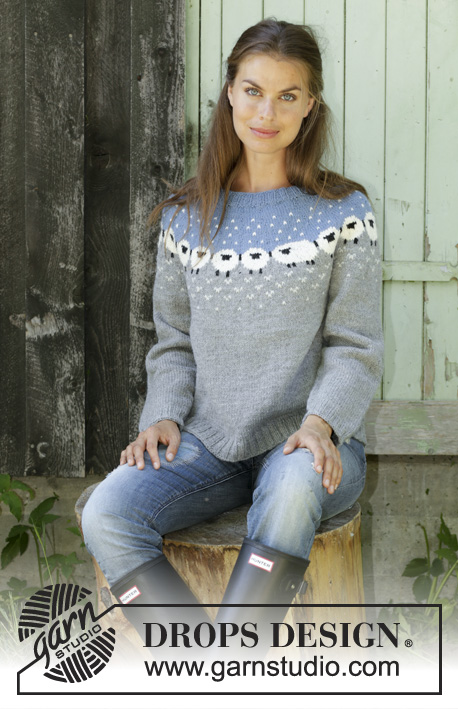
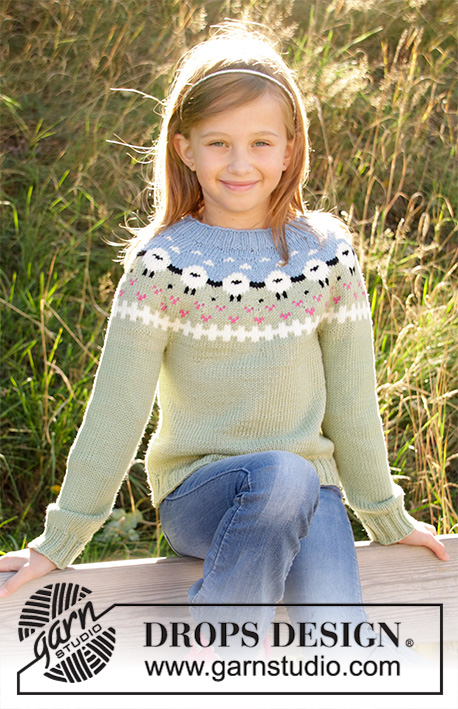
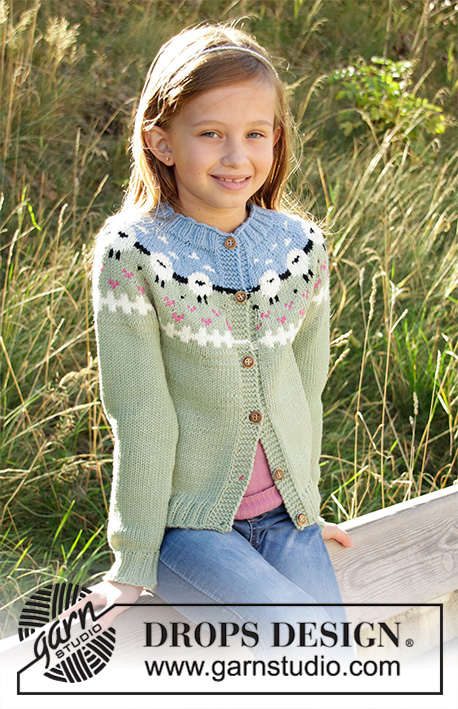
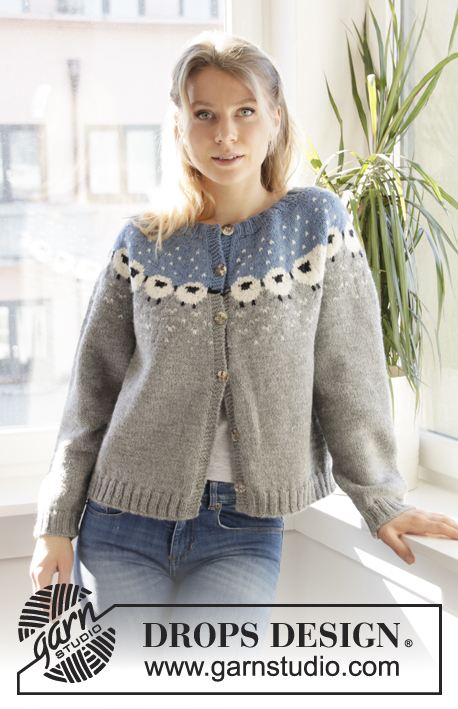
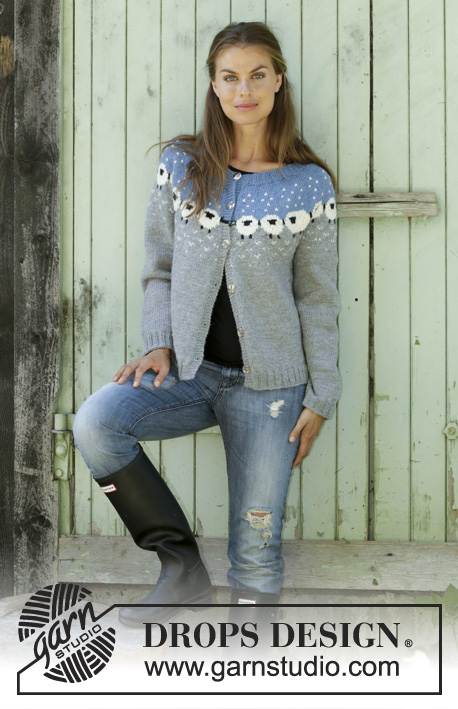
Knitted jacket with round yoke in DROPS Lima. Piece is knitted top down in Nordic pattern with sheep. Size: S - XXXL
DROPS 194-1 |
||||||||||||||||
|
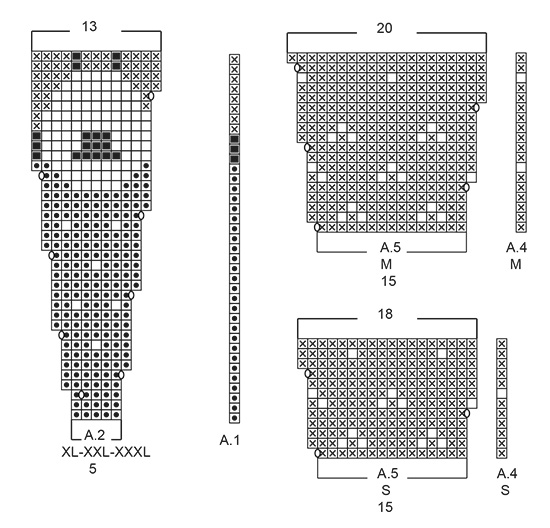
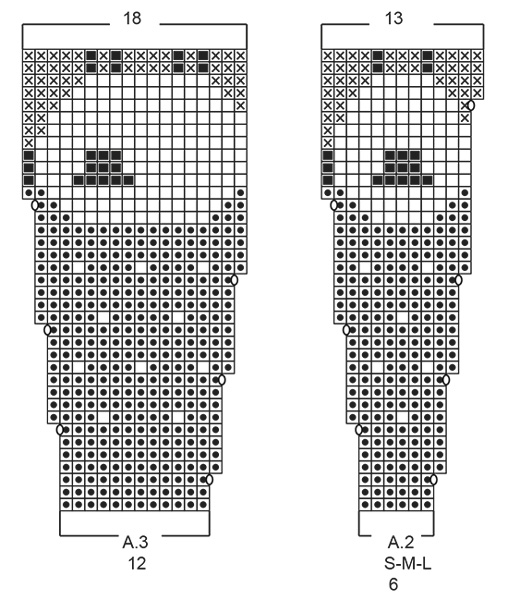
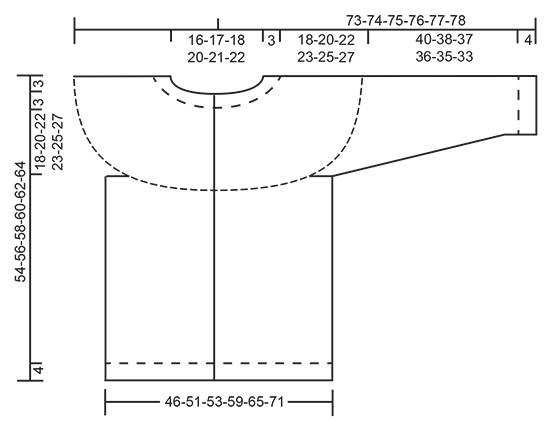
---------------------------------------------------------- EXPLANATION FOR THE PATTERN: ---------------------------------------------------------- GARTER STITCH (back and forth): 1 ridge = knit 2 rows. PATTERN: See diagrams A.1 to A.5. Choose diagram for your size. Work diagrams in stockinette stitch. As the color changes are far apart, the strands should be twined after approx. every 7th stitch, to avoid long loose strand on the wrong side. INCREASE TIP (evenly): To calculate how to increase evenly, use the total number of stitches on row (e.g. 100 stitches), minus band (= 10 stitches = 90 stitches) and divide stitches by number of increases to be done (e.g. 31) = 2.9. In this example increase by making 1 yarn over after approx. every 3rd stitch. Do not increase over band. On next row work yarn overs twisted to avoid holes. DECREASE TIP (applies to sleeves): Decrease 1 stitch on each side of marker as follows: Work until 3 stitches remain before marker, knit 2 together, knit 2 stitches (marker is between these stitches), slip 1 stitch knitwise, knit 1, pass slipped stitch over stitch worked (= 2 stitches decreased). BUTTONHOLES: Decrease for buttonholes on right band (when garment is worn). Decrease from right side when 3 stitches remain on row as follows: Make 1 yarn over, knit the next 2 stitches together, knit last stitch. On next row knit yarn over to make holes. Decrease first buttonhole when rib in neck measures approx. 1½-2 cm. Then decrease the next 5-5-6-6-7-7 buttonholes, approx. 8½-8½-8-8-7½-7½ cm between each. ---------------------------------------------------------- START THE PIECE HERE: ---------------------------------------------------------- JACKET - SHORT OVERVIEW OF THE GARMENT: Work yoke back and forth on circular needle, top down. Divide the yoke into sleeves and body. Work body back and forth. Sleeves are worked in the round on double pointed needles. YOKE: Cast on 100-104-108-112-120-128 stitches (including 5 band stitches in each side of piece) on circular needle size 3 mm / US 2.5 with gray blue. Purl 1 row from wrong side with 5 band stitches in GARTER STITCH - read explanation above, in each side of piece. Work 5 band stitches in garter stitch, rib (= knit 2/purl 2) until 7 stitches remain, knit 2 and finish with 5 band stitches in garter stitch. Decrease for BUTTONHOLES on right band - read explanation above. Work rib for 3 cm / 1", adjust so that last row is from right side. Switch to circular needle size 4 mm / US 6. Purl 1 row from wrong side with 5 band stitches in garter stitch in each side and increase 31-27-35-33-35-37 stitches evenly – read INCREASE TIP = 131-131-143-145-155-165 stitches. Work pattern as follows from right side: Work 5 band stitches in garter stitch, A.1 (= 1 stitch), A.2 (= 6-6-6-5-5-5 stitches) over the next 12-12-12-10-10-10 stitches (= 2 times in total), A.3 (= 12 stitches), A.2 over the next 42-42-48-50-55-60 stitches (= 7-7-8-10-11-12 times in total), A.3 over the next 12 stitches, A.2 over the next 42-42-48-50-55-60 stitches (= 7-7-8-10-11-12 times in total) and finish with 5 band stitches in garter stitch. Work band in the same color as A.1. REMEMBER THE GAUGE! When A.1 to A.3 have been worked 1 time vertically, there are 255-255-281-333-359-385 stitches on needle. Piece measures approx. 16 cm (including rib). Purl 1 row with gray from wrong side with 5 band stitches in garter stitch in each side and increase 11-11-15-8-12-1 stitches evenly = 266-266-296-341-371-386 stitches. Work next row from right side (work yarn overs twisted to avoid holes): Work 5 band stitches in garter stitch (now work band in gray until finished measurements), A.4 (= 1 stitch), A.5 (= 15 stitches) over the next 255-255-285-330-360-375 stitches (= 17-17-19-22-24-25 times in width) and finish with 5 band stitches in garter stitch. When A.4 and A.5 have been worked 1 time vertically, there are 317-351-372-407-443-461 stitches on needle. Piece now measures 21-23-24-25-25-25 cm / 8 ¼"-9"-9⅜"-9 ¾"-9 ¾"-9 ¾" (including rib). Work with gray until finished measurements. Work in stockinette stitch with 5 band stitches in garter stitch until piece measures 21-23-25-26-28-30 cm / 8 ¼"-9"-9 ¾"-10 ¼"-11"-11 ¾" (including rib). Now divide the piece for sleeves and body as follows: Work 5 band stitches in garter stitch, 45-49-51-57-63-68 stitches in stockinette stitch (= front piece), slip the next 64-72-79-84-90-90 stitches on a stitch holder for sleeve and cast on 8-8-10-10-10-14 stitches under sleeve, work 89-99-102-115-127-135 stitches in stockinette stitch (= back piece), slip the next 64-72-79-84-90-90 stitches on a stitch holder for sleeve and cast on 8-8-10-10-10-14 stitches under sleeve, work 45-49-51-57-63-68 stitches in stockinette stitch and finish with 5 band stitches in garter stitch (= front piece) = 205-223-234-259-283-309 stitches. BODY: Then work in stockinette stitch with 5 band stitches in garter stitch in each side of piece. When piece measures 26-26-26-27-27-27 cm / 10 ¼"-10 ¼"-10 ¼"-10⅝"-10⅝"-10⅝" from where body was divided from sleeves, increase 27-33-34-33-41-43 stitches evenly on next row from wrong side = 232-256-268-292-324-352 stitches. Switch to circular needle size 3 mm / US 2.5 and work as follows on next row from right side: Work 5 band stitches in garter stitch, rib (= knit 2/purl 2) until 7 stitches remain, knit 2 and finish with 5 band stitches in garter stitch (work yarn overs twisted to avoid holes). Bind off by knitting from right side when rib measures 4 cm / 1½" (i.e. piece measures approx. 30-30-30-31-31-31 cm / 11 ¾"-11 ¾"-11 ¾"-12⅛"-12⅛"-12⅛" from where body was divided from sleeves). Jacket measures 54-56-58-60-62-64 cm / 21¼"-22"-22¾"-23⅝"-24⅜"-25¼" in total measured from shoulder. SLEEVE: Slip the 64-72-79-84-90-90 stitches from stitch holder in one side of piece on double pointed needles size 4 mm / US 6 and pick up 1 stitch in each of the 8-8-10-10-10-14 stitches cast on under sleeve = 72-80-89-94-100-104 stitches. Insert 1 marker in the middle of the 8-8-10-10-10-14 stitches under sleeve. Work in the round in stockinette stitch with gray. When piece measures 1 cm / ⅜" from where sleeves was divided from body, decrease 1 stitch on each side of marker - read DECREASE TIP. Decrease like this every 3-2-1½-1½-1½-1 cm/1⅛"-¾"-½"-½"-½"-⅜" 11-15-18-19-22-23 times in total = 50-50-53-56-56-58 stitches. When piece measures 40-38-37-36-35-33 cm / 15 ¾"-14⅞"-14 ½"-14⅛"-13 ¾"-13" from where sleeves were divided from body, increase 2-2-3-0-4-2 stitches evenly on next round = 52-52-56-56-60-60 stitches. Switch to double pointed needles size 3 mm / US 2.5 and work rib = knit 2/purl 2. Bind off by knitting when piece measures 44-42-41-40-39-37 cm / 17 ¼"-16 ½"-16⅛"-15 ¾"-15 ¼"-14 ½" from where sleeve was divided from body (= approx. 4 cm / 1½" rib). Work the other sleeve the same way. ASSEMBLY: Sew on buttons on left band. |
||||||||||||||||
Diagram explanations |
||||||||||||||||
|
||||||||||||||||
 |
||||||||||||||||
 |
||||||||||||||||
 |
||||||||||||||||
 |
||||||||||||||||
Have you finished this pattern?Tag your pictures with #dropspattern #sheephappenscardigan or submit them to the #dropsfan gallery. Do you need help with this pattern?You'll find 28 tutorial videos, a Comments/Questions area and more by visiting the pattern on garnstudio.com. © 1982-2026 DROPS Design A/S. We reserve all rights. This document, including all its sub-sections, has copyrights. Read more about what you can do with our patterns at the bottom of each pattern on our site. |
||||||||||||||||


With over 40 years in knitting and crochet design, DROPS Design offers one of the most extensive collections of free patterns on the internet - translated to 17 languages. As of today we count 324 catalogs and 12290 patterns - 12280 of which are translated into English (US/in).
We work hard to bring you the best knitting and crochet have to offer, inspiration and advice as well as great quality yarns at incredible prices! Would you like to use our patterns for other than personal use? You can read what you are allowed to do in the Copyright text at the bottom of all our patterns. Happy crafting!
Post a comment to pattern DROPS 194-1
We would love to hear what you have to say about this pattern!
If you want to leave a question, please make sure you select the correct category in the form below, to speed up the answering process. Required fields are marked *.