
Popular categories
Looking for a yarn?


Comments / Questions (47)
![]() Alessia wrote:
Alessia wrote:
Salve volevo fare alcune domande relative al modello. Ho finito il motivo a trifogli e ho ripreso 198 maglie. Ho iniziato a fare il diagramma A.3. e dopo 2 cm ho iniziato le diminuzioni. Vanno fatte solo sui lati dove ci sono i 2 segni? Il diagramma A4 deve essere completato tutto in orizzontale? Ed infine volevo chiedere se dopo aver fatto la prima diminuzione, come devo proseguire il giro successivo?
25.03.2020 - 16:38DROPS Design answered:
Buongiorno Alessia. Deve diminuire dove ci sono i segni, alternando una volta prima e una volta dopo il segno. Il diagramma A4 viene lavorato tutto in orizzontale. Terminato A4, lavora su queste maglie come indicato sulla riga di A3 che sta lavorando sulle altre maglie. Buon lavoro!
27.03.2020 - 16:26
![]() Paola Pozzi wrote:
Paola Pozzi wrote:
Un sito meraviglioso con bellissimi modelli, lo uso spesso e vi ringrazio di cuore per quello che offrite .
17.03.2020 - 10:33
![]() Paola Pozzi wrote:
Paola Pozzi wrote:
Buongiorno sono Paola, sto eseguendo il modello ipanema ma sinceramente non riesco a capire come si fanno le diminuzioni sui lati, sono ferma con il lavoro. Grazie per il vostro aiuto e complimenti per il sito, meraviglioso.
17.03.2020 - 10:30DROPS Design answered:
Buongiorno Paola. Sulla prima riga di A.4 lavora: 1 maglia alta, 2 cat, 1 maglia alta , 2 cat, 1 maglia alta. Riga 2: 1 maglia alta in ogni maglia alta e 1 maglia alta intorno agli archi di catenelle (e non 2 maglie alte come in A.3). Riga 3: 1 maglia alta nella maglia alta , 2 cat, saltare 3 maglie alte e finire con 1 maglia alta nella maglia alta successiva. Riga 4: 1 maglia alta nella maglia alta, 1 maglia alta nell’arco di catenelle e 1 maglia alta nella maglia alta successiva. Buon lavoro!
17.03.2020 - 17:22
![]() Henriette Humlebæk wrote:
Henriette Humlebæk wrote:
Jeg hækler str. medium - alle mål passer med opskriften, men jeg synes, det virker som om toppen bliver meget stor, er det en meget stor medium? - jeg har hæklet hele kløvermønstret og er gået i gang med A3 omgangene. Så det er det nederste af toppen, jeg vurderer - men som nævnt, så passer det, jeg har hæklet med de mål, der er opgivet.
07.08.2019 - 22:20DROPS Design answered:
Hej Henriette, du finder alle mål på toppen i måleskitsen nederst i opskriften. Vælg den størrelse som har de mål som passer til dig. God fornøjelse!
09.08.2019 - 08:53
![]() Laura wrote:
Laura wrote:
Buona sera. Sono arrivata alla fine dei 25 cm e devo iniziare a dividere il lavoro. Ma nn capisco se devo dividere 81 maglie x parte e poi partire dalla 7 e iniziare a lavorare le 70 m.a.facendo il giro m.a. e 2 cat saltando 2 maglie. Poi tornare indietro e proseguire con a3 fino a 36 cm . Corretto? Grazie
30.07.2019 - 23:24DROPS Design answered:
Buongiorno Laura. Sì, è corretto come ha indicato. Buon lavoro!
30.07.2019 - 23:57
![]() Mary wrote:
Mary wrote:
C'è un errore nello schema delle diminuzioni, nel terzo giro i punti alti intorno alla catenella devono essere 2 e non 1, altrimenti si calano 4 punti ogni volta e non 3.
24.07.2019 - 13:23
![]() Leena Myllymaa wrote:
Leena Myllymaa wrote:
Ihana ohje, helppo aloittelijallekin.
03.06.2019 - 10:29
![]() GHISLAINE wrote:
GHISLAINE wrote:
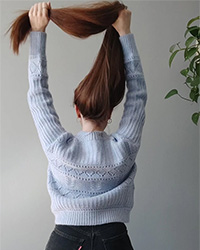
Bonjour, je commence ce jour ce modèle et je souhaite savoir s'il existe une photo vu de dos ? Si oui, pouvez-vous me la transmettre ? Avec mes remerciements anticipés. Cdt.
21.05.2019 - 20:43DROPS Design answered:
Bonjour Ghislaine, nous n'avons pas de photo de dos de ce modèle. Crochetez le dos d'abord en une seule pièce puis divisez en deux pour former la fente d'encolure et terminez chaque demi-dos séparément. Bon crochet!
22.05.2019 - 09:12
![]() Josepha wrote:
Josepha wrote:
Bonjour je viens de finir la partie trèfle et j'ai du mal à poursuivre. Si je comprends bien il faut faire des brides entre les brides. Si je fais cela j'ai un quadrillage et et non pas des brides serrées entre elles. Pourriez vous me guider pour effectuer le rang entre A1 et A3. Par avance je vous en remercie
11.04.2019 - 13:32DROPS Design answered:
Bonjour Josepha, pour crocheter la partie du haut, on travaille le long du côté gauche de la bordure trèfle (cf schéma), on va ainsi piquer non pas dans les mailles de début et de fin de rang mais autour de celles-ci, à intervalles réguliers pour avoir le bon nombre de brides à la fin de ce premier rang. Bon crochet!
11.04.2019 - 14:54
![]() Laurent wrote:
Laurent wrote:
D accord donc comme une diminution ce fait en 3 rangs je les fait les unes à la suite des autres c est ça ?
14.02.2019 - 12:39DROPS Design answered:
Bonjour Laurent, si ces 3 rangs = 4 cm alors oui, ajustez bien pour que vos diminutions soient faites toutes les 4 cm. Bon crochet!
14.02.2019 - 14:46
|
|||||||||||||||||||||||||
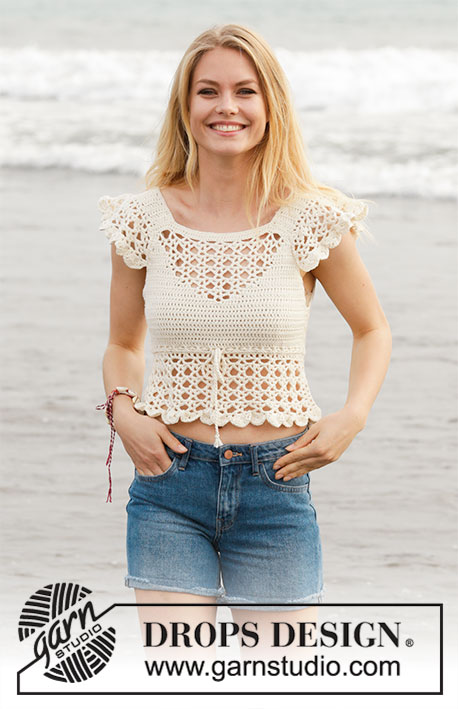
Ipanema#ipanematop |
|||||||||||||||||||||||||
 |
 |
||||||||||||||||||||||||
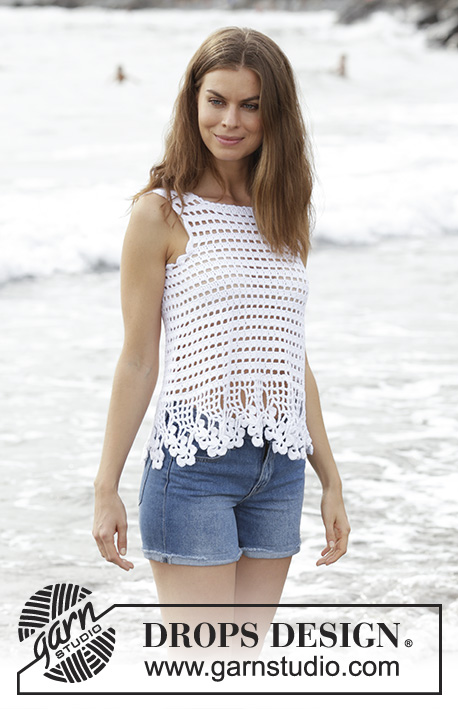
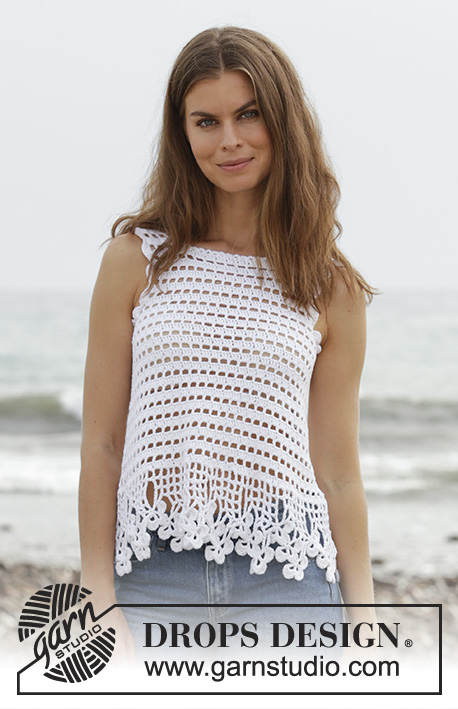
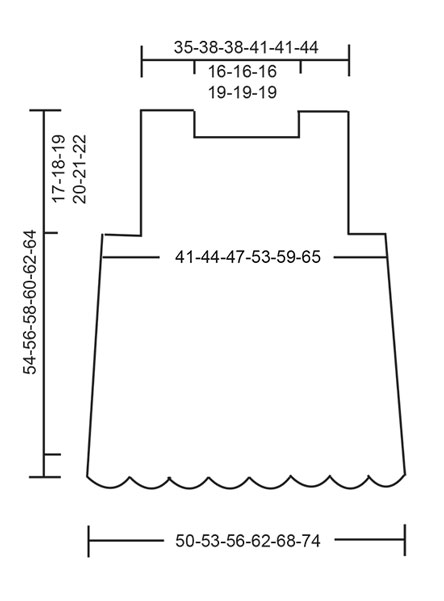
Crocheted top with clover and lace pattern. The piece is worked in DROPS Cotton Light. Sizes S - XXXL.
DROPS 190-2 |
|||||||||||||||||||||||||
|
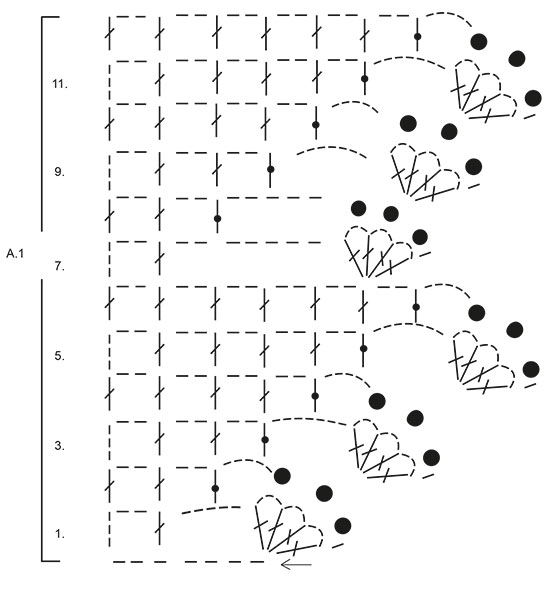
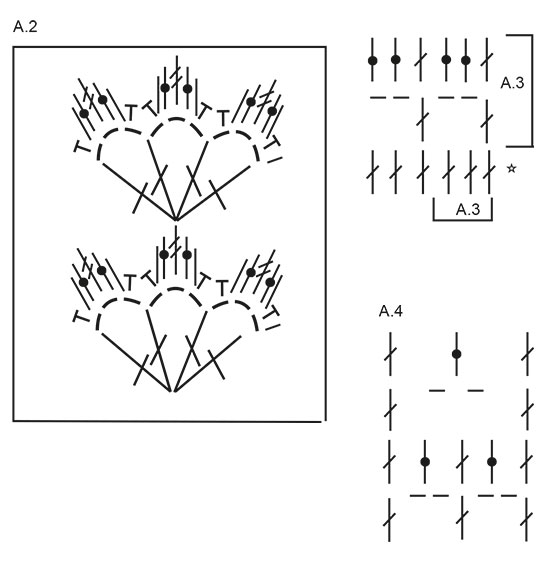
INFORMATION FOR THE PATTERN: PATTERN: See diagrams A.1 to A.4. CROCHET INFO-1: The first row on each clover leaf (= 1 double crochet, 3 chain stitches, 1 double crochet, 3 chain stitches, 1 double crochet, 3 chain stitches, 1 double crochet in the same double crochet) is worked in the middle treble crochet of the previous clover leaf - see A.2. CROCHET INFO-2: The first double crochet at the beginning of the row/round is replaced by 3 chain stitches. Finish the row/round with 1 slip stitch in the 3rd chain stitch at the beginning of the row/round. The first single crochet at the beginning of the row is replaced by 1 chain stitch. ---------------------------------------------------------- TOP: First the clover pattern is worked from side to side at the bottom, then the top is worked upwards in the round as far as the armholes. Here the piece is divided and the front and back pieces are worked separately. Work 12 chain stitches (including 5 chain stitches to turn) with Cotton Light and hook size 3.5 mm/E/4. Read CROCHET INFO-1! Continue by working according to A.1 until you have worked 1 repeat in height. Then repeat rows 7-12 until the piece measures approx. 100-106-112-124-136-148 cm / 39⅜"-41⅝"-44"-48 ¾"-53 ½"-58 ¼" – finish after row 12. Sew the clover edge together to make a ring (seam = side of the top). Then continue working upwards in the round, THE PIECE IS NOW MEASURED FROM HERE! Crochet up 198-210-222-246-270-294 double crochets around the double crochets from the long-side in A.1. Then work according to A.3 – read CROCHET INFO-2. Continue this pattern upwards. Insert 2 marker threads in the piece, 1 at the beginning of the round and 1 after 99-105-111-123-135-147 double crochets (= sides). When the piece measures 2 cm / ¾" decrease 1 double crochet group (= 3 double crochets or 1 double crochet + 2 chain stitches) in each side, decrease before both marker threads. Diagram A.4 shows how to decrease in the pattern. Repeat the decrease upwards every 4 cm / 1½"; decrease alternately before and after the marker threads in the sides, i.e. the first time you decrease 1 double crochet group before the marker threads, the second time you decrease 1 double crochet group after both marker threads. Decrease a total of 6 times in each side of the top = 162-174-186-210-234-258 double crochets/chain stitches. When the piece measures 25-26-27-28-29-30 cm / 9¾"-10¼"-10⅝"-11"-11⅜"-11¾", adjust so that the next round to be worked is the first round in A.3, divide the piece for the front and back pieces. Cut the strand. FRONT PIECE: Skip the first 6-6-9-12-18-21 double crochets, work A.3 over the next 70-76-76-82-82-88 double crochets (= 23-25-25-27-27-29 repeats of A.3 + 1 double crochet). Turn and work back. Continue this pattern upwards. When the piece measures 36-38-40-42-44-46 cm / 14¼"-15"-15¾"-16½"-17¼"-18" work over just the first 19-22-22-22-22-25 double crochets/chain stitches on the row = right shoulder. Continue until the piece measures 42-44-46-48-50-52 cm / 16½"-17¼"-18"-19"-19¾"-20½" / 16½"-17¼"-18"-19"-19¾"-20½", cut and fasten the strand. Work the left shoulder in the same way, i.e. work over just the last 19-22-22-22-22-25 double crochets/chain stitches on the row. The 32-32-32-38-38-38 double crochets/chain stitches not worked = neck. The piece measures a total of 54-56-58-60-62-64 cm / 21¼"-22"-22¾"-23⅝"-24⅜"-25¼" / 21¼"-22"-22¾"-23⅝"-24⅜"-25¼". BACK PIECE: Skip the first 11-11-17-23-35-41 double crochets after the front piece, work A.3 over the next 70-76-76-82-82-88 double crochets (= 23-25-25-27-27-29 repeats of A.3 + 1 double crochet). Turn and work back (there are now 11-11-17-23-35-41 double crochets in each side which are not worked (= armholes). Continue A.3 upwards. When the piece measures 30-32-34-36-38-40 cm / 11¾"-12½"-13⅜"-14¼"-15"-15¾ divide the back piece so that you have a split mid back. RIGHT BACK PIECE: Now work over just the first 35-38-38-41-41-44 double crochets; work A.3 over the first 33-36-36-39-39-42 double crochets/chain stitches and finish with 2 double crochets towards mid back. When the piece measures 36-38-40-42-44-46 cm / 14¼"-15"-15¾"-16½"-17¼"-18" work over just the first 19-22-22-22-22-25 double crochets/chain stitches on the row = right shoulder. The 16-16-16-19-19-19 double crochets not worked = neck. Continue until the piece measures 42-44-46-48-50-52 cm / 16½"-17¼"-18"-19"-19¾"-20½" / 16½"-17¼"-18"-19"-19¾"-20½", cut and fasten the strand. LEFT BACK PIECE: Now work over just the last 35-38-38-41-41-44 double crochets; work 1 double crochet towards mid back, work A.3 over the next 33-36-36-39-39-42 double crochets/chain stitches and finish with 1 double crochet towards the side. When the piece measures 36-38-40-42-44-46 cm / 14¼"-15"-15¾"-16½"-17¼"-18" work over just the last 19-22-22-22-22-25 double crochets/chain stitches on the row = left shoulder. The 16-16-16-19-19-19 double crochets not worked = neck. Continue until the piece measures 42-44-46-48-50-52 cm / 16½"-17¼"-18"-19"-19¾"-20½" / 16½"-17¼"-18"-19"-19¾"-20½", cut and fasten the strand. ASSEMBLY: Sew the shoulder seams. CROCHET EDGE AROUND THE ARMHOLES: Start at bottom of armhole. Work 1 single crochet,* skip forward approx. 2 cm / ¾", work 7 double crochets around the next double crochet, skip forward approx. 2 cm / ¾", work 1 single crochet around the next double crochet *, repeat from *-* and finish with 1 slip stitch in the single crochet at the beginning of the round. Work in the same way around the other armhole. CROCHET EDGE AROUND THE NECK: Start mid back. Work 1 single crochet, * 3 chain stitches, skip forward approx. 1 cm / ⅜", work 1 single crochet *, repeat from *-*. ASSEMBLY -2: Sew a button to the top of the split mid back; the button is buttoned through 2 double crochets. |
|||||||||||||||||||||||||
Diagram explanations |
|||||||||||||||||||||||||
|
|||||||||||||||||||||||||
 |
|||||||||||||||||||||||||
 |
|||||||||||||||||||||||||
 |
|||||||||||||||||||||||||
Have you finished this pattern?Tag your pictures with #dropspattern #ipanematop or submit them to the #dropsfan gallery. Do you need help with this pattern?You'll find 10 tutorial videos, a Comments/Questions area and more by visiting the pattern on garnstudio.com. © 1982-2026 DROPS Design A/S. We reserve all rights. This document, including all its sub-sections, has copyrights. Read more about what you can do with our patterns at the bottom of each pattern on our site. |
|||||||||||||||||||||||||


With over 40 years in knitting and crochet design, DROPS Design offers one of the most extensive collections of free patterns on the internet - translated to 17 languages. As of today we count 324 catalogs and 12177 patterns - 12167 of which are translated into English (US/in).
We work hard to bring you the best knitting and crochet have to offer, inspiration and advice as well as great quality yarns at incredible prices! Would you like to use our patterns for other than personal use? You can read what you are allowed to do in the Copyright text at the bottom of all our patterns. Happy crafting!
Post a comment to pattern DROPS 190-2
We would love to hear what you have to say about this pattern!
If you want to leave a question, please make sure you select the correct category in the form below, to speed up the answering process. Required fields are marked *.