
Popular categories
Looking for a yarn?


Comments / Questions (55)
![]() Irene Motti wrote:
Irene Motti wrote:
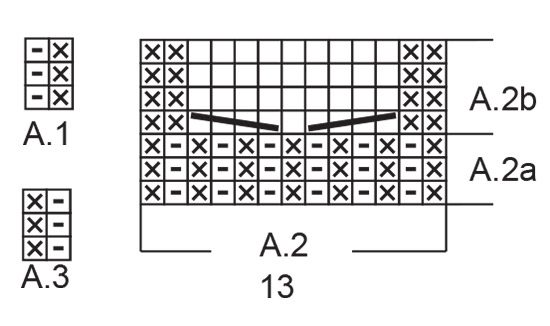
Vielen Dank für diese tolle Anleitung! :-) Falls das Zopfmuster nicht erkennbar ist, ist ggf. das Diagramm nicht richtig umgesetzt worden: hier gilt - = rechts verschränkt, x = links
20.11.2021 - 12:40
![]() Corinna wrote:
Corinna wrote:
Hallo, vielen lieben Dank. Aber leider hilft die Antwort gar nicht weiter und stellt auch keine Lösung dar, meine gestellten Fragen zu beantworten, denn das Zopfmuster ist nicht zu erkennen. Es ist auch nicht klar, ob sich A.2 auch noch mal in drei Reihen über A.2b gestrickt wird um dann im nächsten "Rep" für das eindeutige Zopfmuster zu sorgen, denn so kommt kein Zopfmuster zur Geltung weder eine Art Zopfstruktur. Wo liegt der Fehler? LG Corinna
23.06.2021 - 18:14DROPS Design answered:
Liebe Corinna, es tut mir leid, daß ich Ihnen nicht richtig helfen könnte, darf ich noch mal versuchen? A.2 a = 4 Reihen = Bündchen und wird nur einmal in der Höhe gestrickt, nach diesen 4 Reihen stricken Sie A.2b über A.2a (= 4 Reihen), A.2b wiederholen Sie dann in der Höhe (= 1 Zopf bei jeder 4. Reihe/Runde). Vielleicht kann Ihnen Ihr DROPS Laden besser auch telefonisch oder per E-Mail weiterhelfen? Viel Spaß beim stricken!
24.06.2021 - 08:42
![]() Corinna wrote:
Corinna wrote:
Hi, ich habe Probleme mit dem "Zopfmuster" in der Runde und ihrem Diagramm, jenes ich auf 52 Maschen angeschlagen habe. Es werden 4 Reihen von rechts nach links gestrickt und dann? Oder eine Runde von rechts nach links & dann eine Reihe von links nach rechts? Die Beschreibung und das Strickbild machen keinen Sinn in den 4 Reihen. Wechselt etwa das Diagramm nach 4 Runden von links nach Rechts? Gruß Corinna
23.06.2021 - 04:32DROPS Design answered:
Liebe Corinna, A.2a ist über 4 Reihen gestrickt, dh die ersten 4 Reihen sind Bündchen 1 Masche rechts verschränkt/1 Masche links (A.1 (= 20 M), A.2 (=13 M), A.3 (= 2 m)) dann stricken Sie A.2b über die 13 M von A.2a: Zöpfe entstehen bei der 1. Reihe und dann bei jeder 4. Reihe. Wenn Sie in der Runde stricken, lesen Sie immer rechts nach links, wenn Sie später in Hin- und Rückreihen stricken lesen Sie die Rückreihen links nach rechts. Hier lesen Sie mehr. Viel Spaß beim stricken!
23.06.2021 - 08:14
![]() Linn wrote:
Linn wrote:
Når det står « Legg opp 48-52-52 (56-56) masker på settpinner» hvor mange masker skal jeg ha på hver pinne? Nybegynner her, så er det str? Mulig å få en forklaring her?
22.02.2021 - 13:02
![]() CHIARA wrote:
CHIARA wrote:
Buongiorno, vorrei chiedervi se possibile una gentilezza. E' possibile caricare dei video dove si può seguire passo passo l'esecuzione dei lavori. Mi piace moltissimo lavorare a maglia. Mi piacerebbe realizzare qualcosa che avete voi nel sito. Purtroppo non riesco a seguire le istruzioni. Magari seguendo qualche video riesco a fare qualche vostro progetto. Sono interessata a scarpette, calzini e vestitini per neonato. Grazie
12.02.2021 - 08:41DROPS Design answered:
Buonasera Chiara, ci sono tantissimi video sul nostro sito per imparare le tecniche di base e in ogni modello c'è l'elenco dei video correlati, a volte seguono anche l'esecuzione. Buon lavoro!
12.02.2021 - 23:04
![]() Simona wrote:
Simona wrote:
Che lunghezza devono avere i ferri a doppia punta ?
27.01.2021 - 22:40DROPS Design answered:
Buonasera Simona, la lunghezza dei ferri a doppia punta è soggettiva, deve valutare se lavora meglio con quelli lunghi o corti. Buon lavoro!
28.01.2021 - 22:52
![]() Marie wrote:
Marie wrote:
Jeg er i gang med sokker str 6/9, har samlet masker op og er i gang med at strikke rib rundt på foden, men det ser ikke ud til at passe med mønsteret. På billedet fortsætter den midterste maske fra mønsterrækken med at være ret mens min bliver vrang. Mit maskeantal stemmer og kan ellers ikke se hvad jeg har gjort anderledes. Hvad gør jeg galt?
26.10.2020 - 21:26DROPS Design answered:
Hej Marie, det vil være forskelligt i de forskellige størrelser, du kan justere de selv med flere/færre masker om du vil have forreste maske ret. God fornøjelse!
04.11.2020 - 12:28
![]() Ale wrote:
Ale wrote:
Buongiorno, la spiegazione riporta "i diagrammi mostrano tutti i ferri del motivo visti sul dritto del lavoro". Essendo una lavorazione in tondo non capisco se devo lavorare i primi 3 giri come i diagrammi o se alternare lavorando un giro come i diagrammi e un giro come si presentano le maglie. Grazie!
21.10.2020 - 12:22DROPS Design answered:
Buongiorno Ale. Deve lavorare come indicato nel diagramma. Quindi i primi 3 giri sono: 1 maglia rovescio, 1 maglia diritto ritorto, in modo da ottenere le coste. Buon lavoro!
21.10.2020 - 13:23
![]() DANIELLE GLOAGUEN wrote:
DANIELLE GLOAGUEN wrote:
Bonjour il doit y avoir une erreur sur le diagramme pour A2b : il faut glisser 2 mailles sur l aiguille puis tricoter 2mailles endroit et reprendre les 2 mailles en attente et non "glisser 3 mailles sur l aiguille puis tricoter 1 et reprendre les 3 mailles en attente": comme sur les explications des autres snow boots adultes .La maille entre les torsades a également une erreur : c est 1 maille envers sur l endroit ,endroit sur l envers( comme sur le diagramme des autres snow boot)
29.09.2020 - 00:00DROPS Design answered:
Bonjour Mme Gloaguen, les stylistes ont fait un choix différent ici, les torsades sont correctes, et au milieu, on a bien 1 maille endroit, vous pouvez toutefois tout à fait adapter les torsades à votre goût. Bon tricot!
29.09.2020 - 08:14
![]() Ute Trapp wrote:
Ute Trapp wrote:
Hallo liebes Drops-Team, ich habe diese hübschen Snowboots angefangen und komme leider mit der Anleitung nicht zurecht. Ich arbeite mit Nadelspiel. Es werden aber im Diagramm die Maschen in Hin- und Rückreihen beschrieben. Arbeite ich nicht in der Runde? Vielen Dank für die Hilfe.
02.09.2020 - 13:20DROPS Design answered:
Liebe Frau Trapp, Diagramme werden zuerst in Runden gestrickt (lesen Sie jede Reihe rechts nach links) aber dann werden Sie das Diagram in Reihen gestrickt (Fußrücken), hier wird das Diagram links nach rechts bei den Rückreihen gestrickt. Viel Spaß beim stricken!
02.09.2020 - 13:27
|
||||||||||||||||
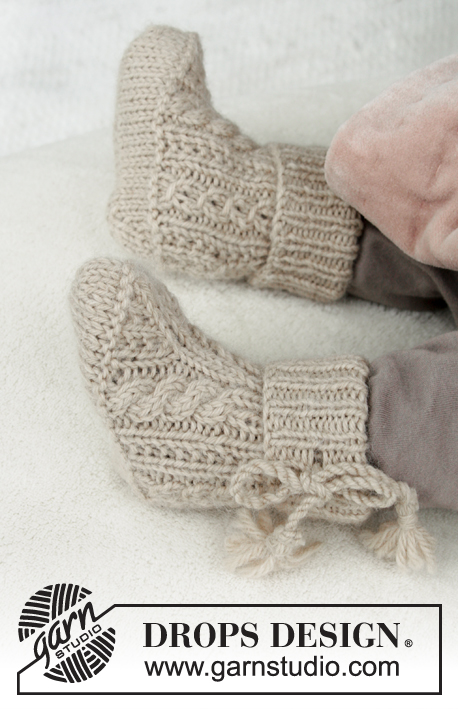
Mini Snow Boots#minisnowboots |
||||||||||||||||
|
|
||||||||||||||||
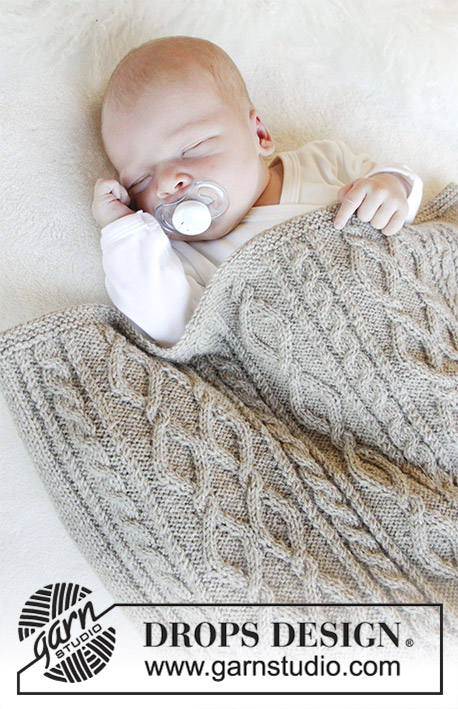
Knitted socks with cables and rib for baby. Size 1 month - 4 years Piece is knitted in DROPS Puna.
DROPS Baby 31-25 |
||||||||||||||||
|
INFORMATION FOR PATTERN: PATTERN: See diagrams A.1 to A.3. Diagrams show all rows in pattern seen from the right side. ---------------------------------------------------------- SOCK: Worked in the round on double pointed needles. Cast on 48-52-52 (56-56) stitches on double pointed needles size 2.5 mm / US 1.5 with Puna. Work A.1 (= 2 stitches) over the first 18-20-20 (22-22) stitches, A.2a (= 13 stitches) and finish with A.3 (= 2 stitches) over the remaining 17-19-19 (21-21) stitches. When A.2a has been worked 1 time vertically, work A.2b over A.2a. Continue pattern like this. REMEMBER THE GAUGE! When piece measures 5-6-6 (6-7) cm, work as before until 1 stitch remains on round, knit the last stitch and the first 2 stitches 3 together (= 2 stitches decreased), work 4 rounds, then purl 3 stitches (= purl 1, knit 1 twisted, 1 purl) together mid back (= 2 stitches decreased) = 44-48-48 (52-52) stitches. When piece measures approx. 8-9-10 (11-12) cm, adjust so that next round in A.2b is 1st or 3rd round, work the first 16-18-18 (20-20) stitches, then slip them on 1 stitch holder, work the next 13 stitches and keep this on the needle (A.2b = upper foot) and work the remaining 15-17-17 (19-19) stitches and then slip them on 1 stitch holder. Cut the yarn and continue back and forth with A.2b over the 13 stitches on needle. When upper foot measures 3½-4-5 (6½-7½) cm/1¼"-1½"-2" (2½"-2⅞"), pick up 10-12-14 (20-22) stitches on each side of upper foot and slip stitches from stitch holders back on needles = 64-72-76 (92-96) stitches. Work rib (= purl 1, knit 1 twisted) in the round, over all stitches for 1½-2-2½ (3-3½) cm / ½"-¾"-⅞" (1⅛"-1¼"), then bind off the first 26-30-32 (40-42) stitches, work rib as before over the next 13 stitches and bind off the last 25-29-31 (39-41) stitches. Work rib back and forth for 9-10-11 (13-15) cm over the remaining 13 stitches for sole. Stitch knitted twisted from right side, is purled from wrong side. bind off and sew sole to sock - sew edge to edge to avoid a chunky seam. Knit another sock the same way. |
||||||||||||||||
Diagram explanations |
||||||||||||||||
|
||||||||||||||||
 |
||||||||||||||||
Have you finished this pattern?Tag your pictures with #dropspattern #minisnowboots or submit them to the #dropsfan gallery. Do you need help with this pattern?You'll find 16 tutorial videos, a Comments/Questions area and more by visiting the pattern on garnstudio.com. © 1982-2026 DROPS Design A/S. We reserve all rights. This document, including all its sub-sections, has copyrights. Read more about what you can do with our patterns at the bottom of each pattern on our site. |
||||||||||||||||


With over 40 years in knitting and crochet design, DROPS Design offers one of the most extensive collections of free patterns on the internet - translated to 17 languages. As of today we count 325 catalogs and 12298 patterns - 12288 of which are translated into English (US/in).
We work hard to bring you the best knitting and crochet have to offer, inspiration and advice as well as great quality yarns at incredible prices! Would you like to use our patterns for other than personal use? You can read what you are allowed to do in the Copyright text at the bottom of all our patterns. Happy crafting!
Post a comment to pattern DROPS Baby 31-25
We would love to hear what you have to say about this pattern!
If you want to leave a question, please make sure you select the correct category in the form below, to speed up the answering process. Required fields are marked *.