
Looking for a yarn?


Comments / Questions (24)
![]() Alison wrote:
Alison wrote:
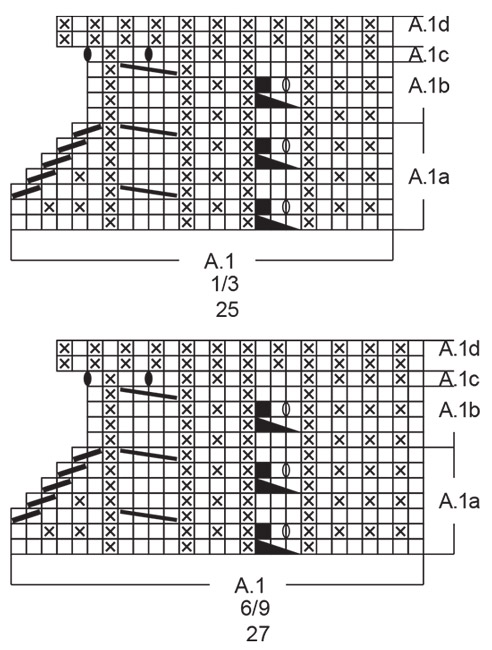
I am doing 6-9 months A1a section. First row is 27 stitches, it becomes 25 stitches after the first row. But second row of A1a has 26 stitches in the pattern. Am I reading the pattern incorrectly?
19.04.2022 - 12:16DROPS Design answered:
Dear Alison, first row in A.1 is worked over 27 sts but there are 26 sts after this row - see next to last symbol in the diagram key: you will decrease 1 stitch by slipping 1, knitting 2 and passing over the slipped stitch over the knitted stitches. See also how to work this kind of cable here. Happy knitting!
19.04.2022 - 13:11
![]() Renate Bannink wrote:
Renate Bannink wrote:
Ik wil met dit baby slofjes beginnen maar hoe begin ik met dit patroon?
06.02.2022 - 12:58DROPS Design answered:
Dag Renate,
Het patroon begint bij de paragraaf 'SLOFFEN'. Daar staat aangegeven hoeveel steken je op moet zetten. (De reeks getallen corresponderen met de verschillende maten). Maak wel eerst een proeflapje om te controleren of de stekenverhouding klopt.
11.02.2022 - 15:08
![]() Daniela wrote:
Daniela wrote:
Buongiorno, Non ho capito come procedere quando il modello dice di unire in tondo. Sono arrivata al punto di unire in tondo il lavoro, dopo aver concluso l'ultimo giro di A2a e ho 40 maglia (taglia 1/3 mesi). Avendo finito sul diritto ora devo unire in tondo ma unisco tenendo il lato rovescio esterno? Non capisco che passaggi fare dopo per unire in tondo e iniziare a fare A1.b su A1a, avendo finito con A2. Grazie
21.09.2021 - 15:44DROPS Design answered:
Buongiorno Daniela, le pantofole sono lavorate in tondo dall'inizio del lavoro. Abbiamo corretto l'inizio delle spiegazioni. Buon lavoro!
22.09.2021 - 18:33
![]() Sarah wrote:
Sarah wrote:
Oh jetzt habe ich es verstanden. Nicht 2 rechts zusammenstricken und die abgehobene Masche wie zum Abketten überziehen, sondern 1 abheben, 2 normal rechts stricken und dann die abgehobene überziehen. Tut mir leid, doch kein Fehler 😃
08.09.2021 - 22:21
![]() Sarah wrote:
Sarah wrote:
Hallo, Im Muster A1 und A2 sind Fehler. Überall, wo ich von 3 Maschen auf 1 Masche abnehmen soll, soll ich in der Reihe darüber zwischen 2 rechten Maschen 1 Umschlag arbeiten, um wieder auf 3 Maschen zu kommen. Das funktioniert nicht. 3>1 und dann aus 2>3?
08.09.2021 - 22:06DROPS Design answered:
Liebe Sarah, meinen Sie das 9. Symbol? Hier werden 3 Maschen zu 2 Maschen abgenommen: die erste dieser 3 M abheben, die 2 nächsten Maschen rechts stricken (nicht zusammen), und die abgehobene Masche überziehen = es sind nur noch 2 Maschen; bei der nächsten Runde stricken Sie 1 M rechts, 1 Umschlag, 1 M rechts = wieder 3 M. Dieses Video zeigt, wie man, so ein Zopf strickt, es kann vielleicht Ihnen helfen. Viel Spaß beim stricken!
09.09.2021 - 08:45
![]() Shelly Ann Browne wrote:
Shelly Ann Browne wrote:
I am confused as to how to proceed after starting the first row of A1 and then what do I do next. It talks about going vertically, and I am wondering if it is not in the round any more then?
23.12.2019 - 15:10DROPS Design answered:
Dear Mrs Browne, you first work pattern A.1a, A.2a one time in height (= all rows in diagram = 7 rows) = there are now 40 to 60 sts depending on the size. Then work diagram A.1b over A.1a and diagram A.2b over A.2a (diagrams b are 4 rows). Happy knitting!
02.01.2020 - 10:33
![]() Dominique RENAULT wrote:
Dominique RENAULT wrote:
Merci merci👍👍
15.11.2019 - 13:48
![]() RENAULT DOMINIQUE wrote:
RENAULT DOMINIQUE wrote:
Bonjour...quand on glisse 1 maille que l'on tricote ensemble les 2 mailles suivantes et que l'on passe par dessus la maille glissée....il reste 1 maille...alors que le diagramme en montre 2 🤔 je n'arrive pas a comprendre, je me trompe où ? Merci de prendre du temps pour me répondre😀 j'adore votre site 👍👍👍
15.11.2019 - 10:44DROPS Design answered:
Bonjour Mme Renault et merci. On doit glisser 1 maille, puis tricoter les 2 mailles suivantes séparément (et pas ensemble), puis on passe la maille glissée par-dessus la maille tricotée = il reste 2 mailles. Au tour suivant,on tricote: 1 m end, 1 jeté, 1 m end = on a de nouveau 3 m. Bon tricot!
15.11.2019 - 11:33
![]() Franzi wrote:
Franzi wrote:
Bis zur Muster Beschreibung A1 verstehe ich die Anleitung danach komme ich einfach nicht nicht weiter. Vielleicht sind es auch die Musterbilder die mich einfach verwirren ich weiß einfach nimmer weiter. Dabei stricke ich öfters Muster. Danke schon einmal im Vor raus für die Hilfe.
17.09.2019 - 11:35DROPS Design answered:
Lieber Franzi, Sie stricken zuerst A.1a und A.2a einmal in der Höhe = 7 bis 11 Reihen je nach der Größe, dann stricken Sie A.1b über A.1a und A.2b über A.2b (= 4 Reihen) bis die Arbeit 7-14 cm (siehe Grösse) misst, dann stricken Sie die Diagramme c = 1 Reihe in A.1c/A.2c ( = Zunahmen) und dann stricken Sie die Diagramme D (= 2 Reihen) bis die Arbeit 13-24 cm misst). Vergessen Sie nicht, die Diagramme für die gewünschte Größe zu wählen. Viel Spaß beim stricken!
17.09.2019 - 13:29
![]() Fanny wrote:
Fanny wrote:
Bonjour ! Lorsque il est dit de glisser une maille à l'endroit, de tricoter 2 mailles endroit et de passer la maille glissée sur la maille tricotée, faut-il tricoter ensemble les deux mailles à l'endroit ou alors passer la maille glissée par dessus les deux mailles endroit ? Merci beaucoup pour votre site qui est une mine d'idée et d'astuces, encore bravo !
16.12.2018 - 22:37DROPS Design answered:
Bonjour Fanny, cette vidéo montre comment tricoter cette petite torsade: on glisse 1 m, on tricote 2 m et on passe la m glissée par-dessus les 2 m tricotées. Bon tricot!
17.12.2018 - 10:19
|
|||||||||||||||||||||||||||||||
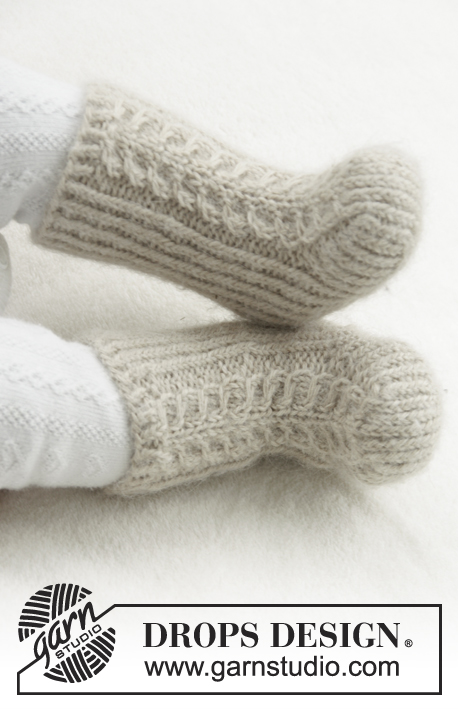
Aiden Socks#aidensocks |
|||||||||||||||||||||||||||||||
 |
 |
||||||||||||||||||||||||||||||
Knitted slippers for baby with cables and rib. Size 1 month - 4 years Piece is knitted in DROPS Lima or DROPS Fiesta.
DROPS Baby 31-24 |
|||||||||||||||||||||||||||||||
|
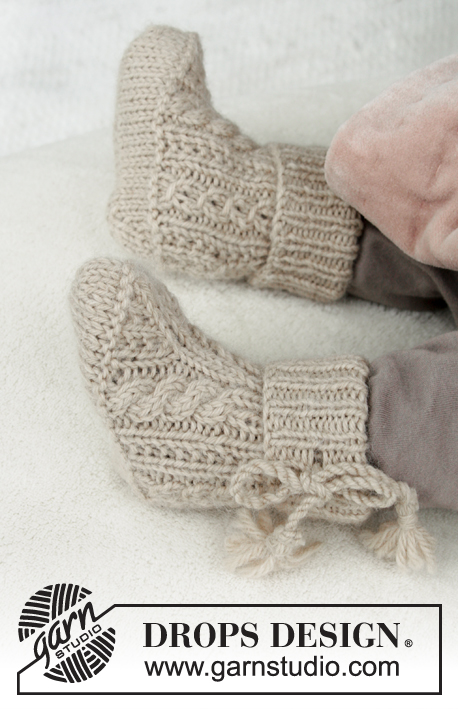
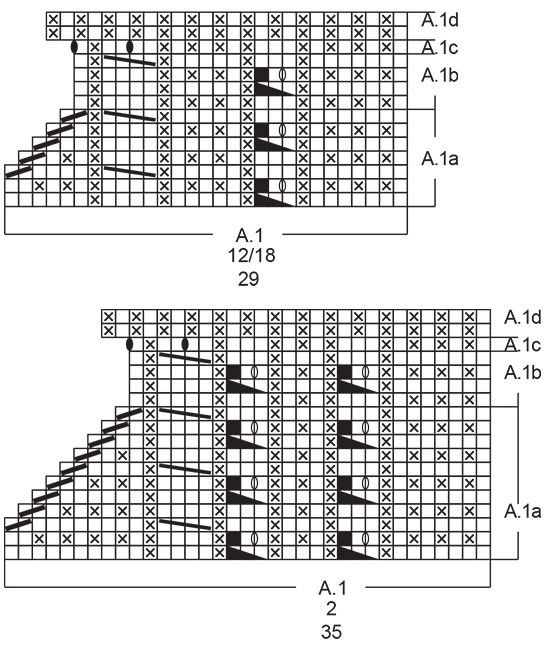
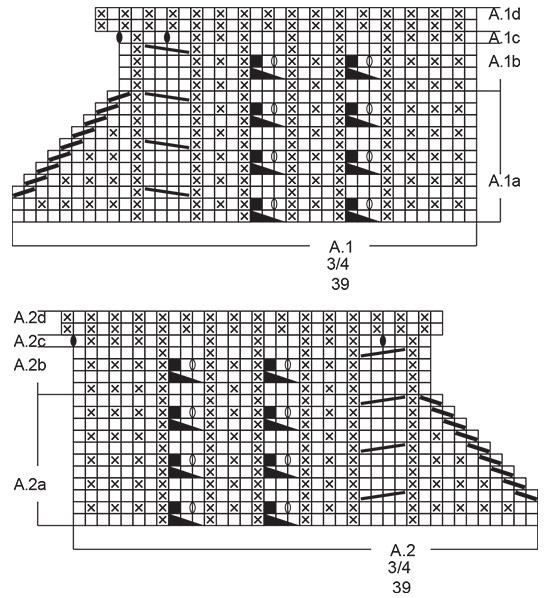
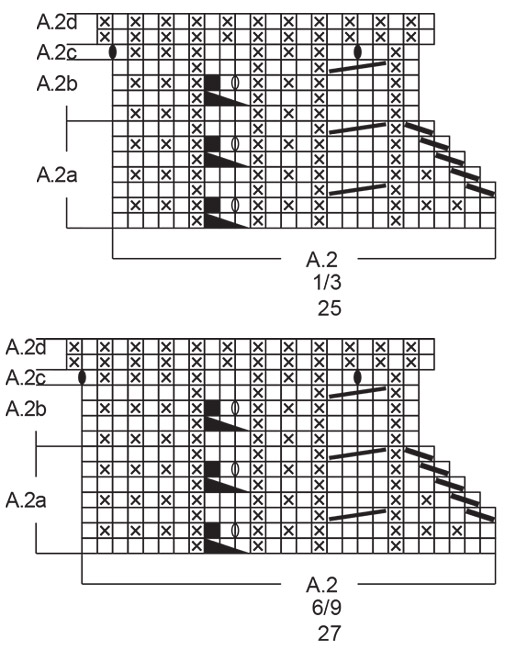
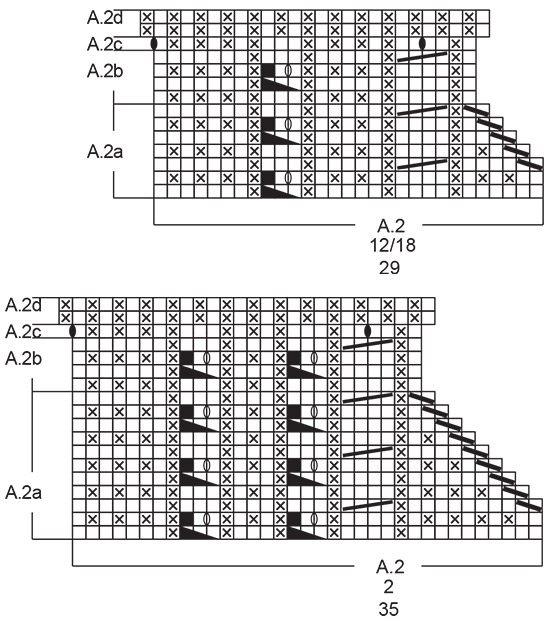
INFORMATION FOR PATTERN: PATTERN: See diagrams A.1 and A.2. Choose diagram for your size. ---------------------------------------------------------- SLIPPERS: Piece is worked in the round from mid under foot and up to leg. Round starts mid back. Cast on 38-42-46 (58-66) stitches on double pointed needles size 3.5 mm / US 4 with Lima or Fiesta. Insert 1 marker after 19-21-23 (29-33) stitches in piece (= mid front). Knit 1 round. Then increase as follows: ROUND 1: Knit 1, 1 yarn over, knit until 1 stitch remain before marker mid front, 1 yarn over, knit 2 (marker is in the middle of these stitches), 1 yarn over, knit until 1 stitch remains, 1 yarn over, knit 1 (= 4 stitches increased). ROUND 2: Knit all stitches, work yarn overs twisted; they should not make holes. Repeat 1st and 2nd round 3 times in total = 50-54-58 (70-78) stitches. REMEMBER THE GAUGE! Knit 2 rounds. Purl 1 round. The sole is now done and continue to work pattern over all stitches as follows: Work A.1a (= 25-27-29 (35-39) stitches), (marker mid front), work A.2a (= 25-27-29 (35-39) stitches). Continue pattern in the round like this. When A.1a and A.2a have been worked 1 time vertically, there are 40-44-48 (52-60) stitches on needle. Then work A.1b over A.1a and A.2b over A.2a. Repeat A.1b and A.2b vertically until piece measures 7-9-12 (12-14) cm. Work A.1c over A.1b and A.2c over A.2b = 44-48-52 (56-64) stitches. Then work rib as follows: Work A.1d over A.1c and A.2d over A.2c. When piece measures 13-16-20 (21-24) cm (2 cm now remain), work 2 holes for ties in the side as follows: Work 7-9-9 (11-11) stitches as before, knit 2 together, 1 yarn over (= 1 hole), work 2 stitches as before, knit 2 together, 1 yarn over (= 1 hole), work as before the rest of round. Continue with rib as before, do not work yarn overs twisted, they should make holes. When piece measures 15-18-22 (23-26) cm/6"-7"-8¾" (9"-10¼"), bind off with knit over knit and purl over purl. Make sure to avoid a tight bind-off edge, bind off with 1 larger needle size if needed. Sew the slipper together under foot, sew in the outermost part of the outermost stitch. Work 1 more slipper, when making holes for the ties make them at the end of round. I.e.: Work as before until 13-15-15 (17-17) stitches remain, knit 2 stitches together, 1 yarn over, knit 2, knit 2 stitches together, 1 yarn over and work as before the rest of round. TIES: Cut 2 lengths Lima or Fiesta of approx. 1 meter/1.2 yds. Twine the strands together until they resist, fold the strands double so that they twine. Make a knot at each end. Fold rib approx. half way down and thread tie through holes, tie a bow. Make 1 tie for each slipper. |
|||||||||||||||||||||||||||||||
Diagram explanations |
|||||||||||||||||||||||||||||||
|
|||||||||||||||||||||||||||||||
|
|||||||||||||||||||||||||||||||
|
|||||||||||||||||||||||||||||||
|
|||||||||||||||||||||||||||||||
|
|||||||||||||||||||||||||||||||
|
|||||||||||||||||||||||||||||||
Have you finished this pattern?Tag your pictures with #dropspattern #aidensocks or submit them to the #dropsfan gallery. Do you need help with this pattern?You'll find 25 tutorial videos, a Comments/Questions area and more by visiting the pattern on garnstudio.com. © 1982-2025 DROPS Design A/S. We reserve all rights. This document, including all its sub-sections, has copyrights. Read more about what you can do with our patterns at the bottom of each pattern on our site. |
|||||||||||||||||||||||||||||||


With over 40 years in knitting and crochet design, DROPS Design offers one of the most extensive collections of free patterns on the internet - translated to 17 languages. As of today we count 314 catalogs and 11821 patterns - 11811 of which are translated into English (US/in).
We work hard to bring you the best knitting and crochet have to offer, inspiration and advice as well as great quality yarns at incredible prices! Would you like to use our patterns for other than personal use? You can read what you are allowed to do in the Copyright text at the bottom of all our patterns. Happy crafting!
Post a comment to pattern DROPS Baby 31-24
We would love to hear what you have to say about this pattern!
If you want to leave a question, please make sure you select the correct category in the form below, to speed up the answering process. Required fields are marked *.