
Popular categories
Looking for a yarn?


Comments / Questions (121)
![]() Anne Larsen wrote:
Anne Larsen wrote:
Flot kjole, men målet på kjolens bredde kommer ikke til passe. Kan det hænge sammen med at strikkefastheden i glatstrik er anderledes end strikkefastheden i strik i en blanding af ret/vrangog hulmønster
29.08.2018 - 21:06
![]() Lelletta wrote:
Lelletta wrote:
Buonasera! Vorrei sostituire il tipo di lana con uno che non abbia pelucchi, ma il vostro convertitore di filati non ha trovato nulla. Potete aiutarmi? Grazie mille!
29.08.2018 - 17:12DROPS Design answered:
Buongiorno Lelletta. Può sostituire con la Baby Merino, molto consigliata per capi per bambini e senza pelucchi. Buon lavoro!
29.08.2018 - 17:38
![]() Ilse Richter wrote:
Ilse Richter wrote:
Vielen Dank für ihre schnelle Antwort! Herzlichen Dank auch für die kostenlosen sehr netten Strick Ideen!!! Ich stricke mit der original Wolle,bin gestern bis Halsausschnitt gekommen,Ärmelausschnitt kommt mir sehr groß vor! Nach der letzten Lochrunde,die ich versetzte,machte ich noch eine Lochrunde! Das Kleid sieht einfach super aus! Vielen Dank ilse
11.05.2018 - 11:01
![]() Ulrike wrote:
Ulrike wrote:
An dieser Stelle möchte ich mich bei DROPS für die Unzahl toller Strickanleitungen bedanken. Gerade im Babybereich habe ich schon sehr viel danach gestrickt und fand Ihre Anleitungen immer super!
10.05.2018 - 16:02
![]() Ulrike wrote:
Ulrike wrote:
Ich habe das Kleidchen grade mit Baby-Merino fertiggestellt und alle sind ganz begeistert. Angefangen habe ich zwar mit der Maschenzahl für ein Jahr und dann gemerkt, dass die Breite nur 43 cm beträgt. Also hielt ich mich nun an die Maße von 6/9 Monate. In der Länge gab ich dann einfach noch etwas Muster (Lochmuster wie ganz unten) dazu, damit ich genau mit den Armausschnitten Krausrippen weiterstricken konnte.
10.05.2018 - 16:01DROPS Design answered:
Liebe Ulrike, Stimmte Ihre Maschenprobe? Mit 24 M = 10 cm sollte das Kleid ca 48 cm in der Breite sein (= 228 M x 10 / 24 = 47.5 cm). Viel Spaß beim stricken!
11.05.2018 - 08:21
![]() ILse Richter wrote:
ILse Richter wrote:
LIebes Team! Die Beschreibung ab dem Armausschnitt ist sehr unverständlich,ich wäre jetzt so weit und kann nicht weiter.Bitte um genaue Beschreibung oder Zeichnung! Der letzte Mustersatz von A2 stimmt auch nicht. Ich hab jetzt 132 Maschen auf der Nadel,wie gehts weiter?Was heißt neben 3 Kraus r.M.,wird sowieso alles kraus r.gestrickt.Bitte um Erklärung! L.G.ilse
10.05.2018 - 12:29DROPS Design answered:
Frau Richter, bei 132 Maschen können Sie 11 Mal das Muster A.2 in der Breite wiederholen. Nach 31 cm werden Sie kraus rechts auf die 18 M. auf beiden Seiten (Armausschnitt) stricken, gleichzeitig werden 4 M über die restlichen Maschen je am Vorder- und Rückenteil abgenommen: 132 M - 2 x 4 M = 124 M (= 62 für Vorder- und Rückenteil). Nach 32 cm werden die 9 mittleren Kraus rechts Maschen auf beiden Seiten abgekettet und jedes Teil wird dann Separat gestrickt (= mit 3 M kraus rechts auf beiden Seiten). Viel Spaß beim stricken!
11.05.2018 - 07:51
![]() Christin wrote:
Christin wrote:
Ich stricke gerade das Kleid in68-74 es ist riesig. Mit korrekter wolle und Naadel statt 43cm Messe ich unten 50. Warum fällt alles immer so gross aus. Das ist echt ärgerlich, das Kleid soll im Winter passen
27.04.2018 - 12:30DROPS Design answered:
Liebe Christin, stimmt Ihre Maschenprobe? Mit 204 M für 3. Größe sollen Sie 85 cm um herum, dh 42.5 cm (ca 43 cm) für die Hälfte, wie in der Maßskizze. Viel Spaß beim stricken!
27.04.2018 - 13:19
![]() Doreen wrote:
Doreen wrote:
Liebes Drops Team, Beim Mustersatz 2 der Größe 68/74 stimmt der letzte Mustersatz vor den krausrippen nicht mit dem Mustersatz davor überein. Also 5 Rechte Maschen, 2Maschen zusammen ,1 Umschlag, 5 Rechte das verschiebt sich und sieht nicht schön aus. Ich denke das ist durch die Abnahmen. Ich hoffe sie verstehen was ich meine. Wie kann ich das abändern?
02.04.2018 - 19:14DROPS Design answered:
Liebe Doreen, wegen der Abnahmen wird die Anzahl von dem Rapporte in der Breite immer weniger sein, aber Diagramm wird immer in der Runde anpassen, Löchermuster werden aber nicht in der Höhe aneinandergereiht. Viel Spaß beim stricken!
03.04.2018 - 09:46
![]() Loredana wrote:
Loredana wrote:
Buongiorno, vorrei lavorare il vestitino con i ferri dritti cucendolo sul dietro. Secondo voi è possibile? Grazie Loredana
27.03.2018 - 08:56DROPS Design answered:
Buongiorno Loredana, può lavorare il vestitino in piano con la cucitura sul dietro, aggiungendo 1 maglia di vivagno per la cucitura. Tenga presente che dovrà adattare le spiegazioni e la lavorazione del motivo alla lavorazione in piano. Buon lavoro!
27.03.2018 - 10:48
![]() Jo wrote:
Jo wrote:
Salve, ho un piccolo dubbio i diagramma vanno letti da destra a sinistra e dopo da sinistra a destra?. Per esempio: 1 fila (leggo da destra a sinistra) 2 fila ( da sinistra a destra) e così via.
21.03.2018 - 15:37DROPS Design answered:
Buongiorno Jo. Quando lavora in tondo, legge i diagrammi sempre da destra verso sinistra. Quando lavora avanti e indietro, legge la prima riga (e tutti i ferri sul diritto del lavoro) da destra verso sinistra; la seconda riga (e tutti i ferri sul rovescio del lavoro) da sinistra verso destra. Buon lavoro!
21.03.2018 - 17:19
|
|||||||||||||||||||||||||
Serafina#serafinadress |
|||||||||||||||||||||||||
 |
 |
||||||||||||||||||||||||
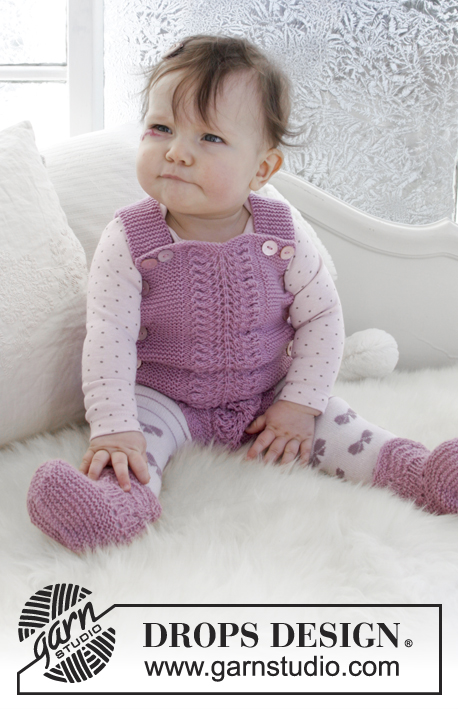
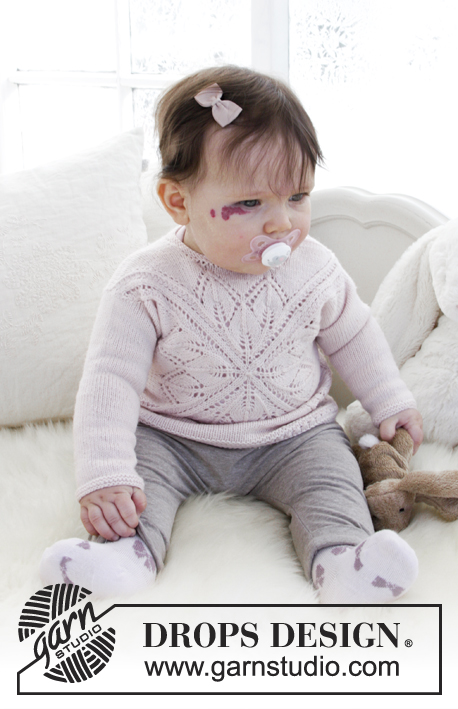
Knitted dress with lace pattern and garter stitch for baby. Size 0 - 4 years Piece is knitted in DROPS Alpaca.
DROPS Baby 31-17 |
|||||||||||||||||||||||||
|
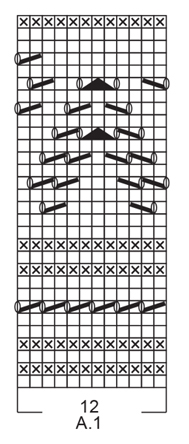
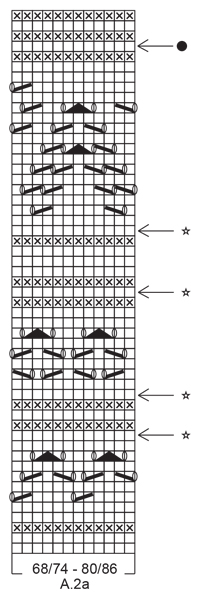
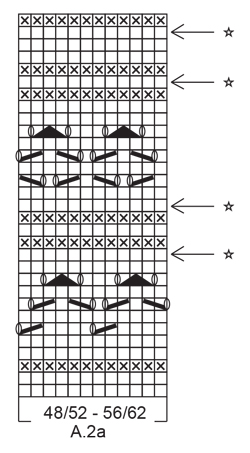
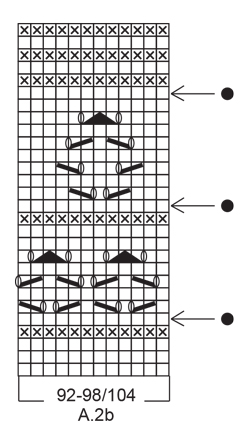
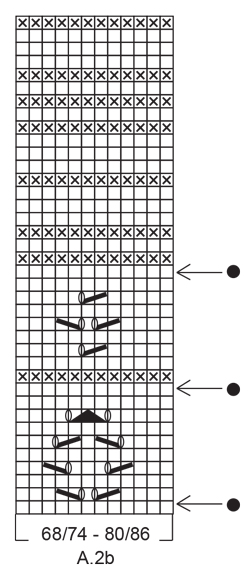
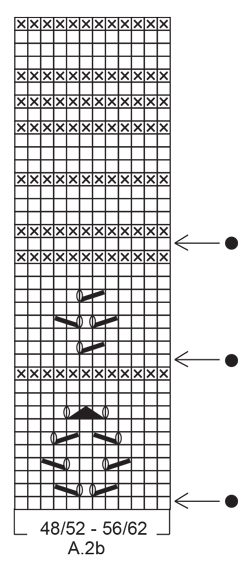
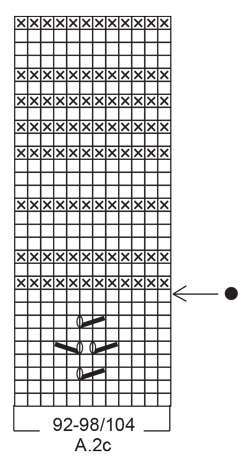
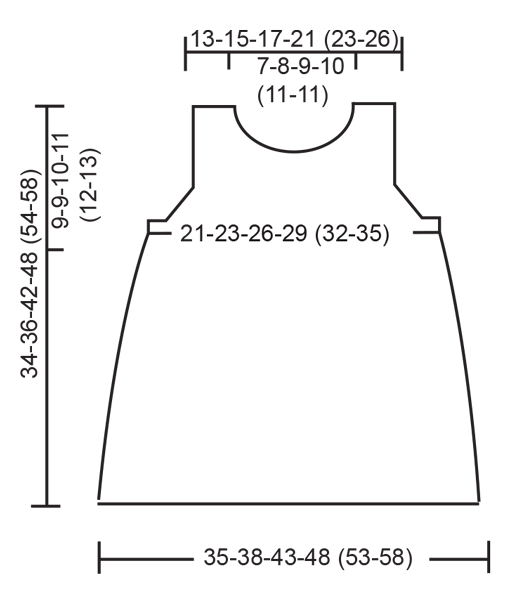
INFORMATION FOR PATTERN: GARTER STITCH (worked in the round): 1 ridge = 2 rounds. Knit 1 round and purl 1 round. GARTER STITCH (back and forth): 1 ridge = knit 2 rows. PATTERN: See diagrams A.1 and A.2 (first A.2a, then A.2b and A.2c). Choose diagram for your size. Diagrams show all rows in pattern seen from the right side. DECREASE TIP-1 (applies evenly spaced decrease): To calculate how to decrease evenly, use the total number of stitches on row (e.g. 168 stitches) and divide stitches by number of decreases to be done (e.g. 6) = 28. In this example work approx. every 27th and 28th stitch together. DECREASE TIP-2 (applies to armholes): Decrease inside 3 edge stitches in garter stitch. All decreases are done from the right side. Decrease before 3 edge stitches as follows: Knit 2 together. Decrease after 3 edge stitches as follows: Slip 1 stitch knitwise, knit 1, pass slipped stitch over stitch worked. ---------------------------------------------------------- DRESS: Worked in the round on circular needle up to armhole, then work front and back piece back and forth separately. Neck edge is worked back and forth on needle. BODY: Cast on 168-180-204-228 (252-276) stitches on circular needle size 3 mm / US 2.5 with Alpaca. Insert 1 marker at beginning of round and 1 marker after 84-90-102-114 (126-138) stitches, markers indicates side of garment. Then work A.1 (= 12 stitches) over all stitches (= 14-15-17-19 (21-23) times in width). REMEMBER THE GAUGE! When A.1 has been worked 1 time vertically, piece measures approx. 8 cm / 3⅛". Then work A.2 (= 12 stitches) over all stitches (= 14-15-17-19 (21-23) times in width). On rounds marked with arrow decrease stitches evenly - read DECREASE TIP-1. For every time 12 stitches are decreased in total, work 1 repetition less of A.2 in width. When all decreases are done, there are 108-120-132-156 (156-180) stitches on needle (= 54-60-66-78 (78-90) stitches on each side of marker). READ ALL OF THE FOLLOWING SECTION BEFORE CONTINUING! WORK PATTERN WHILE AT THE SAME TIME DECREASING FOR ARMHOLE THE SIDE AS FOLLOWS: PATTERN: Continue with pattern. When A.2 has been worked vertically, continue in GARTER STITCH - see explanation above. Piece measures approx. 27-27-33-33 (39-39) cm/10½"-10½"-13"-13" (15¼"-15¼"). ARMHOLE: When piece measures 24-26-31-36 (41-44) cm, continue as follows: Work 9 stitches in garter stitch, work pattern/garter stitch as before, but decrease 4-4-4-8 (2-6) stitches evenly until 9 stitches remain before next marker, work 18 stitches in garter stitch, work pattern/garter stitch as before, but decrease 4-4-4-8 (2-6) stitches evenly until 9 stitches remain on round, finish with 9 stitches in garter stitch = 100-112-124-140 (152-168) stitches in total (= 50-56-62-70 (76-84) stitches on each side of markers). Continue like this until piece measures 25-27-32-37 (42-45) cm/9¾"-10½"-12½"-14½" (16½"-17¾"). Now bind off stitches for armhole as follows: bind off the first 6 stitches, work 3 stitches in garter stitch, work pattern until 9 stitches remain before next marker, work 3 stitches in garter stitch, bind off the next 12 stitches, work 3 stitches in garter stitch, work pattern as before until 9 stitches remain, work 3 stitches in garter stitch and bind off the last 6 stitches. Now finish front and back piece separately. BACK PIECE: Now work back and forth. = 38-44-50-58 (64-72) stitches. Continue with pattern and 3 stitches in garter stitch in each side of piece. Then decrease 1 stitch for armhole inside 3 stitches in garter stitch in each side of piece - read DECREASE TIP-2! Decrease like this on every other row 3-4-5-4 (4-5) times in total = 32-36-40-50 (56-62) stitches. When piece measures 32-34-40-46 (52-56) cm/12½"-13½"-15¾"-18" (20½"-22"), bind off the middle 16-18-22-24 (26-26) stitches for neck = 8-9-9-13 (15-18) stitches on each shoulder. Now finish each shoulder separately. LEFT SHOULDER: Continue in stockinette stitch with 3 stitches in garter stitch out towards armhole as before until piece measures 34-36-42-48 (54-58) cm/13½"-14¼"-16½"-19" (21¼"-22¾") in total. Bind off by purling from wrong side. This shoulder is sewn together with left shoulder on front piece later. RIGHT SHOULDER: Continue in stockinette stitch with 3 stitches in garter stitch out towards armhole as before until piece measures 34-36-42-48 (54-58) cm/13½"-14¼"-16½"-19" (21¼"-22¾") in total. Bind off by knitting from wrong side. On this shoulder sew on buttons later. FRONT PIECE: Work as on back piece until piece measures 30-32-37-42 (48-51) cm/11¾"-12½"-14½"-16½" (19"-20"). Now bind off the middle 10-12-16-16 (18-18) stitches for neck = 11-12-12-17 (19-22) stitches on each shoulder. Now finish each shoulder separately. RIGHT SHOULDER: bind off 1 stitch on every row from neck 3-3-3-4 (4-4) times in total = 8-9-9-13 (15-18) stitches. When piece measures 32-34-40-46 (52-56) cm/12½"-13½"-15¾"-18" (20½"-22"), work in stockinette stitch with 3 stitches in garter stitch out towards armhole. When piece measures 34-36-42-48 (54-58) cm/13½"-14¼"-16½"-19" (21¼"-22¾") decrease for 2 buttonholes from right side as follows: Knit 1-1-1-2 (3-3), knit 2 together, make 1 yarn over (= 1 buttonhole), knit 2-2-2-4 (5-8), knit 2 together, make 1 yarn over (= 1 buttonhole), finish with 1-2-2-3 (3-3) stitches in garter stitch. Bind off by knitting on next row from wrong side. LEFT SHOULDER: Bind off 1 stitch on every row from neck 3-3-3-4 (4-4) times in total = 8-9-9-13 (15-18) stitches. Continue in stockinette stitch with 3 stitches in garter stitch out towards armhole as before until piece measures 34-36-42-48 (54-58) cm/13⅜"-14¼"-16½"-19" (21¼"-22¾") in total. Bind off by purling from wrong side. This shoulder is sewn together with left shoulder on back piece later. ASSEMBLY: Sew buttons on to right shoulder on back piece. Sew left shoulder together with grafting/kitchener stitches. NECK EDGE: Worked back and forth. Begin at right shoulder on back piece and pick up 46-70 stitches around the neck from right side. Knit 3 rows, bind off by knitting, make sure to avoid a tight bind-off edge, bind off with 1 larger needle size if needed. |
|||||||||||||||||||||||||
Diagram explanations |
|||||||||||||||||||||||||
|
|||||||||||||||||||||||||
 |
|||||||||||||||||||||||||
 |
|||||||||||||||||||||||||
 |
|||||||||||||||||||||||||
 |
|||||||||||||||||||||||||
 |
|||||||||||||||||||||||||
 |
|||||||||||||||||||||||||
 |
|||||||||||||||||||||||||
 |
|||||||||||||||||||||||||
 |
|||||||||||||||||||||||||
Have you finished this pattern?Tag your pictures with #dropspattern #serafinadress or submit them to the #dropsfan gallery. Do you need help with this pattern?You'll find 27 tutorial videos, a Comments/Questions area and more by visiting the pattern on garnstudio.com. © 1982-2026 DROPS Design A/S. We reserve all rights. This document, including all its sub-sections, has copyrights. Read more about what you can do with our patterns at the bottom of each pattern on our site. |
|||||||||||||||||||||||||


With over 40 years in knitting and crochet design, DROPS Design offers one of the most extensive collections of free patterns on the internet - translated to 17 languages. As of today we count 325 catalogs and 12291 patterns - 12281 of which are translated into English (US/in).
We work hard to bring you the best knitting and crochet have to offer, inspiration and advice as well as great quality yarns at incredible prices! Would you like to use our patterns for other than personal use? You can read what you are allowed to do in the Copyright text at the bottom of all our patterns. Happy crafting!
Post a comment to pattern DROPS Baby 31-17
We would love to hear what you have to say about this pattern!
If you want to leave a question, please make sure you select the correct category in the form below, to speed up the answering process. Required fields are marked *.