
Popular categories
Looking for a yarn?


Comments / Questions (20)
![]() Maria B. Martens wrote:
Maria B. Martens wrote:
Hej. Jeg er igang med den skønne Spring Princess sweater, men er nu jeg gået i stå. Jeg har strikket A.1 en gang i højden og har 204 masker på pinden. I følge opskriften skal jeg nu lukke af til hals - når jeg har gjort det, hvor mange masker skal der så være på pinden? Jeg spørger fordi jeg ikke kan få det til at passe med det antal masker jeg skal have tilbage efter at have strikket 12 pinde af diagram A.2, A.3 og glatstrik i højden over de yderste 6 masker (247 m).
19.02.2019 - 15:00
![]() Milada Stočková wrote:
Milada Stočková wrote:
I do not understand where to start after binding off for neck. i am back in the last corner and now I should cut the yarn and start from the neck, but where: on the left side, because when I stay on the left side of the neck, I will go on knitting A2 and 4 stiches, ( i am working the biggest size), and then I start knitting from the wrong side, why should I cut the yarn? and from the wrong side purl most stiches?? thanks a lot for answer.
10.02.2019 - 18:56DROPS Design answered:
Dear Mrs Stočková, after you have cut the yarn, slipe the next 10 sts (= A.2 + 4 sts in stocking st worked at the beg of the previous round) on the right needle (= the sts worked before the cast off for neck), turn piece join yarn and work now from WS beg from the left shoulder (when worn) along the 3 whole sides of square and finishing with the right shoulder of piece. Happy knitting!
11.02.2019 - 10:58
![]() Noel wrote:
Noel wrote:
Bonjour, Merci pour les explications mais je ne comprends toujours pas. Je tricote avec des aiguilles droites. J'ai commencé avec 6 mailles. J'ai maintenant 204 mailles (1marqueur tout les 51 m). Mon 1er rang avec l'encolure je l'ai tricoté sur l'endroit. et là je ne comprends pas comment je vais pouvoir continuer. Merci
09.11.2018 - 07:36DROPS Design answered:
Bonjour Mme Noel, ce pull se tricote normalement en rond à partir du centre du carré - et les explications sont décrites pour un ouvrage tricoté ainsi. Vous devez maintenant rabattre des mailles pour l'encolure sur l'un des côtés du carré, et continuer à partir de l'un des côtés de l'encolure, tout le tour du carré jusqu'à l'autre côté de l'encolure. Bon tricot!
09.11.2018 - 08:14
![]() Noel wrote:
Noel wrote:
Bonjour, je ne comprends pas comment faire pour le modèle Baby 3113. Quand on coupe le fil et que l'on doit reprendre à l'encolure. On reprend à gauche sur le petit nombre de maille ou à droite sur le plus grand nombre ? Ensuite pour les marqueurs on fait comment ? avez-vous un schéma cela m'aiderai à mieux comprendre. Merci.
08.11.2018 - 09:36DROPS Design answered:
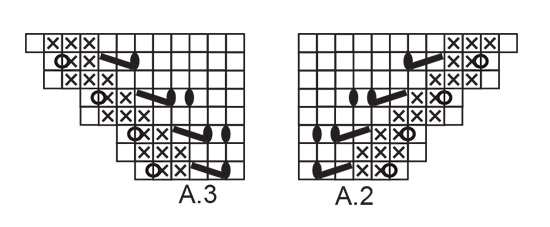
Bonjour Mme Noel, après avoir tricoté le 1er tour en rabattant les mailles de l'encolure, vous terminez dans le coin de l'épaule gauche (à droite vu sur l'endroit). Vous continuez maintenant en allers et retours en commençant par le côté encolure à droite (vu sur l'endroit) des mailles rabattues = tournez le carré et tricotez sur l'envers en commençant par les m jersey, A.2, (ancien début des tours), A.3 et ainsi de suite jusqu'à l'autre côté de l'encolure. Bon tricot!
08.11.2018 - 11:58
![]() Vanessa wrote:
Vanessa wrote:
Bei mir leiert Merinowolle nach dem Waschen immer furchtbar aus und ich waschen schon immer extra vorsichtig. Ist das normal? Stricke ich zu locker? Aber dann müsste ich ja mehr Wollen verbrauchen und das ist nicht der Fall. Oder sollte ich dann einfach eine Größe kleiner stricken? Ich bitte um Rat! Herzliche Grüße, Vanessa
06.11.2018 - 14:20DROPS Design answered:
Liebe Vanessa, am besten stricken Sie immer zuerst eine Maschenprobe - lieber etwas zu fest als zu locker - waschen Sie die Maschenprobe (nicht zu warm und nicht einweichen) und trocknen lassen. Danach prüfen Sie noch Ihre Maschenprobe und die Nadelgröße anpassen wenn nötig ist. Nehmen Sie bitte Kontakt mit Ihrem DROPS Laden auf, sie werden Ihnen persönnliche Hilfen anbieten. Viel Spaß beim stricken!
07.11.2018 - 08:09
![]() Rosa López wrote:
Rosa López wrote:
Se puede hacer con agujas rectas en vez de circulares?
19.10.2018 - 13:11DROPS Design answered:
Hola Rosa. En este modelo se usa una aguja circular debido al elevado número de puntos. Puedes sustituir la aguja circular por agujas de doble punta pero no resulta muy cómodo para trabajar.
20.10.2018 - 19:50Paulina wrote:
Hola, estoy confundida con la indicación del frente, luego de desplazar la vuelta y comenzar desde el escote ida y vuelta, dice que se debe tejer 12 hileras de A2 , A3 y punto jersey, pues A2 y A3 sólo tienen 8 hileras en vertical. Y luego dice tejer A2 y A3 en vertical en los puntos de los extremos ¿aquí hay que tejerlos denuevo? ... me confunde esta explicación... si me pueden ayudar lo agradezco mucho.
10.08.2018 - 03:32DROPS Design answered:
Hola Paulina. Si e diagrama tiene 8 filas, para continuar en vertical repites el diagrama a partir de la fila 1 tantas filas hacia arriba como sean necesarias para completar el patrón ( en tu caso 4 filas más). En cuanto a tu otra pregunta, sí, en los 6 puntos más externos se trabajan los diagramas A.2 y A.3 de nuevo (uno a un lado y el otro en el otro).
14.08.2018 - 19:58Marjolein wrote:
I am having difficulties finding out what the right an wrong rows are in the diagram, could i get some help?
05.08.2018 - 09:57DROPS Design answered:
Dear Marjolein, pattern A.1 is knitted on the round, so every row is knitted from teh right side. For the other patterns, the first row (where you have yarnovers and knitted together stitches) is from the right side andthe rows, where you only knit knitted and puled stitches are knitted form the wrong side. I hope this helps. Happy Knitting!
05.08.2018 - 10:13
![]() Mimi Routh wrote:
Mimi Routh wrote:
I think my two dolls, Liesl and Krista, chubby 22\" toddler girls, would look great in this beautiful pullover. Beautiful design!
03.04.2018 - 18:51
![]() Carol wrote:
Carol wrote:
This is knit, not crochet as the icon suggests.
16.03.2018 - 03:16
|
||||||||||||||||||||||||||||
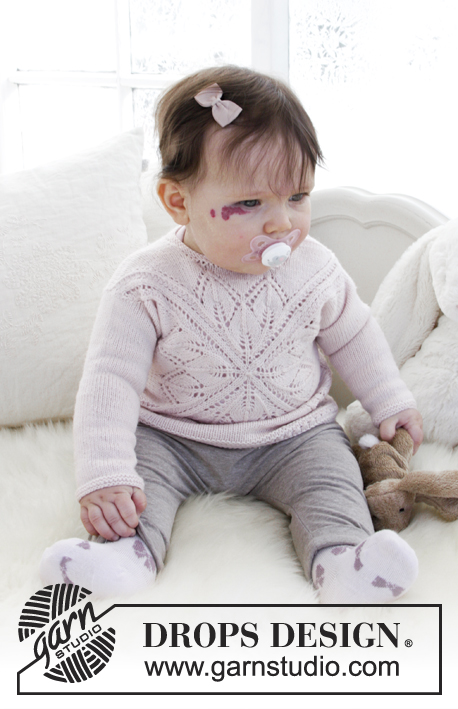
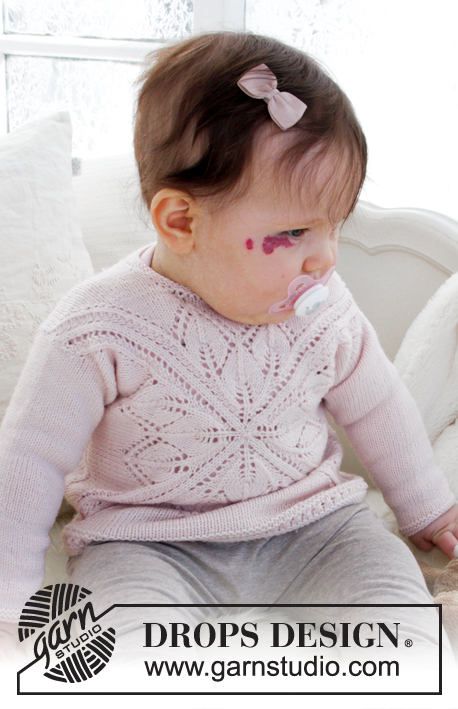
Spring Princess#springprincesssweater |
||||||||||||||||||||||||||||
 |
 |
|||||||||||||||||||||||||||
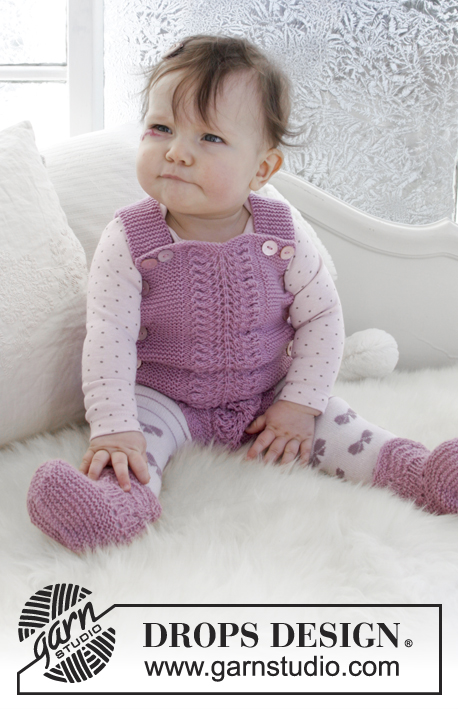
Knitted sweater in a square with lace pattern for baby. Size 1 month - 4 years Piece is knitted in DROPS BabyMerino.
DROPS Baby 31-13 |
||||||||||||||||||||||||||||
|
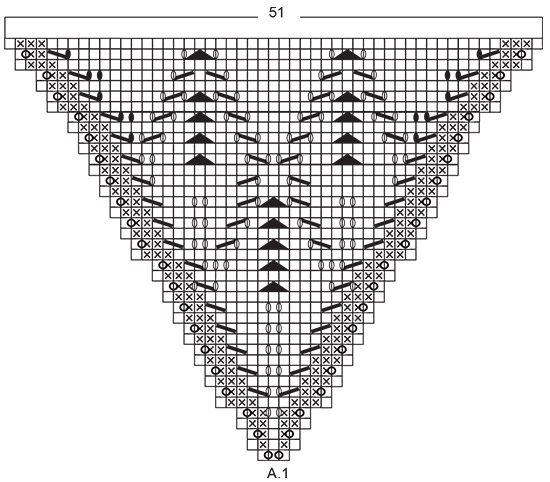
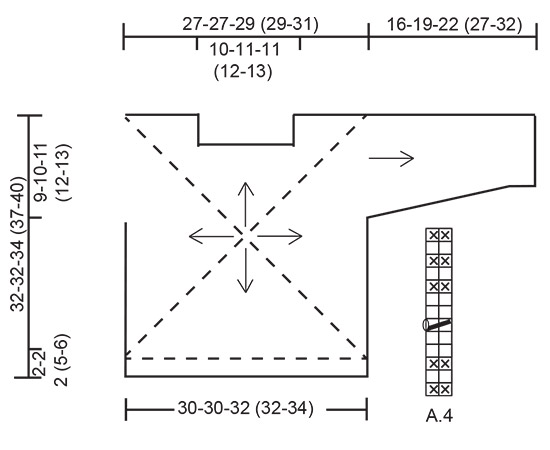
INFORMATION FOR PATTERN: GARTER STITCH (back and forth): 1 ridge = knit 2 rows. GARTER STITCH (worked in the round): 1 ridge = 2 rounds. Knit 1 round and purl 1 round. PATTERN: See diagrams A.1 to A.4. Diagrams show all rows in pattern seen from the right side. DECREASE TIP (applies to sleeves): Decrease 1 stitch on each side of marker as follows: Decrease 1 stitch after marker as follows: Knit 1, slip 1 stitch knitwise, knit 1, pass slipped stitch over (= 1 stitch decreased). Decrease 1 stitch before marker as follows: Work until 3 stitches remain before marker, knit the next 2 stitches together (= 1 stitch decreased = 2 stitches decreased in total). ---------------------------------------------------------- SWEATER: Piece is first worked in the round in a square from middle of front piece and out towards neck and sides, then continue back and forth. Work over to back piece, slip shoulder together and work down back piece. Finish with an edge at the bottom of sweater in the round on circular needle. For sleeves pick up stitches, work them top down, in the round on double pointed needles. FRONT PIECE: Worked in the round. Cast on 6 stitches on double pointed needles size 3 mm / US 2.5 with BabyMerino, switch to circular needle when needed. Knit 1 round. On next round increase as follows: * Knit 1, 1 yarn over *, work from *-* = 12 stitches, knit yarn overs twisted on next round, they should not make holes. Then work A.1 4 times in total, insert 1 marker between every A.1 (= 4 markers). REMEMBER THE GAUGE! When diagram A.1 has been worked 1 time vertically, there are 204 stitches on needle (= 51 stitches on each of the sides). Piece now measures approx. 24 cm at the widest. Now bind off for neck as follows: Work A.2 (= 6 stitches), work 7-6-6 (5-4) stitches in stockinette stitch, bind off the next 25-27-27 (29-31) stitches for neck, work 7-6-6 (5-4) stitches in stockinette stitch, work A.3 (= 6 stitches), A.2 over the next 6 stitches, * work in stockinette stitch until 6 stitches remain before next marker, A.3 over the next 6 stitches, A.2 over the next 6 stitches *, work from *-* 2 times in total, work in stockinette stitch until 6 stitches remain before last marker, A.3 over the last 6 stitches, cut the yarn. Displace the round so that next row will start from the neck. Work A.2 as before and in stockinette stitch over the remaining 7-6-6 (5-4) stitches for neck decrease. Now work back and forth. Work 10-10-12 (12-16) row in total of A.2, A.3 and stockinette stitch. Repeat diagram A.2 and A.3 vertically over the outermost 6 stitches on each side of markers in each corner = 235-233-249 (247-269) stitches. Piece measures approx. approx. 30-30-32 (32-34) cm on the widest. Now work next row as follows from right side: Knit 20-19-21 (20-22) (= until 1st marker = right shoulder), knit the next 22-24-26 (29-31) stitches, slip them on a stitch holder (= stitches for right sleeve), bind off the next 43-41-43 (40-44) stitches (= until 2nd marker = right side), knit 65-65-69 (69-75), slip them on a stitch holder (= until 3rd marker = bottom edge. Slip these stitches together with stitch from back piece later and work a lace pattern over these), bind off the next 43-41-43 (40-44) stitches (= left side), knit the next 22-24-26 (29-31) stitches, slip them on a stitch holder (= until 4th marker = stitches for left sleeve), knit the remaining 20-19-21 (20-22) stitches (= left shoulder). Now work back piece over stitches as follows: BACK PIECE: LEFT SHOULDER: Insert 1 marker in piece, NOW MEASURE PIECE FROM HERE! Cast on 1 stitch on next row from wrong side = 21-20-22 (21-23) stitches. Work the new stitch in GARTER STITCH – see explanation above, (pick up stitches for sleeve inside this stitch later). Work 2 cm / ¾" in stockinette stitch with 1 edge stitch in garter stitch towards shoulder, then cast on 13-14-14 (15-16) stitches for neck at the end of next row from right side = 34-34-36 (36-39) stitches. Then work in stockinette stitch with 1 edge stitch in garter stitch in each side of piece. When piece measures 8 cm / 3⅛" (= 6 cm / 2⅜" vent), adjust to finish with 1 row from right side, put piece aside and work right shoulder as follows: RIGHT SHOULDER: Work as left shoulder but reversed, i.e. cast on 1 stitch towards sleeve at the end of first row from right side and cast on 13-14-14 (15-16) stitches for neck at the end of row from wrong side. When piece measures 8 cm / 3⅛", adjust to finish with 1 row from right side, work shoulder together as follows: First work over stitches from right shoulder as follows: Work 1 edge stitch in garter stitch, purl 32-32-34 (34-37), 1 stitch in garter stitch, then work over stitches from left shoulder as follows, 1 stitch in garter stitch, purl 32-32-34 (34-37), 1 edge stitch in garter stitch = 68-68-72 (72-78) stitches. Then work piece in stockinette stitch with 1 edge stitch in garter stitch in each side of piece. When piece measures 9-10-11 (12-13) cm cast on 2 new stitch for armholes at the end of the next 2 rows = 72-72-76 (76-82) stitches. Then work piece in stockinette stitch over all stitches. Work until back piece measures 30-30-32 (32-34) cm at the longest, adjust measurement according to front piece, back piece and front piece should now be the same length. Keep stitches on needle. ASSEMBLY: Sew side seams in outer loops of edge stitches. Then work an edge at the bottom of sweater over stitches from both front and back piece as follows: BOTTOM EDGE: Slip stitches from stitch holder at the bottom of front piece onto same circular needle as stitches from back piece = 137-137-145 (145-157) stitches. Now continue in the round. Knit 1 round and increase 7 stitches evenly over front piece = 144-144-152 (152-164) stitches. Work 0-0-0 (3-4) cm/0"-0"-0" (1"-1½") in stockinette stitch. Then work A.4 over all stitches. Bind off by knitting when A.4 has been worked 1 time vertically. Edge measures approx. 2-2-2 (5-6) cm. Piece measures approx. 32-32-34 (37-40) / 12½"-12½"-13½" (14½"-15¾") cm in total from shoulder. SLEEVE: Work sleeves in the round on double pointed needles, top down. Slip stitches from stitch holder on front piece in one side on double pointed needles size 3 mm / US 2.5 (= 22-24-26 (29-31) stitches) and pick up from right side 22-24-26 (29-31) stitches evenly over back piece inside 1 edge stitch, from shoulder and down to and with where the 2 new stitches were cast on (i.e. pick up approx. 1 stitch in each of the 2 stitches cast on for armhole on back piece) = 44-48-52 (58-62) stitches. Insert 1 marker mid under sleeve. Work in stockinette stitch. When sleeve measures 2 cm / ¾", decrease 1 stitch on each side of marker - READ DECREASE TIP! Decrease like this every 4-3-2½ (2½-3) cm/1½"-1"-⅞" (⅞"-1") , 3-5-6 (8-9) times in total = 38-38-40 (42-44) stitches. When piece measures 15-18-21 (26-31) cm, work 3 ridges over all stitches. Bind off by knitting. Make sure to avoid a tight bind-off edge, bind off with 1 larger needle size if needed. Sleeve measures approx. 16-19-22 (27-32) cm/ 6¼"-7½"-8¾" (10½"-12½"). Work the other sleeve the same way. NECK EDGE: Work piece back and forth from mid back. I.e. pick up stitch from right side from right shoulder on back piece, over front piece and over left shoulder on back piece. Pick up approx. 55 to 74 stitches. Work 3 ridges. Bind off by knitting. Make sure to avoid a tight bind-off edge, bind off with 1 larger needle size if needed. STRAP: Now work a strap for buttoning button at the top of neck on back piece. Work 1 slip stitch on left shoulder in last stitch cast on in neck, work 6 chain stitch and finish with 1 slip stitch in same stitch as the first. Fasten off. Sew on button inside 1 edge stitch in garter stitch at the top of neck on back piece on right shoulder. |
||||||||||||||||||||||||||||
Diagram explanations |
||||||||||||||||||||||||||||
|
||||||||||||||||||||||||||||
 |
||||||||||||||||||||||||||||
 |
||||||||||||||||||||||||||||
 |
||||||||||||||||||||||||||||
Have you finished this pattern?Tag your pictures with #dropspattern #springprincesssweater or submit them to the #dropsfan gallery. Do you need help with this pattern?You'll find 34 tutorial videos, a Comments/Questions area and more by visiting the pattern on garnstudio.com. © 1982-2026 DROPS Design A/S. We reserve all rights. This document, including all its sub-sections, has copyrights. Read more about what you can do with our patterns at the bottom of each pattern on our site. |
||||||||||||||||||||||||||||


With over 40 years in knitting and crochet design, DROPS Design offers one of the most extensive collections of free patterns on the internet - translated to 17 languages. As of today we count 324 catalogs and 12290 patterns - 12280 of which are translated into English (US/in).
We work hard to bring you the best knitting and crochet have to offer, inspiration and advice as well as great quality yarns at incredible prices! Would you like to use our patterns for other than personal use? You can read what you are allowed to do in the Copyright text at the bottom of all our patterns. Happy crafting!
Post a comment to pattern DROPS Baby 31-13
We would love to hear what you have to say about this pattern!
If you want to leave a question, please make sure you select the correct category in the form below, to speed up the answering process. Required fields are marked *.