
Popular categories
Looking for a yarn?


Comments / Questions (91)
![]() Astrid Brokate wrote:
Astrid Brokate wrote:
Hallo, Ich stricke den Pulli gerade in Größe 40, da ich ihn gerne etwas größer hätte. Normal habe ich Größe 38 und ich habe ziemlich kurze Arme. Wie lang sollte ich den Ärmel stricken, bevor ich Maschen abkette? Über eine Antwort würde ich mich freuen. Astrid Brokate
10.10.2024 - 19:13DROPS Design answered:
Liebe Frau Brokate, messen Sie einen ähnlichen Pullover den Sie gerne haben und tragen; und vergleichen Sie dann mit der Skizze, so können Sie am besten die Länge der Ärmel anpassen. Hier lesen Sie mehr über Maßskizze. Viel Spaß beim Stricken!
11.10.2024 - 09:41
![]() Astrid Brokate wrote:
Astrid Brokate wrote:
Hallo, Ich stricke den Pulli gerade in Größe 40, da ich ihn gerne etwas größer hätte. Normal habe ich Größe 38 und ich habe ziemlich kurze Arme. Wie lang sollte ich den Ärmel stricken, bevor ich Maschen abkette? Über eine Antwort würde ich mich freuen. Astrid Brokate
10.10.2024 - 19:09
![]() Veronika wrote:
Veronika wrote:
Hallo! Ich möchte den Pullover gerne von oben nach unten stricken. Wie muss ich die Nackenerhöhung umrechnen? Ich stricke in Grüße L. Hat jemand schon Erfahrung damit dieses Strickmuster top down zu stricken und hat ein paar Tipps für mich? Danke!
27.09.2024 - 10:50DROPS Design answered:
Liebe Veronika, vielleicht können Sie dann die Anleitung von Ende bis Anfang (und umgekehrt, dh Abnehmen anstatt zunehmen und zunehmen anstatt abnehmen) lesen und kann wahrscheinlich die Erhöhung für den Hals genauso gestrickt werden. Viel Spaß beim Stricken!
27.09.2024 - 13:59
![]() Anna wrote:
Anna wrote:
Hej! Mam już odłożony korpus i jeden rękaw. Ale zaczęłam się zastanawiać, bo po zrobieniu drugiego rękawa muszę połączyć te trzy części i robić je razem na okrągło. Ale od każdej z nich odchodzi nitka w stronę własnego motka. Jak to zrobić, żeby to przerabiać razem, jedną nitką? I zacząć z innego miejsca, niż skończyłam – okrążenia w korpusie zaczynały i kończyły się na boku, a teraz ma być od środka tyłu.
19.09.2024 - 20:53DROPS Design answered:
Witaj Anno, odcinasz nitki przy rękawach (niech zostaną dosyć długie). Zaczynasz przerabiać korpus od nitki na boku, dalej przerabiając dołączasz 1 rękaw, dalej przerabiasz tył i dołączasz drugi rękaw, przerabiasz do starego początku okrążenia (na boku), teraz należy odciąć nitkę. Teraz wycofaj drut do początku nowego okrążenia, czyli do środka tyłu i zacznij przerabiać od nowego motka. "Dalej przerabiać kolorem jasnoniebieski. Przerobić 1 okrążenie na prawo, w tym samym czasie równomiernie zamykając 4-6-0-2-6-4 oczka". Pozdrawiamy!
20.09.2024 - 08:45
![]() Astrid Brokate wrote:
Astrid Brokate wrote:
Hallo, Ich möchte gerne den Periwinkel Pulli stricken. Was ist in der aktualisierten Anleitung anders als in der ursprünglichen Anleitung? Ich würde mich über eine Anleitung freuen. Astrid Brokate
25.07.2024 - 15:35DROPS Design answered:
Liebe Astrid, es liegt bereits die korrigierte Version vor, die alte Anleitung ist nicht mehr abrufbar. Was korrigiert wurde, sehen Sie, wenn Sie auf "Hier klicken, um die Korrektur(en) zu sehen" klicken - dann öffnet sich darunter ein Fenster, in dem die Korrekturen kurz beschrieben sind. Diese sind aber, wie gesagt, bereits alle in der Anleitung enthalten. Viel Spaß beim Stricken!
26.07.2024 - 13:21
![]() Astrid wrote:
Astrid wrote:
Ab welcher Höhe beginne ich mit dem Muster?
14.07.2024 - 13:24DROPS Design answered:
Liebe Astrid, das hängt von der Größe ab, die Sie wählen. Der Rumpf ist 36 cm hoch, dann werden die Ärmel hinzugefügt und die Passe gearbeitet. Nach 1-2-3-3-4-6 cm Höhe beginnt man dann das Muster zu stricken. Das Muster wird dann bei 36 + 1-2-3-3-4-6 cm gearbeitet, je nach gewählter Größe. Viel Spaß beim Weiterstricken!
14.07.2024 - 14:02
![]() Adel Pais wrote:
Adel Pais wrote:
Hi O need to do this pattern grey and white like the photo in the end but the patern only have white and other colour Can you help me about that? Thanks Adel
25.02.2024 - 12:54
![]() Myrna Laupland wrote:
Myrna Laupland wrote:
Drops 191-1 I normally knit one colour patterns in right hand throwing style. I will knit the A1 and A2 patterns holding one colour in my left hand and the other in my right hand. The pattern is a star for the colour and white square for the off white contrast. Which is the dominant pattern & what colour should I carry in my left hand ? Thank You
24.01.2024 - 18:30DROPS Design answered:
Dear Mrs Laupland, the dominant color might change with the rows in the diagrams, you can then work with the dominant color in the right hand and the pattern color with the left hand, just make sure that the strands are not too tight to avoid loosing elasticity. Happy knitting!
25.01.2024 - 08:46
![]() Carol wrote:
Carol wrote:
Hi, I have managed to miss decreasing stitches every 8cm in the body (daft I know). I am knitting size 2 so have 220 stitches on my needle. I have knitted about 31 cm, is there any way can I rescue the project without having to rip it and start again from the first 8cm please?
21.01.2024 - 11:51DROPS Design answered:
Dear Carol, if you keep this number of stitches for yoke, body will be much too large for the required size, you might have to rip it and start again from the first 8 cm to keep the A shape. Happy knitting!
22.01.2024 - 10:06
![]() Helga wrote:
Helga wrote:
Leider muss ich nochmal nachfragen. Bitte wie und wo muss ich genau abnehmen beim Diagramm A1 vorletzte Reihe, damit es mir das Muster nicht verschiebt? Ich stricke Größe L. Und wenn es heißt in den hellen Bereichen, muss ich dann jeweils zwei Maschen zusammenstricken und dann nur noch eine helle Masche dazustricken, so dass ich dann bei den Abnahmestellen nur 2 anstatt 3 helle Maschen habe.? Ich bin echt am verzweifeln. Ganz lieben Dank schon mal
11.01.2024 - 19:06DROPS Design answered:
Liebe Helga, die Zunahmen sollen Sie so anpassen, damit das Muster nicht verschoben wird, die Zunahmen sollen immer in den Natur Bereich gestrickt werden. Viel Spaß beim stricken!
12.01.2024 - 07:52
|
|||||||||||||
Periwinkle#periwinklesweater |
|||||||||||||
 |
 |
||||||||||||
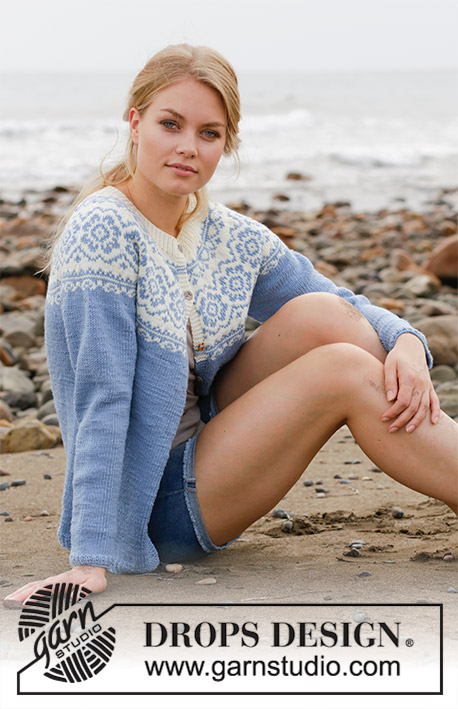
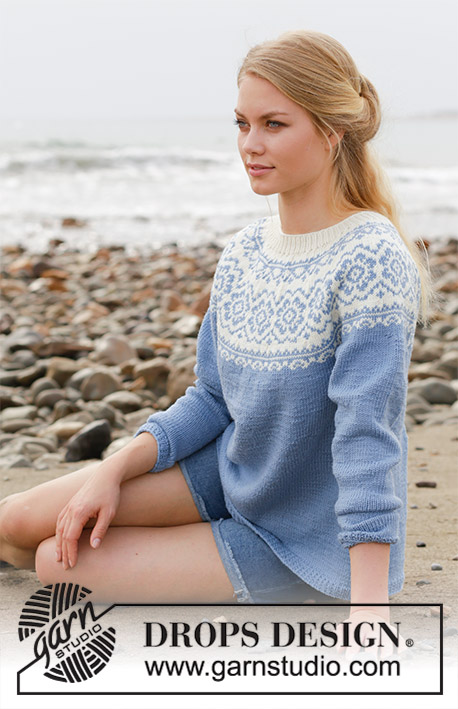
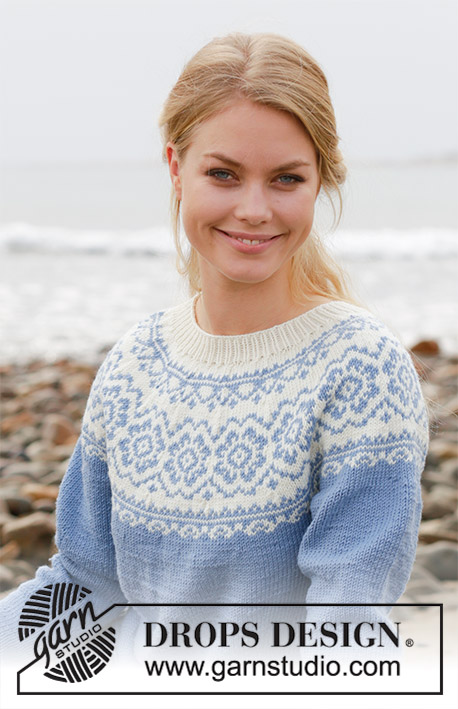
Knitted sweater with round yoke, multi-colored Nordic pattern and A-shape. Size: S - XXXL Piece is knitted in DROPS Merino Extra Fine.
DROPS 191-1 |
|||||||||||||
|
INFORMATION FOR PATTERN: PATTERN: See diagrams A.1 and A.2. Choose diagram for your size. DECREASE TIP-1 (evenly): To calculate how to decrease evenly, use the total number of stitches on round (e.g. 200 stitches) and divide stitches by number of decreases to be done (e.g. 10) = 20. In this example decrease by knitting approx. every 19th and 20th stitch together. DECREASE TIP-2 (applies to sides of body): Begin 5 stitches before marker thread in the side, knit 2 together, knit 6 (marker thread is in the middle of these 6 stitches), slip 1 stitch knitwise, knit 1, pass slipped stitch over stitch worked (= 2 stitches decreased). INCREASE TIP (applies to mid under sleeve): Begin 1 stitches before marker thread, make 1 yarn over, knit 2 (marker thread is in the middle of these 2 stitches), make 1 yarn over (= 2 stitches increased). On next round knit yarn overs twisted to avoid holes. KNITTING TIP: To avoid the knitting gauge to tighten when working pattern, it is important not to tighten the strands on back side of piece. Use a larger needle size when working pattern if needed. ---------------------------------------------------------- SWEATER: Body is worked in the round on circular needle, bottom up. Sleeves are worked in the round on double pointed needles/a short circular needle, bottom up. Then slip body and sleeves together and finish yoke in the round on circular needle. An elevation in the back of neck can be worked to get a better fit so that yoke is somewhat higher in the neck. This elevation can be skipped, to make the neck the same at the front and back - see explanation on elevation in pattern. BODY: Cast on 200-220-238-258-284-312 stitches on circular needle size 3 mm / US 2.5 with light gray blue. Work rib as follows: ROUND 1: Knit all stitches. ROUND 2: * Knit 1, purl 1 *, repeat from *-* the entire round. Repeat 1st and 2nd round until rib measures 3 cm / 1". Switch to circular needle size 4 mm / US 6. Knit 1 round while decreasing 10-10-12-12-14-14 stitches evenly - read DECREASE TIP-1 = 190-210-226-246-270-298 stitches. Insert 1 marker thread at beginning of round and 1 marker thread after 95-105-113-123-135-149 stitches (= in the sides), move the marker thread when working. Work in stockinette stitch in the round. REMEMBER THE GAUGE! When piece measures 8 cm / 3⅛", decrease 1 stitch on each side of both marker threads - read DECREASE TIP-2 (= 4 stitches decreased). Decrease like this every 8 cm / 3⅛" 4 times in total in each side = 174-194-210-230-254-282 stitches. Work until piece measures approx. 36 cm / 14¼" in all sizes. Work next round as follows: Bind off 4-4- 5-5- 6-7 stitches for armhole, knit 79-89-95-105-115-127 stitches (back piece), bind off 8-8-10-10-12-14 stitches for armhole, knit 79-89-95-105- 115-127stitches (front side), and bind off the remaining 4-4-5-5-6-7 stitches for armhole. Put piece aside and work the sleeves. SLEEVE: Cast on 44-46-48-52-52-54 stitches on double pointed needles size 3 mm / US 2.5 with light gray blue. Work rib as follows: ROUND 1: Knit all stitches. ROUND 2: * Knit 1, purl 1 *, repeat from *-* the entire round. Repeat 1st and 2nd round until rib measures 3 cm / 1". Switch to double pointed needles size 4 mm / US 6. Insert 1 marker thread at beginning of round (= mid under sleeve) and move the marker thread upwards. Work in stockinette stitch in the round. When piece measures 9-7-9-7-9-7 cm / 3½"-2¾"-3½"-2¾"-3½"-2¾", increase 2 stitches mid under sleeve - read INCREASE TIP. Increase like this every 3½-3-2-2-1½-1½ cm / 1¼"-1⅛"-¾"-¾"-½"-½" 11-13-16-17-19-20 times in total = 66-72-80-86-90-94 stitches (switch to a short circular needle when there are enough stitches). Continue until sleeve measures 46-45-43-41-40-38 cm / 18"-17¾"-17"-16"-15¾"-15" (shorter measurements in the larger sizes because of wider neck and longer yoke). Work next round as follows: bind off 4-4-5-5-6-7 stitches, knit 58-64-70-76-78-80 stitches and bind off the remaining 4-4-5-5-6-7 stitches. Put piece aside and make another sleeve the same way. YOKE: Slip sleeves on to same circular needle as body where armholes were bound off = 274-306-330-362-386-414 stitches. NOW MEASURE THE PIECE FROM HERE! Read KNITTING TIP! Begin round mid back where body is finished. Continue with light gray blue. Knit 1 round while decreasing 4-6-0-2-6-4 stitches evenly = 270-300-330-360-380-410 stitches - remember DECREASE TIP-1. Work stockinette stitch in the round. When piece measures 1-2-3-3-4-6 cm / ⅜"-¾"-1"-1"-1½"-2 ½" from where body and sleeves were put together, work A.1 in the round (= 27-30-33-36-38-41 repetitions of 10 stitches). Continue pattern like this. AT THE SAME TIME on row marked with arrow in A.1 decrease 10-0-10-20-20-30 stitches evenly = 260-300-320-340-360-380 stitches. NOTE! In size S and L decrease in the off white sections. Now work A.2 in the round (= 13-15-16-17-18-19 repetitions of 20 stitches). Continue pattern like this and decrease as shown in A.2. When A.2 has been worked, there are 130-150-160-170-180-190 stitches on needle. Now work elevation in the back of neck or start to work the neck edge if you do not want an elevation. ELEVATION IN BACK OF NECK: Skip this paragraph if you do not want an elevation. Insert 1 marker at beginning of round = mid back. Begin from right side with off white and knit 15-16-17-18-19-20 stitches past stitch with marker, turn, tighten yarn and purl 30-32-34-36-38-40. Turn, tighten yarn and knit 45-48-51-54-57-60, turn, tighten yarn and purl 60-64-68-72-76-80. Turn, tighten yarn and knit 75-80-85-90-95-100, turn, tighten yarn and purl 90-96-102-108-114-120, turn, tighten yarn and knit until mid back. NECK EDGE: Knit 1 round with off white while decreasing 24-40-44-48-54-58 stitches evenly = 106-110-116-122-126-132 stitches. Switch to a short circular needle size 3 mm / US 2.5. Work rib as follows: * Knit 1, purl 1 *, repeat from *-* the entire round. Continue rib like this for 3 cm / 1". Bind off stitches with knit over knit and purl over purl. Sweater measures approx. 58-60-62-64-66-68 cm / 22¾"-23⅝"-24⅜"-25¼"-26"-26¾" from shoulder and down. ASSEMBLY: Sew the openings under the sleeves. |
|||||||||||||
Diagram explanations |
|||||||||||||
|
|||||||||||||
 |
|||||||||||||
 |
|||||||||||||
 |
|||||||||||||
 |
|||||||||||||
Have you finished this pattern?Tag your pictures with #dropspattern #periwinklesweater or submit them to the #dropsfan gallery. Do you need help with this pattern?You'll find 31 tutorial videos, a Comments/Questions area and more by visiting the pattern on garnstudio.com. © 1982-2026 DROPS Design A/S. We reserve all rights. This document, including all its sub-sections, has copyrights. Read more about what you can do with our patterns at the bottom of each pattern on our site. |
|||||||||||||


With over 40 years in knitting and crochet design, DROPS Design offers one of the most extensive collections of free patterns on the internet - translated to 17 languages. As of today we count 324 catalogs and 12291 patterns - 12281 of which are translated into English (US/in).
We work hard to bring you the best knitting and crochet have to offer, inspiration and advice as well as great quality yarns at incredible prices! Would you like to use our patterns for other than personal use? You can read what you are allowed to do in the Copyright text at the bottom of all our patterns. Happy crafting!
Post a comment to pattern DROPS 191-1
We would love to hear what you have to say about this pattern!
If you want to leave a question, please make sure you select the correct category in the form below, to speed up the answering process. Required fields are marked *.