
Popular categories
Looking for a yarn?


Comments / Questions (91)
![]() Maren wrote:
Maren wrote:
Hallo! Die Farbe hell graublau 19 gibt es ja so nicht mehr, handelt es sich hierbei nun um traumblau (19) oder graublau (23)?
21.03.2026 - 15:36DROPS Design answered:
Liebe Maren, die Namen der Farben können oft aktualisiert werden, aber die Nummer sind immer die gleichen, so Nr 19 ist immer noch die gleiche Farbe. Viel Spaß beim Stricken!
23.03.2026 - 08:24
![]() Ghouali wrote:
Ghouali wrote:
Bjr la maille décalée sur la grille deA2 est bien prise du rang précédent merci de me répondre
14.03.2026 - 11:24DROPS Design answered:
Bonjour Mme Ghouali, on ne décale pas de mailles dans A.2, on va simplement diminuer des mailles (cf 3ème symbole = 2 m ens à l'end); on a donc 1 ou 2 mailles en moins (en fonction du nombre de diminutions) au tour suivant. Pensez à bien placer des marqueurs entre chaque A.2, vous pourrez ainsi mieux suivre votre motif et bien vérifier votre nombre de mailles à chaque tour. Bon tricot!
16.03.2026 - 08:35
![]() Ghouali wrote:
Ghouali wrote:
Bonsoir voilà comment diminuer les mailles dans A1 en taille S où il y a un jacquard sur la fleche peut être au rang au dessus sur une ligne neutre merci de me repondre
07.03.2026 - 00:38DROPS Design answered:
Bonjour Mme Ghouali, pour diminuer dans le diagramme A.1, tricotez 2 mailles ensemble à l'endroit en naturel (= vous aurez ainsi 10 fois 2 mailles en coloris naturel au lieu de 3 entre 2 mailles bleu gris clair tout le tour ). Bon tricot!
09.03.2026 - 07:51
![]() Nathalie wrote:
Nathalie wrote:
Guten Tag, ich habe diesen Pullover gerade fertig . Das ist mein erster Pulli mit einer Rundpasse. Die Anleitung ist sehr schön und der Pullover auch. Mein Pullover ist schwarz/ weiß . Danke für die schöne Idee. Liebe Grüße aus dem Ruhrgebiet
02.02.2026 - 15:57
![]() Josi wrote:
Josi wrote:
Bonjour J’aimerais tricoter ce pull mais on débutant du haut vers le bas avec ce motif. Est-Ce possible si oui comment faire pour avoir les explications Merci
04.12.2025 - 10:51DROPS Design answered:
Bonjour Josi, c'est probablement possible, retrouvez ici tous nos modèles d'empiècement arrondi dans ce type de tension, tricotés de haut en bas - cela pourra vous aider. Bon tricot!
04.12.2025 - 14:25
![]() Jill wrote:
Jill wrote:
Can you help me rework this lovely pattern so that it’s a standard shape sweater instead of an A shape (size large). Thanks so much.
18.11.2025 - 19:31DROPS Design answered:
Dear Jill, if you like straight edges, ie if the 50 cm x 2 = 100 cm in size L is right for you at the bottom edge, you can just work without decreasubg on the sides, so you might use the number of sts to cast on in M = 50 cm at the bottom and do not decrease on each side = 210 sts after rib and continue and cast off for armhole as explained for L. Happy knitting!
19.11.2025 - 08:17
![]() Zuriñe wrote:
Zuriñe wrote:
Hola! La corrección del patrón donde está? Está corregido ya y se puede utilizar el patrón que figura?
15.09.2025 - 16:42DROPS Design answered:
Hola Zuriñe, las notas de corrección son para aquellos que hayan impreso el patrón antes de la fecha indicada. El patrón que se muestra online está ya corregido y es la versión más actual.
22.09.2025 - 01:27
![]() Kristin wrote:
Kristin wrote:
I'd like to suggest a change in wording in the Yoke section for the A1 pattern. In "NOTE! In size S and L decrease in the off white sections," I suggest changing the word "sections" to "rows." I tried to decrease within the off-white sections in the pattern row (with the arrow) and had problems.
31.08.2025 - 16:25
![]() Carmen wrote:
Carmen wrote:
Hi, kan ik dit patroon ook downloaden en dan printen?
11.08.2025 - 12:01DROPS Design answered:
Dag Carmen,
Al onze patronen zijn gratis af te drukken het print pictogram rechts boven bij het patroon. Klik op het print pictogram en dan op 'Patroon afdrukken'.
18.08.2025 - 10:29
![]() Patricia wrote:
Patricia wrote:
Pour apporter une précision à ma question ci dessous quand je commence le motif A1 je commence par 2 mailles grises la logique voudrait que je termine mon tour par 2 mailles grises sauf que là je termine par de mailles de couleur naturel. Voilà pour l'explication supplémentaire si ça peut aider à résoudre mon problème
29.03.2025 - 16:10DROPS Design answered:
Bonjour Patricia, pensez à mettre un marqueur entre chaque A.1, cela vous permettra de mieux visualiser chaque motif et son nombre de mailles et d'ainsi mieux repérer à quel niveau vous avez eu ce décalage. Bon tricot!
31.03.2025 - 08:31
|
|||||||||||||
Periwinkle#periwinklesweater |
|||||||||||||
 |
 |
||||||||||||
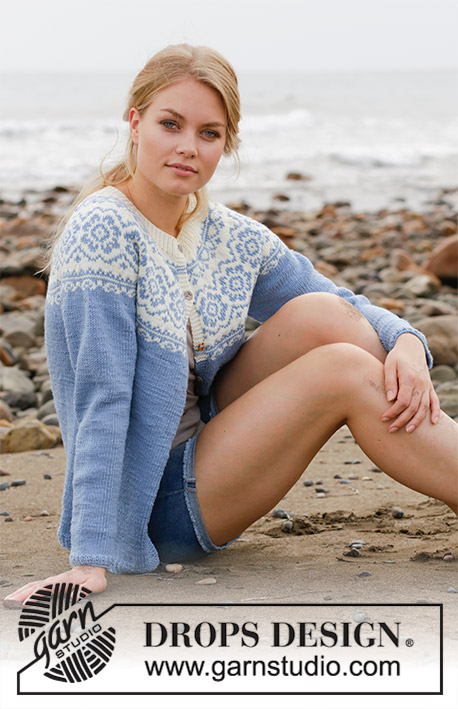
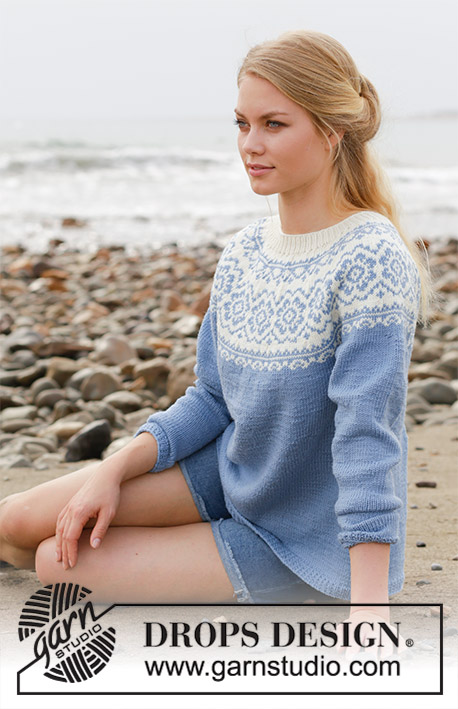
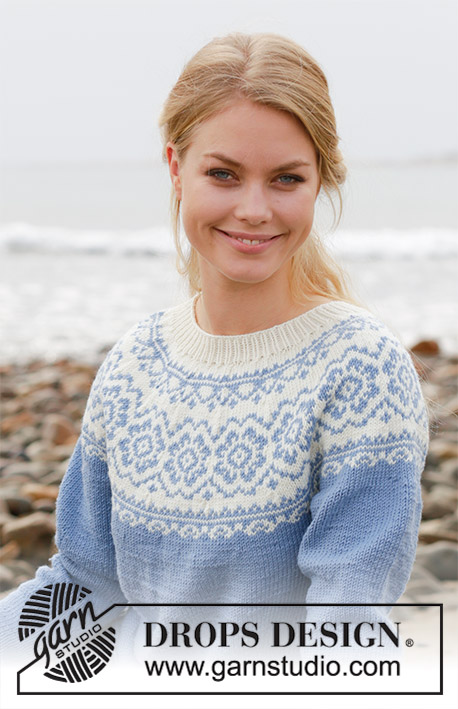
Knitted sweater with round yoke, multi-colored Nordic pattern and A-shape. Size: S - XXXL Piece is knitted in DROPS Merino Extra Fine.
DROPS 191-1 |
|||||||||||||
|
INFORMATION FOR PATTERN: PATTERN: See diagrams A.1 and A.2. Choose diagram for your size. DECREASE TIP-1 (evenly): To calculate how to decrease evenly, use the total number of stitches on round (e.g. 200 stitches) and divide stitches by number of decreases to be done (e.g. 10) = 20. In this example decrease by knitting approx. every 19th and 20th stitch together. DECREASE TIP-2 (applies to sides of body): Begin 5 stitches before marker thread in the side, knit 2 together, knit 6 (marker thread is in the middle of these 6 stitches), slip 1 stitch knitwise, knit 1, pass slipped stitch over stitch worked (= 2 stitches decreased). INCREASE TIP (applies to mid under sleeve): Begin 1 stitches before marker thread, make 1 yarn over, knit 2 (marker thread is in the middle of these 2 stitches), make 1 yarn over (= 2 stitches increased). On next round knit yarn overs twisted to avoid holes. KNITTING TIP: To avoid the knitting gauge to tighten when working pattern, it is important not to tighten the strands on back side of piece. Use a larger needle size when working pattern if needed. ---------------------------------------------------------- SWEATER: Body is worked in the round on circular needle, bottom up. Sleeves are worked in the round on double pointed needles/a short circular needle, bottom up. Then slip body and sleeves together and finish yoke in the round on circular needle. An elevation in the back of neck can be worked to get a better fit so that yoke is somewhat higher in the neck. This elevation can be skipped, to make the neck the same at the front and back - see explanation on elevation in pattern. BODY: Cast on 200-220-238-258-284-312 stitches on circular needle size 3 mm / US 2.5 with light gray blue. Work rib as follows: ROUND 1: Knit all stitches. ROUND 2: * Knit 1, purl 1 *, repeat from *-* the entire round. Repeat 1st and 2nd round until rib measures 3 cm / 1". Switch to circular needle size 4 mm / US 6. Knit 1 round while decreasing 10-10-12-12-14-14 stitches evenly - read DECREASE TIP-1 = 190-210-226-246-270-298 stitches. Insert 1 marker thread at beginning of round and 1 marker thread after 95-105-113-123-135-149 stitches (= in the sides), move the marker thread when working. Work in stockinette stitch in the round. REMEMBER THE GAUGE! When piece measures 8 cm / 3⅛", decrease 1 stitch on each side of both marker threads - read DECREASE TIP-2 (= 4 stitches decreased). Decrease like this every 8 cm / 3⅛" 4 times in total in each side = 174-194-210-230-254-282 stitches. Work until piece measures approx. 36 cm / 14¼" in all sizes. Work next round as follows: Bind off 4-4- 5-5- 6-7 stitches for armhole, knit 79-89-95-105-115-127 stitches (back piece), bind off 8-8-10-10-12-14 stitches for armhole, knit 79-89-95-105- 115-127stitches (front side), and bind off the remaining 4-4-5-5-6-7 stitches for armhole. Put piece aside and work the sleeves. SLEEVE: Cast on 44-46-48-52-52-54 stitches on double pointed needles size 3 mm / US 2.5 with light gray blue. Work rib as follows: ROUND 1: Knit all stitches. ROUND 2: * Knit 1, purl 1 *, repeat from *-* the entire round. Repeat 1st and 2nd round until rib measures 3 cm / 1". Switch to double pointed needles size 4 mm / US 6. Insert 1 marker thread at beginning of round (= mid under sleeve) and move the marker thread upwards. Work in stockinette stitch in the round. When piece measures 9-7-9-7-9-7 cm / 3½"-2¾"-3½"-2¾"-3½"-2¾", increase 2 stitches mid under sleeve - read INCREASE TIP. Increase like this every 3½-3-2-2-1½-1½ cm / 1¼"-1⅛"-¾"-¾"-½"-½" 11-13-16-17-19-20 times in total = 66-72-80-86-90-94 stitches (switch to a short circular needle when there are enough stitches). Continue until sleeve measures 46-45-43-41-40-38 cm / 18"-17¾"-17"-16"-15¾"-15" (shorter measurements in the larger sizes because of wider neck and longer yoke). Work next round as follows: bind off 4-4-5-5-6-7 stitches, knit 58-64-70-76-78-80 stitches and bind off the remaining 4-4-5-5-6-7 stitches. Put piece aside and make another sleeve the same way. YOKE: Slip sleeves on to same circular needle as body where armholes were bound off = 274-306-330-362-386-414 stitches. NOW MEASURE THE PIECE FROM HERE! Read KNITTING TIP! Begin round mid back where body is finished. Continue with light gray blue. Knit 1 round while decreasing 4-6-0-2-6-4 stitches evenly = 270-300-330-360-380-410 stitches - remember DECREASE TIP-1. Work stockinette stitch in the round. When piece measures 1-2-3-3-4-6 cm / ⅜"-¾"-1"-1"-1½"-2 ½" from where body and sleeves were put together, work A.1 in the round (= 27-30-33-36-38-41 repetitions of 10 stitches). Continue pattern like this. AT THE SAME TIME on row marked with arrow in A.1 decrease 10-0-10-20-20-30 stitches evenly = 260-300-320-340-360-380 stitches. NOTE! In size S and L decrease in the off white sections. Now work A.2 in the round (= 13-15-16-17-18-19 repetitions of 20 stitches). Continue pattern like this and decrease as shown in A.2. When A.2 has been worked, there are 130-150-160-170-180-190 stitches on needle. Now work elevation in the back of neck or start to work the neck edge if you do not want an elevation. ELEVATION IN BACK OF NECK: Skip this paragraph if you do not want an elevation. Insert 1 marker at beginning of round = mid back. Begin from right side with off white and knit 15-16-17-18-19-20 stitches past stitch with marker, turn, tighten yarn and purl 30-32-34-36-38-40. Turn, tighten yarn and knit 45-48-51-54-57-60, turn, tighten yarn and purl 60-64-68-72-76-80. Turn, tighten yarn and knit 75-80-85-90-95-100, turn, tighten yarn and purl 90-96-102-108-114-120, turn, tighten yarn and knit until mid back. NECK EDGE: Knit 1 round with off white while decreasing 24-40-44-48-54-58 stitches evenly = 106-110-116-122-126-132 stitches. Switch to a short circular needle size 3 mm / US 2.5. Work rib as follows: * Knit 1, purl 1 *, repeat from *-* the entire round. Continue rib like this for 3 cm / 1". Bind off stitches with knit over knit and purl over purl. Sweater measures approx. 58-60-62-64-66-68 cm / 22¾"-23⅝"-24⅜"-25¼"-26"-26¾" from shoulder and down. ASSEMBLY: Sew the openings under the sleeves. |
|||||||||||||
Diagram explanations |
|||||||||||||
|
|||||||||||||
 |
|||||||||||||
 |
|||||||||||||
 |
|||||||||||||
 |
|||||||||||||
Have you finished this pattern?Tag your pictures with #dropspattern #periwinklesweater or submit them to the #dropsfan gallery. Do you need help with this pattern?You'll find 31 tutorial videos, a Comments/Questions area and more by visiting the pattern on garnstudio.com. © 1982-2026 DROPS Design A/S. We reserve all rights. This document, including all its sub-sections, has copyrights. Read more about what you can do with our patterns at the bottom of each pattern on our site. |
|||||||||||||


With over 40 years in knitting and crochet design, DROPS Design offers one of the most extensive collections of free patterns on the internet - translated to 17 languages. As of today we count 324 catalogs and 12291 patterns - 12281 of which are translated into English (US/in).
We work hard to bring you the best knitting and crochet have to offer, inspiration and advice as well as great quality yarns at incredible prices! Would you like to use our patterns for other than personal use? You can read what you are allowed to do in the Copyright text at the bottom of all our patterns. Happy crafting!
Post a comment to pattern DROPS 191-1
We would love to hear what you have to say about this pattern!
If you want to leave a question, please make sure you select the correct category in the form below, to speed up the answering process. Required fields are marked *.