
Popular categories
Looking for a yarn?


Comments / Questions (61)
![]() Brili wrote:
Brili wrote:
Bonjour, Pensez-vous qu'il serait possible de convertir ce modèle pour qu'il soit entièrement réalisé au crochet, en ms ou en brides?
29.02.2020 - 20:57
![]() Daniela wrote:
Daniela wrote:
Buonasera, aspetto ancora una cortese risposta alla mia domanda del 26/3/2019 ore 12,48... grazie comunque
12.01.2020 - 22:59
![]() Mia wrote:
Mia wrote:
Mönstret Varv 2 står det att man ska sticka alla maskor slätstickning sett från rätsidan. Innebär det att man ska sticka räta maskor på detta varv?
09.10.2019 - 22:16DROPS Design answered:
Hej Mia, dvs att du stickar varv 2 avig från avigsidan :)
10.10.2019 - 14:58
![]() SAVALLE wrote:
SAVALLE wrote:
Bonjour encore moi je suis au moment de mettre des marques et je m'aperçois que si je les mets à la 61ème maille et l'autre à la 183 ème je n'ai pas le compte pour l'autre devant pouvez vous me conseiller il est très dur ce modèle mais je me régale à le faire
02.07.2019 - 15:53DROPS Design answered:
Bonjour Mme Savalle, vous devez avoir 2 marqueurs, à 61 m des bords de chaque côté, soit 122 m pour le dos entre les deux marqueurs (= le 1er après la 61ème maille, le 2ème marqueur après la 183ème maille). Bon tricot!
02.07.2019 - 16:02
![]() SAVALLE wrote:
SAVALLE wrote:
Je ne vois pas bien comment coudre les carrés fleurs merci de bien vouloir me répondre cordialement Christiane Savalle
26.06.2019 - 17:22DROPS Design answered:
Bonjour Mme Savalle, cette vidéo montre comment coudre 2 carrés entre eux, vous allez ici coudre les mailles en l'air des 2 carrés entre elles (la 1ère du 1er carré avec la 1ère du 2ème carré et ainsi de suite). Bonne continuation!
27.06.2019 - 08:28
![]() Gunvor Madsen wrote:
Gunvor Madsen wrote:
Når der står: tag en maske løs af, hvad menes der så? En maske ret løs af eller en maske vrang løs af?
03.07.2016 - 11:51DROPS Design answered:
Hej Gunvor. En maske löst af uden anden forklaring vil jeg tage som en maske ret lös af.
04.07.2016 - 16:37
![]() Gunvor Madsen wrote:
Gunvor Madsen wrote:
Endnu et spørgsmål. Skal man tage masker op fra retsiden på den hæklede remse? Hvis man gør det bliver første pind derefter fra vrangsiden og man kan ikke starte mønster hvis hvis 1.p skal strikkes fra retsiden. Håber på snarlig svar så jeg kan komme igang med den flotte top :-)
03.07.2016 - 11:47DROPS Design answered:
Hej Gunvor. Det staar der ikke noget om. Jeg ville göre det som er paenest og saa sörge for at 1. pind du strikker kommer paa retsiden.
05.07.2016 - 14:53
![]() Gunvor Madsen wrote:
Gunvor Madsen wrote:
Flot top. Jeg forstår 1.p i mønsteret men ved pind nr. 2 skriver I: 2. p: Strik alle m glatstrik set fra retsiden" det er svært at vide hvad der er retsiden når ikke der står hvor man starter. Hvis pind nr. 2 er fra vrangiden, hvorfor så ikke bare skrive 2.p strik alle masker vrang? Håber på hurtigt svar så jeg kan komme igang med toppen:-)
03.07.2016 - 11:44DROPS Design answered:
Hej Gunvor. Ja, det er saa den maade det er skrevet paa dengang. Men du skal strikke vr paa vrangen og r paa retten saa 2 p af mönstret vil blive glatstrik set fra retten....
05.07.2016 - 14:36
![]() Angélique wrote:
Angélique wrote:
Bonjour, j'allais commencer ce modèle et je viens de prendre connaissance de la question de Mamilo... j'ai donc fait un essai avant, et il me semble que la maille glissée est tricotée endroit TORSE, je crois que c'est le détail qui manque. Tricoté de cette façon, on retrouve le point des photos du tuto. Merci pour tous vos magnifiques modèles !
06.06.2016 - 13:23
![]() Michèle wrote:
Michèle wrote:
Ce modèle est très beau, malheureusement je vais tout défaire car le point le déforme en biais malgré mise en forme par trempage et repassage, rien n'y fait, il se déforme en quelques minutes. Il faut proposer un autre point. Je suis une tricoteuse experte et mon avis est fondé.
25.11.2015 - 09:35
|
|
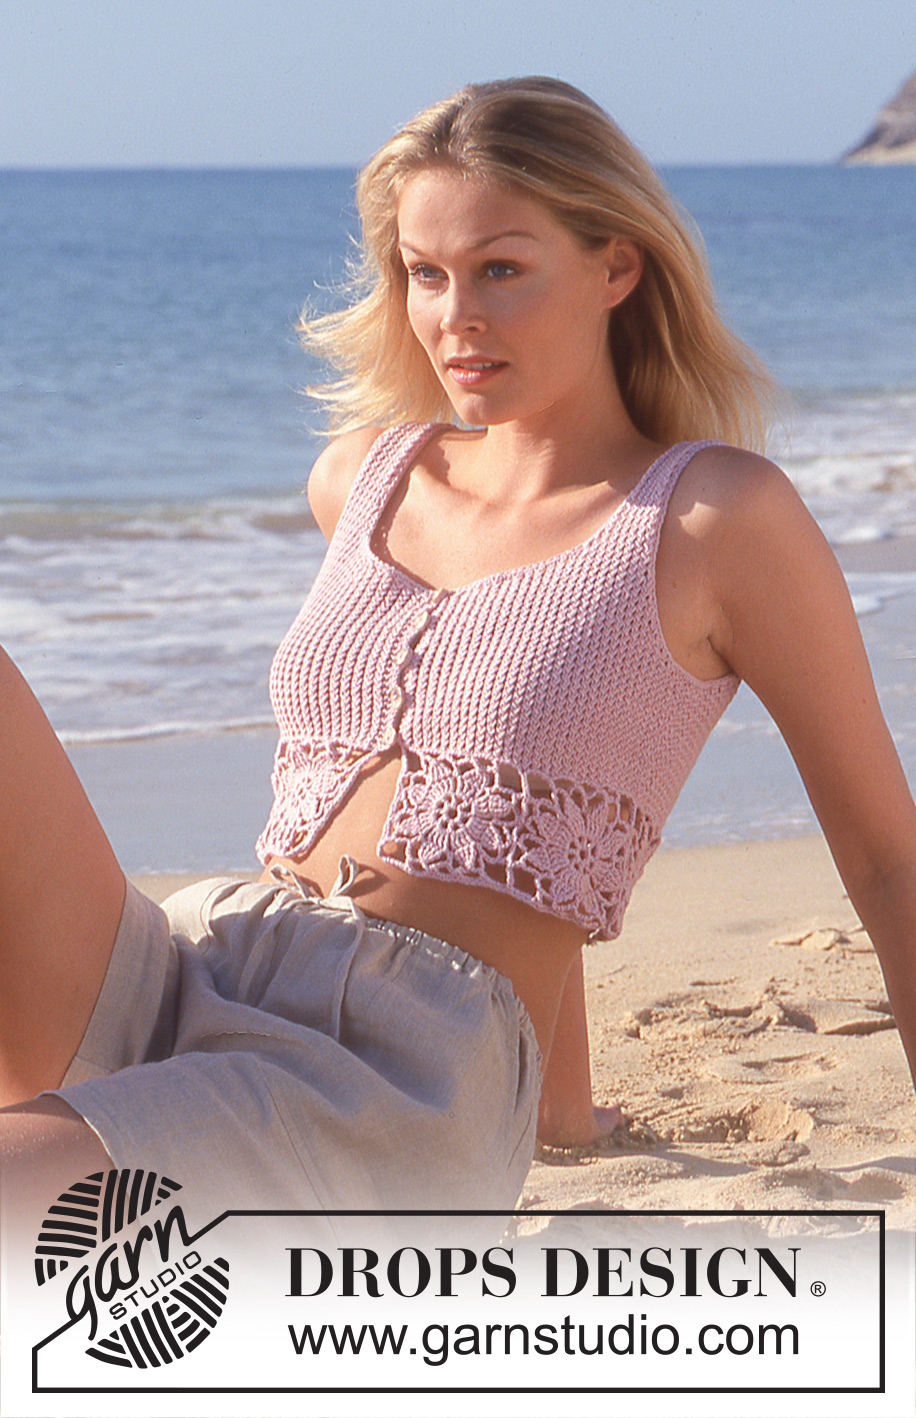
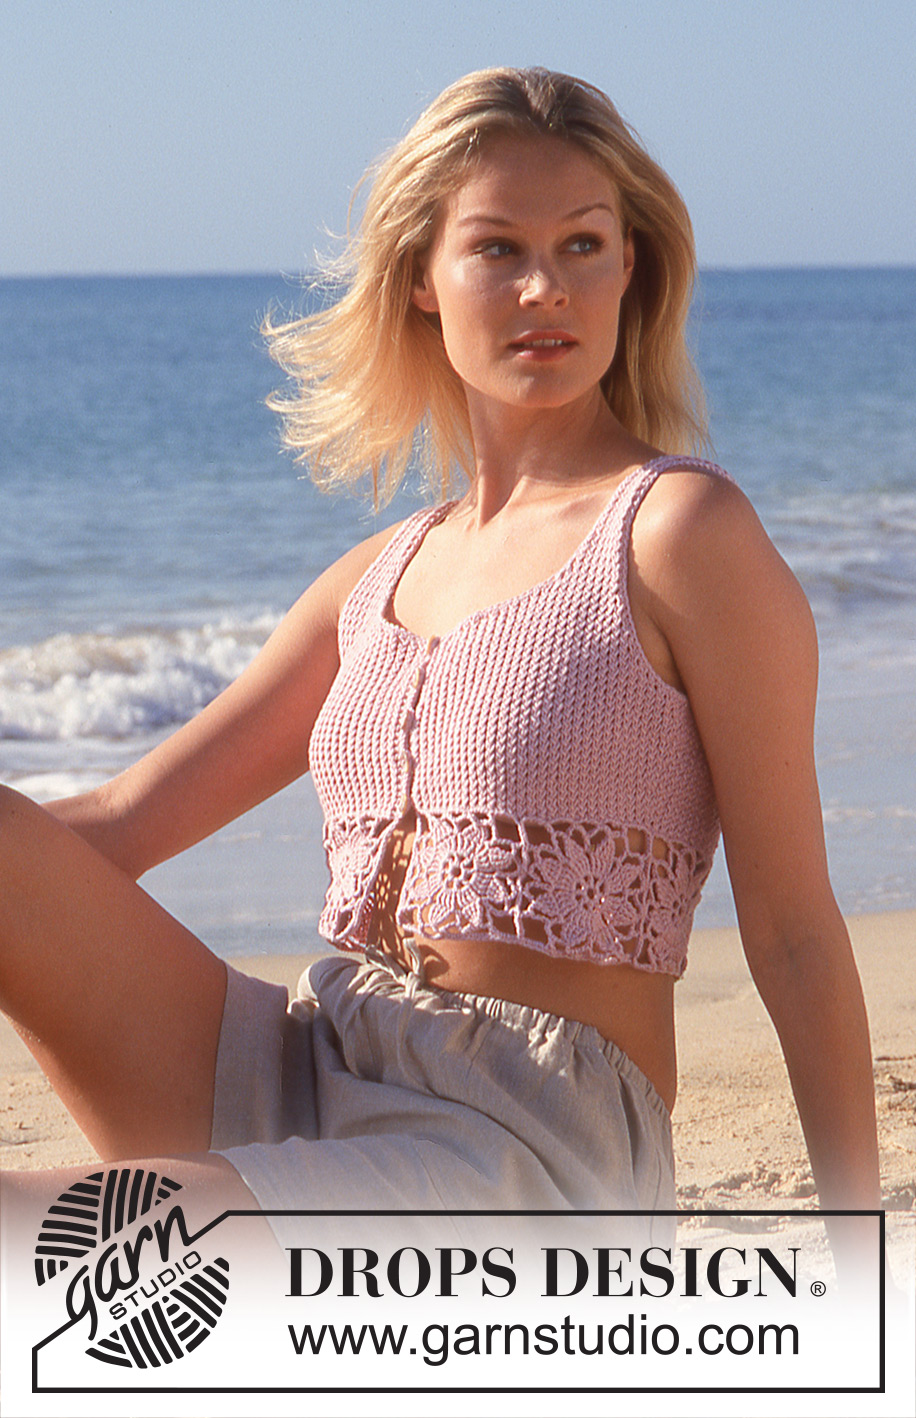
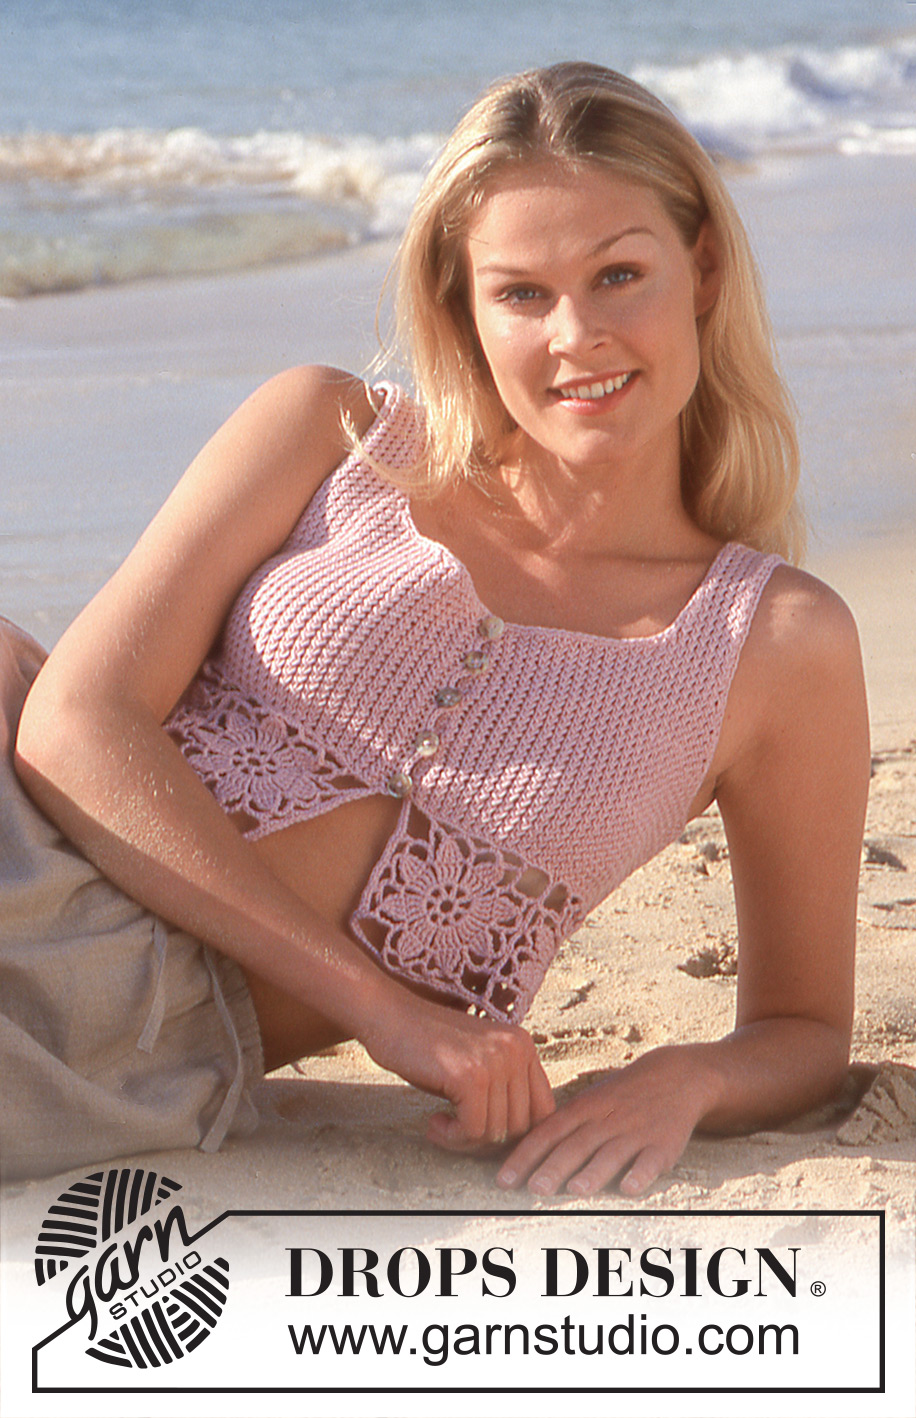
Beachside Garden#beachsidegardentop |
|
 |
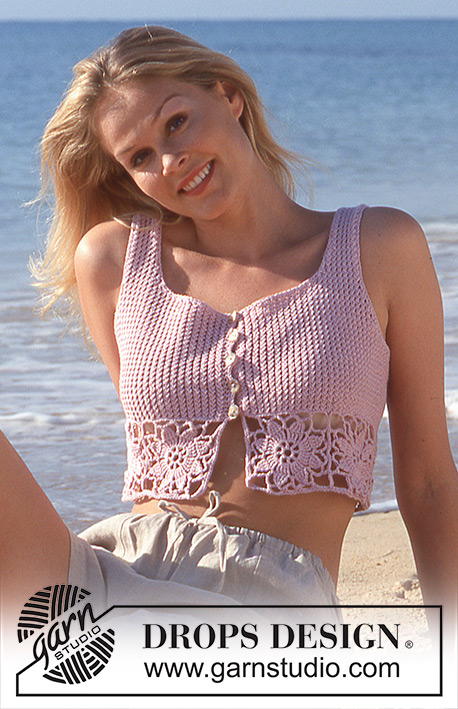 |
DROPS Short top in Safran with crocheted flower squares.
DROPS 64-8 |
|
|
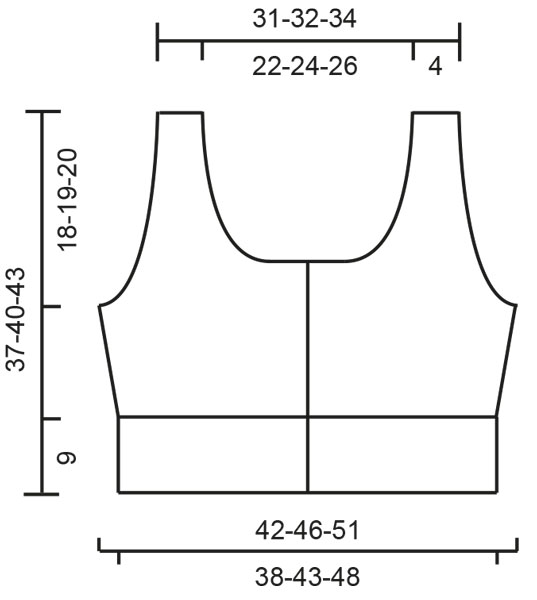
KNITTING GAUGE: 26 stitches in width and 34 rows in height in stocking stitch = 10 x 10 cm [4" x 4"] 28 stitches in width x 36 rows in height in pattern = 10 x 10 cm. [4" x 4"] NOTE: Needle size is only a guide. If you get too many stitches on 10 cm [4"], change to a larger needle size. If you get too few stitches on 10 cm [4"], change to a smaller needle size. Crochet gauge: One flower square measures approx. 9.5 x 9.5 cm [3.75" x 3.75"] PATTERN: Pattern is divisible by 2. Row 1: * slip one st as if to K, K 1, pass the slipped st over 1 K and leave the slipped st on left needle, K the slipped st *, repeat from *-*. Row 2: K2, purl all stitches and finish with K2. Repeat 1st and 2nd row Garter st, when knitting flat: Knit all sts, all rows. Knitting tip: All decs are made on right side rows, inside 1 edge st which is knit in garter st throughout. Dec 2 sts as follows: After 1 edge st: Slip 1, K 2 tog, pass the slipped st over (psso). Before 1 edge st: K 3 tog. Dec 1 st as follows: After 1 edge st: Slip 1, K 1, psso. Before 1 edge st: K 2 tog. Crocheted flower square: Chain 8 and join them into a ring with 1 slip st. Row 1: * 1 double crochet (dc) (the first dc is replaced by ch 3), ch 2 *, repeat from * - * 8 times, join with a slip st into the first dc. Row 2: * 4 trebles (the first treble is replaced by ch 4 around the ch st bow, ch 2 *, repeat from * - * 8 times, join with a slip st in the first treble. Row 3: * 4 trebles in the 4 trebles from the previous row (the first treble is replaced by ch 4) -- but keep the last loop of each on the hook until all trebles have been crocheted, then pull the yarn through all sts on the crochet hook (4 sts become 1), ch 6, 1 treble around the ch 2 from the preceding row, ch 6 *, repeat from * - * 8 times, join with a slip st in the first treble group. Row 4: Slip st to the center of the ch st bow, ch 1, 1 single crochet (sc) around the ch st bow, * ch 5, 1 sc around the next ch st bow, ch 5, 1 dc around the next ch st bow, ch 10, 1 dc around the next ch st bow (= corner), ch 5, 1 sc around the next ch st bow *, repeat from * - * a total of 3 times, then ch 5, 1 sc around the next ch st bow, ch 5, 1 dc around the next ch st bow, ch 10, 1 dc around the next ch st bow (= corner), ch 5, join with a slip st in the first sc. Top: Crochet 8-9-10 flower squares - see instructions above. Join together into a long strip - sew in the edge sts. Pick up and knit 220-244-272 sts in the upper ch st round on the crocheted strip. Attach 1 marker in the work after 55-61-68 sts and 1 marker after 165-183-204 sts. Knit Pattern - see instructions above, but keep the 2 edge sts at each side (center front) in garter st throughout. After 1 cm [⅜"], inc 2 sts at each marker 5 times every 7-8-10 rows - inc 2 sts beside each other and knit them into the pattern = 240-264-292 sts. When the work measures 19-21-23 cm [7.5"-8.25"-9"], knit the next row as follows: 57-62-68 sts for the front, bind off 8-10-12 sts for armhole, 110-120-132 sts for the back, bind off 8-10-12 sts for armhole, 57-62-68 sts for the front. Knit the rest of each part separately. Right Front: = 57-62-68 sts. Keeping the armhole edge st in garter st, dec for armholes every other row - see Knitting tip - 2 sts 3-5-6 times, 1 st 6-5-6 times = 45-47-50 sts. When the work measures 23-24-26 cm [9"-9.5"-10.25"], bind off 24-26-29 sts at the center front for neck opening. Keeping the center front edge st in garter st, dec at the neck edge every other row - see Knitting tip - 2 sts 3 times, 1 st 3 times = 12-12-12 sts remain on each shoulder. Continue by knitting Pattern, but keep 1 st at each side in garter st. Bind off when the work measures 37-40-43 cm [14.5"-15.75"-16⅞"]. Left Front: Knit like the right front, but reverse all shaping. Back: 110-120-132 sts. Keeping the armhole edge st in garter st, dec at each side for armholes as on the front = 86-90-96 sts. When the work measures 23-24-26 cm [9"-9.5"-10.25"], bind off the center 44-48-54 sts for neck opening. Keeping each neck edge st in garter st, dec at each neck edge every other row - see Knitting tip: 2 sts 3 times, 1 st 3 times = 12-12-12 sts remain on each shoulder. Continue knitting Pattern, but keep 1 st at each side in garter st throughout. Bind off when the work measures 37-40-43 cm [14.5"-15.75"-16⅞"]. Assembly: Sew the loops on the shoulders together. Crochet around the armhole: 1 row of single crochet (sc) inside 1 edge st. Make 5 buttonholes evenly distributed along the right front edge - the top buttonhole at the very top, the lowest just before the flower squares begin. Crochet inside the 2 edge sts -- begin at the very top as follows: Row 1: ch 5, skip over 1 cm [⅜"] (= 1 buttonhole), sc until the next buttonhole. Row 2: 4 sc around the ch st loop (buttonhole) and slip st between the buttonholes. After row 2: Continue to work sc around the neck opening, down along the left front and around the entire crocheted flower border. Sew on the buttons. |
|
 |
|
Have you finished this pattern?Tag your pictures with #dropspattern #beachsidegardentop or submit them to the #dropsfan gallery. Do you need help with this pattern?You'll find 27 tutorial videos, a Comments/Questions area and more by visiting the pattern on garnstudio.com. © 1982-2026 DROPS Design A/S. We reserve all rights. This document, including all its sub-sections, has copyrights. Read more about what you can do with our patterns at the bottom of each pattern on our site. |
|


With over 40 years in knitting and crochet design, DROPS Design offers one of the most extensive collections of free patterns on the internet - translated to 17 languages. As of today we count 325 catalogs and 12298 patterns - 12288 of which are translated into English (US/in).
We work hard to bring you the best knitting and crochet have to offer, inspiration and advice as well as great quality yarns at incredible prices! Would you like to use our patterns for other than personal use? You can read what you are allowed to do in the Copyright text at the bottom of all our patterns. Happy crafting!
Post a comment to pattern DROPS 64-8
We would love to hear what you have to say about this pattern!
If you want to leave a question, please make sure you select the correct category in the form below, to speed up the answering process. Required fields are marked *.