
Popular categories
Looking for a yarn?


Comments / Questions (61)
![]() Paz wrote:
Paz wrote:
Hi! Beautiful pattern. My question is about the increases. I suppose that you make one increase before the marker and another one after the marker, but how do you do it and at the same time keep the pattern intact? Which kind of increase do you use? Thank you very much in advance.
27.04.2022 - 09:54DROPS Design answered:
Dear Paz, you can either increase with a yarn over from RS (and work this yarn over twice from WS: once in the back loop of yarn over + in front loop); or increase between a repeat of 2 sts as shown in this video (but without the K1 between both increases, that way you will increase 2 sts = 1 repeat between 2 repeats of 2 sts). Happy knitting!
27.04.2022 - 15:09
![]() Anne Severinsen wrote:
Anne Severinsen wrote:
Hej garn-nørder. :) Hvordan tager man ud og ind i den strikkede del? Mvh Anne Severinsen
12.04.2022 - 10:21
![]() Lieve wrote:
Lieve wrote:
Beste Drops, Voor de afwerking wordt gezegd \"Haak binnen de 2 kantsteken\" wil dat zeggen dat ik tussen de patroonsteek en de 2 kantsteken steken of lussen moet ophalen om de knoopsgaten te kunnen haken? Of wordt gewoon bedoeld om te haken langs de buitenrand? Dank u
29.03.2022 - 16:35DROPS Design answered:
Dag Lieve,
Je haakt inderdaad tussen de patroonsteek en de 2 kantsteken.
04.04.2022 - 13:59
![]() Lieve Moreau wrote:
Lieve Moreau wrote:
Beste Drops, Voor de afwerking wordt gezegd "Haak binnen de 2 kantsteken" wil dat zeggen dat in tussen de patroonsteek en de 2 kantsteken lussen moet haken? Of wordt gewoon bedoeld om te haken langs de buitenrand? Dank u
26.03.2022 - 18:12
![]() Lieve Moreau wrote:
Lieve Moreau wrote:
Beste drops, De meerderirgen bij de merkdraad, moeten die telkens vóór of na de markers of 1 vóór en 1 na de marker ttz moeten alle meerderingen op de voorpanden gebeuren of ook op het achterpand?
26.03.2022 - 18:04DROPS Design answered:
Dag Lieve,
Je meerdert 2 steken bij elke markeerdraad, 1 steek voor de markeerdraad en 1 steek na de markeerdraad. Je meerdert dus 4 steken in totaal op de naald. Hierdoor meerder je zowel op de voorpanden als op het achterpand.
29.03.2022 - 09:54
![]() Marie-Andrée Gratton wrote:
Marie-Andrée Gratton wrote:
Bonjour Le coton safran groupe A aiguille 3mm. échantillon 24m x 32rg Le modèle aig 3mm. 28m x 36rg. Je ne comprends pas cette différence merci pour vos explications
13.03.2022 - 16:25DROPS Design answered:
Bonjour Mme Gratton, erreur dans la traduction française, on doit avoir 28 mailles x 36 rangs en point fantaisie et non en jersey, correction faite, merci pour l'info. Bon tricot!
14.03.2022 - 11:20
![]() Irene wrote:
Irene wrote:
No consigo que me salga el motivo del patrón. Deslizo 1 pt de derecho (P1), hago 1 derecho (P2), deslizo P2 sobre P1 y mantengo P2 en la aguja izqda y lo tejo de derecho. En la siguiente vuelta tejo de revés, pero no se me parece al punto de la imagen... ¿Es posible que P1 haya que deslizarlo de revés (es decir, metiendo la aguja derecha en P1 de arriba a abajo y no de abajo a arriba) en vez de derecho? ¿Cómo se harían los aumentos sin que se vea afectado el motivo del patrón? Gracias!
21.07.2021 - 17:23DROPS Design answered:
Hola Irene, es como si trabajaras de 1 pt 2 pts. Deslizamos como de derecho, trabajamos 1 d y luego con la aguja izquierda pasamos el pt deslizado sobre el pt trabajado. No quitamos la aguja izquierda y trabajamos desde el bucle del pt deslizado otro pt de derecho. Como el patrón necesita dos pts, al aumentar un pt a cada lado los trabajamos de derecho, mientras que en el siguiente aumento tendremos ya dos puntos y podremos trabajar el patrón.
31.07.2021 - 18:20
![]() Irene wrote:
Irene wrote:
Hola! No consigo que el cuadrado con flor me salga de las medidas que dice el patrón (9,5x9,5cm). Tejo bastante apretado y con el ganchillo de 3,5 mm me sale de unos 11,5x11,5 cm... ¿Es posible que el tamaño del ganchillo esté incorrecto? Gracias!
21.07.2021 - 17:17DROPS Design answered:
Hola Irene, si es posible. El tamaño de la aguja de ganchillo es orientativo. Cambie a un tamaño de aguja de ganchillo más pequeño. Buen trabajo!
21.07.2021 - 21:58
![]() Irene wrote:
Irene wrote:
Hola! En el patrón del cuadrado con flor, fila 3, se dice que se haga "1 p.a.d. dentro del arco de 2 p.de cad. de la fila anterior". Sin embargo, en el vídeo explicativo en vez de 1 p.a.d. se hace un p.a... ¿Cuál de los dos puntos (p.a. o p.a.d.) hay que hacer en la fila 3? Muchas gracias!
20.07.2021 - 12:20DROPS Design answered:
Hola Irene, debe ser punto alto (p.a.) en este lugar. Hay un error en la versión española. Lo corregiremos. Buen trabajo!
21.07.2021 - 09:22
![]() LAPALUS Christiane wrote:
LAPALUS Christiane wrote:
Erreur sur le nombre de mailles devant 57 mailles diminuer 5x2 mailles + 6x1maille = 16 mailles 57 mailles -16 mailles = 41 mailles et non 45 mailles
29.05.2021 - 13:35DROPS Design answered:
Bonjour Mme Lapalus, le nombre de mailles est juste, mais le nombre de mailles à diminuer était inversé, la correction a été faite, merci pour votre retour. Bon tricot!
31.05.2021 - 08:37
|
|
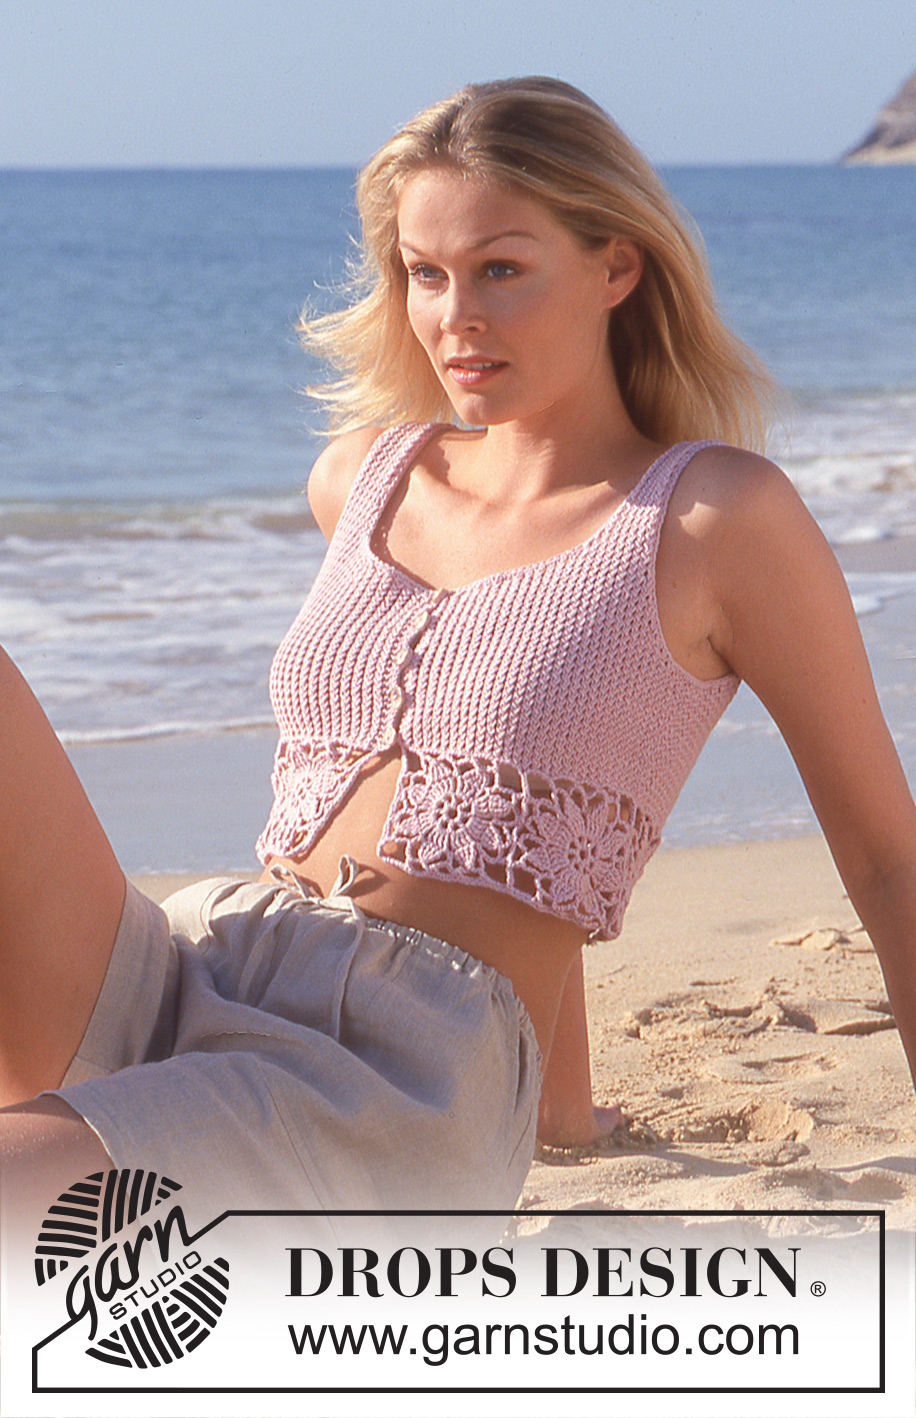
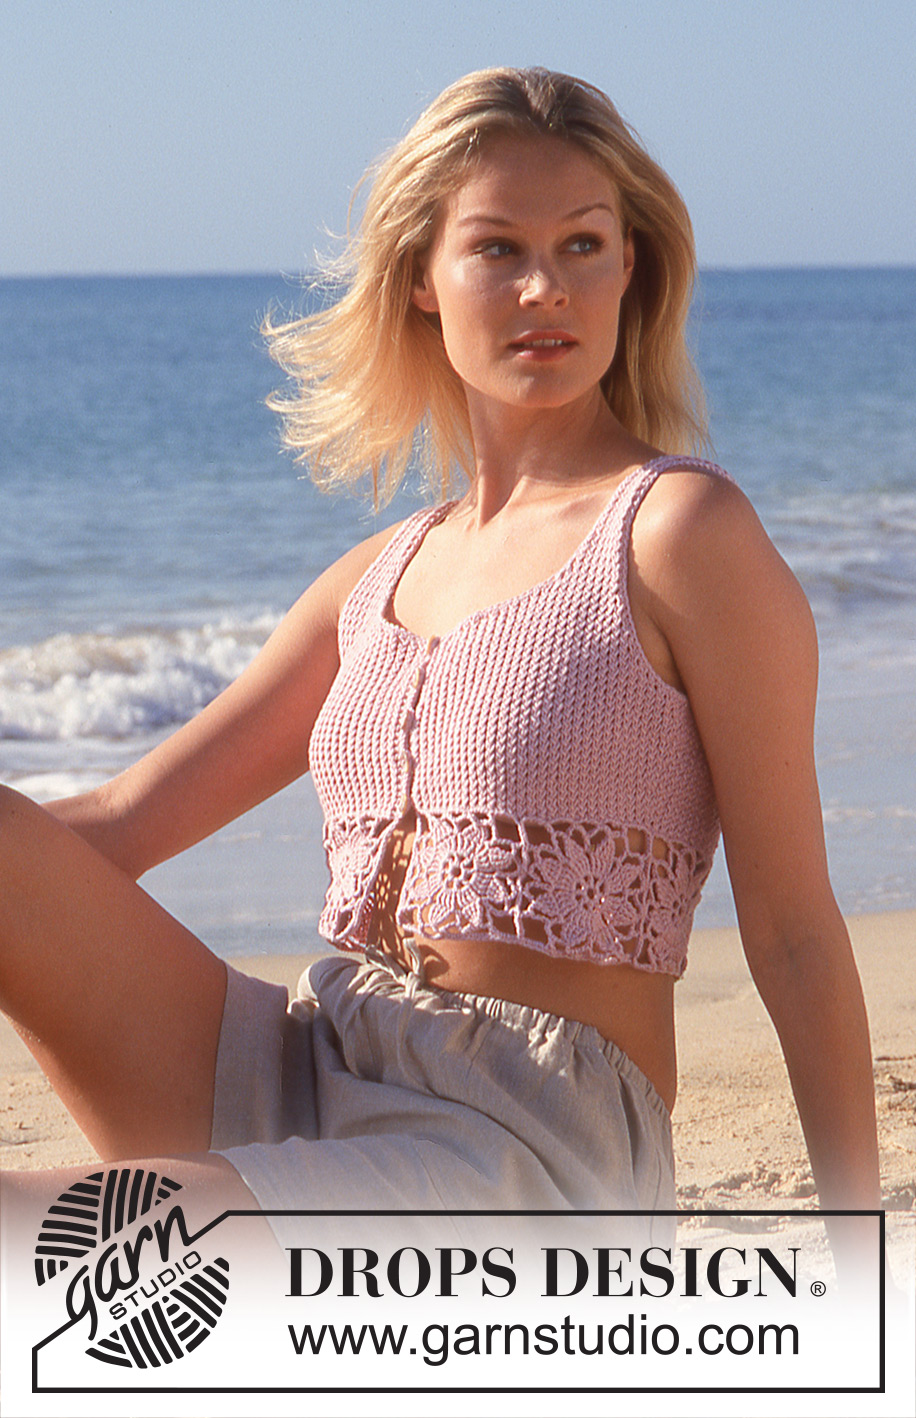
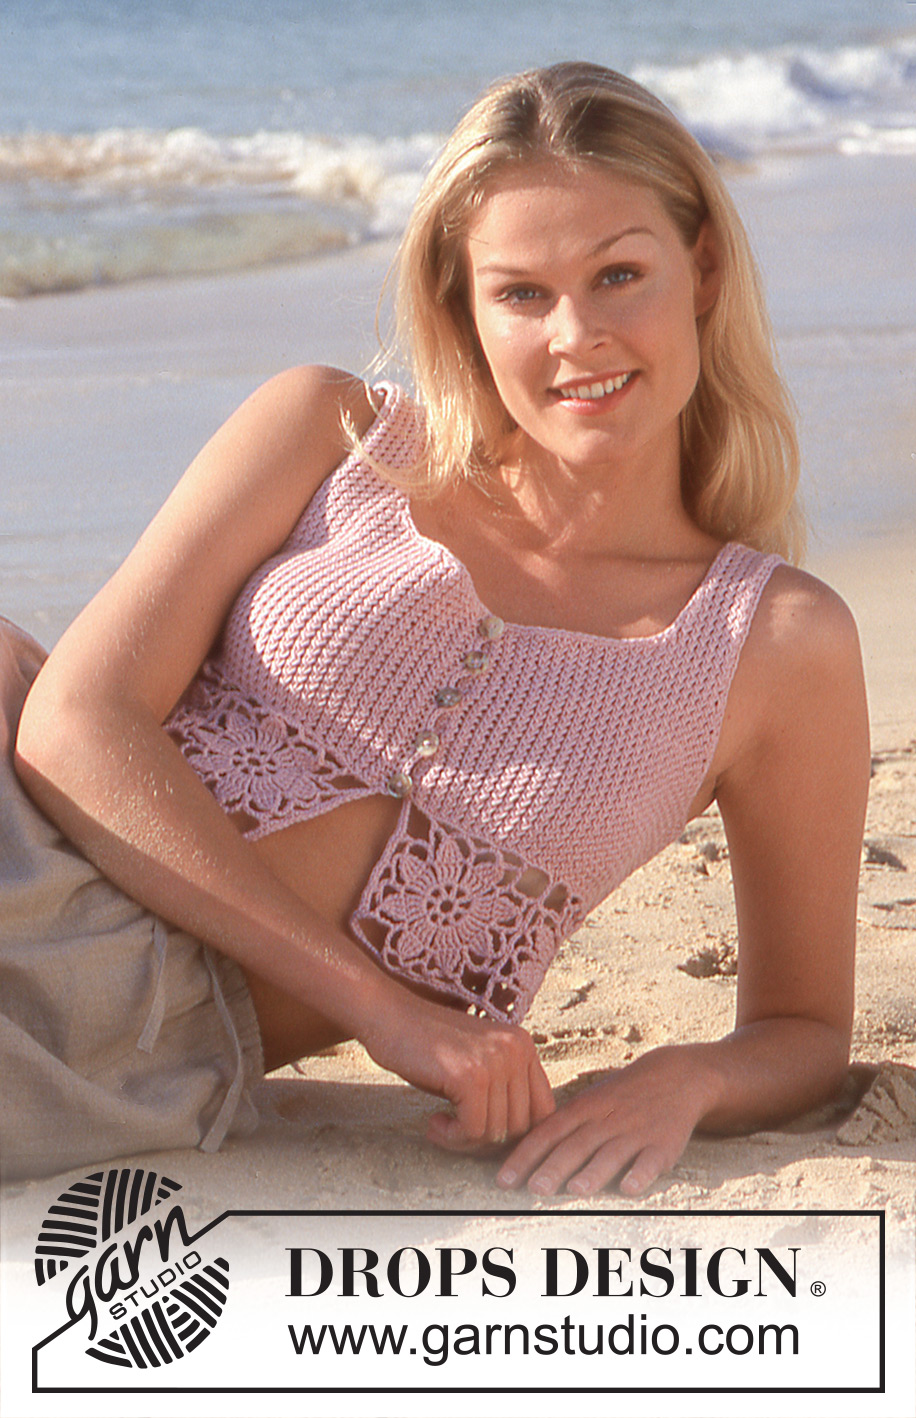
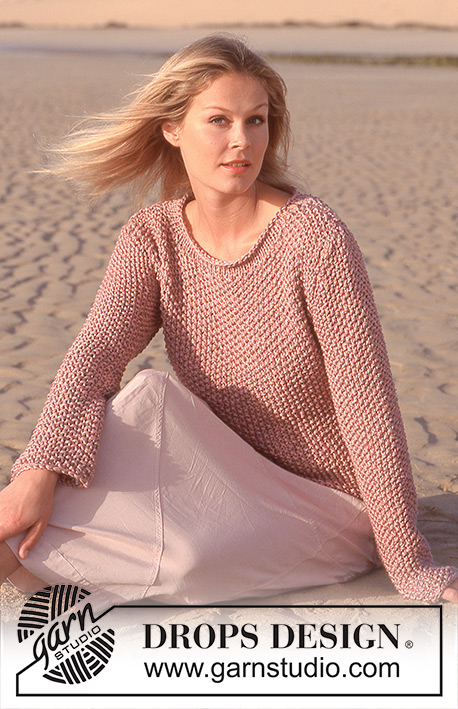
Beachside Garden#beachsidegardentop |
|
 |
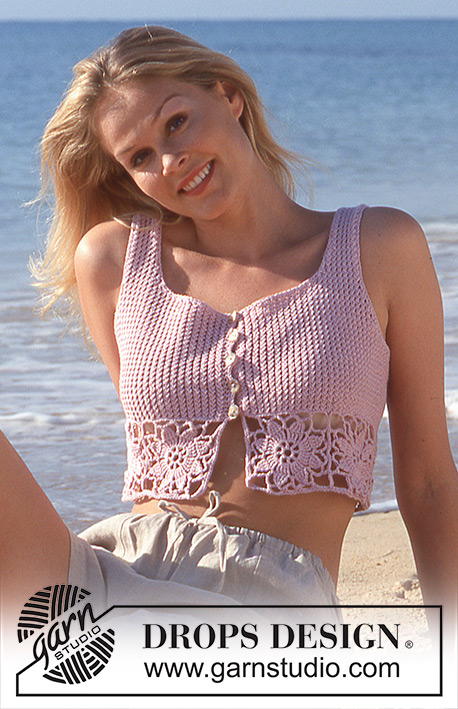 |
DROPS Short top in Safran with crocheted flower squares.
DROPS 64-8 |
|
|
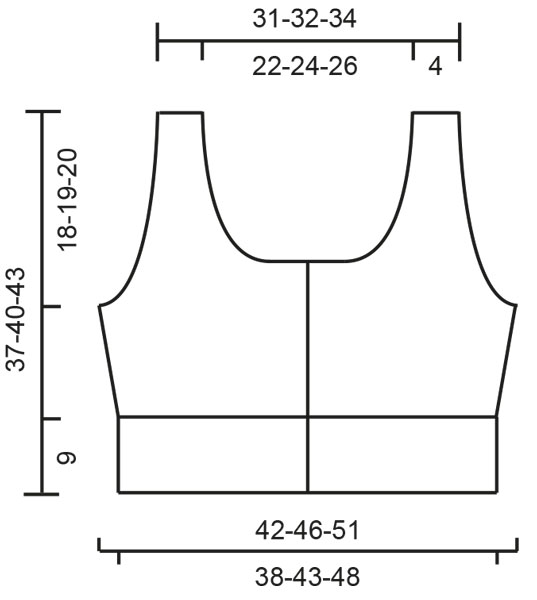
KNITTING GAUGE: 26 stitches in width and 34 rows in height in stocking stitch = 10 x 10 cm [4" x 4"] 28 stitches in width x 36 rows in height in pattern = 10 x 10 cm. [4" x 4"] NOTE: Needle size is only a guide. If you get too many stitches on 10 cm [4"], change to a larger needle size. If you get too few stitches on 10 cm [4"], change to a smaller needle size. Crochet gauge: One flower square measures approx. 9.5 x 9.5 cm [3.75" x 3.75"] PATTERN: Pattern is divisible by 2. Row 1: * slip one st as if to K, K 1, pass the slipped st over 1 K and leave the slipped st on left needle, K the slipped st *, repeat from *-*. Row 2: K2, purl all stitches and finish with K2. Repeat 1st and 2nd row Garter st, when knitting flat: Knit all sts, all rows. Knitting tip: All decs are made on right side rows, inside 1 edge st which is knit in garter st throughout. Dec 2 sts as follows: After 1 edge st: Slip 1, K 2 tog, pass the slipped st over (psso). Before 1 edge st: K 3 tog. Dec 1 st as follows: After 1 edge st: Slip 1, K 1, psso. Before 1 edge st: K 2 tog. Crocheted flower square: Chain 8 and join them into a ring with 1 slip st. Row 1: * 1 double crochet (dc) (the first dc is replaced by ch 3), ch 2 *, repeat from * - * 8 times, join with a slip st into the first dc. Row 2: * 4 trebles (the first treble is replaced by ch 4 around the ch st bow, ch 2 *, repeat from * - * 8 times, join with a slip st in the first treble. Row 3: * 4 trebles in the 4 trebles from the previous row (the first treble is replaced by ch 4) -- but keep the last loop of each on the hook until all trebles have been crocheted, then pull the yarn through all sts on the crochet hook (4 sts become 1), ch 6, 1 treble around the ch 2 from the preceding row, ch 6 *, repeat from * - * 8 times, join with a slip st in the first treble group. Row 4: Slip st to the center of the ch st bow, ch 1, 1 single crochet (sc) around the ch st bow, * ch 5, 1 sc around the next ch st bow, ch 5, 1 dc around the next ch st bow, ch 10, 1 dc around the next ch st bow (= corner), ch 5, 1 sc around the next ch st bow *, repeat from * - * a total of 3 times, then ch 5, 1 sc around the next ch st bow, ch 5, 1 dc around the next ch st bow, ch 10, 1 dc around the next ch st bow (= corner), ch 5, join with a slip st in the first sc. Top: Crochet 8-9-10 flower squares - see instructions above. Join together into a long strip - sew in the edge sts. Pick up and knit 220-244-272 sts in the upper ch st round on the crocheted strip. Attach 1 marker in the work after 55-61-68 sts and 1 marker after 165-183-204 sts. Knit Pattern - see instructions above, but keep the 2 edge sts at each side (center front) in garter st throughout. After 1 cm [⅜"], inc 2 sts at each marker 5 times every 7-8-10 rows - inc 2 sts beside each other and knit them into the pattern = 240-264-292 sts. When the work measures 19-21-23 cm [7.5"-8.25"-9"], knit the next row as follows: 57-62-68 sts for the front, bind off 8-10-12 sts for armhole, 110-120-132 sts for the back, bind off 8-10-12 sts for armhole, 57-62-68 sts for the front. Knit the rest of each part separately. Right Front: = 57-62-68 sts. Keeping the armhole edge st in garter st, dec for armholes every other row - see Knitting tip - 2 sts 3-5-6 times, 1 st 6-5-6 times = 45-47-50 sts. When the work measures 23-24-26 cm [9"-9.5"-10.25"], bind off 24-26-29 sts at the center front for neck opening. Keeping the center front edge st in garter st, dec at the neck edge every other row - see Knitting tip - 2 sts 3 times, 1 st 3 times = 12-12-12 sts remain on each shoulder. Continue by knitting Pattern, but keep 1 st at each side in garter st. Bind off when the work measures 37-40-43 cm [14.5"-15.75"-16⅞"]. Left Front: Knit like the right front, but reverse all shaping. Back: 110-120-132 sts. Keeping the armhole edge st in garter st, dec at each side for armholes as on the front = 86-90-96 sts. When the work measures 23-24-26 cm [9"-9.5"-10.25"], bind off the center 44-48-54 sts for neck opening. Keeping each neck edge st in garter st, dec at each neck edge every other row - see Knitting tip: 2 sts 3 times, 1 st 3 times = 12-12-12 sts remain on each shoulder. Continue knitting Pattern, but keep 1 st at each side in garter st throughout. Bind off when the work measures 37-40-43 cm [14.5"-15.75"-16⅞"]. Assembly: Sew the loops on the shoulders together. Crochet around the armhole: 1 row of single crochet (sc) inside 1 edge st. Make 5 buttonholes evenly distributed along the right front edge - the top buttonhole at the very top, the lowest just before the flower squares begin. Crochet inside the 2 edge sts -- begin at the very top as follows: Row 1: ch 5, skip over 1 cm [⅜"] (= 1 buttonhole), sc until the next buttonhole. Row 2: 4 sc around the ch st loop (buttonhole) and slip st between the buttonholes. After row 2: Continue to work sc around the neck opening, down along the left front and around the entire crocheted flower border. Sew on the buttons. |
|
 |
|
Have you finished this pattern?Tag your pictures with #dropspattern #beachsidegardentop or submit them to the #dropsfan gallery. Do you need help with this pattern?You'll find 27 tutorial videos, a Comments/Questions area and more by visiting the pattern on garnstudio.com. © 1982-2026 DROPS Design A/S. We reserve all rights. This document, including all its sub-sections, has copyrights. Read more about what you can do with our patterns at the bottom of each pattern on our site. |
|


With over 40 years in knitting and crochet design, DROPS Design offers one of the most extensive collections of free patterns on the internet - translated to 17 languages. As of today we count 325 catalogs and 12298 patterns - 12288 of which are translated into English (US/in).
We work hard to bring you the best knitting and crochet have to offer, inspiration and advice as well as great quality yarns at incredible prices! Would you like to use our patterns for other than personal use? You can read what you are allowed to do in the Copyright text at the bottom of all our patterns. Happy crafting!
Post a comment to pattern DROPS 64-8
We would love to hear what you have to say about this pattern!
If you want to leave a question, please make sure you select the correct category in the form below, to speed up the answering process. Required fields are marked *.