
Popular categories
Looking for a yarn?


Comments / Questions (47)
![]() Lorraine Robinson wrote:
Lorraine Robinson wrote:
I would like to now the ply of the wool love to make this pattern but must no what wool the get here thank you
12.04.2019 - 05:17DROPS Design answered:
Dear Mrs Robinson, DROPS Puna is a 8 ply/DK/Worsted - find more info about the yarn in its shadecard - and find here DROPS retailers shipping worldwide. Happy knitting!
12.04.2019 - 09:08
![]() Stine Inger wrote:
Stine Inger wrote:
Hei. Eg lurer på dei siste diagrambeskrivelsene. Der er ikkje noko tegn i dei to siste rutene.
28.03.2019 - 22:50DROPS Design answered:
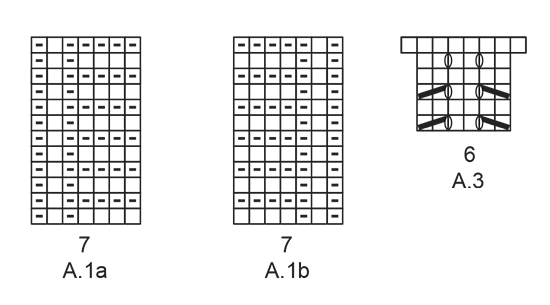
Hei Stine. Gjelder dette uansett hvaslags enhet du bruker (mobil, nettbrett, PC)? Vi har nå sjekket symbolene, og de ligger der alle sammen. Begge symbolene går over 2 masker, slik: Strikk 2 masker rett sammen = en strek fra øverst i høyre hjørnet, diagonalt ned mot nederste venstre hjørnet. Ta 1 maske løst av pinnen som om den skulle stikkes rett, 1 rett, løft den løse masken over = en strek fra nederste høyre hjørnet, diagonalt opp til øverste venstre hjørnet. God fornøyelse.
03.04.2019 - 10:06
![]() Christine Weir wrote:
Christine Weir wrote:
Hi ...i'm a little stuck!!;;;I dont understand the diagram explanation...insert needle down between 4 &5 stitch ....is it down in rows or further along the same row ? thanks
05.01.2019 - 02:06DROPS Design answered:
Dear Mrs Weir, you will insert the needle between the 4th and 5th stitch on the same row (not down) - see from time code 3:47 approx. in this video (showing how to work the pattern for the matching jumper). Happy knitting!
07.01.2019 - 09:34
![]() Jo wrote:
Jo wrote:
Je viens de trouver. Merci!
22.11.2018 - 19:30
![]() Jo wrote:
Jo wrote:
Bonjour, je ne comprends pas la taille que je dois choisir. Je fais un 96/79/98. Cordialement
22.11.2018 - 18:54
![]() Elsy Ödling wrote:
Elsy Ödling wrote:
Jag skulle vilja ha mönstret så att man stickar nerifrån och upp. Oket sist.
14.09.2018 - 09:42DROPS Design answered:
Hej Elsy, vi har desværre ikke mulighed for at skrive opskriften om. Det er faktisk slet ikke svært at strikke ovenfra og ned, og fordelen er at man kan prøve den undervejs. God fornøjelse!
17.09.2018 - 12:53
![]() Elsy Ödling wrote:
Elsy Ödling wrote:
Jag skulle vilja ha mönstret så att man stickar nerifrån och upp. Oket sist.
08.09.2018 - 10:16
![]() Clare Elias wrote:
Clare Elias wrote:
Thank you for your help.
01.05.2018 - 12:48Clare Elias wrote:
Are the charts followed left to right. On the second row do you follow the charts in reverse order so A1.b then A.2c etc thank you for your help
28.04.2018 - 18:39DROPS Design answered:
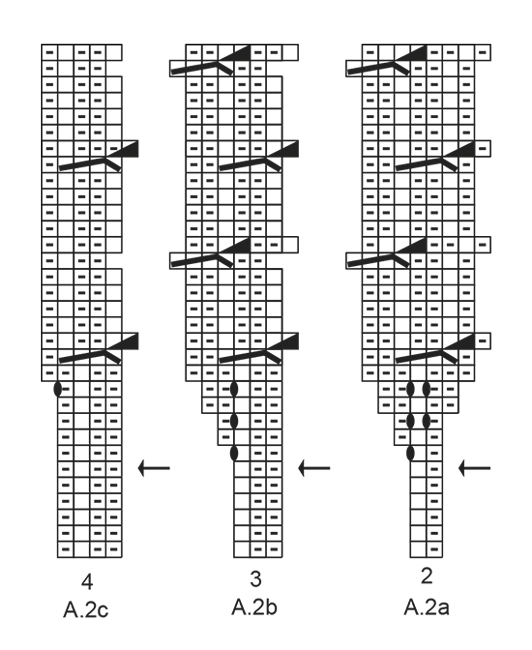
Dear Mrs Elias, from RS read diagram from the right towards the left starting on the bottom corner on the right side and work A.1a, A.2a, A.2b, A.2c, A.1b. From the wrong side, read diagrams from the left towards the right as they appear, ie: A.1b, A.2c, A.2b, A.2a, A.1a. Happy knitting!
30.04.2018 - 11:44Lorraine Bruce wrote:
Thank you for answering my question so promptly. As I live in Australia it is somewhat difficult to contact a store. I have to substitute an Australian yarn for the Drops one.
26.04.2018 - 01:23
|
||||||||||||||||||||||||||||
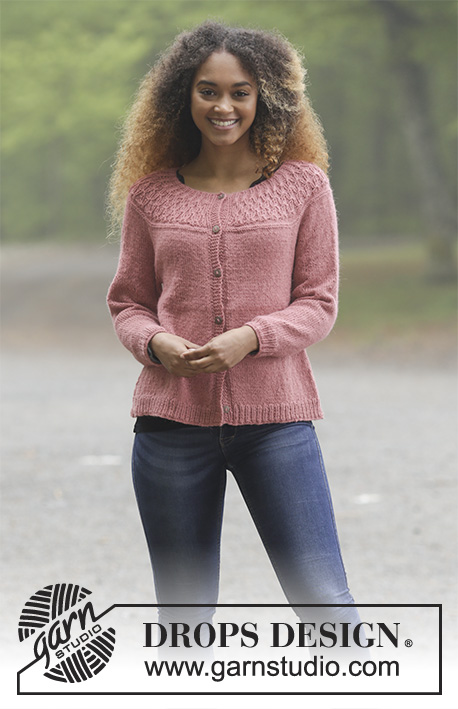
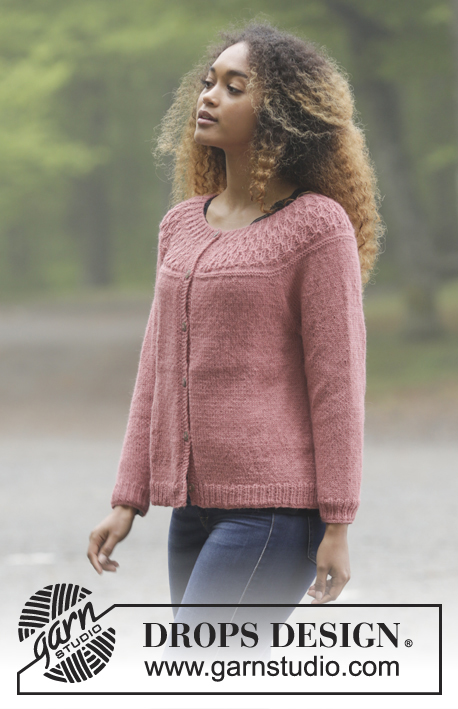
Namdalen Jacket#namdalenjacket |
||||||||||||||||||||||||||||
 |
 |
|||||||||||||||||||||||||||
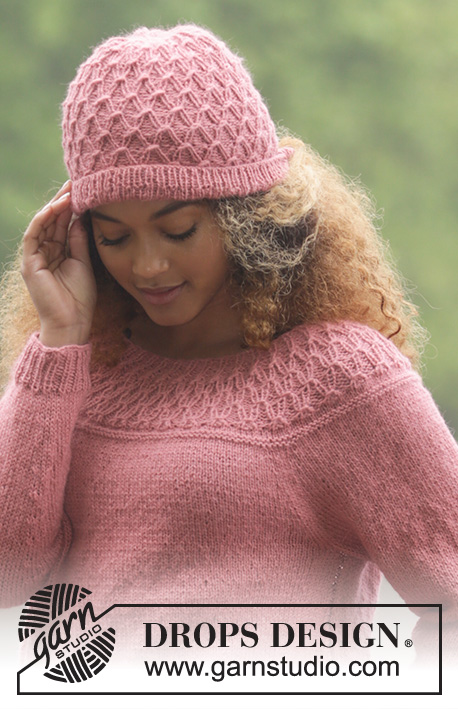
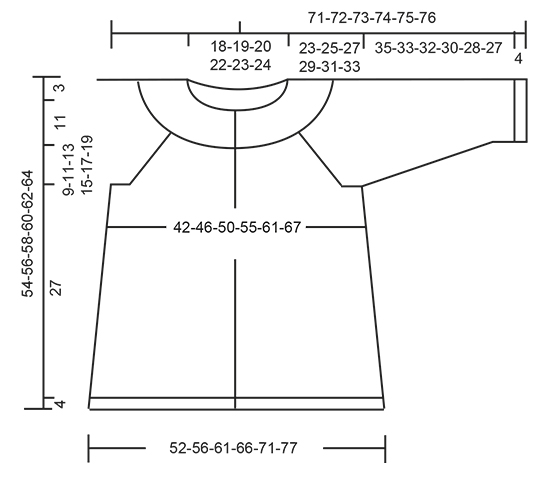
Knitted jacket with round yoke, raglan and texture, worked top down. Size: S - XXXL Piece is knitted in DROPS Puna.
DROPS 179-2 |
||||||||||||||||||||||||||||
|
INFORMATION FOR PATTERN: GARTER STITCH (back and forth): 1 ridge = knit 2 rows. PATTERN: See diagrams A.1 to A.3. Diagrams show all rows in pattern seen from the right side. INCREASE TIP (evenly): To calculate how to increase evenly, use the total number of stitches on row (e.g. 254 stitches), minus stitch in band (= 14 stitches) and divide the remaining stitches by number of increases to be done (e.g. 8) = 30. I.e. in this example increase after approx. every 30th stitch and do not increase over bands. Increase 1 stitch by making a yarn over. On next row knit yarn overs twisted to avoid holes. RAGLAN: All increases are done from right side. Increase 1 stitch on each side of marker thread as follows: Work until 2 stitches remain before marker thread, 1 yarn over, knit 4 (marker thread is in the middle of these 4 stitches), 1 yarn over. Repeat at the remaining marker threads on row (= 8 stitches increased on needle). On next row purl yarn overs twisted to avoid holes. DECREASE TIP (applies to mid under sleeve): Begin 3 stitches before marker and knit 2 together, knit 2 (marker is between these 2 stitches), slip 1 stitch knitwise, knit 1, pass slipped stitch over stitch worked (= 2 stitches decreased). BUTTONHOLES: Decrease for buttonholes on right band. I.e. decrease for buttonhole at the end of row from right side. 1 BUTTONHOLE = knit third and fourth band stitch from edge together and make 1 yarn over. On next row knit yarn over = hole. Decrease for buttonholes when piece measures: S: 2, 11, 20, 29, 38 and 47 cm M: 2, 11, 20, 29, 39 and 49 cm L: 2, 11, 21, 31, 41 and 51 cm XL: 2, 11, 21, 31, 41 and 51 cm XXL: 2, 11, 20, 29, 38, 47 and 56 cm XXXL: 2, 11, 20, 29, 38, 47 and 56 cm ---------------------------------------------------------- JACKET: Worked back and forth on circular needle, top down. Work sleeves in the round on double pointed needles. YOKE: Cast on 128-134-140-146-152-158 stitches on circular needle size 3.5 mm / US 4 with Puna. Purl 1 row from wrong side. Then work PATTERN – see explanation above, as follows: Work A.1a (= 7 band stiches), work A.2a (= 2 stitches on first row), work A.2b (= 36-38-40-42-44-46 repetitions of 3 stitches on first row), work A.2c (= 4 stitches on first row), work A.1b (= 7 band stiches). When 6 rows have been worked of diagrams (to and with row marked with arrow in diagrams) switch to circular needle size 4 mm / US 6. Remember BUTTONHOLES - see explanation above. Work band stitches as shown in diagrams A.1a and A.1b until finished measurements. REMEMBER THE GAUGE! When entire A.2a, A.2b and A.2c have been worked vertically, there are 242-254-266-278-290-302 stitches on needle and piece measures 10 cm / 4" from cast-on edge. Work 2 rows in stockinette stitch while increasing 2-8-16-24-20-34 stitches evenly on first row – read INCREASE TIP = 244-262-282-302-310-336 stitches, Work 2 ridges in GARTER STITCH - see explanation above. Insert 4 marker threads in piece without working as follows: Insert 1st marker thread after 41-43-46-50-53-58 stitches, 2nd marker thread after another 47-52-56-58-56-59 stitches, 3rd marker thread after another 68-72-78-86-92-102 stitches, and 4th marker thread after another 47-52-56-58-56-59 stitches. There are now 41-43-46-50-53-58 stitches left on needle. Continue in stockinette stitch and band stitches in each side as before and on next row from right side begin increase for RAGLAN – see explanation above. Increase like this on every 4th row (= every other row from right side) 6-8-9-10-12-13 times in total = 292-326-354-382-406-440 stitches. Continue with stockinette stitch without increasing stitches until piece measures 23-25-27-29-31-33 cm / 9"-9¾"-10½"-11½"-12¼"-13" from cast-on edge. Work next row from wrong side as follows: Work first 47-51-55-60-65-71 stitches (= half right front piece), slip the next 59-68-74-78-80-85 stitches on a stitch holder (= sleeve), cast on 8-8-10-10-12-12 new stitches under sleeve, work the next 80-88-96-106-116-128 stitches (= back piece), slip the next 59-68-74-78-80-85 stitches on a stitch holder (= sleeve), cast on 8-8-10-10-12-12 new stitches under sleeve, work the remaining 47-51-55-60-65-71 stitches on round (= half left front piece). BODY: = 190-206-226-246-270-294 stitches. Insert a marker thread in the middle of the new stitches cast-on under sleeves in each side (= 4-4-5-5-6-6 stitches on each side of marker thread). NOW MEASURE THE PIECE FROM HERE! Work in stockinette stitch with 7 edge stitches in garter stitch in each side of piece. When piece measures 3 cm / 1", work A.3 (= 6 stitches) mid under each sleeve so that there are 3 stitches of diagram on each side of marker thread. For every time A.3 has been worked vertically, 4 stitches have been increased on needle. Work the new stiches in stockinette stitch. Continue like this until A.3 have been worked 11 times vertically = 234-250-270-290-314-338 stitches. Piece measures approx. 27 cm / 10½". Knit 1 row from right side while increasing 20-22-23-24-27-30 stitches evenly = 254-272-293-314-341-368 stitches. Purl 1 row from wrong side. Switch to circular needle size 3.5 mm / US 4. Now work rib as follows: Work 7 band stitches as before, purl 1, * knit 1, purl 2 *, work from *-* until 9 stitches remain on needle, knit 1, purl 1 and 7 band stitches as before. When rib measures 4 cm / 1½" - adjust so that last row worked is from right side, switch to circular needle size 4 mm / US 6. Purl 1 row from wrong side and bind off by knitting from right side. To avoid a tight bind-off edge use a larger needle or make a yarn over that is casted off after approx. every 4th stitch. Jumper measures approx. 54-56-58-60-62-64 cm / 21¼"-22"-22¾"-23⅝"-24⅜"-25¼" from shoulder and down. SLEEVES: Work sleeves in the round on double pointed needles. Slip the 59-68-74-78-80-85 stitches from stitch holder on double pointed needles size 4 mm / US 6. Pick in addition up 1 stitch in each of the 8-8-10-10-12-12 stitches cast on under sleeve = 67-76-84-88-92-97 stitches. Insert 1 marker thread in the middle of the new stitches (= mid under sleeve). NOW MEASURE THE PIECE FROM HERE! Work in stockinette stitch in the round. When piece measures 3 cm / 1", decrease 2 stitches mid under sleeve - read DECREASE TIP. Decrease like this every 8th-6th-5th-4th-4th-3rd round 11-14-16-18-19-20 times in total = 45-48-52-52-54-57 stitches. Work 1 round while decreasing 0-0-1-1-0-0 stitches = 45-48-51-51-54-57 stitches. Continue in stockinette stitch until piece measures 35-33-32-30-28-27 cm / 13¾"-13"-12½"-11¾"-11"-10½" (NOTE: shorter measurements in the larger sizes because of longer yoke). Switch to double pointed needles size 3.5 mm / US 4. Now work rib = knit 1/purl 2 until rib measures 4 cm / 1½". Switch back to circular needle size 4 mm / US 6. Knit 1 round. Then bind off by knitting. To avoid a tight bind-off edge use a larger needle or make a yarn over that is casted off after approx. every 4th stitch. Sleeve measures approx. 39-37-36-34-32-31 cm / 15¼"-14½"-14¼"-13½"-12½"-12¼". Work the other sleeve the same way. |
||||||||||||||||||||||||||||
Diagram explanations |
||||||||||||||||||||||||||||
|
||||||||||||||||||||||||||||
 |
||||||||||||||||||||||||||||
 |
||||||||||||||||||||||||||||
 |
||||||||||||||||||||||||||||
Have you finished this pattern?Tag your pictures with #dropspattern #namdalenjacket or submit them to the #dropsfan gallery. Do you need help with this pattern?You'll find 24 tutorial videos, a Comments/Questions area and more by visiting the pattern on garnstudio.com. © 1982-2026 DROPS Design A/S. We reserve all rights. This document, including all its sub-sections, has copyrights. Read more about what you can do with our patterns at the bottom of each pattern on our site. |
||||||||||||||||||||||||||||


With over 40 years in knitting and crochet design, DROPS Design offers one of the most extensive collections of free patterns on the internet - translated to 17 languages. As of today we count 324 catalogs and 12290 patterns - 12280 of which are translated into English (US/in).
We work hard to bring you the best knitting and crochet have to offer, inspiration and advice as well as great quality yarns at incredible prices! Would you like to use our patterns for other than personal use? You can read what you are allowed to do in the Copyright text at the bottom of all our patterns. Happy crafting!
Post a comment to pattern DROPS 179-2
We would love to hear what you have to say about this pattern!
If you want to leave a question, please make sure you select the correct category in the form below, to speed up the answering process. Required fields are marked *.