
Popular categories
Looking for a yarn?


Comments / Questions (169)
![]() Laila Kvist Jepsen wrote:
Laila Kvist Jepsen wrote:
Kan jeg se et foto af hvordan, den ser ud under armhulen eller hvor armene ikke er tæt på kroppen. Jeg har aldrig før haft det så svært med en opskrift!
17.02.2021 - 18:24DROPS Design answered:
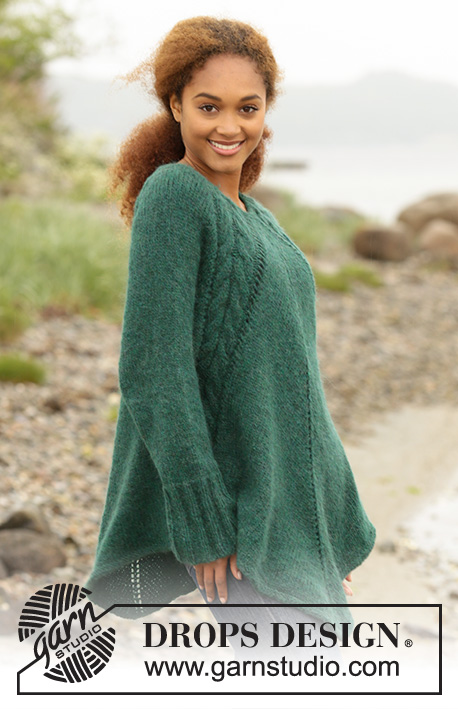
Hej Laila, vi har kun de 3 billeder du ser nedenfor det store, men et af dem viser siden på tunikaen :)
18.02.2021 - 08:38
![]() Laila Kvist Jepsen wrote:
Laila Kvist Jepsen wrote:
Hej. Er igang med ærmerne. Kan det passe at snoninger ikke fortsætter ned på ærmet? Men derimod bliver snoningen afsluttet under ærmet og bliver til ret masker?
16.02.2021 - 19:45DROPS Design answered:
Hej Laila, snoningerne fortsætter i hver side på ryg & forstykket til arbejdet er færdigt. Der er ikke snoninger på ærmerne. :)
18.02.2021 - 09:13
![]() Rikke wrote:
Rikke wrote:
Kan det passe af når man deler til ærmer og krop, så deler man midt imellem de 2 snogninger således at den ene går til kroppen og den anden til ærmet. Det ser nemlig ikke sådan ud på billedet
30.01.2021 - 18:17DROPS Design answered:
Hej Rikke, ja det stemmer :)
03.02.2021 - 14:06
![]() Marion Nicola Simonsen wrote:
Marion Nicola Simonsen wrote:
Jeg er nået til deling af arbejdet i ærmer, for- og bagstykke. strikker str. XL og har 442 masker Forstår ikke at A.2A og A,3 skal deles således at der er 11 masker til ærmet og 9 m til for- og bagstykket, ifølge billedet er hele A2A og A.3 meregnet i for- og bagstykket.
18.01.2021 - 16:57DROPS Design answered:
Hej Marion, du er nødt til at dele imellem de 2 snoninger, derfor bliver det 9 i den ene side og 11 i den anden. God fornøjelse!
20.01.2021 - 16:39
![]() Gertie Tobias wrote:
Gertie Tobias wrote:
The bottom of page 2and 3 are printed over an advert so cant read them
11.12.2020 - 12:45
![]() Strikker wrote:
Strikker wrote:
Hei, har dere en video på hvordan man skal legge opp masker i denne oppskriften?
20.04.2020 - 20:34DROPS Design answered:
Hej, ja du finder alle de videoer og lektioner som kan bruge til denne bluse nederst i opskriften. God fornøjelse!
21.04.2020 - 11:42
![]() Cecilia Guidotti wrote:
Cecilia Guidotti wrote:
Grazie capito! Perfetto.
08.04.2020 - 16:25
![]() Cecilia Guidotti wrote:
Cecilia Guidotti wrote:
Salve qualcuno può aiutarmi a capire da dove si parte. Non mi è chiaro per niente! In italiano se possibile. Grazie Cecilia
02.04.2020 - 17:06DROPS Design answered:
Buonasera Cecilia, nella prima parte delle spiegazioni vengono illustrate le tecniche utilizzate, dal paragrafo tunica si inizia la lavorazione vera e propria a partire dallo sprone. Buon lavoro!
02.04.2020 - 20:38
![]() Alexandra wrote:
Alexandra wrote:
Hallo, ich bin am Ende des Rumpfteils vor den Krausrippen..der Pullover ist leider viel zu kurz. An den Seiten grade so auf Höhe der Taille. Da fehlen locker noch 20cm. Vorne ist er allerdings schon recht lang. Wenn ich jetzt noch 20cm strickt hängt er wahrscheinlich fast bei den Knien. Ich stricke in XXXL, Maschenprobe passt genau zur Anleitung. Irgendwelche Ideen was hier schief gelaufen ist? Die Breite passt, nur die Länge nicht. Danke schonmal!
07.03.2020 - 21:43DROPS Design answered:
Liebe Alexandra, nicht sicher wo liegt das Problem... haben Sie schon 20 Mal zugenommen bzw 40 Runden gestrickt? dann sollte der Rumpfteil ca 18 cm vom Markierer sein. Viel Spaß beim stricken!
09.03.2020 - 11:02
![]() Dorthe wrote:
Dorthe wrote:
Ich habe es nicht verstanden. Ich habe die 1. Runde im Muster gestrickt. Aber dann? Nehme ich schon wieder zu und stricke Muster? Oder doch eher erst mal so etwas wie eine " Rückreihe". Schönes Modell, aber ich gebe bald auf ohne Eure Hilfe:-)
10.02.2020 - 11:14DROPS Design answered:
Liebe Dorthe, Sie stricken zuerst die einzige Reihe in A.1 wie beschrieben, dann stricken Sie A.2A, A.3 (= Zöpfe bei jeder Raglanlinie) und gleichzeitig nehmen Sie so zu: bei den Ärmeln in jeder 2. Runde dann in jeder 4. Runde und gleichzeitg nehmen Sie in der MItte Vorder- + Rückenteil. Viel Spaß beim stricken!
10.02.2020 - 11:35
|
|||||||||||||||||||||||||
Emerald Queen#emeraldqueensweater |
|||||||||||||||||||||||||
 |
 |
||||||||||||||||||||||||
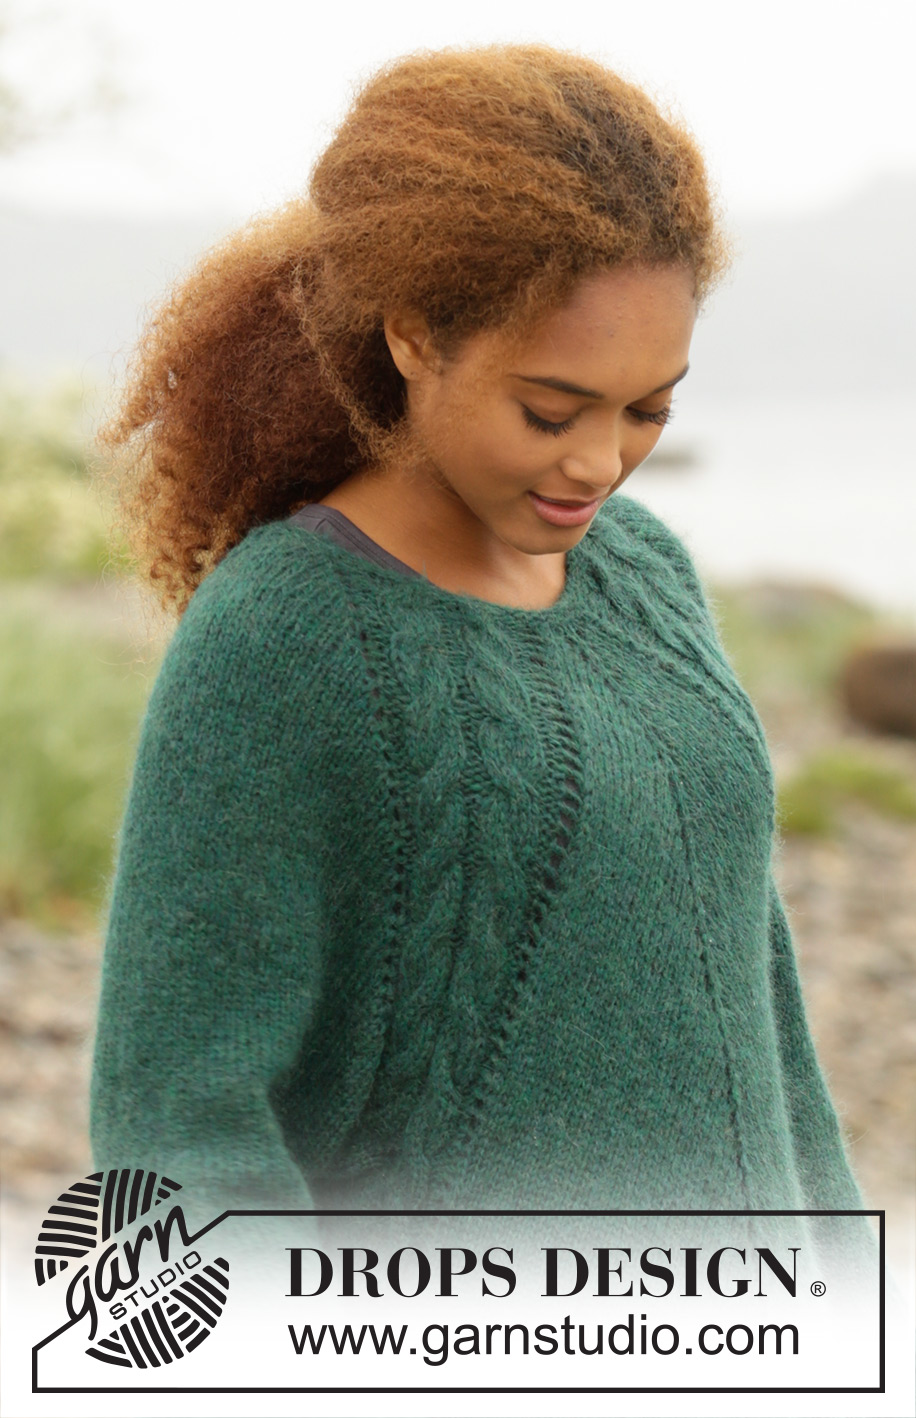
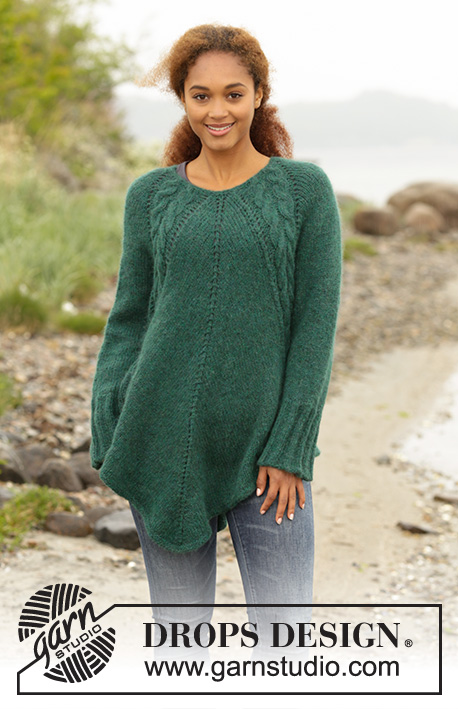
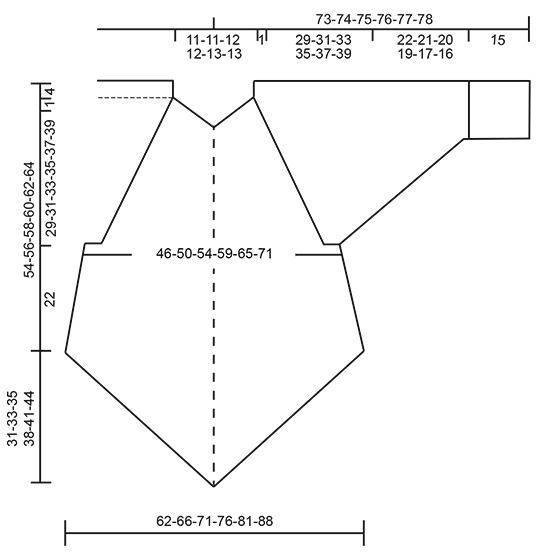
Knitted DROPS tunic with deep raglan and cables, worked top down in ”Air”. Size: S - XXXL.
DROPS 171-1 |
|||||||||||||||||||||||||
|
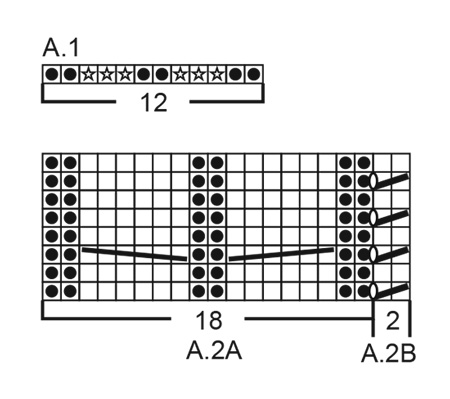
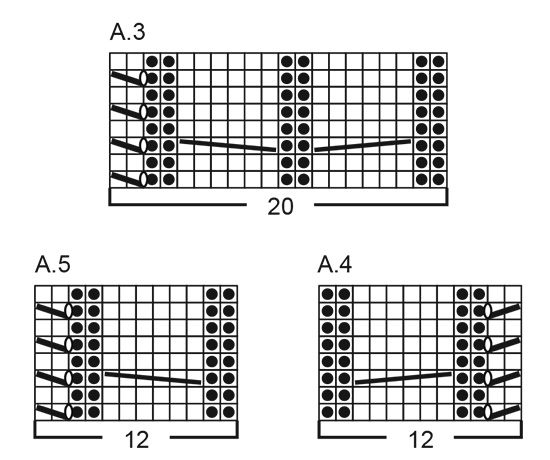
GARTER ST (worked in the round): 1 ridge = 2 rounds. * K 1 round and P 1 round *, repeat from *-*. PATTERN: See diagrams A.1 to A.5. INCREASE FOR SLEEVES: Increase 1 st in each side on each sleeve by increasing after A.2 and before A.3 (= 2 st inc on each sleeve and 4 sts in total on round). Inc 1 st by making 1 yarn over, on next round knit yarn over to make holes. INCREASE MID FRONT AND MID BACK: Increase 2 sts on each side of st with marker thread on mid front and mid back as follows: Knit until 1 st before st with marker thread, make 1 yarn over, knit 1, make 1 yarn over, knit st with marker thread, make 1 yarn over, knit 1, make 1 yarn over (= 4 sts inc mid front/mid back and 8 sts in total on round). On next round knit the 2 yarn overs closest to the st with mid-st to make holes, the outermost 2 sts should be knit twisted to avoid holes. Increase 1 st on each side of st with marker thread on mid front and mid back as follows: Work until st with maker thread, make 1 yarn over, knit st with maker thread (mid-st), make 1 yarn over (= 2 sts inc mid front/mid back and 4 sts in total on round).On next round knit yarn overs to make holes. KNITTING TIP-1: To avoid the eye let row being interrupted while increasing for sleeves on every 4th row and not on every 2nd row as before, work as follows on the rows that previously had increases: After A.2: Make 1 yarn over, slip 1 st knitvise, knit 1 and pass slipped st over the knit st. Before A.3: Knit until 2 sts before A.3, knit 2 st tog and make 1 yarn over. KNITTING TIP-2: If you want a little less volume on body, it is possible to make some adjustments after dividing for sleeves. Decrease 2 sts mid front and mid back on i.e every 8th round as follows (decrease on a round with increases): Knit until 2 sts before st with marker (= mid-st), knit 2 tog, make 1 yarn over, knit 1 (= mid-st), make 1 yarn over, slip 1 st knitvise, knit 1 and pass slipped st over the knit st (this decrease will give approx 8 cm / 3⅛" less width in total at the end of body). DECREASE TIP (applies to sleeves): Beg 3 sts before marker and dec as follows: K 2 tog, K 2 (marker is in the middle of these 2 sts), slip 1 st as if to K, K 1, psso. ---------------------------------------------------------- TUNIC: Worked in the round on circular needle, top down. YOKE: Cast on 66-66-70-70-74-74 sts on a short circular needle size 4 mm / US 6 with 2 strands Air. Remove 1 strand and continue with 1 strand Air as follows: Work 2 ridges in GARTER ST - see explanation above. Switch to a short circular needle size 5 mm / US 8, work next round as follows: Work A.1 (= 12 sts inc to 18 sts), 2 sts in stockinette st (= sleeve), A.1 (= 12 sts inc to 18 sts), 7-7-9-9-11-11 sts in stockinette st (insert 1 marker in the middle of these sts = mid front), A.1 (= 12 sts inc to 18 sts), 2 sts in stockinette st (= sleeve), A.1 (= 12 sts inc to 18 sts) and 7-7-9-9-11-11 sts in stockinette st (insert 1 marker in the middle of these sts = mid back) = 90-90-94-94-98-98 sts on needle. Next round work as follows: Work A.2 (= 18 sts), inc 1 st – READ INCREASE FOR SLEEVES, knit 2, inc 1 st for sleeve, work A.3 (= 20 sts), knit 0-0-1-1-2-2 s, inc 2 sts on each side of st with marker thread – READ INCREASE MID FRONT AND MID BACK, knit 0-0-1-1-2-2 sts, work A.2B (= 2 sts), work A.2A (=18 sts), inc 1 st for sleeve, knit 2 sts, inc 1 st for sleeve, work A.3 (= 20 sts), knit 0-0-1-1-2-2 sts, inc 2 sts on each side of st with marker thread (= mid back) and knit 0-0-1-1-2-2 sts and work A.2B (= 2 sts) = 102-102-106-106-110-110 sts on needle. Then work stockinette st in the round with A.2 and A.3 in every transition between body and sleeves. AT THE SAME TIME continue increase for sleeves and increase mid front and mid back as follows: SLEEVES: Increase on every 2nd round 10-13-15-21-23-27 times in total (including the increase explained on firste round), then increase on every 4th round 11-11-11-9-9-8 times in total - READ KNITTING TIP-1. MID FRONT AND MID BACK : Inc 2 sts on every side of st with marker in it on every 2nd round 11-14-15-18-21-25 times in total (including the increases explained on first round). Then increase 1 st on each side of st with marker in it on every 2nd round 21-20-21-21-20-18 times in total. REMEMBER THE GAUGE! After last increase on body and sleeves each side of st with marker thread there are 346-378-402-442-474-510 sts on needle. Work next round as follows: Work as before over the first111 sts (= until middle of 2 P sts in A.2), slip the next 62-68-72-80-84-90 sts on a stitch holder (= sleeve), cast on 6-6-8-8-10-12 new sts under sleeve, work as before over the next 111-121-129-141-153-165 sts on front piece(i.e 11 st in A.3, 89-99-107-119-131-143 knit sts, 11 sts in A.2)slip the next 62-68-72-80-84-90 sts on a stitch holder (= sleeve), cast on 6-6-8-8-10-12 new sts under sleeve and work the remaining 100-110-118-130-142-154 sts on back piece as before (i.e 11 sts in A.3 and 89-99-107-119-131-143 knit sts). Finish body and sleeves separately. BODY: = 234-254-274-298-326-354 sts. Insert 1 marker in the piece. Work next round as follows: Work A.4 (12 sts), knit 4-4-6-6-8-10 sts, A.5 (=11 sts), knit until mid-st, make 1 yarn over, knit 1 (= mid-st), make 1 yarn over, knit until A.2, work A.4 (= 12 sts), knit 4-4-6-6-8-10 sts, A.5 (= 12 sts), knit until mid-st, make 1 yarn over, knit 1 (= mid-st), make 1 yarn over and knit the rest of round (= 4 sts increased). Continue pattern like this while AT THE SAME TIME continuing to increase mid front and mid back on every 2nd round until inc has been done 20 times on each side of mid front/mid back from marker - READ KNITTING TIP-2 = 314-334-354-378-406-434 sts on needle (or work until desired length). On next round work sts in each cable K tog 2 by 2 (= 12 sts dec) = 302-322-342-366-394-422 sts. Switch to circular needle size 4 mm / US 6 and work 2 ridges in garter st in the round over all sts. Switch back to circular needle size 5 mm / US 8 and bind off (this is done to avoid a tight bind-off edge). SLEEVE: Worked in the round on a short circular needle, switch to double pointed needles when needed. Slip the sts from stitch holder in one side of piece on a short circular needle size 5 mm / US 8 and pick up 1 st in each of the 6-6-8-8-10-12 sts cast on under sleeve on body = 68-74-80-88-94-102 sts on needle. Insert 1 marker at beg of round (= mid under sleeve) - NOW MEASURE PIECE FROM HERE. Work in stockinette st in the round over all sts AT THE SAME TIME on first round dec over the two cables by working sts in each cable K tog 2 by 2 (= 6 sts dec) = 62-68-74-82-88-96 sts. When piece measures 2 cm / ¾", dec 2 sts mid under sleeve - READ DECREASE TIP. Dec a total of 12-14-17-20-22-25 times in Size S: On every 4th round, in size M: On every 3rd round, in size L: Alternately on every 2nd and 3rd round, in size XL: On every other round, in size XXL: Alternately on every and every other round and size XXXL. On every round = 38-40-40-42-44-46 sts on needle. Continue to work until piece measures 22-21-20-19-17-16 cm / 8¾"-8¼"-8"-7½"-6¾"-6¼" (NOTE: Shorter measurements in the larger sizes because of wider shoulders). K 1 round while AT THE SAME TIME inc 7-10-10-8-11-9 sts evenly = 45-50-50-50-55-55 sts. Switch to double pointed needles size 4 mm / US 6 and work rib in the round = K 2/P 3. When rib measures 15 cm / 6", switch back to double pointed needles size 5 mm / US 8 before binding off with K over K and P over P (this is done to avoid a tight bind-off edge). Work the other sleeve the same way. |
|||||||||||||||||||||||||
Diagram explanations |
|||||||||||||||||||||||||
|
|||||||||||||||||||||||||
 |
|||||||||||||||||||||||||
 |
|||||||||||||||||||||||||
 |
|||||||||||||||||||||||||
Have you finished this pattern?Tag your pictures with #dropspattern #emeraldqueensweater or submit them to the #dropsfan gallery. Do you need help with this pattern?You'll find 25 tutorial videos, a Comments/Questions area and more by visiting the pattern on garnstudio.com. © 1982-2026 DROPS Design A/S. We reserve all rights. This document, including all its sub-sections, has copyrights. Read more about what you can do with our patterns at the bottom of each pattern on our site. |
|||||||||||||||||||||||||


With over 40 years in knitting and crochet design, DROPS Design offers one of the most extensive collections of free patterns on the internet - translated to 17 languages. As of today we count 324 catalogs and 12290 patterns - 12280 of which are translated into English (US/in).
We work hard to bring you the best knitting and crochet have to offer, inspiration and advice as well as great quality yarns at incredible prices! Would you like to use our patterns for other than personal use? You can read what you are allowed to do in the Copyright text at the bottom of all our patterns. Happy crafting!
Post a comment to pattern DROPS 171-1
We would love to hear what you have to say about this pattern!
If you want to leave a question, please make sure you select the correct category in the form below, to speed up the answering process. Required fields are marked *.