
Popular categories
Looking for a yarn?


Comments / Questions (12)
![]() Sophie wrote:
Sophie wrote:
So you said to increase by 2 stitches before and after A.2, but then you also say to increase by 1 stitch before and after A.2. Does that mean that I'm increasing by 3 stitches each round for the front/back pieces, or to increase by 2 stitches before and after on A.2.2 and then subsequent rounds to increase by 1 stitch before and after?
23.04.2025 - 17:04DROPS Design answered:
Dear Sophie, when increasing 2 sts on body, you will increase only 1 st on sleeves, so that you will increase 2 sts after A.2 at the beg of front/back piece + 2 sts before next A.2 at the end of front /back piece and at the same time, increase 1 st after A.2 at the beg of sleeves + 1 st before next A.2 at the end of sleeve (12 sts increased in total on the round). Then you will increase 1 st on each side of each A.2 for both body and sleeves (8 sts increased in total on the round). See your size for the number of times. Happy crocheting!
24.04.2025 - 08:36
![]() Sophie wrote:
Sophie wrote:
I've been reading and rereading the raglan increases instructions for a couple hours now and still don't understand. How many increases per row should there be for front and back? How many increases per row should there be for each sleeve? Where do these increases occur? Why does the raglan for sleeves include the first raglan increase? The first raglan increase is part of the half back.
20.04.2025 - 05:05DROPS Design answered:
Dear Sophie, the increases are worked on a different rythm on body and on sleeves, on back and front pieces you first increase 2 sts after A.2 at the beg of front/back piece + 2 sts before next A.2 at the end of front/back piece (4 sts for each front/back piece= 8 sts for body) then you increase 1 stitch after A.2 at the beg of front/back piece + 1 stitch before A.2 at the end of front/back piece (2 sts increased for both front/back piece = 4 sts for body); and on sleeves you increase only 1 stitch after A.2 at the beg of sleeve and 1 st before next A.2 at the end of sleeve. Happy crocheting!
22.04.2025 - 15:14
![]() Desiree Barhorst-Weller wrote:
Desiree Barhorst-Weller wrote:
Ik heb een heupomtrek van 142 cm. Zal ik maat XXXL nog wel passen dan of ben ik genoodzaakt nog groter te haken/een grotere haaknaald te nemen?
13.03.2022 - 20:54DROPS Design answered:
Dag Desiree,
Je zou inderdaad een grotere haaknaald kunnen nemen voor het onderste deel. Misschien eerst even een proeflapje maken om te kijken op welke afmetingen je dan uitkomt.
14.03.2022 - 12:29
![]() Solfrid Løkke wrote:
Solfrid Løkke wrote:
Hei, Jeg forstår ikke dette med stolpemaskene når jeg starter med bolen. Det står at jeg ikke skal hekle over de 4 første stolpemaskene og heller ikke de fire maskene når jeg er nesten rundt igjen. For meg blir det da et hull på 8 masker og det tror jeg ikke skal stemme. Jeg lurer også litt på om jeg skal hekle rundt og rundt på bolen og ikke fram og tilbake. Mvh Solfrid Løkke
27.04.2020 - 21:39DROPS Design answered:
Hej Solfrid, jo du hekler over alle masker også stolpemaskerne, men når du øger, skal du ikke øge over de yderste 4 masker i hver side. Du hekler frem og tilbage til du er færdig med raglanøkningen, efter det fortsætter du rundt ifølge opskriften. God fornøjelse!
29.04.2020 - 09:07
![]() Heidi wrote:
Heidi wrote:
Bei dem Abschnitt PASSE steht in der 4. Zeile: "(einschl. je 4 fM beidseitig für die Blenden)". Bei der Anleitung vom gleichen Model als Jacke steht das auch. Da es beim Pulli keine Blende gibt, müsste dann die Maschenzahl nicht 4 M. weniger sein, da die Blenden der Jacke übereinander liegen? Vielen Dank im Voraus.
29.03.2019 - 11:43DROPS Design answered:
Liebe Heidi, dieses Modell ha hinten im Rücken Knöpfen, dh bis Ende der Passe. Viel Spaß beim häkeln!
01.04.2019 - 10:33
![]() Centientje wrote:
Centientje wrote:
Voor de afwerking van de onderkant mouw en lijf moeten volgens de patroonbeschrijving 4 stk in de lossenboogjes worden gehaakt, maar bij mij gaan de onderkanten dan golven. Als ik echter 3 stk in de lossenboogjes haak, ziet het werk er veel rechter en strakker uit.
06.08.2018 - 09:01
![]() Centientje wrote:
Centientje wrote:
Ik heb de beschrijving van het patroon precies gevolgd en nu de trui gereed is valt deze niet recht maar zit er een flinke draai in. Wat ging er mis? Hoe los ik het probleem op?
30.07.2018 - 17:00DROPS Design answered:
Dag Centientje, Het is denk ik het beste om het werk wat te bevochten en tussen 2 handdoeken te leggen om op vorm te brengen. Dus na het bevochtigen leg je het werk in de juiste afmetingen tussen de handdoeken en dan laat je het drogen.
31.07.2018 - 11:46
![]() Centientje wrote:
Centientje wrote:
Ik ga beginnen aan de mouw, maar, waar moet ik na de 6 lossen insteken? (Haak de eerste toer als volgt aan de verkeerde kant: Haak 6 losse l, haak 1 v/stk in elke st op de mouw als hiervoor en eindig toer met 8 l, keer het werk.)
21.07.2018 - 15:24DROPS Design answered:
Dag Centientje, De 6 lossen komen onder de mouw, dus onder de oksel, zeg maar. Na de 6 lossen begin je de eerste steek aan het begin van de mouw, dus in de overgang tussen mouw en lijf.
22.07.2018 - 11:55Van Staden wrote:
Thank you
22.05.2017 - 15:09Van Staden wrote:
I'm assuming the size worked in the picture on this pattern is a small size which i'm noticing more or less 5 A2 patterns worked. Would like to know if my calculations are correct? Is it possible to also attach a picture of the back part. Thank you Nina
22.05.2017 - 13:27DROPS Design answered:
Dear Mrs Van Staden, back piece looks as front piece - you should have also 23 rows worked in A.2 (as for the raglan inc), ie 1 time rows 1-5 + 4 times rows 2-5 + 1 time rows 2-3. Happy crocheting!
22.05.2017 - 15:06
|
|||||||||||||||||||
Sweet Indigo |
|||||||||||||||||||
|
|
|||||||||||||||||||
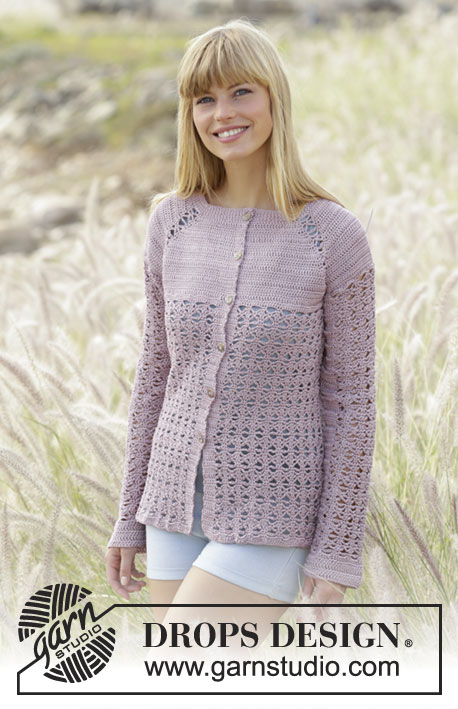
Crochet DROPS jumper with raglan, lace pattern and button band mid back on yoke, worked top down in ”Cotton Viscose”. Size: S - XXXL.
DROPS Extra 0-1295 |
|||||||||||||||||||
|
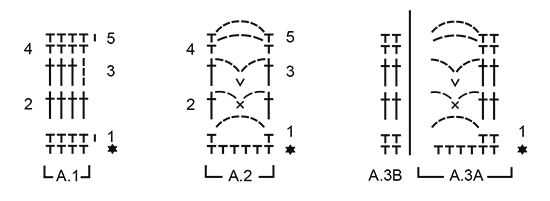
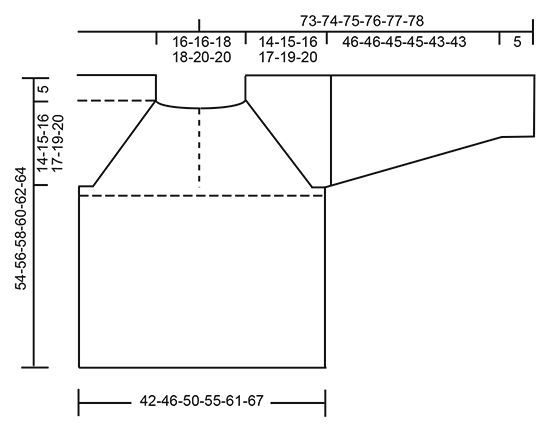
CROCHET INFO: Replace first dc at beg of every dc row with 3 ch. At beg of every sc row beg with 1 ch - this ch DOES NOT replace first sc. At the end of every row with sc or dc work last sc/dc in first sc or in 3rd ch from beg of previous row (depending on whether previous row was sc or dc). At beg of every dc round, replace first dc with 3 ch and finish round with 1 sl st in 3rd ch. At beg every round with sc beg with 1 ch (this ch does NOT replace first sc), finish round with 1 sl st in 1st ch. PATTERN: See diagrams A.1 to A.3. When rows/rounds 1-5 has been worked 1 time, repeat rows/rounds 2-5 onwards. INCREASE TIP: Inc 1 st by working 2 sc/dc in same st. DECREASE TIP: Work 1 sc/dc but wait with last YO and pull through (= 2 sts on hook), then work next sc/dc but on last pull through, pull YO through all sts on hook = 1 sc/dc dec. ----------------------------------------------------------- JUMPER: The piece is worked top down. Worked back and forth from mid back. YOKE: Work 134-134-147-147-158-158 ch on hook size 3.5 mm/E/4 with Cotton Viscose. Work first row as follows from WS: Work 1 sc in 2nd ch from hook - READ CROCHET INFO, * skip ch 1, 1 sc in each of the next 3 ch *, repeat from *-* until 0-0-1-1-0-0 ch remains and finish with 1 sc in each of the last 0-0-1-1-0-0 ch = 100-100-110-110-118-118 sc (includes 4 sc in each side towards mid back for band). Work 1 row with 1 sc in every st from previous row. Work 1 row sc from WS while inc 24-24-22-22-22-22 sc evenly – READ INCREASE TIP = 124-124-132-132-140-140 sc on row – NOTE: Do not inc over the outermost 4 sc in each side. READ ALL OF THE FOLLOWING SECTION BEFORE CONTINUING AND REMEMBER THE CROCHET GAUGE! Work next row as follows from RS: Work A.1 over the first 17-17-19-19-21-21 sc (the first 4 sts at beg of row = band), work 2 sc in each of the next 2 sc (= raglan inc), work A.2 over the next 6 sts (i.e. 1 sc in first sc, ch 6, skip 4 sc, 1 sc in next sc) (= half back piece), work 2 sc in next st, 1 sc in each of the next 14 sc, 2 sc in next sc (= sleeve), A.2 over the next 6 sc, 2 sc in each of the next 2 sc, 1 sc in each of the next 26-26-30-30-34-34 sc, 2 sc in each of the next 2 sc (= front piece), A.2 over the next 6 sc, 2 sc in next sc, 1 sc in each of the next 14 sc, 2 sc in next sc (= sleeve), A.2 over the next 6 sts, 2 sc in each of the next 2 sc, 1 sc in each of the last 17-17-19-19-21-21 sc (= half back piece, the last 4 sc at the end of row = band), turn piece – NOTE: Count inc on this row with total no of raglan inc. Continue back and forth with A.1 over sleeves, front and back piece (i.e. 2 rows dc, 2 rows sc) and A.2 in each transition between body and sleeves (when 1st-5th row have been worked 1 time, repeat 2nd-5th row). AT THE SAME TIME inc for raglan every row as follows - NOTE: Inc differently on body and sleeves: RAGLAN INC ON FRONT AND BACK PIECE: Inc 2 sts before/after A.2 on front and back piece by working 2 dc/sc in each of the last 2 sc/dc before/after A.2 on front and back piece. Repeat inc with 2 dc before/after A.2 (= 8 sts inc) on every row 3-6-6-11-13-18 times in total (includes first raglan inc). Then inc 1 st before/after A.2 by working 2 dc/sc in sc/dc before/after A.2 on front and back piece. Repeat inc with 1 st before/after A.2 (= 4 sts inc) on every row 16-15-17-13-13-10 times in total. RAGLAN INC ON SLEEVES: Inc 1 st before/after A.2 in each side on sleeves by working 2 dc/sc in dc/sc before/after A.2 on sleeves. Repeat inc with 1 st on every row 19-21-23-24-26-28 times in total (includes first raglan inc). TRANSITION FROM A.2 TO SC/DC: AT THE SAME TIME on last row with inc work 6 sc/dc over A.2 instead of A.2 in every transition between body and sleeves (adjust according to pattern A.1). After last inc, there are 288-316-340-368-400-436 sts on row. Work next row as follows from RS: Work 1 sc/dc as before in each of the first 44-49-53-59-65-72 sts (= half back piece), skip the next 60-64-68-70-74-78 sts (= sleeve), work 12 ch, work 1 sc/dc as before in each of the next 80-90-98-110-122-136 sts (= front piece), skip the next 60-64-68-70-74-78 sts (= sleeve), work 12 ch and work 1 sc/dc as before in each of the last 44-49-53-59-65-72 sts (= half back piece) = 192-212-228-252-276-304 sts on row. Then finish body and sleeves separately. Fasten off. BODY: Insert 1 marker on row – NOW MEASURE PIECE FROM HERE. Now work in the round. Beg 4 sts in from one side of button band. The first 4 sts are no longer worked. Work 1 round sc/dc as before with 1 sc/dc in every st and 12 sc/dc around ch-space under each sleeve AT THE SAME TIME inc 22-20-22-22-22-24 sts evenly until 4 sts remain, skip these sts = 210-228-246-270-294-324 sts on round. Then work pattern in the round according to diagram A.3, i.e. work as follows: ROUND 1: Work * 1 sc in each of the first/next 2 sts, ch 6, skip 4 sts *, repeat from *-* the entire round. ROUND 2: Work * 1 dc in each of the first/next 2 sc, ch 2, 1 sc around ch-space, 2 ch *, repeat from *-* the entire round. ROUND 3: Work * 1 dc in each of the first/next 2 dc, ch 3, 1 sl st in sc, 3 ch *, repeat from *-* the entire round. ROUND 4: Work * 1 sc in each of the first/next 2 dc, 4 ch *, repeat from *-* the entire round. ROUND 5: Work * 1 sc in each of the first/next 2 sc, 6 ch *, repeat from *-* the entire round. Continue pattern like this according to diagram A.3 (repeat rounds 2-5 in diagram). When piece measures approx. 34-35-36-37-37-38 cm / 13½"-13¾"-14¼"-14½"-14½"-15" from under sleeve - finish after 4th or 5th round in pattern, work 1 round with dc, i.e. work 1 dc in every sc from previous round and 4 dc around every ch-space. Work 1 round sc with 1 sc in every dc. Cut the yarn, piece measures approx. 54-56-58-60-62-64 cm / 21¼"-22"-22¾"-23⅝"-24⅜"-25¼" from shoulder and down. SLEEVE: = 60-64-68-70-74-78 sts. Worked in the round. Insert 1 marker on round – NOW MEASURE PIECE FROM HERE. Insert 1 marker mid under sleeve. Move the marker upwards when working. Work first round as follows: Work 6 loose ch, work 1 sc/dc in every st on sleeve as before and finish round with ch 6, finish with 1 sl st in first ch on round. Work 1 dc in each of the first ch 6, 1 dc in every dc from previous round AT THE SAME TIME inc 0-0-0-0-4-4 dc evenly and work 1 dc in each of the last 6 ch = 72-76-80-82-90-94 dc on round. Then work pattern according to diagram A.3 as follows: (Work dc as first st in A.3B), work 11-13-12-13-14-16 dc, work A.3A until 13-15-14-15-16-18 sts remain on round, work A.3B and finish with 1 dc in each of the last 11-13-12-13-14-16 sts. Continue pattern like this according to diagram A.3 (repeat rounds 2-5). READ ALL OF THE FOLLOWING SECTION BEFORE CONTINUING! AT THE SAME TIME on 2nd round dec 1 st in each side by working the first 2 dc on round tog 2 by 2 and the last 2 dc on round tog 2 by 2 – READ DECREASE TIP. Repeat dec 11-13-12-13-14-16 times in total in each side on alternately every 4th and 5th round = 50-50-56-56-62-62 dc. Work A.3 until sleeve measures approx. 46-46-45-45-43-43 cm / 18"-18"-17¾"-17¾"-17"-17" from marker – finish after 4th or 5th round in pattern (NOTE: Shorter measurements in the larger sizes because of longer yoke). Approx. 5 cm / 2" remain until finished measurements, try the jumper on for correct sleeve length. Then work dc in the round over all sts - NOTE: Work 1 dc in every sc and 4 dc around every ch-space. When edge with dc measures 5 cm / 2" and sleeve measures approx. 51-51-50-50-48-48 cm / 20"-20"-19¾"-19¾"-19"-19" from armhole, cut the yarn. Work the other sleeve the same way. NECK EDGE: Beg mid back. Work 1 sc in every sc from ch-row. NOTE: Do not work in ch not worked on first row = 100-100-110-110-118-118 sc. ASSEMBLY: Sew the openings under the sleeves. Sew on buttons, top button approx. 2 cm / ¾" from neck, place the other buttons evenly down band (button through dc on band). Place the left band behind the right band on mid back and fasten. |
|||||||||||||||||||
Diagram explanations |
|||||||||||||||||||
|
|||||||||||||||||||
 |
|||||||||||||||||||
 |
|||||||||||||||||||
Have you finished this pattern?Tag your pictures with #dropspattern or submit them to the #dropsfan gallery. Do you need help with this pattern?You'll find 15 tutorial videos, a Comments/Questions area and more by visiting the pattern on garnstudio.com. © 1982-2026 DROPS Design A/S. We reserve all rights. This document, including all its sub-sections, has copyrights. Read more about what you can do with our patterns at the bottom of each pattern on our site. |
|||||||||||||||||||


With over 40 years in knitting and crochet design, DROPS Design offers one of the most extensive collections of free patterns on the internet - translated to 17 languages. As of today we count 324 catalogs and 12290 patterns - 12280 of which are translated into English (US/in).
We work hard to bring you the best knitting and crochet have to offer, inspiration and advice as well as great quality yarns at incredible prices! Would you like to use our patterns for other than personal use? You can read what you are allowed to do in the Copyright text at the bottom of all our patterns. Happy crafting!
Post a comment to pattern DROPS Extra 0-1295
We would love to hear what you have to say about this pattern!
If you want to leave a question, please make sure you select the correct category in the form below, to speed up the answering process. Required fields are marked *.