
Popular categories
Looking for a yarn?


Comments / Questions (20)
![]() Karin wrote:
Karin wrote:
Bonjour J'ai un problème au niveau de 27 cm vous dites tricoter les jetés en maille torse au rang suivant faut il tricoter ainsi sur toute la ligne ou pour tout le reste de l'ouvrage Merci pour votre réponse
03.02.2026 - 11:36DROPS Design answered:
Bonjour Karin, vous pensez aux augmentations faites sur les côtés du gilet à 27 cm de hauteur, exact? Si tel est bien le cas alors, seuls ces jetés sont tricotés torse. Les jetés des diagrammes sont à tricoter comme avant. Bon tricot!
03.02.2026 - 17:47
![]() Cristiana wrote:
Cristiana wrote:
Buongiorno. Sto iniziando il motivo traforato, nel primo giro di A1a e A1b , ci sono due diminuzioni ma non c'è il gettato corrispondente. Questo vuol dire che alla fine del motivo in verticale ci saranno 18 diminuzioni? Ho capito bene? grazie.
25.11.2025 - 18:16DROPS Design answered:
Buongiorno Cristiana, si, il motivo A.1a e b iniziano con 10 maglie e finiscono con 9. Buon lavoro!
17.01.2026 - 11:11
![]() Antje wrote:
Antje wrote:
Hallo! Ich stricke GrößeL/XL und bin jetzt in der 1. Reihe von A1b, ganz am Anfang. Wenn ich da wie gezeichnet 1 Umschlag und dann 4 Maschen (!) stricke, sind die danach zusammengestrickten 2 Maschen zu denen zusammengestrickten 2 Maschen in der Reihe A1a um eine Masche nach links versetzt, es gibt also nicht diese verbundene Linie, die ja zu dem Muster gehört bzw. das Muster bildet. Ist das verständlich? Ich hoffe. Bitte um Aufklärung. Lieben Dank Antje
14.06.2024 - 20:50DROPS Design answered:
Liebe Antje, A.1a wird nur einmal gestrickt, dann A.1b wird wiederholt, so sollte man das nicht sehen. Viel Spaß beim Stricken!
17.06.2024 - 07:46
![]() Perrine wrote:
Perrine wrote:
Bonjour, Pour tricoter le diagramme de la partie devant et dos, j'ai tricoté A1a à A4a 1 fois en hauteur (=2 rangs) puis A1b à A4b sur les 8 rangs suivants (taille M). Je ne sais pas s'il faut continuer en répétant uniquement les 8 rangs A1b à A4b pour la suite ou bien est-ce qu'il faut répéter la totalité du diagramme à chaque fois soit a puis B (10 rangs) de A1, A2, A3 et A4 ? Merci de m'aider.
14.07.2021 - 17:19DROPS Design answered:
Bonjour Perrine, vous devez maintenant uniquement répéter la partie b des diagrammes (dans la partie a, on a diminué des mailles pour préparer les diagrammes b). autrement dit, quand les diagrammes b sont terminés, reprenez au 1er rang de la partie b et répétez ainsi ces 8 rangs. Bon tricot!
15.07.2021 - 09:29
![]() Małgorzata wrote:
Małgorzata wrote:
Witam sweter jest w rozmiarze XXL i jak przerabiam pierwszy rząd zostaje mi 8 oczek
19.08.2019 - 19:01DROPS Design answered:
Witaj Małgorzato! Przepraszam za tak późną odpowiedź. Jeśli będziesz w przyszłości miała pytania, proszę zaznacz w formularzu PYTANIE, a nie KOMENTARZ, wtedy odpowiemy w przeciągu 2-3 dni. W rozmiarze XXL masz na początku 302 oczka, w rzędzie w którym umieszczasz markery jest ich tyle samo. Być może w którymś miejscu pomylił ci się rozmiar (dla XXL zawsze bierz przedostatnią cyfrę). A propos, czy już zagłosowałaś na nową kolekcję DROPS Jesień/Zima, zapraszamy serdecznie!
07.06.2020 - 22:24
![]() Małgorzata wrote:
Małgorzata wrote:
Witam mam problem ze wzorem zostają mi oczka i nie wiem co robie źle
17.08.2019 - 06:34DROPS Design answered:
Witaj Małgosiu! Jaki rozmiar wykonujesz i w którym miejscu we wzorze się znajdujesz? Dokładniej opisz problem. Pozdrawiamy
19.08.2019 - 16:20
![]() Milada wrote:
Milada wrote:
Zdravím, děkuji za tento krásný model, mám dotaz: šálový límec se plete na jehlicích č. 3,5 nebo jehlicích č. 4? Děkuji za odpověď.
11.06.2019 - 08:26DROPS Design answered:
Dobrý den, Milado, šálový límec pleteme na jehlicích č.3,5. Hodně zdaru! Hana
06.12.2019 - 17:26
![]() Marie wrote:
Marie wrote:
What is the gauge for this sweater??
10.10.2018 - 18:53DROPS Design answered:
Dear Marie, you'll find the gauge in the Header: 21 sts x 28 rows in stockinette stitch = 4"x4" with needle size 4 mm and 22 sts x 30 rows in stockinette stitch = 4"x4" with needle size 3,5 mm. Happy knitting!
11.10.2018 - 08:52Mrs J Clemett wrote:
Thank you. Thought the p1 was part of the first set of numbers! Love the yarn, it's lovely to work with.
05.12.2016 - 12:10
![]() Julie Clemett wrote:
Julie Clemett wrote:
The beginning of the lace pattern doesn't seem to add up. I'm making the XL size and I have 60 stitches on each front and 110 for the back. The pattern says to knit 5sts garter, plus 11 for the first lace panel then 3 times 12sts of the second panel then 4sts of purl. That's 56 sts. 2 of those sts are supposed to be past the marker? That's 6sts I'm out. Can you help me please?
03.12.2016 - 22:30DROPS Design answered:
Dear Mrs Clemett, you are working 5 sts in garter st, A.1a = 11 sts, then work A.1b over the next 36 sts, P1 = 53 sts, ie 7 sts left before marker on the side. Work now 14 sts in stocking st = 7 sts to marker + 7 sts past marker. Happy knitting!
05.12.2016 - 09:17
|
||||||||||||||||
Cornfield#cornfieldcardigan |
||||||||||||||||
|
|
||||||||||||||||
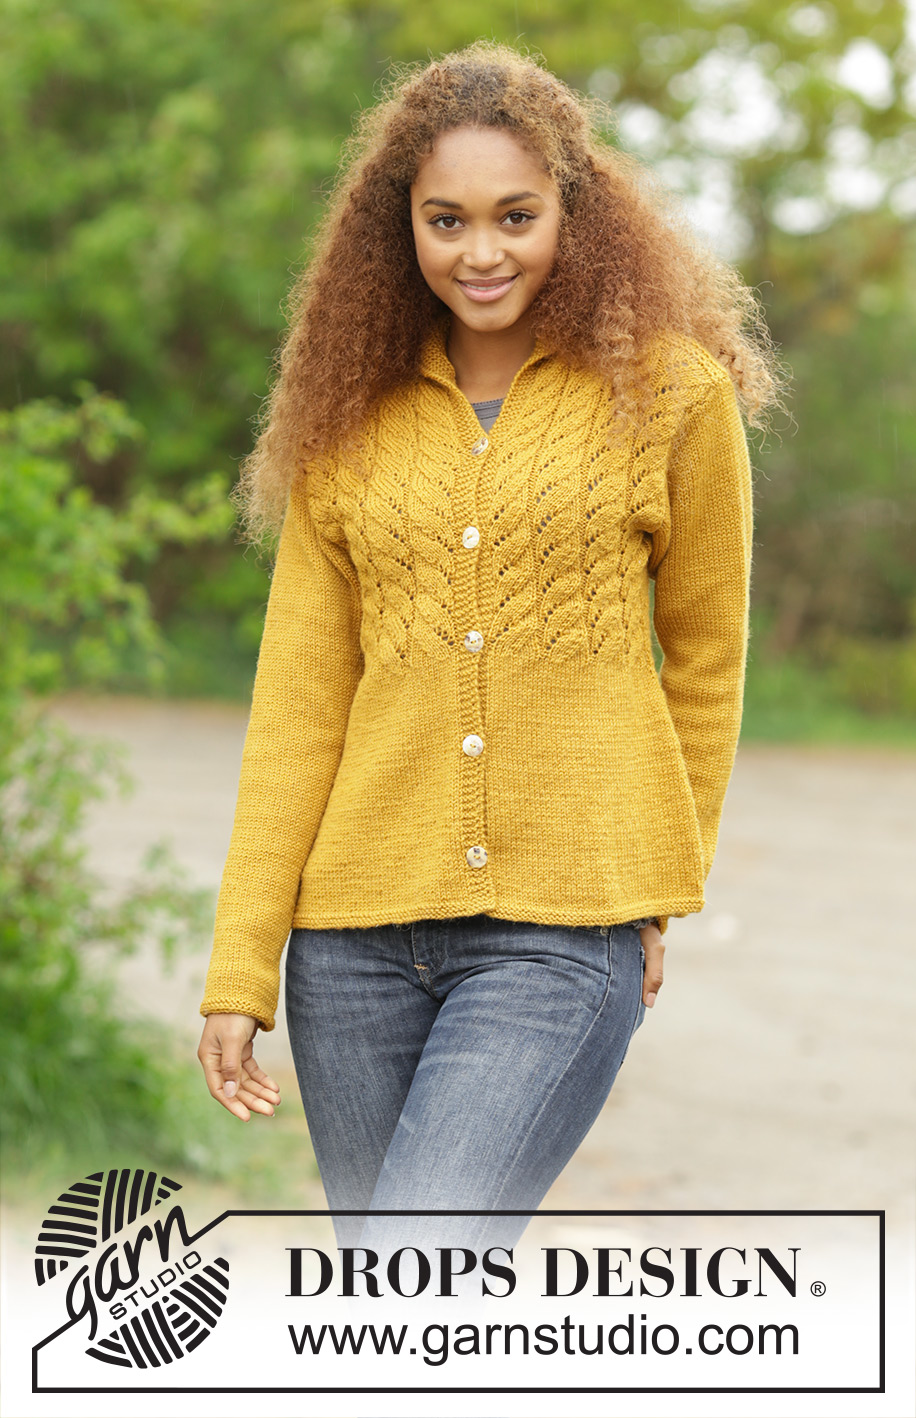
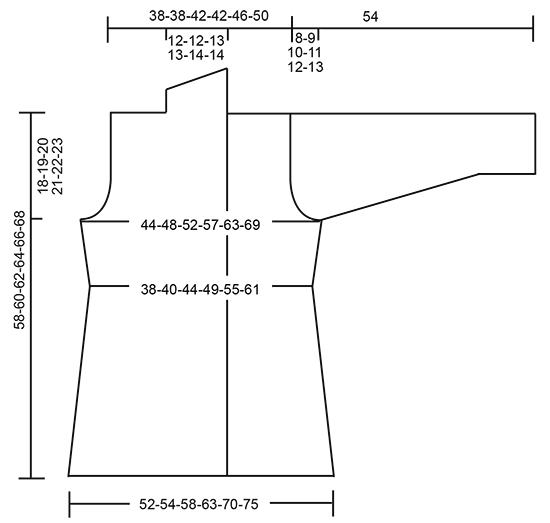
Knitted DROPS jacket with lace pattern and shawl collar in ”Karisma”. Size: S - XXXL.
DROPS 173-13 |
||||||||||||||||
|
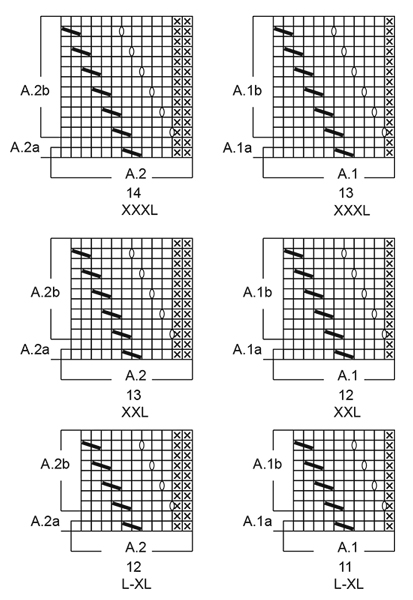
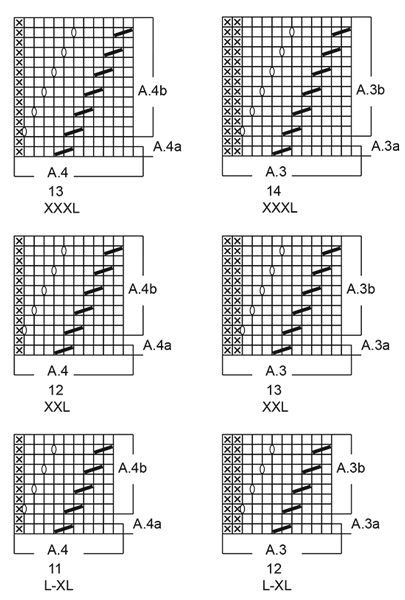
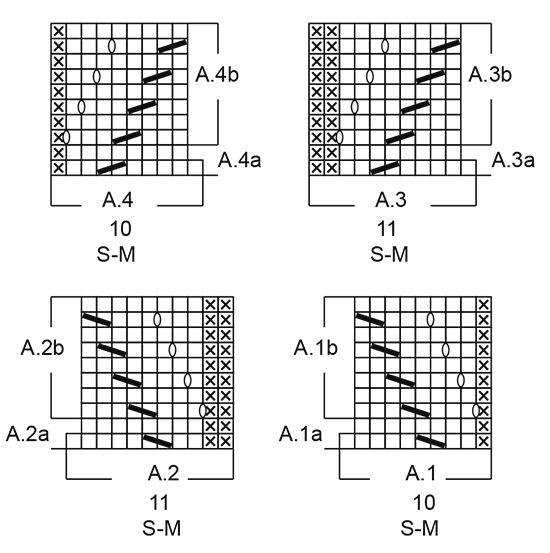
GARTER ST (worked in the round): 1 ridge = 2 rounds. * K 1 round and P 1 round *, repeat from *-*. GARTER ST (back and forth): K all rows. 1 ridge = K2 rows. PATTERN: See diagrams A.1 to A.4. The diagrams show all rows in pattern seen from RS. See diagram for correct size. DECREASE TIP: All dec are done from RS! Work until 3 sts remain before marker, K 2 tog (= 1 st dec), K 2 (marker is in the middle of these 2 sts), slip 1 st as if to K, K 1, psso (= 1 st dec). INCREASE TIP: Work until 1 sts remain before marker in the side, 1 YO, work 2 sts in stockinette st (marker is in the middle of these sts), 1 YO (= 2 sts inc). Work YO twisted on next row to avoid holes. BUTTONHOLES: Dec for buttonholes on right band. 1 buttonhole = K tog second and third st from edge and make 1 YO. Dec for buttonholes when piece measures: SIZE S: 6, 15, 24, 33 and 42 cm SIZE M: 7, 16, 25, 34 and 43 cm SIZE L: 6, 14, 22, 30, 38 and 46 cm SIZE XL: 7, 15, 23, 31, 39 and 47 cm SIZE XXL: 6, 15, 24, 33, 41 and 49 cm SIZE XXXL: 8, 17, 26, 34, 42 and 50 cm ---------------------------------------------------------- JACKET: Worked back and forth on needle. BODY: Cast on 230-238-254-274-302-326 sts (includes 5 band sts in each side of piece) on circular needle size 3.5 mm / US 4 with Karisma. Work 2 ridges in GARTER ST - see explanation above. Switch to circular needle size 4 mm / US 6. On next row insert 2 markers in the piece as follows: Work 5 band sts in garter st, 55-57-61-66-73-79 sts in stockinette st, insert 1 marker (= right front piece), 110-114-122-132-146-158 sts in stockinette st (= back piece), insert 1 marker, 55-57-61-66-73-79 sts in stockinette st, finish with 5 band sts in garter st (= left front piece). REMEMBER THE KNITTING GAUGE Work band sts in garter st until finished measurements. Remember BUTTONHOLES - see explanation above. When piece measures 7 cm / 2¾", dec 1 st on each side of each markers (= 4 sts dec) - READ DECREASE TIP! Dec like this every 1½ cm / ½" 11 times in total = 186-194-210-230-258-282 sts. When piece measures 25 cm / 9¾", work next row from RS as follows: Work 5 band sts in garter st, * A.1a (= 10-10-11-11-12-13 sts), repeat A.2a (= 11-11-12-12-13-14 sts) 3 times in total in width (= 33-33-36-36-39-42 sts), P 1, 0-4-4-14-20-24 sts in stockinette st (marker is in the middle of these sts), P 1, repeat A.3 (= 11-11-12-12-13-14 sts) 3 times in total in width (= 33-33-36-36-39-42 sts), A.4 (= 10-10-11-11-12-13 sts) *, repeat from *-* 2 times in total, finish with 5 band sts in garter st. When A.1a to A.4a have been worked 1 time vertically, there are 170-178-194-214-242-266 sts. Then work A.1b to A.4b over A.1a to A.4a vertically. When piece measures 27 cm / 10½", inc 1 st on each side of each marker (= 4 sts inc) - READ INCREASE TIP! Inc like this every 2-1½-1½-1½-2-2 cm / ¾"-½"-½"-½"-¾"-¾" 6-8-9-9-8-8 times in total = 194-210-230-250-274-298 sts. P YOs twisted on next row, they should not make holes. Then work these sts in stockinette st. When piece measures 40-41-42-43-44-45 cm / 15¾"-16⅛"-16½"-17"-17¼"-17¾", bind off for armholes on next row from RS as follows: Work 48-52-57-61-67-73 sts (includes band sts = right front piece), bind off the next 6-6-6-8-8-8 sts (= 3-3-3-4-4-4 sts on each side of marker), work 86-94-104-112-124-136 sts (= back piece), bind off the next 6-6-6-8-8-8 sts (= 3-3-3-4-4-4 sts on each side of marker), work the remaining 48-52-57-61-67-73 sts (includes band sts = left front piece) = 48-52-57-61-67-73 sts on each front piece and 86-94-104-112-124-136 sts on back piece. LEFT FRONT PIECE: = 48-52-57-61-67-73 sts. Continue working pattern as before and bind off for armhole at beg of every row from RS as follows: bind off 3 sts 0-0-0-0-1-1 time in total, 2 sts 0-2-2-4-4-4 times in total, and then 1 st 2-2-3-3-2-4 times in total = 46-46-50-50-54-58 sts. Work next row as follows from RS: K 1, P 1, A.3 a total of 3 times in width as before, A.4 over the next 9-9-10-10-11-12 sts as before and finish with 5 band sts in garter st. Continue pattern like this. When piece measures 57-59-61-63-65-67 cm / 22½"-23¼"-24"-24¾"-25½"-26⅜" (adjust so that next row is from RS), switch to circular needle size 3.5 mm / US 4 and work 1 ridge over all sts. On next row from RS bind off the first 28-29-31-31-34-38 sts for shoulder = 18-17-19-19-20-20 sts remain for shawl collar. Work short rows over the remaining sts (= for shawl collar), beg mid front (1st row = WS) as follows: * Work 2 rows back and forth over the first 11-10-12-12-13-13 sts, work 2 rows back and forth over all sts *, repeat from *-* until shawl collar measures 8-8-9-9-10-10 cm / 3⅛"-3⅛"-3½"-3½"-4"-4" at the shortest. Bind off. RIGHT FRONT PIECE: Work and bind off as left front piece but reversed. I.e. Bind off for armhole at beg of row from WS. Work pattern A.1 instead of A.4 and A.2 instead of A.3. Shawl collar beg from RS. BACK PIECE: = 86-94-104-112-124-136 sts. Continue working pattern as before and bind off for armhole at beg of every row in each side of piece as follows: bind off 3 sts 0-0-0-0-1-1 time in total, 2 sts 0-2-2-4-4-4 times in total, and then 1 st 2-2-3-3-2-4 times in total = 82-82-90-90-98-106 sts. Work next row as follows from RS: Work 1 st in stockinette st, P 1, repeat A.3 a total of 3 times in width as before, A.4 over the next 9-9-10-10-11-12 sts as before, A.1 over the next 9-9-10-10-11-12 sts as before, repeat A.2 a total of 3 times in width as before, finish with P 1 and 1 st in stockinette st. When piece measures 56-58-60-62-64-66 cm / 22"-22¾"-23⅝"-24⅜"-25¼"-26", bind off the middle 24-24-26-26-28-28 sts = 29-29-32-32-35-39 sts on each shoulder. Now finish each shoulder separately. On next row from the neck, bind off 1 st = 28-29-31-31-34-38 sts remain on shoulder. Continue to work P over P and pattern, work the repetitions that do not fit pattern in stockinette st. When piece measures 57-59-61-63-65-67 cm / 22½"-23¼"-24"-24¾"-25½"-26⅜", switch to circular needle size 3.5 mm / US 4. Work 1 ridge in garter st over all sts. Bind off. Work the other shoulder the same way. Piece measures 58-60-62-64-66-68 cm / 22¾"-23⅝"-24⅜"-25¼"-26"-26¾" in total. SLEEVE: Worked in the round on double pointed needles. Cast on 42-44-46-48-50-52 sts on double pointed needles size 3.5 mm / US 4 with Karisma. Work 2 ridges in GARTER ST - see explanation above. Switch to double pointed needles size 4 mm / US 6. Work in stockinette st. Insert 1 marker at the beg of the round. When piece measures 10-8-6-10-10-7 cm / 4"-3"-2¼"-4"-4"-2¾", inc 1 st on each side of marker (= 2 sts inc). Inc like this every 2-2-2-1½-1½-1½ cm / ¾"-¾"-¾"-½"-½"-½" 17-18-19-20-21-22 times in total = 76-80-84-88-92-96 sts. When piece measures 46-45-44-43-42-41 cm / 18"-17¾"-17¼"-17"-16½"-16" (shorter measurements in the larger sizes because of longer sleeve cap and wider shoulders), bind off for sleeve cap at beg of every row in each side as follows: bind off 3-3-3-4-4-4 sts 1 time, 2 sts 3 times and 1 st 6 times, then bind off 2 sts in each side until piece measures 53 cm / 21"", then bind off 3 sts 1 time in each side. Bind off the remaining sts, the piece measures 54 cm / 21¼". Make another sleeve. ASSEMBLY: Sew the shoulder seams. Sew the collar tog mid back and sew it to the neckline. Sew in sleeves. Sew the buttons on to the left band. |
||||||||||||||||
Diagram explanations |
||||||||||||||||
|
||||||||||||||||
 |
||||||||||||||||
 |
||||||||||||||||
 |
||||||||||||||||
 |
||||||||||||||||
Have you finished this pattern?Tag your pictures with #dropspattern #cornfieldcardigan or submit them to the #dropsfan gallery. Do you need help with this pattern?You'll find 23 tutorial videos, a Comments/Questions area and more by visiting the pattern on garnstudio.com. © 1982-2026 DROPS Design A/S. We reserve all rights. This document, including all its sub-sections, has copyrights. Read more about what you can do with our patterns at the bottom of each pattern on our site. |
||||||||||||||||


With over 40 years in knitting and crochet design, DROPS Design offers one of the most extensive collections of free patterns on the internet - translated to 17 languages. As of today we count 324 catalogs and 12291 patterns - 12281 of which are translated into English (US/in).
We work hard to bring you the best knitting and crochet have to offer, inspiration and advice as well as great quality yarns at incredible prices! Would you like to use our patterns for other than personal use? You can read what you are allowed to do in the Copyright text at the bottom of all our patterns. Happy crafting!
Post a comment to pattern DROPS 173-13
We would love to hear what you have to say about this pattern!
If you want to leave a question, please make sure you select the correct category in the form below, to speed up the answering process. Required fields are marked *.