Comments / Questions (108)
![]() Courtney wrote:
Courtney wrote:
I'm confused by the short rows. Charts A.5 through A.8 have 8 rows with 20 increases. If I'm reading this correctly, you work 5 short rows (10 rows total): Work 24 sts less for row 1, turn, 24 sts less for row 2, turn, 6 sts less for rows 3-4, 4 sts less for 1-6 leaving you with 209 total sts on the WS. If you turn at this point, you are not at the shoulder. If you add more rows, the st count if off. Do you turn after the final short row on the WS or keep going in pattern to the shoulder?
02.04.2019 - 20:28DROPS Design answered:
Dear Courtney, sorry for late answer. The last short row will be worked from WS, then turn and work next row from RS to the end of the row, turn, work next row from WS to the other end of the row (= all stitches), and work now next row from RS (= from shoulder). Happy knitting!
16.05.2019 - 11:34
![]() Arlette Dufour wrote:
Arlette Dufour wrote:
Je voudrais savoir il n'a pas une erreur car je fait le devant=123m puis aug 8 m de chaque coté pour les épaules j'ai 139m et vous dite =165m le même que le dos qui a un dessin de plus pouvais vous m'expliquer je vous remercie Mme dufour
21.03.2019 - 08:07DROPS Design answered:
Bonjour Mme Dufour, on a 163 mailles quand A.2, A.3 et A.4 sont terminés et que les 8 m ont été montées de chaque côté= on augmente 5 m dans A.2 et dans A.4 et 16 m dans A.3, soit 123+5+5+16+8+8= 165 m. Bon tricot!
21.03.2019 - 09:58
![]() Claudia wrote:
Claudia wrote:
Salve,grazie mille per i meravigliosi modelli che ci offrite, come questo che sto lavorando.dopo aver lavorato le 24 maglie ai ferri accorciati, cosa significa lavorare 6 maglie in meno per ogni giro. si intende 6 maglie in meno dalle 24 precedenti? Grazie, e buon lavoro!
18.03.2019 - 11:33DROPS Design answered:
Buongiorno Claudia. Deve lavorare 6 maglie in meno rispetto alle maglie lavorate la volta precedente. Buon lavoro!
18.03.2019 - 12:03
![]() Diana wrote:
Diana wrote:
Liebes DROPS-Team, ich stricke das Vorterteil in Größe M und stecke an der letzten verkürzten Reihe fest. Ich habe auf einer Seite bereits die 2 Reihen um 6M verkürzt gestrickt. Wenn ich die letzten 6M (nin in einer Hin-R) nun verkürzt stricken will, wo wende ich dann? Auf der Seite, auf der ich wenden muß, habe ich ja bereits 2x 6M verkürzt. Wende ich nochmal an der gleichen Stelle (d.h. über der gleichen M) wie die Reihe zuvor? Dann entsteht allerdings ein ziemlich großes Loch.
11.02.2019 - 20:49DROPS Design answered:
Liebe Diana, wenn Sie die 26 + 6 + 6 M auf beiden Seiten stillgelegt haben, wenden Sie und stricken 1 Reihe bis zur Ende (= über alle Maschen auf eine Seite), wenden und stricken jetzt die Rückreihe bis zur Ende der Reihe = die nächste Reihe beginnt jetzt am Schulter. Viel Spaß beim stricken!
12.02.2019 - 09:03
![]() Carina Ardrot wrote:
Carina Ardrot wrote:
Efter A1, när jag nu ska sticka A2,3,4 ska jag fortfarande sticka de tre första räta m på varje sida? De har ju inte varit med på mönstret på A1 men skulle ändå göras. Alltså gäller samma sak när man stickar A2,3,4?
11.02.2019 - 16:14DROPS Design answered:
Hei Carina. Nei, det strikkes ikke rettmasker i endene når du strikker A.2-A.-4. Om du legger sammen de 3 masketallene for hvert diagram får du alle maskene på pinnene. Hvis du strikker størrelse L feks: A.2 over 42 masker + A.3 over 39 masker + A.4 over 42 makser = 123 masker. Det er så mange masker du har på pinnen. Når du skal strikke A.5-A.7 derimot, står det at du skal strikke 1 maske rettstrikk i hver side. God fornøyelse.
13.02.2019 - 13:25
![]() Carina Ardrot wrote:
Carina Ardrot wrote:
Jag saknar A11
24.01.2019 - 08:04DROPS Design answered:
Hei Carina. A.11 ligger helt på toppen midt mellom de 2 trekantdiagrammene for A.1. God fornøyelse.
24.01.2019 - 14:21
![]() Elke Patt wrote:
Elke Patt wrote:
Ich habe einige Abläufe gebraucht und auch öfter aufgemacht, aber die Arbeit hat sich gelohnt. Super schönes Top. Ganz raffiniertes Muster!
11.11.2018 - 11:43
![]() Berit wrote:
Berit wrote:
Ich bin am verzweifeln. Stricke den Pullover mit Arm. Bin bei Größe XL A5-A8 3x stricken + 4R von A5-A8. Macht 28 Reihen. Ich soll ab der 2. Reihe verkürzt stricken bis noch 23 M beim glatt re Teil übrig sind dass ist dann immer 1M weniger und schon 30 Reihen. Dann brauche ich bei XL nochmal 4 Reihen. Wo bekomme ich die 6 fehlenden Reihen her? Oder wo ist mein Denkfehler? Vielen Dank.
17.08.2018 - 20:27DROPS Design answered:
Liebe Berit, die Antwort steht oben! :-)
24.08.2018 - 09:55
![]() Berit wrote:
Berit wrote:
Ich bin am verzweifeln. Stricke den Pullover mit Arm. Bin bei Größe XL A5-A8 3x stricken + 4R von A5-A8. Macht 28 Reihen. Ich soll ab der 2. Reihe verkürzt stricken bis noch 23 M beim glatt re Teil übrig sind dass ist dann immer 1M weniger und schon 30 Reihen. Dann brauche ich bei XL nochmal 4 Reihen. Wo bekomme ich die 6 fehlenden Reihen her? Oder wo ist mein Denkfehler? Vielen Dank
17.08.2018 - 20:17
![]() Magliano wrote:
Magliano wrote:
Bonjour, je ne comprends pas le début des explications pour le dos, serai t il possible d en avoir des supplémentaires? Voir une vidéo ou photo? D avance merci
19.07.2018 - 17:55DROPS Design answered:
Bonjour Mme Magliano, le dos se tricote comme le devant, mais cette fois, on commence en rond en répétant A.1 4 fois au total en rond (pas d'encolure V dans le dos), et, après A.1, on continue ensuite en allers et retours. Bon tricot!
20.07.2018 - 14:15
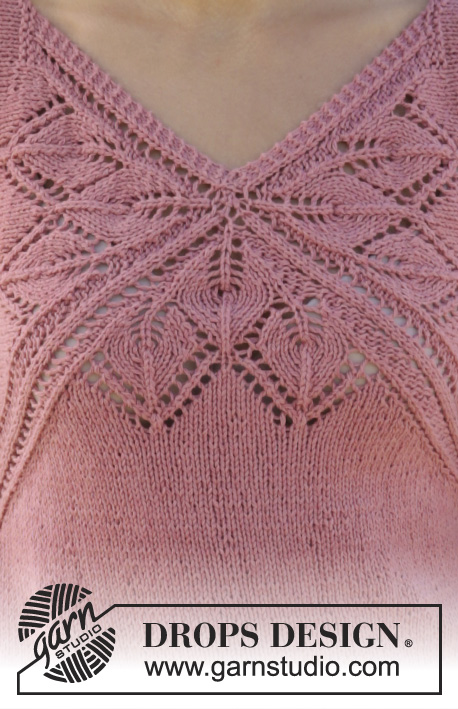
Butterfly Heart Top#butterflyhearttop |
|||||||||||||||||||||||||||||||
 |
 |
||||||||||||||||||||||||||||||
Knitted DROPS top with lace pattern and V-neck in ”Belle”. Worked top down. Size: S - XXXL.
DROPS 170-4 |
|||||||||||||||||||||||||||||||
|
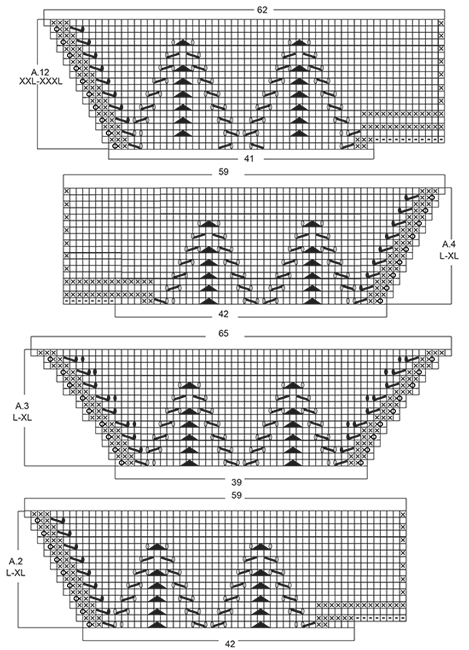
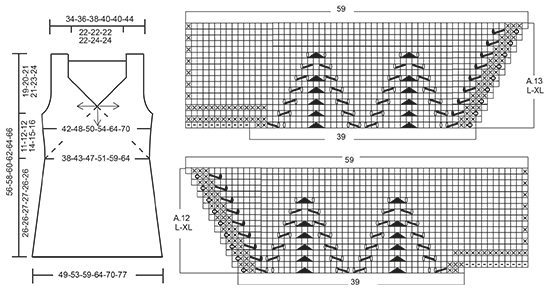
GARTER ST (back and forth): K all rows. 1 ridge = K2 rows. PATTERN: See diagrams A.1 to A.13. The diagrams show all rows in pattern seen from RS. See diagram for correct size. SHORT ROWS: When turning in short rows, slip first st as if to K. Tighten thread and make sure to avoid big holes. INCREASE TIP: All inc are done from RS. Inc 1 st by making 1 YO, on next row P YO twisted to avoid holes. ---------------------------------------------------------- TOP: Work from the middle of V-neck and out in 3 triangles on front piece and 4 triangles on back piece, then work downwards. FRONT PIECE: Work back and forth from neck and down. Cast on 8 sts on circular needle size 4 mm / US 6 with Belle. K 1 row. On next row inc as follows: * K 1, 1 YO *, repeat from *-* until 1 st remains and finish with K 1 = 15 sts on needle. Work next row as follows (from RS): Work YOs from previous row twisted, they should not make holes. Work 3 sts in GARTER ST - see explanation above, A.1, insert 1st marker, A.1, insert 2nd marker, A.1 (= repeat A.1 3 times in total on row), finish with 3 sts in garter st. REMEMBER THE KNITTING GAUGE When A.1 has been worked 1 time vertically, there are 123-123-123-123-129-129 sts on needle. Piece measures approx. 11-11-11-11-12-12 cm / 4½"-4½"-4½"-4½"-4¾"-4¾" from cast-on edge. Work next row as follows from RS: Work A.2 over the first 42-42-42-42-44-44 sts, A.3 over the next 39-39-39-39-41-41 sts and A.4 over the last 42-42-42-42-44-44 sts, after A.4 cast on 8 sts at the end of row for shoulder (see diagram). Work A.4 to A.2 on next row, after A.2 cast on 8 sts at the end of row for shoulder (see diagram). When A.2 to A.4 have been worked 1 time vertically, there are 165-165-183-183-193-193 sts on needle. Piece measures approx. 15-15-17-17-19-19 cm / 6"-6"-6¾"-6¾"-7½"-7½" from cast-on edge. READ ALL OF THE FOLLOWING SECTION BEFORE CONTINUING! WORK PATTERN AS BEFORE WHILE AT THE SAME TIME WORKING SHORT ROWS IN EACH SIDE OF PIECE. PATTERN: Work next row as follows from RS: Work 1 st in garter st, 48-48-52-52-55-55 sts in stockinette st, work A.5 over the next 6 sts, (marker), A.6 over the next 6 sts, 43-43-53-53-57-57 sts in stockinette st, A.7 over the next 6 sts, (marker), A.8 over the next 6 sts, 48-48-52-52-55-55 sts in stockinette st, finish with 1 st in garter st. Repeat A.5 to A.8 over the 6 sts on each side of each marker 2-3-2-3-4-5 times in total, then repeat the first 0-0-6-4-4-4 rows of A.5 to A.8 1 more times. SHORT ROWS: AT THE SAME TIME when 2-6-0-2-0-6 rows of A.5 to A.8 have been worked, work SHORT ROWS - see explanation above - in each side of piece as follows: Work until 26-26-24-23-18-18 sts remain on row (work A.5 to A.8 as before), turn and work until 26-26-24-23-18-18 sts remain, turn piece. Then work short rows in the different sizes as follows: SIZE M: Work 6 sts less for every turn 2 times in each side of piece. SIZE L-XL: Work 6 sts less for every turn 1-2 times in each side of piece, then work 4 sts less on every turn 3-2 times in each side of piece. SIZE XXL-XXXL: Work 6 sts less for every turn 1-1 time in each side of piece, then work 4 sts less for every turn 4-4 times in each side of piece, then work 2 sts less on every turn 4-5 times in each side of piece. ALL SIZES: When the short rows have been worked, work last row from WS, so that next row beg from shoulder. Then work over all sts from RS as follows: Work in garter st over the first 42-44-46-48-50-52 sts AT THE SAME TIME inc 0-2-4-4-6-6 sts evenly, work as before (i.e. A.5 to A.8 and stockinette st) until 42-44-46-48-50-52 sts remain, work in garter st over the last sts AT THE SAME TIME inc 0-2-4-4-6-6 sts evenly (= 42-46-50-52-56-58 sts in garter st in each side of piece). Work 3 rows in garter st over the outermost 42-46-50-52-56-58 sts in garter st in each side of piece, pattern and stockinette st over the remaining sts. On next row from WS work as follows: bind off with K over the first 40-44-48-50-54-56 sts for armhole, work 2 sts in garter st, work in stockinette st and pattern as before until 42-46-50-52-56-58 sts remain, 2 sts in garter st, bind off with K over the last 40-44-48-50-54-56 sts for armhole. Cut the yarn. 8-8-8-12-12-12 rows of A.5 to A.8 remain. Beg next row from RS. Continue to work in garter st over the first and last 2 sts in each side of piece. When A.5 to A.8 have been worked, there are 23-25-26-27-32-34 sts before 1st marker, 79-91-99-107-123-135 sts between 1st and 2nd marker and 23-25-26-27-32-34 sts after 2nd marker = 125-141-151-161-187-203 sts in total on row. Piece measures approx. 21-24-25-27-32-35 cm / 8¼"-9½"-9¾"-10½"-12½"-13¾" on the widest measured from cast-on edge. Insert 1 marker in piece, NOW MEASURE PIECE FROM HERE. On next row from RS loosely bind off the first 22-24-25-26-31-33 sts with K, work 1 edge st in garter st, (marker), work A.9 over the first 6 sts after marker, stockinette st over the next 67-79-87-95-111-123 sts, A.10 over the last 6 sts before second marker, (marker), 1 edge st in garter st, loosely bind off the last 22-24-25-26-31-33 sts = 81-93-101-109-125-137 sts remain on needle. Cut the yarn. Work next row from WS over the remaining sts as follows: 1 edge st in garter st, A.10 as before, stockinette st over the next 67-79-87-95-111-123 sts, A.9 as before, 1 edge st in garter st. When A.9 and A.10 have been worked 1 time vertically, continue in stockinette st with 1 edge st in garter st in each side of piece. When piece measures 3 cm / 1" from marker, inc 1 st in each side of piece inside 1 edge st (= 2 sts inc) - READ INCREASE TIP. Repeat inc every 1½-1½-1½-1-1-1 cm / ½"-½"-½"-⅜"-⅜"-⅜" 12-10-12-14-12-13 times in total = 105-113-125-137-149-163 sts on needle. When piece measures 23-23-24-24-23-23 cm / 9"-9"-9½"-9½"-9"-9" from marker (piece measures 53-55-57-59-61-63 cm / 21"-21⅝"-22½"-23¼"-24"-24¾" in total from shoulder), adjust so that next row is from RS, switch to circular needle size 3.5 mm / US 4. Work next row from RS as follows: Work 1 edge st in garter st, work A.11 (= 2 sts) until 2 sts remain, work first st in A.11, finish with 1 edge st in garter st. On row with holes (i.e. 7th row) work next to last st K. Bind off when A.11 has been worked 1 time vertically. Piece measures 56-58-60-62-64-66 cm / 22"-22¾"-23⅝"-24⅜"-25¼"-26" in total from shoulder. BACK PIECE: Piece is first worked in the round, then worked as front piece. Cast on 6 sts on double pointed needles size 4 mm / US 6 with Belle, switch to circular needle when needed. K 1 row. On next row inc as follows: * K 1, 1 YO *, repeat from *-* = 12 sts on row, K YOs twisted on next row, they should not make holes. Work A.1 4 times in total, insert 1 marker between each A.1 (= 4 markers). When A.1 has been worked 1 time vertically, there are 156-156-156-156-164-164 sts on needle. Continue as follows: A.12 over the first 39-39-39-39-41-41 sts, work A.3 over the next 39-39-39-39-41-41 sts and A.13 over the last 39-39-39-39-41-41 sts, slip the remaining sts on a stitch holder for neck edge (= 39-39-39-39-41-41 sts), after A.13 cast on 11 sts at the end of row for shoulder (see diagram). Then work back and forth on needle. Work A.13/A.3/A.12 on next row, after A.12 cast on 11 sts at the end of row for shoulder (see diagram). When A.12/A.3/A.13 have been worked 1 time vertically, there are 165-165-183-183-193-193 sts on needle. Piece measures approx. 15-15-17-17-19-19 cm / 6"-6"-6¾"-6¾"-7½"-7½" from cast-on edge. Now continue back piece as front piece. NECK EDGE: Worked back and forth on needle. Slip sts from stitch holder for neck edge on back piece back on circular needle size 3.5 mm / US 4. Work 2 ridges. Fasten ridges where sts were cast on for shoulder. Fasten off. ASSEMBLY: Sew the side seams inside 1 edge st in garter st. Sew shoulder seams inside 1 edge st in garter st. Tighten tog the middle (i.e. cast-on edge) on both front and back piece. |
|||||||||||||||||||||||||||||||
Diagram explanations |
|||||||||||||||||||||||||||||||
|
|||||||||||||||||||||||||||||||
 |
|||||||||||||||||||||||||||||||
 |
|||||||||||||||||||||||||||||||
 |
|||||||||||||||||||||||||||||||
 |
|||||||||||||||||||||||||||||||
 |
|||||||||||||||||||||||||||||||
Have you finished this pattern?Tag your pictures with #dropspattern #butterflyhearttop or submit them to the #dropsfan gallery. Do you need help with this pattern?You'll find 22 tutorial videos, a Comments/Questions area and more by visiting the pattern on garnstudio.com. © 1982-2026 DROPS Design A/S. We reserve all rights. This document, including all its sub-sections, has copyrights. Read more about what you can do with our patterns at the bottom of each pattern on our site. |
|||||||||||||||||||||||||||||||


Post a comment to pattern DROPS 170-4
We would love to hear what you have to say about this pattern!
If you want to leave a question, please make sure you select the correct category in the form below, to speed up the answering process. Required fields are marked *.