
Popular categories
Looking for a yarn?


Comments / Questions (174)
![]() Birgit wrote:
Birgit wrote:
Guten Tag .wenn ich nur vor und nach den 11 Raglanmaschen je 1 M zunehme, ergibt das alle 2 Reihen , 4M Zunahmen. Müsste ich nicht irgendwie auf 8 Maschen kommen? Sonst gewinne ich ja nichts für Rücken und Vorderteile.
27.07.2025 - 09:57DROPS Design answered:
Liebe Birgit, die Zunahmen werden beim Rumpfteil und bei den Ärmeln mit einem unterschiedlichen Rythmus gestrickt; dh man kann 8 Maschen (= Rumpfteil/Ärmel in jeder 2. Reihe) oder nur 4 Maschen (wenn man für Rumpfteil in jeder 2. Reihe aber bei den Ärmeln nur in jeder 4. Reihe zunehmen soll). Viel Spaß beim Stricken!
04.08.2025 - 11:26
![]() Toril Skramstad wrote:
Toril Skramstad wrote:
Etter alle økningene til raglan har jeg 402 masker for str L, men arbeidet måler 30 cm og ikke ca 22 som det skulle. Burde jeg øke på hver 2. rette pinne lenger før jeg går over til hver 4. rette pinne? Mvh Toril
28.04.2025 - 15:37
![]() ELAINE HINNELLS wrote:
ELAINE HINNELLS wrote:
Hi. when increasing, are the sleeve increases the first raglans on each row , and the body the two inner ones. Or is the sleeve one side and the body the other side on the same raglan. If it is the latter then i have done the whole lot wrong. Its a lovely cardigan , but not the easiest pattern to follow and i have been knitting for almost 60 years. I will persevere though.
03.02.2025 - 20:52DROPS Design answered:
Dear Mrs Hinnells, the right front piece is before 1st marker, the left sleeve between 1st and 2nd marker, the back piece is between 2nd and 3rd marker, the left sleeve is between 3rd and 4th marker and the right front piece is after 4th marker. Hope it will help you. Happy knitting!
04.02.2025 - 09:52
![]() Mary Joan Banks wrote:
Mary Joan Banks wrote:
Please can you tell me the number of balls of yarn I need for the XL? I have found this difficult to determine from the information presented in the pattern. Thank you. Mary
22.01.2025 - 11:16DROPS Design answered:
Dear Mary, you will find the total amount of yarn required for each size under header, tab "Pattern", ie in size XL: 500 g DROPS Alpaca/50 g a ball = you will need 10 balls DROPS Alpaca. Happy knitting!
22.01.2025 - 16:18
![]() Heather Spence wrote:
Heather Spence wrote:
I have just sent an email asking for measurements and then discovered a size chart! Apologies.
29.12.2024 - 22:13
![]() Heather Spence wrote:
Heather Spence wrote:
I am having difficulty locating the actual measurements in inches/centimetres for each size. Could you help please? Thank you.
29.12.2024 - 22:11DROPS Design answered:
Dear Heather, you can find a size chart with the measurements of the garment in cm at the bottom of the pattern. You can read this lesson for more information regarding the size charts: https://www.garnstudio.com/lesson.php?id=24&cid=19. Happy knitting!
29.12.2024 - 22:19
![]() Ruth Åström wrote:
Ruth Åström wrote:
Det står att jag ska lägga upp 106 maskor för oket inkl 5 framkantsmaskor i varje sida mot mitt fram. Ska jag lägga upp 106 maskor eller 116 maskor?
29.12.2024 - 19:07DROPS Design answered:
Hei Ruth. 106 masker er inkludert framkantsmaskene. Skrevet på en annen måte: legg opp 5 framkantmasker + legg opp 101 masker + legg opp 5 framkantmasker = 106 masker. mvh DROPS Design
06.01.2025 - 14:12
![]() Kern wrote:
Kern wrote:
Hi, if the 5 stitches for the band are in purl, why is the instruction for dec buttonholes in Knit. K2tog and not Purl2tog after YO?
14.10.2024 - 21:27DROPS Design answered:
Dear Kern, you are right you should work here P2 together for buttonholes, a correction will be added, thanks for your feedback. Happy knitting!
15.10.2024 - 09:51
![]() Kern Gretland wrote:
Kern Gretland wrote:
When casting 106 sts INCL 5 band stitches, does that mean 111 sts in total or 106sts inclusive of 5 sts?
14.10.2024 - 14:58DROPS Design answered:
Dear Mrs Gretland, the 5 front band stitches are included in the 106 sts, this means you don't have to cast them on extra. Happy knitting!
14.10.2024 - 16:22
![]() Bente Halsetrønning wrote:
Bente Halsetrønning wrote:
Jeg strikker sweet olivia cardigan. Får ikke økningene til og stemme. 1 maske økt før og etter mønster A1. Riktig? Strikker str L. Skal være 402 masker etter alle økningene. Kan du forklare med T-skje Mvh Bente
07.10.2024 - 11:29DROPS Design answered:
Hei Bente, Ja, du øker på hver side av alle A.1 (8 økte masker på pinnen), men økninger på bolen er forskjellige fra økninger på ermene. På bolen øker du først 2. hver pinne (hver pinne fra retten) x 26 i din størrelse: 26 x 4 = 104, deretter 4. hver pinne x 10 = 40. 104 + 40 = 144 økte masker. På ermene øker du først 2.hver pinne x 18, deretter 4. hver pinne x 14 : 18 x 4 = 72 og 14 x 4 = 56: totalt 128 økte masker. Når alle økningene er ferdige har du økt 144 + 128 = 272 masker. Med de opprinnelige 130 maskene er det 130 + 272 = 402 masker på pinnen. Håper dette hjelper og god fornøyelse!
08.10.2024 - 07:15
|
|||||||
Sweet Olivia Cardigan#sweetoliviacardigan |
|||||||
|
|
|||||||
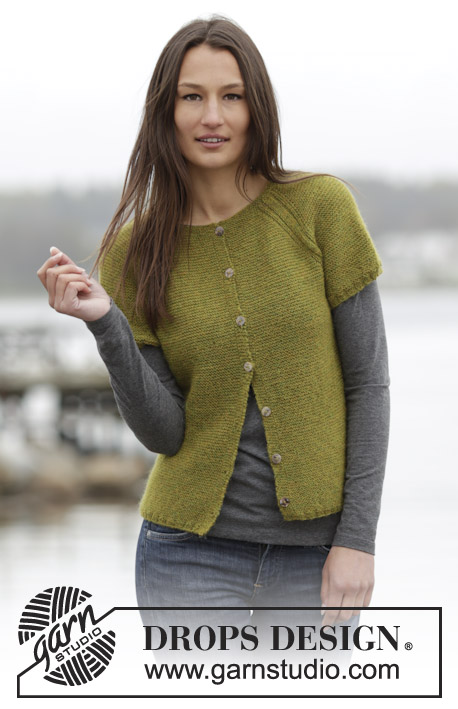
Knitted DROPS jacket in garter st with raglan, worked top down in "Alpaca". Size: S - XXXL.
DROPS 164-42 |
|||||||
|
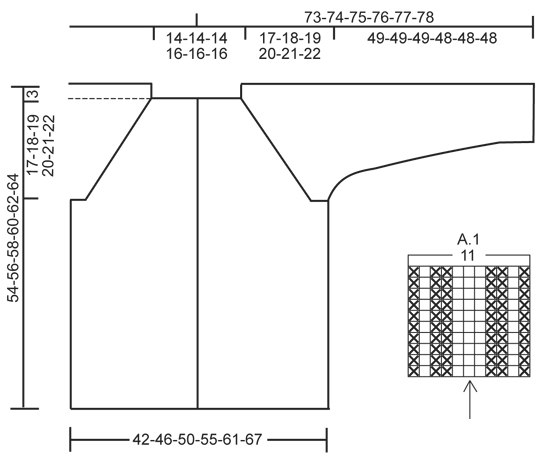
GARTER ST (back and forth): K all rows. 1 ridge = K2 rows. PATTERN: See diagram A.1. The diagram shows all rows in pattern seen from RS. BUTTONHOLES: Dec for buttonholes on right band. 1 buttonhole = work until 3 sts remain on needle (seen from RS), make 1 YO, P 2 tog and P the last 1 st. Dec for buttonholes when piece measures: SIZE S: 2, 9, 16, 24, 32, 40 and 48 cm / ¾",3½",6¼",9½",12½",15¾",19" SIZE M: 2, 10, 18, 26, 34, 42 and 50 cm / ¾",4",7",10¼",13½",16½",19¾" SIZE L: 2, 10, 18, 26, 34, 42 and 50 cm / ¾",4",7",10¼",13½",16½",19¾" SIZE XL: 2, 10, 18, 26, 34, 43 and 52 cm / ¾",4",7",10¼",13½",17",20½" SIZE XXL: 2, 10, 18, 27, 36, 45 and 54 cm / ¾",4",7",10½",14¼",17¾",21¼" SIZE XXXL: 2, 11, 20, 29, 38, 47 and 56 cm / ¾",4½",8",11½",15",18½",22" RAGLAN: Inc 1 st on each side of the 11 raglan sts. Inc by K 2 in st both before and after the 11 raglan sts (= 2 sts inc at every A.1). All inc are done from RS. MEASURING TIP: Because of garter st the garment will be longer when worn. All length measurements must therefore be done while holding up the garment. ---------------------------------------------------------- JACKET: Work back and forth on circular needle from mid front, work top down. YOKE: Cast on 106-106-106-114-114-114 sts (includes 5 band sts each side towards mid front) on circular needle size 2.5 mm / US 1.5 with Alpaca. Work 3 ridges in GARTER ST - see explanation above. Switch to circular needle size 3 mm / US 2.5 and K 1 row from RS while inc 24 sts evenly - NOTE: P the outermost 5 sts in each side towards mid front and do not inc over these sts (= band sts) = 130-130-130-138-138-138 sts on row. Insert 4 markers in the piece as follows (from WS): P 5 (= band sts), K 19-19-19-21-21-21 (= right front piece), insert 1 marker in next st, K 20 (= sleeve), insert 1 marker in next st, K 38-38-38-42-42-42 (= back piece), insert 1 marker in next st, K 20 (= sleeve), insert 1 marker in next st, K 19-19-19-21-21-21 (= left front piece) and finish with P 5 (= band sts). READ ALL OF THE FOLLOWING SECTION BEFORE CONTINUING: Then work ridges (1st row = RS) but in every transition between body and sleeves work A.1 (= 11 sts - NOTE: St with marker should fit with st with arrow in diagram), P the 5 band sts in each side towards mid front on every row until finished measurements. REMEMBER THE KNITTING GAUGE and remember to dec for BUTTONHOLES on right band - see explanation above. AT THE SAME TIME on first row from RS beg inc for RAGLAN – see explanation above. NOTE: Inc differently on body and sleeves: BODY: Inc every other row (i.e. every row from RS) a total of 13-21-26-34-42-53 times and then every 4th row (i.e. every other row from RS) a total of 14-11-10-7-4-0 times. SLEEVE: Inc every other row a total of 17-19-18-20-18-21 times, and on every 4th row a total of 12-12-14-14-16-16 time. After all inc for raglan there are 354-382-402-438-458-498 sts on row and piece measures approx. 20-21-22-23-24-25 cm / 8"-8¼"-8¾"-9"-9½"-9¾" from shoulder. Work next row as follows from WS: Work 52-57-61-68-73-80 sts (= right front piece), slip the next 78-82-84-88-88-94 sts on 1 stitch holder (= sleeve), cast on 6-6-8-8-10-10 new sts (= under sleeve), work 94-104-112-126-136-150 sts (= back piece), slip the next 78-82-84-88-88-94 sts on 1 stitch holder (= sleeve), cast on 6-6-8-8-10-10 sts (= under sleeve), work the remaining 52-57-61-68-73-80 sts (= left front piece). BODY: = 210-230-250-278-302-330 sts. Continue to work in garter st back and forth and P bands - remember buttonholes on right band. When piece measures 33-34-35-36-37-38 cm / 13"-13⅜"-13¾"-14¼"-14½"-15", measured from where sleeve was divided under sleeve (or desired length) – READ MEASURING TIP, P 1 row from WS while inc 2 sts evenly = 212-232-252-280-304-332 sts on needle. Switch to circular needle size 2.5 mm / US 1.5 and work 3 rows rib (= K 2/P 2) with 5 band sts in garter st and 2 K in each side towards mid front (seen from RS). Then LOOSELY bind off sts with K over K and P over P. Entire jacket measures approx. 54-56-58-60-62-64 cm / 21¼"-22"-22¾"-23⅝"-24⅜"-25¼" from shoulder. SLEEVE: Worked in the round on double pointed needles. Slip the 78-82-84-88-88-94 sts from stitch holder in one side of piece back on double pointed needles size 3 mm / US 2.5 and cast in addition on 6-6-8-8-10-10 new sts mid under sleeve = 84-88-92-96-98-104 sts. Insert 1 marker – NOW MEASURE PIECE FROM HERE. Work in stockinette st in the round. AT THE SAME TIME after 3 rounds dec 2 sts mid under sleeve. Repeat dec every 4th round 4-4-4-5-5-5 times in total and then every 4½-3½-3-3-3-2 cm / 1¾"-1¼"-1"-1"-1"-¾" 9-11-12-13-13-16 times in total = 58-58-60-60-62-62 sts. When sleeve measures 48-48-48-47-47-47 cm / 19"-19"-19"-18½"-18½"-18½" (or at desired length), K 1 round while dec 2-2-4-0-2-2 sts evenly = 56-56-56-60-60-60 sts on needle. Work 3 rounds rib (= K 2/P 2). Then LOOSELY bind off sts with K over K and P over P. Work the other sleeve the same way. ASSEMBLY: Sew the openings under the sleeves. Sew the buttons on to the left band. |
|||||||
Diagram explanations |
|||||||
|
|||||||
 |
|||||||
Have you finished this pattern?Tag your pictures with #dropspattern #sweetoliviacardigan or submit them to the #dropsfan gallery. Do you need help with this pattern?You'll find 20 tutorial videos, a Comments/Questions area and more by visiting the pattern on garnstudio.com. © 1982-2026 DROPS Design A/S. We reserve all rights. This document, including all its sub-sections, has copyrights. Read more about what you can do with our patterns at the bottom of each pattern on our site. |
|||||||


With over 40 years in knitting and crochet design, DROPS Design offers one of the most extensive collections of free patterns on the internet - translated to 17 languages. As of today we count 324 catalogs and 12290 patterns - 12280 of which are translated into English (US/in).
We work hard to bring you the best knitting and crochet have to offer, inspiration and advice as well as great quality yarns at incredible prices! Would you like to use our patterns for other than personal use? You can read what you are allowed to do in the Copyright text at the bottom of all our patterns. Happy crafting!
Post a comment to pattern DROPS 164-42
We would love to hear what you have to say about this pattern!
If you want to leave a question, please make sure you select the correct category in the form below, to speed up the answering process. Required fields are marked *.