DROPS Alpaca
DROPS Alpaca
100% Alpaca
from 4.85 $ /50g
Get the yarn to make this pattern from 33.95$.

The yarn cost is calculated from the pattern’s smallest size and the yarn’s cheapest product type. Looking for an even better price? You might find it on the DROPS Deals!

DROPS SS24

Sweet Olivia Cardigan

Knitted DROPS jacket in garter st with raglan, worked top down in "Alpaca". Size: S - XXXL.

DROPS 164-42
DROPS design: Pattern no z-713
Yarn group A
----------------------------------------------------------
Size: S - M - L - XL - XXL - XXXL

Materials:
DROPS ALPACA from Garnstudio
350-400-450-500-550-600 g color no 7233, olive

DROPS DOUBLE POINTED NEEDLES and CIRCULAR NEEDLE (80 cm / 32") SIZE 3 mm/US 2.5 - or size needed to get 24 sts x 48 rows in garter st = 4" x 4" (10 x 10 cm). And 24 sts x 32 rows in stockinette st = 4" x 4" (10 x 10 cm).
DROPS DOUBLE POINTED NEEDLES and CIRCULAR NEEDLE (80 cm / 32") SIZE 2.5 mm/ US 1.5 - for edges.
DROPS MOTHER-OF-PEARL BUTTON: Arched (white), NO 521: 7 pieces in all sizes

-------------------------------------------------------

Alternative Yarn – See how to change yarns here
Yarn Groups A to F – Use the same pattern and change the yarn here
Yarn usage using an alternative yarn – Use our yarn converter here

-------------------------------------------------------

DROPS Alpaca
DROPS Alpaca
100% Alpaca
from 4.85 $ /50g
Get the yarn to make this pattern from 33.95$.

The yarn cost is calculated from the pattern’s smallest size and the yarn’s cheapest product type. Looking for an even better price? You might find it on the DROPS Deals!

Pattern instructions

NOTE: This pattern is written in American English. All measurements in charts are in cm. For conversion from inches to cm - click here. There are different terms for crocheting in American and British English. If this pattern includes crochet, click for "crochet terms" here. For this pattern in British English, please click here.
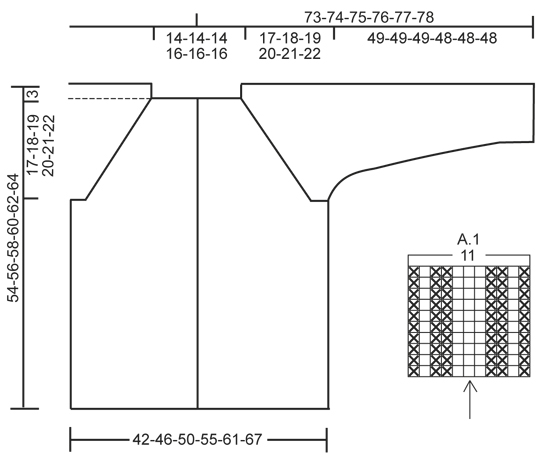
GARTER ST (back and forth):
K all rows. 1 ridge = K2 rows.

PATTERN:
See diagram A.1. The diagram shows all rows in pattern seen from RS.

BUTTONHOLES:
Dec for buttonholes on right band. 1 buttonhole = work until 3 sts remain on needle (seen from RS), make 1 YO, K 2 tog and K the last 1 st.
Dec for buttonholes when piece measures:
SIZE S: 2, 9, 16, 24, 32, 40 and 48 cm /
3/4",3½",6¼",9½",12½",15¾",19"
SIZE M: 2, 10, 18, 26, 34, 42 and 50 cm /
3/4",4",7",10¼",13½",16½",19¾"
SIZE L: 2, 10, 18, 26, 34, 42 and 50 cm /
3/4",4",7",10¼",13½",16½",19¾"
SIZE XL: 2, 10, 18, 26, 34, 43 and 52 cm /
3/4",4",7",10¼",13½",17",20½"
SIZE XXL: 2, 10, 18, 27, 36, 45 and 54 cm /
3/4",4",7",10½",14¼",17¾",21¼"
SIZE XXXL: 2, 11, 20, 29, 38, 47 and 56 cm /
3/4",4½",8",11½",15",18½",22"

RAGLAN:
Inc 1 st on each side of the 11 raglan sts. Inc by K 2 in st both before and after the 11 raglan sts (= 2 sts inc at every A.1). All inc are done from RS.

MEASURING TIP:
Because of garter st the garment will be longer when worn. All length measurements must therefore be done while holding up the garment.
----------------------------------------------------------

JACKET:
Work back and forth on circular needle from mid front, work top down.

YOKE:
Cast on 106-106-106-114-114-114 sts (includes 5 band sts each side towards mid front) on circular needle size 2.5 mm / US 1.5 with Alpaca. Work 3 ridges in GARTER ST - see explanation above. Switch to circular needle size 3 mm / US 2.5 and K 1 row from RS while inc 24 sts evenly - NOTE: P the outermost 5 sts in each side towards mid front and do not inc over these sts (= band sts) = 130-130-130-138-138-138 sts on row.
Insert 4 markers in the piece as follows (from WS): P 5 (= band sts), K 19-19-19-21-21-21 (= right front piece), insert 1 marker in next st, K 20 (= sleeve), insert 1 marker in next st, K 38-38-38-42-42-42 (= back piece), insert 1 marker in next st, K 20 (= sleeve), insert 1 marker in next st, K 19-19-19-21-21-21 (= left front piece) and finish with P 5 (= band sts).
READ ALL OF THE FOLLOWING SECTION BEFORE CONTINUING:
Then work ridges (1st row = RS) but in every transition between body and sleeves work A.1 (= 11 sts - NOTE: St with marker should fit with st with arrow in diagram), P the 5 band sts in each side towards mid front on every row until finished measurements.
REMEMBER THE KNITTING GAUGE and remember to dec for BUTTONHOLES on right band - see explanation above.
AT THE SAME TIME on first row from RS beg inc for RAGLAN – see explanation above. NOTE: Inc differently on body and sleeves:
BODY: Inc every other row (i.e. every row from RS) a total of 13-21-26-34-42-53 times and then every 4th row (i.e. every other row from RS) a total of 14-11-10-7-4-0 times.
SLEEVE: Inc every other row a total of 17-19-18-20-18-21 times, and on every 4th row a total of 12-12-14-14-16-16 time.

After all inc for raglan there are 354-382-402-438-458-498 sts on row and piece measures approx. 20-21-22-23-24-25 cm / 8"-8¼"-8¾"-9"-9½"-9¾" from shoulder.
Work next row as follows from WS: Work 52-57-61-68-73-80 sts (= right front piece), slip the next 78-82-84-88-88-94 sts on 1 stitch holder (= sleeve), cast on 6-6-8-8-10-10 new sts (= under sleeve), work 94-104-112-126-136-150 sts (= back piece), slip the next 78-82-84-88-88-94 sts on 1 stitch holder (= sleeve), cast on 6-6-8-8-10-10 sts (= under sleeve), work the remaining 52-57-61-68-73-80 sts (= left front piece).

BODY:
= 210-230-250-278-302-330 sts. Continue to work in garter st back and forth and P bands - remember buttonholes on right band.
When piece measures 33-34-35-36-37-38 cm / 13"-13⅜"-13¾"-14¼"-14½"-15", measured from where sleeve was divided under sleeve (or desired length) – READ MEASURING TIP, P 1 row from WS while inc 2 sts evenly = 212-232-252-280-304-332 sts on needle. Switch to circular needle size 2.5 mm / US 1.5 and work 3 rows rib (= K 2/P 2) with 5 band sts in garter st and 2 K in each side towards mid front (seen from RS). Then LOOSELY bind off sts with K over K and P over P. Entire jacket measures approx. 54-56-58-60-62-64 cm / 21¼"-22"-22¾"-23⅝"-24⅜"-25¼" from shoulder.

SLEEVE:
Worked in the round on double pointed needles. Slip the 78-82-84-88-88-94 sts from stitch holder in one side of piece back on double pointed needles size 3 mm / US 2.5 and cast in addition on 6-6-8-8-10-10 new sts mid under sleeve = 84-88-92-96-98-104 sts. Insert 1 marker – NOW MEASURE PIECE FROM HERE. Work in stockinette st in the round. AT THE SAME TIME after 3 rounds dec 2 sts mid under sleeve. Repeat dec every 4th round 4-4-4-5-5-5 times in total and then every 4½-3½-3-3-3-2 cm / 1¾"-1¼"-1"-1"-1"-¾" 9-11-12-13-13-16 times in total = 58-58-60-60-62-62 sts.
When sleeve measures 48-48-48-47-47-47 cm / 19"-19"-19"-18½"-18½"-18½" (or at desired length), K 1 round while dec 2-2-4-0-2-2 sts evenly = 56-56-56-60-60-60 sts on needle. Work 3 rounds rib (= K 2/P 2). Then LOOSELY bind off sts with K over K and P over P. Work the other sleeve the same way.

ASSEMBLY:
Sew the openings under the sleeves. Sew the buttons on to the left band.

Diagram

All measurements in charts are in cm.

symbols = K from RS, P from WS
symbols = P from RS, K from WS
diagram
Do you have a question? See a list of frequently asked questions (FAQ)

Knitting tension is what determines the final measurements of your work, and is usually measured per 10 x 10 cm. It is provided like so: number of stitches in width x number of rows in height - eg: 19 stitches x 26 rows = 10 x 10 cm.

The knitting tension is very individual; some people knit/crochet loosely while others work tightly. You adjust the knitting tension with the needle size, which is why the suggested needle size only serve as a guide! You need to adjust this (up or down) to ensure that YOUR knitting tension matches the knitting tension provided in the pattern. If you work with a different knitting tension than provided you will have a different yarn consumption, and your work will have different measurements than what the pattern suggests.

The knitting tension also determines which yarns can replace each other. As long as you achieve the same knitting tension you can replace one yarn with another.

See DROPS lesson: How to measure your tension/gauge

See DROPS video: How to make a gauge tension swatch

The required amount of yarn is provided in grams, eg: 450 g. To calculate how many balls you’ll need you first need to know how many grams are in 1 ball (25g, 50g or 100g). This information is available if you click on the individual yarn quality on our pages. Divide the amount required with the amount of each ball. For example, if each ball is 50g (the most common amount), the calculation will be as follows: 450 / 50 = 9 balls.

The important thing when changing from one yarn to another is that the knitting/crochet tension remains the same. This is so that the measurements of the finished piece will be the same as on the sketch provided. It is easier to achieve the same knitting tension using yarns from the same yarn group. It is also possible to work with multiple strands of a thinner yarn to achieve the knitting tension of a thicker one. Please try our yarn converter. We recommend you to always work a test swatch.

Please NOTE: when changing yarn the garment might have a different look and feel to the garment in the photo, due to individual properties and qualities of each yarn.

See DROPS lesson: Can I use a different yarn than the one mentioned in the pattern?

All our yarns are categorised into yarn groups (from A to F) according to thickness and knitting tension – group A contains the thinnest yarns and group F the thickest. This makes it easier for you to find alternative yarns to our patterns, should you wish to switch yarn. All yarns within the same group have a similar knitting tension and can easily replace each other. However, different yarn qualities have different structures and properties which will give the finished work a unique look and feel.

Click here for an overview of the yarns in each yarn group

At the top of all our patterns you’ll find a link to our yarn converter, which is a helpful tool should you wish to use a different yarn than suggested. By filling in the yarn quality you wish to replace, the amount (in your size) and number of strands, the converter will present good alternative yarns with the same knitting tension. Additionally it will tell you how much you’ll require in the new qualities and whether you’ll need to work with multiple strands. Most skeins are 50g (some are 25g or 100g).

If the pattern is worked with multiple colours, every colour will have to be converted separately. Similarly, if the pattern is worked with several strands of different yarns (for example 1 strand Alpaca and 1 strand Kid-Silk) you will have to find alternatives for each, individually.

Click here to see our yarn converter

Since different yarns have different qualities and textures we have chosen to keep the original yarn in our patterns. However, you can easily find options among our available qualities by using our yarn converter, or simply pick a yarn from the same yarn group.

It is possible that some retailers still have discontinued yarns in stock, or that someone has a few skeins at home that they would like to find patterns for.

The yarn converter will provide both alternative yarn as well as required amount in the new quality.

If you think it's hard to decide what size to make, it can be a good idea to measure a garment you own already and like the size of. Then you can pick the size by comparing those measures with the ones available in the pattern's size chart.

You'll find the size chart at the bottom of the pattern.

See DROPS lesson: How to read size chart

The needle size provided in the pattern serves only as a guide, the important thing is to follow the knitting tension. And since knitting tension is very individual, you will have to adjust the needle size to ensure that YOUR tension is the same as in the pattern – maybe you’ll have to adjust 1, or even 2 needle sizes, up or down to achieve the correct tension. For this, we recommend that you work test swatches.

Should you work with a different knitting tension than the one provided, the measurements of the finished garment might deviate from the measurement sketch.

See DROPS lesson: How to measure your tension/gauge

See DROPS video: How to make a gauge tension swatch

Working a garment top-down provides more flexibility and room for personal adjustment. For example it is easier to try the garment on while working, as well as making adjustments to length of yoke and shoulder caps.

The instructions are carefully explaining every step, in the correct order. Diagrams are adjusted to the knitting direction and are worked as usual.

The diagram depicts all rows/rounds, and every stitch seen from the right side. It is read from bottom to top, from right to left. 1 square = 1 stitch.

When working back and forth, every other row is worked from the right side and every other row is worked from the wrong side. When working from the wrong side, the diagram will have to be worked reversed: from left to right, knit stitches are purled, purl stitches are knit etc.

When working in the round every round is worked from the right side and the diagram are worked from right to left on all rounds.

See DROPS lesson: How to read knitting diagrams

The diagram depicts all rows/rounds, and every stitch seen from the right side. It is worked from bottom to top, from right to left.

When working back and forth every other row is worked from the right side: from right to left and every other row is worked from the wrong side: from left to right.

When working in the round, every row in the diagram are worked from the right side, from right to left.

When working a circular diagram you start in the middle and work your way outwards, counter clockwise, row by row.

The rows usually start with a given number of chain stitches (equivalent to the height of the following stitch), this will either be depicted in the diagram or explained in the pattern.

See DROPS lesson: How to read crochet diagrams

Instructions for working several diagrams after each other on the same row/round, will often be written like so: “work A.1, A.2, A.3 a total of 0-0-2-3-4 times". This means you work A.1 once, then A.2 is worked once, and A.3 is repeated (in width) the number of times provided for your size – in this case like so: S = 0 times, M = 0 times, L=2 times, XL= 3 times and XXL = 4 times.

The diagrams are worked as usual: begin with the first row in A.1, then work the first row in A.2 etc.

See DROPS lesson: How to read knitting diagrams

See DROPS lesson: How to read crochet diagrams

The total width of the garment (from wrist-to-wrist) will be larger in the larger sizes, despite the actual sleeves being shorter. The larger sizes have longer sleeve caps and wider shoulders, so there will be a good fit in all sizes.

The measurement sketch/schematic drawing provides information regarding the full length of the garment. If it’s a jumper or a jacket the length is measured from the highest point on the shoulder (usually closest to the neckline), and straight down to the bottom of the garment. It is NOT measured from the tip of shoulder. Similarly, the length of yoke is measured from the highest point on the shoulder and down to where yoke is split into body and sleeves.

See DROPS lesson: How to read a schematic drawing

Diagrams are often repeated on the round or in height. 1 repeat is the diagram the way it appears in the pattern. If it says to work 5 repeats of A.1 in the round, then you work A.1 a total of 5 times after/next to each other in the round. If it says to work 2 repeats of A.1 vertically/in height you work the entire diagram once, then begin again at the start and work the entire diagram one more time.

Chain stitches are slightly narrower than other stitches and to avoid working the cast-on edge too tight, we simply chain more stitches to begin with. The stitch count will be adjusted on the following row to fit the pattern and measurement sketch.

The rib edge is more elastic and will contract slightly compared to, for example, stocking stitch. By increasing before the rib edge, you avoid a visible difference in width between the rib edge and the rest of the body.

It’s very easy to cast off too tightly, and by making yarn overs while casting off (and simultaneously casting these off) you avoid a too tight cast off edge.

See DROPS video: How to bind off with yarn overs (yo)

To achieve an even increase (or decrease) you can increase on, for example: every 3rd and 4th row alternately, like so: work 2 rows and increase on the 3rd row, work 3 rows and increase on the 4th. Repeat this until the increase is complete.

See DROPS lesson: Increase or decrease 1 st on every 3rd and 4th row alternately

Should you prefer to work in the round instead of back and forth, you may of course adjust the pattern. You’ll need to add steeks mid-front (usually 5 stitches), and follow the instructions. When you would normally turn and work from the wrong side, simply work across the steek and continue in the round. At the end you’ll cut the piece open, pick up stitches to work bands, and cover the cut edges.

See DROPS video: How to knit steeks and cut open

Should you prefer to work back and forth instead of in the round, you may of course adjust the pattern so you work the pieces separately and then assemble them at the end. Divide the stitches for the body in 2, add 1 edge stitch in each side (for sewing) and work the front and back pieces separately.

See DROPS lesson: Can I adapt a pattern for circular needles into straight needles?

Pattern repeats can vary slightly in the different sizes, in order to get the correct proportions. If you’re not working the exact same size as the garment in the photo, yours might deviate slightly. This has been carefully developed and adjusted so that the complete impression of the garment is the same in all sizes.

Make sure to follow instructions and diagrams for your size!

If you have found a pattern you like which is available in women’s size it’s not very difficult to convert it to men’s size. The biggest difference will be the length of sleeves and body. Start working on the women size that you think would fit across the chest. The additional length will be worked right before you cast off for the armhole/sleeve cap. If the pattern is worked top-down you can add the length right after the armhole or before the first decrease on sleeve.

Regarding additional yarn amount, this will depend on how much length you add, but it is better with a skein too many than too few.

All yarns will have excess fibres (from production) that might come off as lint or shedding. Brushed yarns (ie hairier yarns) have more of these loose, excess fibres, causing more shedding.

Shedding also depends on what is worn under or over the garment, and whether this pulls at the yarn fibres. It’s therefore not possible to guarantee that there will be no shedding

Below are some tips on how to get the best result when working with hairier yarns:

1. When the garment is finished (before you wash it) shake it vigorously so the looser hairs come off. NOTE: do NOT use a lint roller, brush or any method that pulls at the yarn.

2. Place the garment in a plastic bag and put it in your freezer - the temperature will cause the fibres to become less attached to each other, and excess fibres will come off easier.

3. Leave in the freezer for a few hours before taking it out and shaking it again.

4. Wash the garment according to the instructions on the yarn label.

Pilling is a natural process that happens to even the most exclusive of fibers. It's a natural sign of wear and tear that is hard to avoid, and that is most visible in high friction areas of your garment like a sweater's arms and cuffs.

You can make your garment look as new by removing the pilling, using a fabric comb or a pill/lint remover.

Still can't find the answer you need? Then scroll down and leave your question so one of our experts can try to help you. This will be done normally within 5 to 10 working days.
In the meantime, you can read the questions and answers that others have left to this pattern or join the DROPS Workshop on Facebook to get help from fellow knitters/crocheters!

You might also like...

Post a comment to pattern DROPS 164-42

We would love to hear what you have to say about this pattern!

If you want to leave a question, please make sure you select the correct category in the form below, to speed up the answering process. Required fields are marked *.

Comments / Questions (135)

country flag Christine wrote:

Thank you for your help with the marker problem I was having with sweet Olivia cardigan markers. I have read other problems and it seems a lot of people ask about this. Maybe it would help to make this clearer. /thanks

08.07.2022 - 00:34

country flag Christine Corkindale wrote:

I am knitting the 3rd size of sweet olivia cardigan. I completed the increase and have 130 stitches. The pattern then says to allow 5 at both ends for the button band. Then to place markers after 19,20,38,20 and 19 stitches. This only adds up to 126 stitches. Where do I work the other 4 stitches? I have pulled this out 3 times and thought I was going crazy.

06.07.2022 - 21:43

DROPS Design answered:

Hi Christine, Each marker is inserted in the "next" stitch after each count, which gives you 4 more stitches. Happy knitting!

07.07.2022 - 06:47

country flag Liv Terese Hermann-Louis wrote:

Hei. Jeg har begynt på Sweet olivia cardigan str. L. Men jeg får ikke oppskriften til å stemme med antall masker. Jeg har tellet og tellet, får 4 masker til overs. Hva gjør jeg? På fårhånd takk for svar. MVH Liv Terese Hermann-Louis

28.04.2022 - 14:04

DROPS Design answered:

Hei Liv Therese, Det høres ut som du har glemt å telle maskene med merkene i (4 merker satt i 4 masker). God fornøyelse!

29.04.2022 - 07:04

country flag Aina Irene Dahl wrote:

Kan jeg bruke samme maskeatall osv. hvis jeg strikker denne i glattstrikk? Eller blir det en annen oppskrift da?

02.04.2022 - 01:01

DROPS Design answered:

Hej Aina, det går fint, men sørg for at overholde strikkefastheden for at få målene som du finder nederst i måleskitsen :)

04.04.2022 - 11:12

country flag Marit Veland Thorsen wrote:

Jeg strikker str. XL. Har økt på hver 2. pinn 20 gg. Så skal jeg øke på hver 4. pinn på "erme." Hva regnes med erme? Det er hittil økt 8 m på hver pinn. Hvor skal det fremdeles økes på hver 2. pinn og hvor skal d økes på hver 4. pinn?

15.03.2022 - 18:38

DROPS Design answered:

Hej Marit. Erme är de ökningar som du gör på ermene (4 st). Du ska öka på hver 2. p 34 ganger och deretter på hver 4.e p 7 ganger på BOL. Du ska öka på hver 2. p 20 ganger och deretter på hver 4. p 14 ganger på ERME. Dvs att efter du har ökat på på hver 2. p 20 ganger på BOL og ERME (=8 ökningar) så fortsätter du att öka 14 ganger till på hver 2. p på BOL men kun på hver 4.e p 14 ganger på ERME. När ökningen på hver 2.p på BOL är ferdig så ökar du på hver 4 p 7 ganger. Mvh DROPS Design

17.03.2022 - 15:15

country flag Monika wrote:

Jeg er i tvivl når der står man tager masker ud på forstykke og ærmedelen - 1 på hver side af raglan. Dermed er nr 2 maske der tages ud vel i ærmedelen? Er den maske så den der står beskrevet under “ærme”? Så det betyder at jeg tager den ene maske ud i ærmedelen og så bare stopper denne efter de 18 gange hvor jeg kører den 1. maske i start af raglan på forstykket indtil 42 gange. Er det rigtig forstået eller skal der flere masker ud i ærmestykket?

06.01.2022 - 20:23

DROPS Design answered:

Hej Monika, du strikker A.1 (11 masker) i hver raglanovergang. Når du tager ud til raglan, tager du 1 maske ud på hver side af de 11 masker (= 8 udtagninger på en udtagningspind), det gør du på hver 2.pind de første 18 gange, efter det fortsætter du på hver 2.pind på ryg & forstykke og på hver 4.pind på ærmerne :)

17.01.2022 - 09:38

country flag Virginie Standaert wrote:

Bonjour, J'ai imprimé les explications mais le diagramme des augmentations du raglan ne s'impriment pas. Pouvez vous me dire pourquoi, parce que je ne peux pas avancer mon tricot sans le diagramme. Merci

23.12.2021 - 15:06

DROPS Design answered:

Bonjour Virginie, copiez l'image du diagramme, collez-la dans le fichier word et imprimez. Bon travail!

28.12.2021 - 13:09

country flag Eli Kleppe Madsen wrote:

Hei, jeg skjønner ikke hvordan jeg skal øke i begynnelsen.

21.12.2021 - 11:10

DROPS Design answered:

Hei Eli. Ta maskeantallet du har (enten 106 eller 114) og del det med 24 masker (som skal økes). Har du 106 masker blir det 106/24=4,2. Da må du øke 1 maske etter hver 4 maske, men side det var 4,2, må du også strikke 5 masker noen ganger. mvh DROPS Design

21.12.2021 - 14:04

country flag Barbara wrote:

Liebes team, ich verstehe die Unterscheidung bei der Raglan-Zunahme nicht. wo ist die Zunahme Rumpf und wo Ärmel? Besten Dank für eure Hilfe. Barbara

18.12.2021 - 14:23

DROPS Design answered:

Liebe Barbara, die Raglanzunahmen werden um einen unterschiedlichen Rythmus beim Vorder- und Rückenteile und bei den Ärmeln gestrickt, dh es soll jeweils vor/nach den 11 Raglanmaschen zugenommen werden, entweder 8 M (= wenn man bei jeder 2. Reihe überall zunimmt) oder nur 4 Maschen (wenn man z.B. bei jeder 2. Reihe bei den Ärmeln zunimmt aber beim Vorder- und Rückentil bei jeder 4. Reihe zunehmen soll). Viel Spaß beim stricken!

20.12.2021 - 07:26

country flag May Venche Kristoffersen wrote:

Det står jo at en skal øke 1 m på hver side av raglan, det må jo bli 8 m på hver omgang så skjønner ikke helt maskeantallet.

02.12.2021 - 23:17

DROPS Design answered:

Hei May Venche, Du sier ikke hvilken størrelse du strikke. Hvis vi tar utgangspunkt i S har du 130 masker. Du øker 4 x 27 = 108 masker på bolen og øker 4 x 29 = 116 på ermene. Da har du 130 + 108 + 116 = 354 masker etter raglan er ferdig. Håper dette hjelper og god fornøyelse!

03.12.2021 - 08:17