
Popular categories
Looking for a yarn?


Comments / Questions (40)
![]() Stacey wrote:
Stacey wrote:
Sorry me again I’m still confused When it says alternate increase right and left side of the markers dose that mean ? Increase on the right side of each 8 markers each row and then on the left side on the next row and then back to right side again next row ? Because if you increase both right and left side of the 8 markers that’s 16 stitch’s increase each row not 8 and that’s where I’m getting confused because I don’t understand the wording ?
12.09.2019 - 09:17DROPS Design answered:
Dear Stacey, as shown in the video linked below, when you have to increase alternately on the right side and left side of each marker, work fist increase row increasing on the right side of each marker, then work the next increase row increasing on the left side of each marker and continue like this = you increase 8 stitches on each increase row. Happy crocheting!
12.09.2019 - 09:24
![]() Stacey wrote:
Stacey wrote:
Im confused by the pattern Where is says increase left and right of the markers seen on RS side Dose this mean only increase either side of the 8 marks every other row ? So one row increase and then the other just crochet into each stitch and the first row where it says just on the right does it mean increase only on the right on the first row and then just crochet the next row and then increase both sides on the next and then crochet every stitch no increase?
11.09.2019 - 22:00DROPS Design answered:
Dear Stacey, this video shows how to increase alternately on the right and left side of markers ; there are 8 markers and you increase 8 stitches per increase row. Happy crocheting!
12.09.2019 - 08:52
![]() Heather wrote:
Heather wrote:
I've done a test piece for increasing right and left of the markers. However one side the dcs increase and the other side stays at 4dc before the first 2dc increase. Ive followed the video, surely the number of dcs should increase on both sides/ends? Evenly When working the pattern are you doing 2 rows of right side marker increase before alternating right/left?
14.03.2019 - 20:34DROPS Design answered:
Dear Heather, you should increase alternately on right and left side of the markers - seen from RS, ie seen from RS the increase will be worked atlernately before and after the markers so that the number of sts increases on each side of markers. Happy crocheting!
15.03.2019 - 08:34
![]() Mirte wrote:
Mirte wrote:
Hallo, bedankt voor het antwoord op mijn vorige vraag! Ik vind nog iets niet duidelijk. In de tekst over de pas staat : “Meerder hierna afwisselend links en rechts van elke markeerder (gezien aan de goede kant). “. Klopt het dat de vermeerderingen vanuit de buitenkant van het vest telkens aan de zelfde kant van de markeerder komen omdat het werk elke toer gedraaid wordt? Zo ziet het eruit in de video, maar de toevoeging in de tekst tussen () schept verwarring. Mvg
25.11.2018 - 13:17DROPS Design answered:
Dag Mirte
Je meerdert de ene keer aan de linker kant en de andere keer aan de rechter kant van de markeerders, gezien vanaf de goede kant. Dus als het werk klaar is, zie je op de goede kant dat er de ene toer aan de ene kant en de andere toer aan de andere kant gemeerderd is. Als je op de verkeerde kant aan het haken bent moet je hier dus rekening mee houden (want rechts op de goede kant is op de verkeerde kant links en vice verca). Hoop dat het zo duidelijk is :)
28.11.2018 - 12:54
![]() Mirte wrote:
Mirte wrote:
Zijn de rijen stokjes identiek of er in de rondte wordt gehaakt (mouwen) of heen en weer (pas). Op de mouwen heb je dan alleen de “voorkant”, terwijl je op de pas voor- en achterkant afwisselt. Hoe kun je ervoor zorgen dat er geen verschil is? Groeten, Mirte
20.11.2018 - 15:58DROPS Design answered:
Dag Mirte
Om de mouwen en de panden er gelijk uit te laten zien, kan je de mouwen ook heen en weer haken vanaf de scheiding door steeds het werk te keren nadat je een halve vaste in de derde losse het begin van de toer hebt gehaakt.
21.11.2018 - 10:46
![]() Charley wrote:
Charley wrote:
Hi, I am working the body and can\'t seem to make it add up. In row 1 of the body I start with 116 stitches for the medium but I\'m not left with 4 stitches at the end to make it even. I see on the diagram it shows the pattern uses 9 stitches but 2tog+sk2+sc+sk2+sc+sk2 is 10 stitches. I can\'t work out where I\'m going wrong, if anyone can offer any insight that would be great! Thank you
13.06.2018 - 22:28Charley answered:
After posting my question I have now seen my error. I was crocheting 2dc tog from previous row but have read properly now and it's 2dc tog in the same stitch. Thank you for the pattern x
13.06.2018 - 22:35
![]() Nancy Janssens wrote:
Nancy Janssens wrote:
Ik haak maat XXL. Een vraagje bij de pas: Ik vermeerder afwisselend links en rechts van de markeerders en om de toer 2 keer. Doe ik deze 2 keer ook thv de markeerders en zoja de welke en in welke toer? Vb toer 2 en 4? Of meer verspreid in de pas?
10.10.2017 - 19:55DROPS Design answered:
Hallo Nancy, Het is de bedoeling dat je het meerderen steeds afwisselend rechts en links van de markeerders doet. Als je om de twee naalden meerdert, meerder je de ene keer bijvoorbeeld links van de markeerders en 2 naalden later rechts van de markeerders. Je wisselt dus steeds af: als je de vorige keer links van de markeerders hebt gemeerderd, doe je het de volgende keer rechts van de markeerders en zo ga je steeds heen en weer.
04.11.2017 - 14:26
![]() Petra Vincken wrote:
Petra Vincken wrote:
Hoi, ik moet nu de eerste regel van het lijf haken , mijn vraag is nu,,er staat , ga nu verder met 1 stk in elke stk/L op de toer , wil dat zeggen dat iK op die2 maal 8L die ik heb moeten haken in de vorige toer ook stokjes op moet haken? alvast bedankt ,Petra
26.05.2017 - 10:18DROPS Design answered:
Hallo Petra, Ja, dat klopt helemaal. Op iedere losse haak je een stokje en op ieder stokje haak je een stokje.
26.05.2017 - 16:13
![]() Stanneke wrote:
Stanneke wrote:
Hallo, ik begrijp bij de mouw niet zo goed wat wordt bedoeld met: naai de opening onder de mouw dicht (bij de afwerking) Moet je deze steken niet meenemen met het in het rond haken van de mouw? Dank alvast!
21.01.2017 - 15:43DROPS Design answered:
Hoi Stanneke. Je hebt gelijk. Je hoeft geen naad te sluiten. Wij zullen het weghalen.
26.01.2017 - 12:00
![]() Melli wrote:
Melli wrote:
Hallo, Nachdem ich 9 Reihen mit je 1 Stb. Zunahmen gehäkelt habe, steht in jeder 2. Reihe -3- (für Größe M) x arb. Wie soll ich dies verstehen? Nach den 9 Reihen habe ich nämlich 147 Stb. (14cm ). Mir fehlen also 33 Stb. bis 180/ und 9cm bis 23. Vielen Dank im Voraus LG Melli
15.10.2016 - 17:02DROPS Design answered:
Liebe Melli, in der Größe M haben Sie 76 Stb, dann sollen Sie 1 M. an jeder Markierung (= 8 Zunahmen) in jede R. ins. 10 x zunehmen: 70 + (8 Zunahmen x 10 = 80) = 156 - dann nehmen Sie 1 M. an jeder Markierung in jede 2. R. ins 3 x = 156+ (8 Zunahmen x 3) = 180 M.
17.10.2016 - 09:09
|
|||||||||||||||||||||||||
Lakeside Cardigan#lakesidecardigan |
|||||||||||||||||||||||||
|
|
|||||||||||||||||||||||||
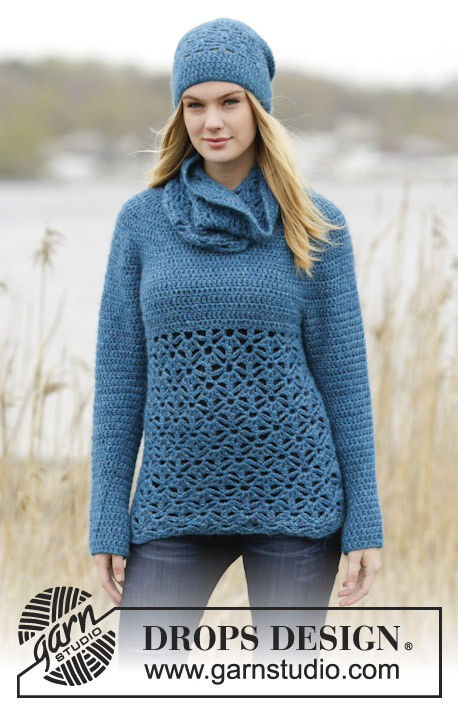
Crochet DROPS jacket round yoke, double crochet and lace pattern, worked top down in ”Air”. Size: S - XXXL.
DROPS 164-33 |
|||||||||||||||||||||||||
|
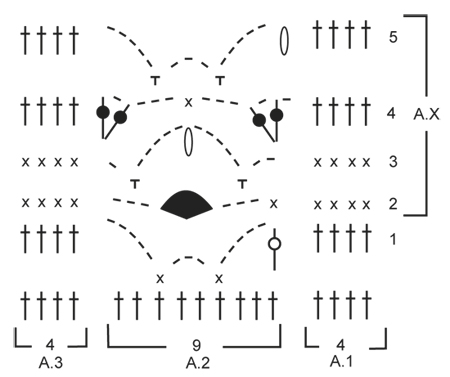
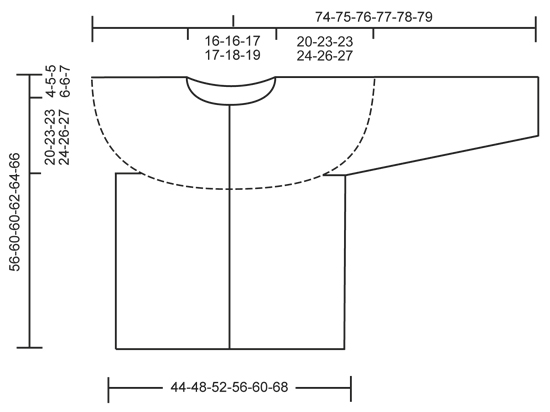
CROCHET INFO: At beg of every row with sc work 1 ch to turn with. Ch does not replace first sc. Replace first dc at beg of every dc row with 3 ch. Sleeve: When working in the round, finish every round with 1 sl st in 3rd ch at beg of round. PATTERN: See diagrams A.1 to A.3. CROCHET 2 dc TOG (in dc): Work 1 dc in next dc but wait with last pull through, work 1 dc more in same dc, but on last pull through, pull through all sts on hook. CROCHET 2 dc TOG (AROUND CH): Work 1 dc around the middle chin dc-group but wait with last pull through, work 1 dc more around same ch, but on last pull through, pull through all sts on hook. DC-GROUP: Work a dc-group around ch-space as follows: Work * 1 dc, 1 ch *, repeat from *-* 2 more times around same ch-space, 1 dc around same ch-space. INCREASE TIP: Inc 1 dc by working 2 dc in 1 sc/dc. DECREASE TIP: Dec 1 dc at beg and end of round as follows: Work 1 dc (= 3 ch at beg of row), * work 1 dc but wait with last pull through (= 2 sts on hook), then work next dc but on last pull through, pull yarn through all sts on hook *, repeat from *-* when 3 dc remain on round = 1 st dec on each side of marker. ---------------------------------------------------------- JACKET: The piece is worked top down. Worked back and forth from mid front. YOKE: Work 75-78-84-89-93-98 ch (includes 1 ch to turn with) on hook size 6 mm / J/10 with Air. Work next row as follows - READ CROCHET INFO: ROW 1: Work 1 sc in 2nd ch from hook, work 1 sc in each of the next 1-4-2-7-3-8 ch, * skip ch 1, work 1 sc in each of the next 7 ch *, repeat from *-* 8-8-9-9-10-10 more times = 65-68-73-78-81-86 sc. ROW 2: Work 1 dc in each of the first 4 sc (= band), continue with 1 dc in every sc until 4 sc remain on row, AT THE SAME TIME inc 6-8-8-10-12-23 dc evenly - READ INCREASE TIP, 1 dc in each of the remaining 4 sc = 71-76-81-88-93-109 dc. Now insert 8 markers in the piece for raglan increasing without working the sts. Insert 4 markers from each side of piece as follows: Insert a marker after 13-13-14-14-16-19 dc, insert next marker after 2 dc, then insert next marker after 9-11-12-14-14-17 dc, and finish with last marker after 2 dc. There are now 19-20-21-24-25-29 dc between the 2 middle markers towards mid back on jacket. Now continue with 1 dc in every dc, AT THE SAME TIME inc 1 dc on right side of each of the 8 markers. Then inc alternately on right and left side of every marker (seen from RS). Repeat inc every row 9-9-11-12-13-16 more times, and every other row 2-3-2-2-2-0 times = 167-180-193-208-221-245 dc on row. Piece measures approx. 20-23-23-24-26-27 cm / 8"-9"-9"-9½"-10¼"-10½". REMEMBER THE CROCHET GAUGE! On next round work as follows: Work 25-27-29-31-34-38 dc (front piece), 8 ch (under sleeve), skip 38-40-42-45-47-50 dc from previous row (= sleeve), 41-46-51-56-59-69 dc (back piece), 8 ch (under sleeve), skip 38-40-42-45-47-50 dc from previous row (= sleeve) and 25-27-29-31-34-38 dc (front piece). Insert a marker, now measure piece from here! BODY: There are now 107-116-125-134-143-161 sts for body. Now measure the piece from here. Now continue with 1 dc in every dc/ch on row, turn and work next row in PATTERN - see explanation above, as follows: ROW 1: Work 1 dc in each of the first 4 dc (= A.1), then work A.2 as follows: * Work 2 dc TOG (in dc) - see explanation above, ch 5, skip 2 dc, 1 sc in next dc, ch 3, skip 2 dc, 1 sc in next dc, ch 5, skip 2 dc *, repeat from *-* 10-11-12-13-14-16 more times, work 1 dc in each of the remaining dc (= A.3). ROW 2: Work 1 sc in each of the first 4 dc, * work ch 3, skip 1 ch-space, work 1 dc-GROUP - see explanation above, around next ch-space, ch 3, skip 1 ch-space, 1 sc in the 2 dc worked tog *, repeat from *-* 10-11-12-13-14-16 more times, work 1 sc in each of the last 4 dc. ROW 3: Work 1 sc in each of the first 4 sc, * ch 2, 1 sc around next ch-space, ch 5, work 2 dc TOG (around ch) - see explanation above, ch 5, 1 sc around next ch-space after dc-group, 1 ch *, repeat from *-* 10-11-12-13-14-16 more times, 1 sc in each of the last 4 sc. ROW 4: Work 1 dc in each of the first 4 sc, (1 dc, ch 1, 1 dc) around first ch-space, ch 3, skip 1 ch-space, 1 sc in the 2 dc worked tog, ch 3, skip 1 ch-space, * (1 dc, ch 1, 1 dc, ch 1, 1 dc, ch 1, 1 dc) around next ch-space, ch 3, skip 1 ch-space, 1 sc in the 2 dc worked tog, ch 3, skip 1 ch-space *, repeat from *-* 9-10-11-12-13-15 more times, (1 dc, ch 1, 1 dc, 1 ch) around last ch-space, 1 dc in each of the last 4 sc. ROW 5: Work 1 dc in each of the first 4 dc, * work 2 dc TOG (around ch), ch 5, work 1 sc around ch-space after dc-group, ch 3, 1 sc around next ch-space, 5 ch *, repeat from *-* 10-11-12-13-14-16 more times, 1 dc in each of the last 4 dc. Continue like this and repeat A.X (= 2nd-5th row) back and forth until piece measures approx. 32 cm / 12½" in all sizes - adjust to finish after 2nd or 4th row in A.1-A.3. Piece measures 56-60-60-62-64-66 cm / 22"-23½"-23½"-24½"-25¼"-26" in total. SLEEVE: Sleeve is worked in the round, top down. Insert a marker in the middle of the 8 ch worked under sleeve. Now measure the piece from here. Let marker follow in piece until finished measurements. Fasten yarn with 1 sl st in the 5th ch of the 8 ch worked in armhole on body. Work 3 ch (= 1 dc) continue with 1 dc in each of the next ch 3, 1 dc in each of the dc for sleeve and then 1 dc in the remaining 4 ch under sleeve = 46-48-50-53-55-58 dc - remember CROCHET INFO! Continue with 1 dc in every dc AT THE SAME TIME when piece measures approx. 4 cm / 1½" beg dec - READ DECREASE TIP. Repeat the same dec every 3rd-2nd-2nd-2nd-2nd-1st round 8-9-10-10-11-12 more times = 28-28-28-31-31-32 dc remain. Fasten off when piece measures 46-44-44-43-42-40 cm / 18"-17¼"-17¼"-17"-16½"-15¾". Work the other sleeve the same way. ASSEMBLY: Fasten the buttons on left front piece, the top button approx. 1 cm / ⅜" from neck edge, fasten the remaining button approx. 8-8-9-9-9-10 cm / 3"-3"-3½"-3½"-3½"-4" apart. Button between 2 dc on right front piece. |
|||||||||||||||||||||||||
Diagram explanations |
|||||||||||||||||||||||||
|
|||||||||||||||||||||||||
 |
|||||||||||||||||||||||||
 |
|||||||||||||||||||||||||
Have you finished this pattern?Tag your pictures with #dropspattern #lakesidecardigan or submit them to the #dropsfan gallery. Do you need help with this pattern?You'll find 17 tutorial videos, a Comments/Questions area and more by visiting the pattern on garnstudio.com. © 1982-2026 DROPS Design A/S. We reserve all rights. This document, including all its sub-sections, has copyrights. Read more about what you can do with our patterns at the bottom of each pattern on our site. |
|||||||||||||||||||||||||


With over 40 years in knitting and crochet design, DROPS Design offers one of the most extensive collections of free patterns on the internet - translated to 17 languages. As of today we count 324 catalogs and 12290 patterns - 12280 of which are translated into English (US/in).
We work hard to bring you the best knitting and crochet have to offer, inspiration and advice as well as great quality yarns at incredible prices! Would you like to use our patterns for other than personal use? You can read what you are allowed to do in the Copyright text at the bottom of all our patterns. Happy crafting!
Post a comment to pattern DROPS 164-33
We would love to hear what you have to say about this pattern!
If you want to leave a question, please make sure you select the correct category in the form below, to speed up the answering process. Required fields are marked *.