
Popular categories
Looking for a yarn?


Comments / Questions (44)
![]() Aymard Sandrine wrote:
Aymard Sandrine wrote:
Bonjour, j'ai beau relire plusieurs fois les explications pour la veste cheyenne 166-47, je ne trouve pas les explications pour le col chale, je travaille pour la taille 2xl je vous en remercie par avance
11.11.2015 - 23:45DROPS Design answered:
Bonjour Mme Aymard, pour le devant droit, au 1er rang (sur l'endroit), tricotez les mailles du col et montez en fin de rang 15 m. Continuez ensuite comme avant en tricotant les nouvelles m au point mousse et continuez à augmenter comme avant - après 3 cm, répartissez 3 x 5 augmentations tous les 4 cm. Quand le col mesure 14 cm côté mailles au point mousse, rabattez toutes les mailles. - le col est ensuite assemblé (fins de rangs côté mailles montées) puis cousu le long de l'encolure dos. Bon tricot!
12.11.2015 - 10:14
![]() Svenja wrote:
Svenja wrote:
Hallo DROPS-Team, die Ärmel habe ich auch schon fertig. Ich komme mit dem Seitenteil nicht weiter! Bitte schnelle Antwort, damit ich weiter stricken kann. LG Svenja
09.11.2015 - 09:08DROPS Design answered:
Sie haben Recht, dass sich in der Anleitung etwas widerspricht. Die Zunahmen erfolgen laut Anleitung an der Seite der Jacke, also an derselben Seite, an der Sie auch das Abketten machen. Die Beschreibung "am vorderen Rand" passt hier dann allerdings nicht, wobei es mir eher wahrscheinlich erscheint, dass die Zunahmen am vorderen Rand erfolgen und nicht an der Seite. Ich leite das Problem an die Designerinnen weiter, bis zur Antwort von dort müssten Sie sich noch gedulden.
12.11.2015 - 23:44
![]() Svenja wrote:
Svenja wrote:
Hallo DROPS-Team, ich bin beim Rechten Vorderteil, habe gerade für dem Arm Abk.. Sie schreiben "am Ende jeder Hin-R" soll die zunahme gemacht werden, und die abnahme für den Armausschnitt am Anfang der Rück-R. Dann nehme ich ja da ab wo ich die ganze Zeit die zunahmen (2,5 cm) gemacht habe. Ist das so richtig? Denn weiter unten heißt es "die Zunahmen am vorderen Rand" weiterarbeiten. Ich bin verwirrt...bitte wo genau nehme ich für den Arm ab und dann weiter zu? LG Svenja
31.10.2015 - 10:42DROPS Design answered:
Antwort siehe oben! :-)
19.11.2015 - 21:36
![]() Hendrika wrote:
Hendrika wrote:
Goedemiddag, Ik heb al een aantal keer telpatroon A.2 gebreid, maar ik krijg het patroon er niet in. Ik heb geen idee wat ik fout doe..? Groet Hendrika
08.10.2015 - 16:51DROPS Design answered:
Hoi Hendrika. Dat is moeilijk om te zeggen wat er dan fout gaat (helaas). Je moet ervoor zorgen dat je breit de juiste steken op de goede kant EN op de verkeerde kant. Dus de st die r op de kant zijn, moeten av op de verkeerde zijn - en omgekeerd.
09.10.2015 - 14:48
![]() Hanna wrote:
Hanna wrote:
Hej! "På första v (= från rätsidan) läggs det upp 13-13-14-14-15-15 m i slutet på v (dessa ska senare sys mot halsen = sjalkrage). De nya m stickas i rätst. KOM IHÅG: Ökningen mitt fram fortsätter till färdigt mått." Det jag undrar är om man ska öka innan de nya maskor man nyss lagt upp, där alla de andra ökningarna har gjorts eller om man ska öka i slutet på varv. MVH
29.09.2015 - 18:59DROPS Design answered:
Hej Hanna, du ökar på samma ställe som alla de andra ökningarna. Lycka till!
06.10.2015 - 15:13
![]() Sandrine wrote:
Sandrine wrote:
Les 29 mailles correspondent à l'épaule ?
25.08.2015 - 17:13DROPS Design answered:
Bonjour Sandrine, tout à fait, ces mailles correspondent à celles de l'épaule, terminez ce rang sur l'envers, et à la fin du rang suivant sur l'endroit, on monte les mailles pour le col (celles-ci seront cousues le long de l'encolure dos) - tout ça pour le devant droit, pour le devant gauche, ce sera en sens inverse. Bon tricot!
25.08.2015 - 18:09
![]() Sandrine wrote:
Sandrine wrote:
Il faut bien rabattre les 29 mailles côté emmanchures c'est à dire en début de rang ?
25.08.2015 - 17:11
![]() Sandrine wrote:
Sandrine wrote:
à 62 cm il faut rabattre sur l'endroit les 29 mailles c'est à dire en début de rang ?
25.08.2015 - 16:21DROPS Design answered:
Bonjour Sandrine, pour le devant droit, quand l'ouvrage mesure 62 cm (taille M) - ajustez pour que le rang suivant soit sur l'envers, on rabat les 29 premières m au début du rang suivant sur l'envers, et on tricote les mailles restantes à l'endroit. Bon tricot!
25.08.2015 - 16:43
![]() GENDRE Jocelyne wrote:
GENDRE Jocelyne wrote:
Bonjour , Il y a une incohérence entre le nombre de CM pour arrêter aux emmanchures et CM total par rapport dessin du modèle . Faut il rabattre a 44 cm pour taille M OU A 60 CM Car en hauteur total on ne peut arriver a 62 cm Vous remercie par avance de votre réponse. Par contre confirme tres beau model. JOCELYNE
10.07.2015 - 14:39DROPS Design answered:
Bonjour Mme Gendre, et merci. En taille M, les 62 cm représentent la hauteur totale soit 44 cm jusqu'aux emmanchures puis 18 cm jusqu'aux épaules. Bon tricot!
10.07.2015 - 16:38
![]() Cindy Ashley wrote:
Cindy Ashley wrote:
Not understanding on the back piece when it says work A3 until 5 stitches remain, work first 5 stitches of A3 until finished measurement. Does this just mean to work A3 until required measurements?
04.07.2015 - 16:45DROPS Design answered:
Dear Mrs Ashley, that's correct you repeat A.3 until finished measurements in height, but in width repeat the 8 sts in A.3 until 5 sts remain at the end of row and finish row with the first 5 sts in A.3. Happy knitting!
06.07.2015 - 09:58
|
||||||||||
Cheyenne#cheyennejacket |
||||||||||
 |
 |
|||||||||
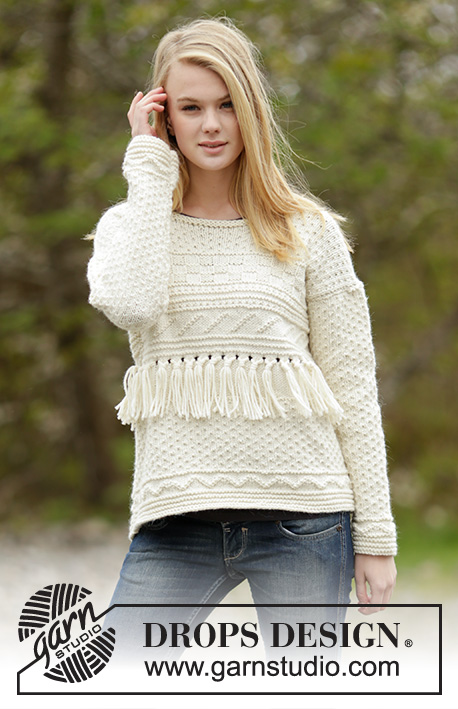
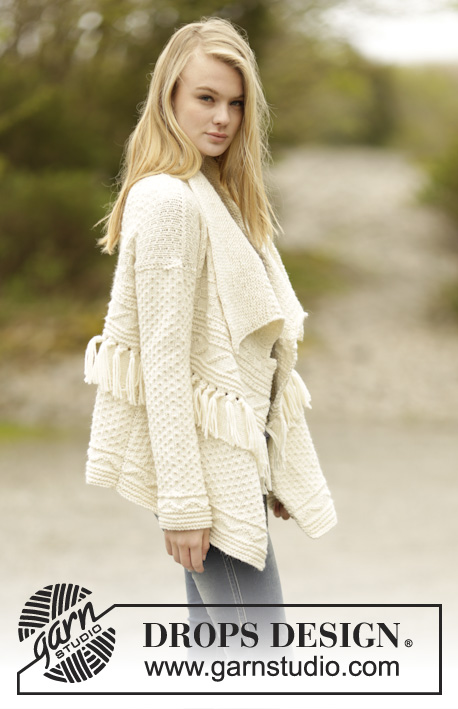
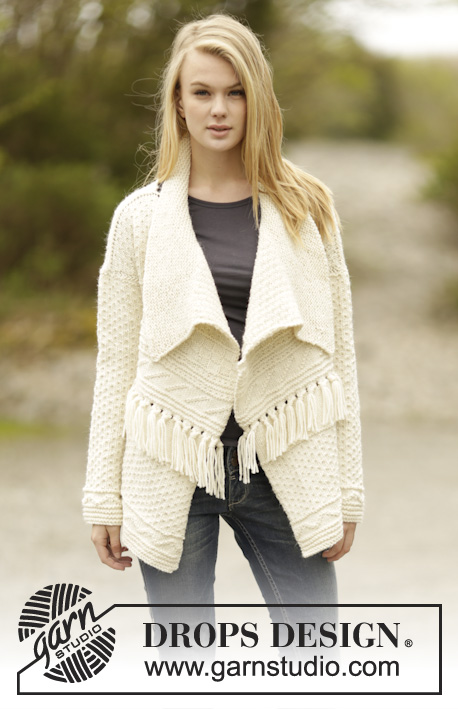
Knitted DROPS jacket with textured pattern, fringes and shawl collar in ”Nepal”. Size: S - XXXL.
DROPS 166-47 |
||||||||||
|
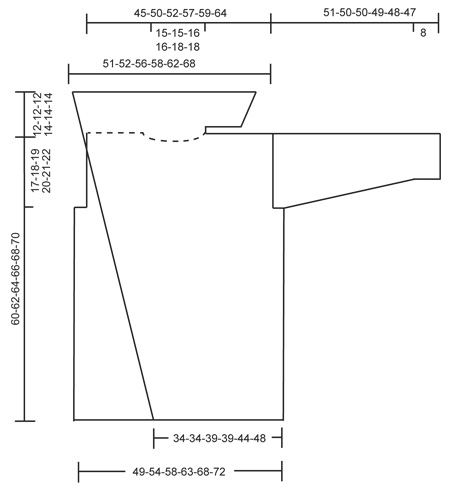
GARTER ST (back and forth): K all rows. 1 ridge = K2 rows. PATTERN: See diagrams A.1 to A.7. The diagrams show all rows in pattern seen from RS. PATTERN-1: Work A.1 a total of 2-2-2-3-3-4 times vertically. Work A.4 1 time in total vertically. Work A.5 1 time in total vertically. Work A.1 1 time in total vertically. Work A.5 1 time in total vertically. Work A.6 1 time in total vertically AT THE SAME TIME on last row from RS inc 1 st. INCREASE TIP 1: Always inc from RS. Inc with 1 YO, K YO twisted on next row to avoid holes. INCREASE TIP 2: Always inc from RS. Inc with 1 YO, work YO twisted on next row to avoid holes. Work the inc sts in to pattern. ---------------------------------------------------------- BACK PIECE: Worked back and forth on circular needle. Cast on 83-91-99-107-115-123 sts on circular needle size 5 mm / US 8 with Nepal. Work 1 ridge in GARTER ST - see explanation above. Work A.1 with 1 st in garter st in each side of piece. Repeat A.1 3 times in total vertically. Work A.2 as follows (first row = WS): 1 st in garter st, work first st in A.2 (so make it the same in both sides of piece) work A.2 until 2 sts remain (= 10-11-12-13-14-15 times), finish with 1 st in garter st. When A.2 has been worked 1 time vertically, work A.3 over A.2 as follows (first row = RS): 1 st in garter st, A.3 until 2 sts remain, work first st of A.3, finish with 1 st in garter st. Work sts in garter st in each side of piece in garter st until finished measurements. REMEMBER THE KNITTING GAUGE Work A.3 until piece measures 20-21-22-22-23-23 cm / 8"-8¼"-8¾"-8¾"-9"-9" (adjust so that last row is from RS). K 1 row from WS. Then work in stockinette st with 1 st in garter st in each side for 7 cm / 2¾", adjust so that last row is from RS. P 1 row from WS AT THE SAME TIME dec 1 st = 82-90-98-106-114-122 sts. Work A.7 with 1 st in garter st in each side of piece. Then work PATTERN-1 - see explanation above. When piece measures 43-44-45-46-47-48 cm / 17"-17¼"-17¾"-18"-18½"-19", bind off 3-3-5-5-7-7 sts in each side for armholes at beg of the 2 next rows. When armholes have been bind off and pattern 1 has been worked 1 time vertically, there are 77-85-89-97-101-109 sts on needle (NOTE: Inc 1 st on last row in pattern 1). Work A.3 until 5-5-1-1-5-5 sts remain, work the first 5-5-1-1-5-5 sts of A.3. Continue pattern until finished measurements. When piece measures 58-60-62-64-66-68 cm / 22¾"-23⅝"-24⅜"-25¼"-26"-26¾", adjust so that next row is from RS, bind off the middle 25-25-27-27-29-29 sts for neck = 26-30-31-35-36-40 sts remain on each shoulder. Now finish each shoulder separately. Bind off 1 st on next row from neck = 25-29-30-34-35-39 sts remain on the shoulder. Bind off when piece measures 60-62-64-66-68-70 cm / 23⅝"-24⅜"-25¼"-26"-26¾"-27½". Work the other shoulder the same way. RIGHT FRONT PIECE: Worked back and forth on circular needle. Cast on 58-58-66-66-74-82 sts (includes 1 band st in garter st) on circular needle size 5 mm / US 8 with Nepal. Work 1 ridge. READ ALL OF THE FOLLOWING SECTION BEFORE CONTINUING! WORK PATTERN WHILE AT THE SAME TIME INC IN THE SIDE AS FOLLOWS: INCREASE: Inc 1 st at the start of row from RS, inside 1 st in garter st when piece measures 2½ cm / ⅞" – READ INCREASE TIP 2, repeat inc every 2½ cm / ⅞" until finished measurements. PATTERN: Work as follows from RS: 1 band st in garter st, A.1 until 1 st remains, finish with 1 st in garter st. Repeat A.1 3 times in total vertically. Work A.2 over A.1 (first row = WS): Work band st and 1 st in the side in garter st until finished measurements. When A.2 has been worked 1 time vertically, work A.3 over A.2. Repeat A.3 until piece measures 20-21-22-22-23-23 cm / 8"-8¼"-8¾"-8¾"-9"-9" (adjust so that last row is from RS). K 1 row from WS. Then work in stockinette st with 1 band st and 1 st in garter st in the side for 7 cm / 2¾", adjust so that last row is from WS. Work A.7 with 1 st in garter st in each side of piece as before. Work pattern 1 with 1 st in garter st in each side of piece as before. When piece measures 43-44-45-46-47-48 cm / 17"-17¼"-17¾"-18"-18½"-19", bind off 3-3-5-5-7-7 sts for armhole on next row from WS. Continue with pattern and 1 band st in garter st towards mid front until piece measures 60-62-64-66-68-70 cm / 23⅝"-24⅜"-25¼"-26"-26¾"-27½", adjust so that next row is from WS. Bind off the first 25-29-30-34-35-39 sts for shoulder, K the remaining sts. Work in garter st until finished measurements. On first row (= from RS) cast on 13-13-14-14-15-15 sts at the end of row (these are sewn to neck = shawl collar). Work the new sts in garter st. REMEMBER: Inc mid front until finished measurements. When piece measures 3 cm / 1", inc 4-4-4-4-5-5 sts evenly - READ INCREASE TIP 1, repeat inc every 4 cm / 1½" 2 more times. Bind off when ridges have been worked for 12-12-12-14-14-14 cm / 4¾"-4¾"-4¾"-5½"-5½"-5½". LEFT FRONT PIECE: Work as right but reversed. I.e inc in the side inside 1 st in garter st at end of row from RS. Bind off sts for armhole at beg of row from RS. Bind off for shoulder at beg of row from RS. Cast on new sts for shawl collar at the end of row from WS. SLEEVE: Worked back and forth on needle. Cast on 42-42-42-50-50-50 sts (includes 1 edge st in each side) on circular needle size 5 mm / US 8 with Nepal. Work 1 ridge. Then work as follows from RS: 1 edge st in garter st, A.1 until 1 st remains, 1 edge st in garter st. Work A.1 3 times in total vertically. Work edge sts in garter st until finished measurements. Work A.2 (first row = WS) 5-5-5-6-6-6 times in total in width with 1 edge st in garter st in each side of piece. When A.2 has been worked 1 time vertically, work A.3 until finished measurements. When piece measures 8 cm / 3⅛", inc 1 st inside 1 edge st in each side of piece. Work the inc sts in the pattern A.3. Repeat inc every 5-4-3½-4-3½-3 cm / 2"-1½"-1¼"-1½"-1¼"-1⅛" 8-10-11-9-11-12 more times = 60-64-66-70-74-76 sts. Bind off when piece measures 51-50-50-49-48-47 cm / 20"-19¾"-19¾"-19¼"-19"-18½" (shorter measurements in the larger sizes because of wider shoulders). Make another sleeve the same way. ASSEMBLY: Sew the shoulder seams. Sew in sleeves. Sew the sleeve seams inside 1 edge st. Sew side seams in outer loops of edge sts. Sew shawl collar tog mid back and sew it to the neckline. FRINGES: Cut 3 strands of approx. 34 cm / 13½", thread them through the holes (in A.7), tie a LOOSE knot, i.e. let the knot hang approx. 1 cm / ⅜" down from holes. Insert 1 fringe between every holes. |
||||||||||
Diagram explanations |
||||||||||
|
||||||||||
 |
||||||||||
 |
||||||||||
Have you finished this pattern?Tag your pictures with #dropspattern #cheyennejacket or submit them to the #dropsfan gallery. Do you need help with this pattern?You'll find 23 tutorial videos, a Comments/Questions area and more by visiting the pattern on garnstudio.com. © 1982-2026 DROPS Design A/S. We reserve all rights. This document, including all its sub-sections, has copyrights. Read more about what you can do with our patterns at the bottom of each pattern on our site. |
||||||||||


With over 40 years in knitting and crochet design, DROPS Design offers one of the most extensive collections of free patterns on the internet - translated to 17 languages. As of today we count 324 catalogs and 12290 patterns - 12280 of which are translated into English (US/in).
We work hard to bring you the best knitting and crochet have to offer, inspiration and advice as well as great quality yarns at incredible prices! Would you like to use our patterns for other than personal use? You can read what you are allowed to do in the Copyright text at the bottom of all our patterns. Happy crafting!
Post a comment to pattern DROPS 166-47
We would love to hear what you have to say about this pattern!
If you want to leave a question, please make sure you select the correct category in the form below, to speed up the answering process. Required fields are marked *.