
Popular categories
Looking for a yarn?


Comments / Questions (44)
![]() Foiratier Christine wrote:
Foiratier Christine wrote:
Re-bonjour, ne vous préoccupez pas de la question posée tout à l'heure, j'ai compris les explications. Merci. Cordialement, Christine
19.09.2016 - 08:07
![]() Foiratier Christine wrote:
Foiratier Christine wrote:
Bonjour. Après avoir fait les diminutions du dos et même du devant les explications disent qu'il faut continuer en point fantaisie A3 jusqu'à la fin. N'y a-t-il pas une erreur quand à l'utilisation des autres points fantaisie c'est à dire A4, A5, et A6 car ces points ne sont pas cités dans les explications et en regardant l'image ils apparaissent. Merci pour votre réponse. Christine
19.09.2016 - 02:38DROPS Design answered:
Bonjour Mme Foiratier, les diagrammes A.4 à A.6 sont tricotés quand on fait le POINT FANTAISIE-1 (cf au début des explications, c'est-à-dire: 2-3-4 x A.1, 1xA.4, 1xA.5, 1xA.1, 1xA.5, 1xA.6 en augmentant 1 m au dernier rang). Bon tricot!
19.09.2016 - 10:16
![]() JBS wrote:
JBS wrote:
It says to work increases on the right and left pieces until finished measurements. What are the finished measurments?
07.06.2016 - 01:54DROPS Design answered:
Dear JBS, at the botttom of the page you can find a measurement chart: here are the finished measurements. Happy knitting!
07.06.2016 - 07:45
![]() Sylvie wrote:
Sylvie wrote:
Excusez moi j'ai posé ma question dans l'onglet commentaires.
23.03.2016 - 18:37
![]() Sylvie wrote:
Sylvie wrote:
Bonjour Je l'excuse mais je n'ai pas bien compris en ce qui concerne les devants, il faut augmenter dès les premiers 2,5 cm (pour la taille M) et coté opposés aux emmanchures je suppose. Combien y a t-il donc d'augmentations en tout. Merci pour votre réponse
23.03.2016 - 18:36DROPS Design answered:
Bonjour Sylvie, on augmente en début de rang sur l'endroit pour le devant droit (et fin de rang sur l'endroit pour le devant gauche), la 1ère augmentation se fait à 2.5 cm et vous continuez à augmenter tous les 2.5 cm jusqu'à la hauteur totale (= 62 cm en taille M) - le nbe de fois dépendra de votre tension (nbe de rangs) en hauteur. Bon tricot!
24.03.2016 - 08:47Linda Loveless wrote:
Do I do the increases on the two front pieces at the side or at the front edges of the work. When do I start to do the collar section
10.02.2016 - 19:07DROPS Design answered:
Dear Mr Loveless, inc are done towards the side, ie at the end of row from RS on right font piece, the inc are done until finished measurements. When you have reach shoulder, you cast off sts for shoulder and cast on new sts for collar (see also schematic). Happy knitting!
11.02.2016 - 10:06
![]() HSB wrote:
HSB wrote:
Volgens mij klopt dat juist wel. Je maakt uiteindelijke de gemeerdere kant vast aan het achterpand waardoor de zijpanden scheef vallen en de gemeerderde kant mooi weggewerkt wordt. Mijn vraag is anders. Nadat er steken voor de armsgaten zijn geminderd, moet ik dan nog meerderen totdat het gehele werk klaar is?
15.01.2016 - 18:55DROPS Design answered:
Hoi HSB. De meerderingen waren omgewisseld (zie correctie), ze komen langs middenvoor en niet aan de zijkant.
19.02.2016 - 15:33
![]() HSB wrote:
HSB wrote:
Ik ben bezig met het rechtervoorpand waarbij wordt gezegd dat je om de 2,5 cm moet meerderen TOT HET WERK KLAAR IS. Nu heb ik net de steken voor de armsgaten afgekant, maar vraag me af of ik nog steeds om de 2,5 cm moet meerderen. Het werk is namelijk nog NIET KLAAR. Bij 60 cm moet ik aan deze zelfde zijde ook 25 steken afkanten. Moet ik vervolgens ook weer om de 2,5 cm meerderen? Het werk is dan ook nog NIET KLAAR, maar het lijkt me allemaal zo onlogisch..
13.01.2016 - 19:05DROPS Design answered:
Beste HSB. Ik ben met je eens, ik vrees dat het een fout in het patroon is en dat u hadden moeten meerderen aan het begin van de nld = langs middenvoor. Maar ik weet dat nog niet zeker, ik heb de vraag neergelegd bij onze Designafdeling en kom zsm terug.
14.01.2016 - 16:38
![]() Clawur wrote:
Clawur wrote:
So, endlich fertig! Es war zwar ein ziemliches Stück Arbeit, aber es hat sich gelohnt. Die Weste ist genauso schön geworden wie ich sie mir vorgestellt habe. Echt toll!
09.01.2016 - 18:01
![]() Aymard Sandrine wrote:
Aymard Sandrine wrote:
Désolée, je me suis trompée sur le post précédent, je tricote une taille 3xl, merci
12.11.2015 - 01:31
|
||||||||||
Cheyenne#cheyennejacket |
||||||||||
 |
 |
|||||||||
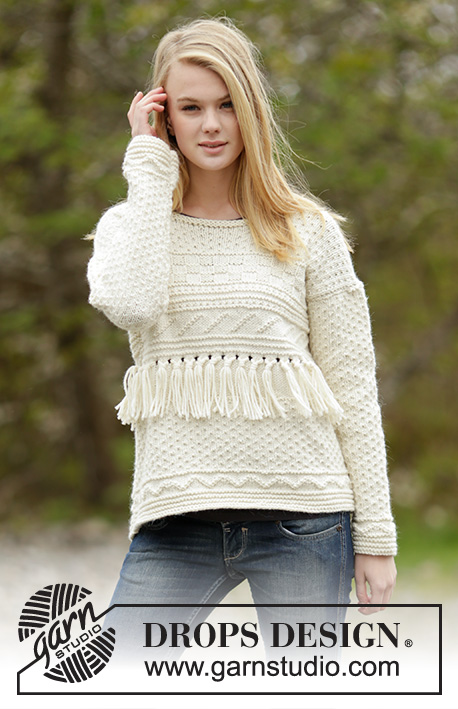
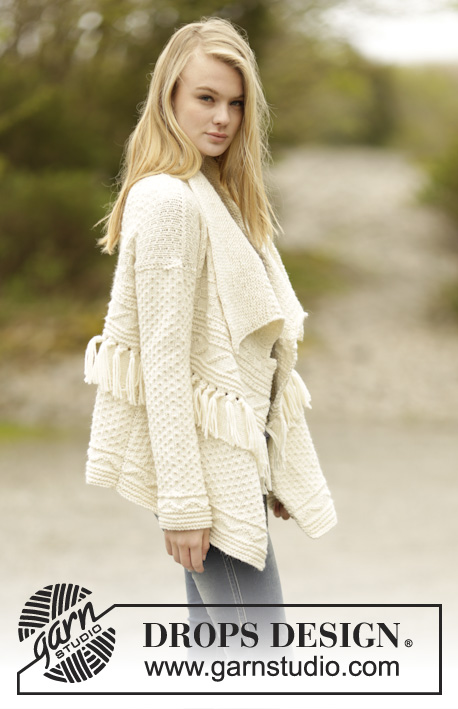
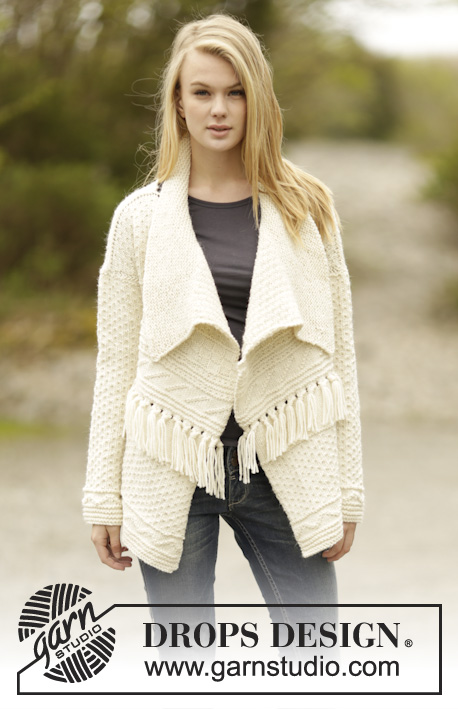
Knitted DROPS jacket with textured pattern, fringes and shawl collar in ”Nepal”. Size: S - XXXL.
DROPS 166-47 |
||||||||||
|
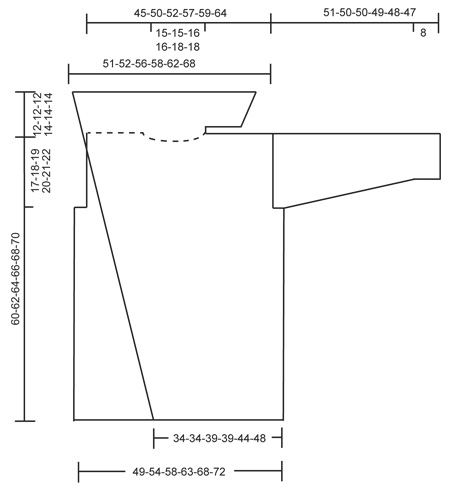
GARTER ST (back and forth): K all rows. 1 ridge = K2 rows. PATTERN: See diagrams A.1 to A.7. The diagrams show all rows in pattern seen from RS. PATTERN-1: Work A.1 a total of 2-2-2-3-3-4 times vertically. Work A.4 1 time in total vertically. Work A.5 1 time in total vertically. Work A.1 1 time in total vertically. Work A.5 1 time in total vertically. Work A.6 1 time in total vertically AT THE SAME TIME on last row from RS inc 1 st. INCREASE TIP 1: Always inc from RS. Inc with 1 YO, K YO twisted on next row to avoid holes. INCREASE TIP 2: Always inc from RS. Inc with 1 YO, work YO twisted on next row to avoid holes. Work the inc sts in to pattern. ---------------------------------------------------------- BACK PIECE: Worked back and forth on circular needle. Cast on 83-91-99-107-115-123 sts on circular needle size 5 mm / US 8 with Nepal. Work 1 ridge in GARTER ST - see explanation above. Work A.1 with 1 st in garter st in each side of piece. Repeat A.1 3 times in total vertically. Work A.2 as follows (first row = WS): 1 st in garter st, work first st in A.2 (so make it the same in both sides of piece) work A.2 until 2 sts remain (= 10-11-12-13-14-15 times), finish with 1 st in garter st. When A.2 has been worked 1 time vertically, work A.3 over A.2 as follows (first row = RS): 1 st in garter st, A.3 until 2 sts remain, work first st of A.3, finish with 1 st in garter st. Work sts in garter st in each side of piece in garter st until finished measurements. REMEMBER THE KNITTING GAUGE Work A.3 until piece measures 20-21-22-22-23-23 cm / 8"-8¼"-8¾"-8¾"-9"-9" (adjust so that last row is from RS). K 1 row from WS. Then work in stockinette st with 1 st in garter st in each side for 7 cm / 2¾", adjust so that last row is from RS. P 1 row from WS AT THE SAME TIME dec 1 st = 82-90-98-106-114-122 sts. Work A.7 with 1 st in garter st in each side of piece. Then work PATTERN-1 - see explanation above. When piece measures 43-44-45-46-47-48 cm / 17"-17¼"-17¾"-18"-18½"-19", bind off 3-3-5-5-7-7 sts in each side for armholes at beg of the 2 next rows. When armholes have been bind off and pattern 1 has been worked 1 time vertically, there are 77-85-89-97-101-109 sts on needle (NOTE: Inc 1 st on last row in pattern 1). Work A.3 until 5-5-1-1-5-5 sts remain, work the first 5-5-1-1-5-5 sts of A.3. Continue pattern until finished measurements. When piece measures 58-60-62-64-66-68 cm / 22¾"-23⅝"-24⅜"-25¼"-26"-26¾", adjust so that next row is from RS, bind off the middle 25-25-27-27-29-29 sts for neck = 26-30-31-35-36-40 sts remain on each shoulder. Now finish each shoulder separately. Bind off 1 st on next row from neck = 25-29-30-34-35-39 sts remain on the shoulder. Bind off when piece measures 60-62-64-66-68-70 cm / 23⅝"-24⅜"-25¼"-26"-26¾"-27½". Work the other shoulder the same way. RIGHT FRONT PIECE: Worked back and forth on circular needle. Cast on 58-58-66-66-74-82 sts (includes 1 band st in garter st) on circular needle size 5 mm / US 8 with Nepal. Work 1 ridge. READ ALL OF THE FOLLOWING SECTION BEFORE CONTINUING! WORK PATTERN WHILE AT THE SAME TIME INC IN THE SIDE AS FOLLOWS: INCREASE: Inc 1 st at the start of row from RS, inside 1 st in garter st when piece measures 2½ cm / ⅞" – READ INCREASE TIP 2, repeat inc every 2½ cm / ⅞" until finished measurements. PATTERN: Work as follows from RS: 1 band st in garter st, A.1 until 1 st remains, finish with 1 st in garter st. Repeat A.1 3 times in total vertically. Work A.2 over A.1 (first row = WS): Work band st and 1 st in the side in garter st until finished measurements. When A.2 has been worked 1 time vertically, work A.3 over A.2. Repeat A.3 until piece measures 20-21-22-22-23-23 cm / 8"-8¼"-8¾"-8¾"-9"-9" (adjust so that last row is from RS). K 1 row from WS. Then work in stockinette st with 1 band st and 1 st in garter st in the side for 7 cm / 2¾", adjust so that last row is from WS. Work A.7 with 1 st in garter st in each side of piece as before. Work pattern 1 with 1 st in garter st in each side of piece as before. When piece measures 43-44-45-46-47-48 cm / 17"-17¼"-17¾"-18"-18½"-19", bind off 3-3-5-5-7-7 sts for armhole on next row from WS. Continue with pattern and 1 band st in garter st towards mid front until piece measures 60-62-64-66-68-70 cm / 23⅝"-24⅜"-25¼"-26"-26¾"-27½", adjust so that next row is from WS. Bind off the first 25-29-30-34-35-39 sts for shoulder, K the remaining sts. Work in garter st until finished measurements. On first row (= from RS) cast on 13-13-14-14-15-15 sts at the end of row (these are sewn to neck = shawl collar). Work the new sts in garter st. REMEMBER: Inc mid front until finished measurements. When piece measures 3 cm / 1", inc 4-4-4-4-5-5 sts evenly - READ INCREASE TIP 1, repeat inc every 4 cm / 1½" 2 more times. Bind off when ridges have been worked for 12-12-12-14-14-14 cm / 4¾"-4¾"-4¾"-5½"-5½"-5½". LEFT FRONT PIECE: Work as right but reversed. I.e inc in the side inside 1 st in garter st at end of row from RS. Bind off sts for armhole at beg of row from RS. Bind off for shoulder at beg of row from RS. Cast on new sts for shawl collar at the end of row from WS. SLEEVE: Worked back and forth on needle. Cast on 42-42-42-50-50-50 sts (includes 1 edge st in each side) on circular needle size 5 mm / US 8 with Nepal. Work 1 ridge. Then work as follows from RS: 1 edge st in garter st, A.1 until 1 st remains, 1 edge st in garter st. Work A.1 3 times in total vertically. Work edge sts in garter st until finished measurements. Work A.2 (first row = WS) 5-5-5-6-6-6 times in total in width with 1 edge st in garter st in each side of piece. When A.2 has been worked 1 time vertically, work A.3 until finished measurements. When piece measures 8 cm / 3⅛", inc 1 st inside 1 edge st in each side of piece. Work the inc sts in the pattern A.3. Repeat inc every 5-4-3½-4-3½-3 cm / 2"-1½"-1¼"-1½"-1¼"-1⅛" 8-10-11-9-11-12 more times = 60-64-66-70-74-76 sts. Bind off when piece measures 51-50-50-49-48-47 cm / 20"-19¾"-19¾"-19¼"-19"-18½" (shorter measurements in the larger sizes because of wider shoulders). Make another sleeve the same way. ASSEMBLY: Sew the shoulder seams. Sew in sleeves. Sew the sleeve seams inside 1 edge st. Sew side seams in outer loops of edge sts. Sew shawl collar tog mid back and sew it to the neckline. FRINGES: Cut 3 strands of approx. 34 cm / 13½", thread them through the holes (in A.7), tie a LOOSE knot, i.e. let the knot hang approx. 1 cm / ⅜" down from holes. Insert 1 fringe between every holes. |
||||||||||
Diagram explanations |
||||||||||
|
||||||||||
 |
||||||||||
 |
||||||||||
Have you finished this pattern?Tag your pictures with #dropspattern #cheyennejacket or submit them to the #dropsfan gallery. Do you need help with this pattern?You'll find 23 tutorial videos, a Comments/Questions area and more by visiting the pattern on garnstudio.com. © 1982-2026 DROPS Design A/S. We reserve all rights. This document, including all its sub-sections, has copyrights. Read more about what you can do with our patterns at the bottom of each pattern on our site. |
||||||||||


With over 40 years in knitting and crochet design, DROPS Design offers one of the most extensive collections of free patterns on the internet - translated to 17 languages. As of today we count 324 catalogs and 12290 patterns - 12280 of which are translated into English (US/in).
We work hard to bring you the best knitting and crochet have to offer, inspiration and advice as well as great quality yarns at incredible prices! Would you like to use our patterns for other than personal use? You can read what you are allowed to do in the Copyright text at the bottom of all our patterns. Happy crafting!
Post a comment to pattern DROPS 166-47
We would love to hear what you have to say about this pattern!
If you want to leave a question, please make sure you select the correct category in the form below, to speed up the answering process. Required fields are marked *.