
Popular categories
Looking for a yarn?


Comments / Questions (94)
![]() Victoria wrote:
Victoria wrote:
Er det mulig å strikke denne oppskriften med Paris-garn?
08.08.2016 - 15:52DROPS Design answered:
Hej. Detta mönster är stickat med ett garn i garngrupp B (och kan stickas med andra garn i samma garngrupp). Paris tillhör garngrupp C så du kan dessvärre inte sticka med det garnet eftersom det har en annan stickfasthet. Mvh DROPS Design
11.08.2016 - 10:52
![]() Kurt wrote:
Kurt wrote:
Hej Julie! Du ska ha 277 m efter A1.
09.07.2016 - 17:20
![]() Julie Marita wrote:
Julie Marita wrote:
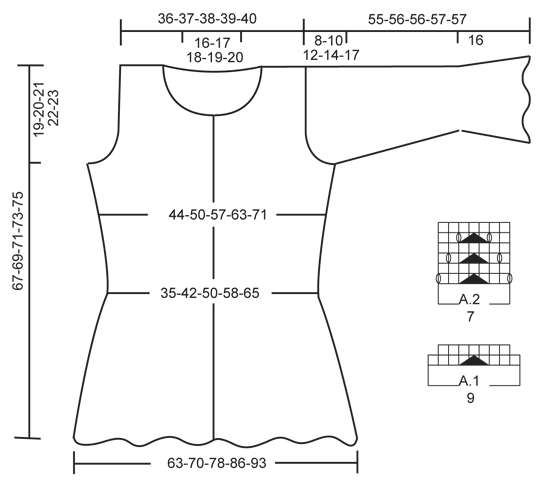
Hei. Jeg skal strikke størrelse S, men får ikke maskeantallet til å stemme, og skjønner ikke hva jeg gjør galt. Ut i fra slik jeg forstår/misforstår oppskriften skal det være 58 masker til hvert forstykke, etter A1, og 119 masker til bakstykket, og det blir 235 masker totalt. Så jeg har 42 masker til overs.. Kan du hjelpe meg med å skjønne hva jeg gjør feil så jeg kan få strikket denne flotte jakken? Tusen takk for svar :)
09.07.2016 - 00:06DROPS Design answered:
Hei Julie. Du har 311 m og strikker str S som fölger: 6 stolpe-m rille, 10 vr, * A.1 (= 9 m), 7 vr *, gjenta fra *-* 3 ganger til (dvs 4 gange i alt), sett 1 merke (= høyre forstk = 80 m), * 7 vr, A.1 *, gjenta fra *-* 8 ganger til (dvs 9 ganger i alt), 7 vr, sett 1 merke (= bakstk = 151 m), * 7 vr, A.1 *, gjenta fra *-* 3 ganger til (4 ganger i alt), 10 vr, 6 stolpe-m rille = 80 m = 311 m. Du tager automatisk ind i förste p af A.1 og har efter denne gentagelse 277 m paa pinden.
12.07.2016 - 17:01
![]() Elisabetta wrote:
Elisabetta wrote:
Ho lavorato già 7 cm di lavoro ma risultano proprio enormi, anche mettendo entrambe le braccia dentro una manica resta comunque larga! Se volessi diminuire le maglie mi conviene farlo 7 alla volta (visto che il motivo A2 è di 7 maglie)?
11.06.2016 - 00:49DROPS Design answered:
Buongiorno Elisabetta. Se vuole ricominciare dall'inizio, dovrebbe togliere 9 m (diagramma A.1) e le 7 m rov tra le due ripetizioni del diagramma A.1. Buon lavoro!
11.06.2016 - 07:41
![]() Elisabetta wrote:
Elisabetta wrote:
Scusate ho iniziato le maniche ma con 96 maglie (taglia S) vengono larghissime...può essere un errore?
10.06.2016 - 21:08DROPS Design answered:
Buonasera Elisabetta. Provi a lavorare qualche ferro: il motivo dovrebbe far diminuire la larghezza effettiva delle maniche. Inoltre sono previste diverse diminuzioni nel corso della prima parte della manica. Se trova che è ancora troppo larga, potrebbe ridurre il numero delle m avviate di una ripetizione del diagramma. Buon lavoro!
10.06.2016 - 21:52
![]() Elisabetta wrote:
Elisabetta wrote:
Buongiorno, Sono al "davanti destro" e non capisco cosa si intenda con "Proseguire lavorando a punto legaccio": quali maglie vanno lavorate a legaccio? Grazie
07.06.2016 - 22:28DROPS Design answered:
Buonasera Elisabetta, deve lavorare a legaccio sulle m del bordo, lavorare A.2 e le m a rov come prima. Buon lavoro!
07.06.2016 - 22:34
![]() Mina wrote:
Mina wrote:
Buongiorno avrei bisogno di un aiuto per la realizzazione delle spalle, non mi somo chiare le spiegazioni. Ho messo in attesa le m centrali per lo scollo, ora come procedo? Quali maglie vanno lavorate a maglia rasata? E devo diminuire solo una maglia all'inizio? Grazie
03.06.2016 - 14:48DROPS Design answered:
Buongiorno Mina. Dopo aver messo in attesa le m per lo scollo, al ferro successivo lavora le 2 m più vicino allo scollo insieme a dir. Sulle m rimaste per la spalla, continua a lavorare il diagramma A.2 come impostato. Vicino allo scollo potrebbe avere un numero di m che non consente di lavorare una ripetizione intera del diag: queste m vanno lavorate a maglia rasata. Buon lavoro!
03.06.2016 - 14:55Maria Cecília wrote:
Obrigada, depois que escrevi o pedido imaginei. Obrigada de todas formas.
24.05.2016 - 18:58
![]() Maria Cecília wrote:
Maria Cecília wrote:
Olá, estou com uma dúvida. Tenho um fio em casa, que não é nenhum dos indicados na receita, e que pede agulhas de 5mm. Montei os 311 pontos para fazer o tamanho S mas para mim são muitos! A circunferência dos meus quadris é de 90cm. Acho que terei que diminuir o número de pontos. Podiam ajudar-me? Obrigada.
19.05.2016 - 11:12DROPS Design answered:
Lamentamos, mas apenas podemos dar indicações para os trabalhos que são feitos com os nossos fios.
20.05.2016 - 15:43
![]() Benedetta wrote:
Benedetta wrote:
Grazie x la vostra preziosa collaborazione!
16.05.2016 - 11:49
|
||||||||||
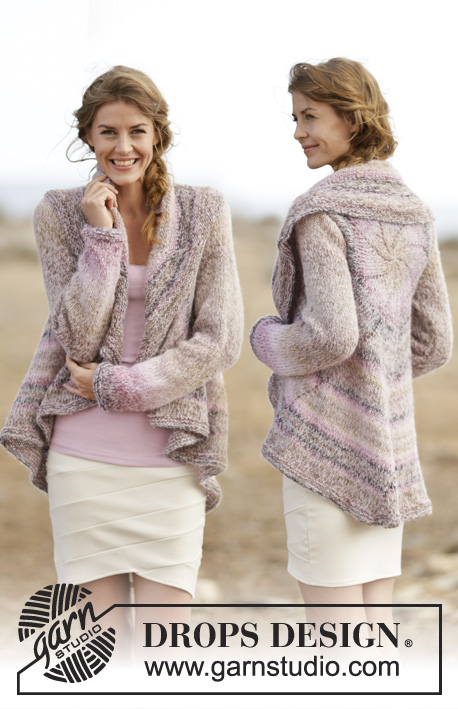
Love Is In The Air Cardigan#loveisintheaircardigan |
||||||||||
 |
 |
|||||||||
Knitted DROPS jacket with lace pattern in ”Muskat” or "Belle". Size: S - XXXL.
DROPS 160-2 |
||||||||||
|
GARTER ST (worked in the round): * K 1 round and P 1 round *, repeat from *-*. 1 ridge = 2 rounds. GARTER ST (back and forth): K all rows. 1 ridge = K2 rows. PATTERN: See diagrams A.1 and A.2. The diagrams show all rows in pattern seen from RS. INCREASE TIP: Work until 1 st remains before marker, 1 YO, P 2 (marker is in the middle of these sts), 1 YO = 2 sts inc. On next row K YO twisted to avoid holes. BUTTONHOLES: Dec for buttonholes on right band from RS. 1 buttonhole = K tog 3rd and 4th st from mid front, then make 1 YO. Dec for buttonholes when piece measures: SIZE S: 15, 23, 31, 39, 47 and 55 cm / 6", 9", 12¼", 15¼", 18½", 21½". SIZE M/L: 15, 23, 31, 39, 48 and 57 cm / 6", 9", 12¼", 15¼", 19", 22½". SIZE XL: 16, 24, 32, 41, 50 and 59 cm / 6¼", 9½", 12½", 16", 19¾", 23¼". SIZE XXL: 16, 25, 34, 43, 52 and 61 cm / 6¼", 9¾", 13⅜", 17", 20½", 24". SIZE XXXL: 17, 27, 36, 45, 54 and 63 cm / 6¾", 10⅝", 14¼", 17¾", 21¼", 24¾". ---------------------------------------------------------- BODY: Worked back and forth on circular needle. Cast on 311-351-411-439-495 sts (includes 6 band sts in each side of piece) on circular needle size 3.5 mm / US 4 with Muskat or "Belle". Work 2 ridges in GARTER ST - see explanation above. Switch to circular needle size 4 mm / US 6. Then work as follows from RS: 6 band sts in garter st, P 10-9-9-8-8, * A.1 (= 9 sts), P 7-6-6-5-5 *, repeat from *-* 3-4-5-6-7 more times, insert 1 marker (= right front piece), * P 7-6-6-5-5, A.1 *, repeat from *-* 8-10-12-14-16 more times, P 7-6-6-5-5, insert 1 marker (= back piece), * P 7-6-6-5-5, A.1 *, repeat from *-* 3-4-5-6-7 more times, P 10-9-9-8-8, 6 band sts in garter st. Work band sts in garter st until finished measurements. Work P sts K from WS and P from RS. Move the markers upwards when working. When A.1 has been worked 1 time vertically, there are 277-309-361-381-429 sts on needle. Then work A.2 (= 7 sts) over A.1 until finished measurements. When piece measures 10 cm / 4", dec as follows: Work 6 band sts in garter st, P 2 tog, P 8-7-7-6-6, * A.2, P 2 tog, P 5-4-4-3-3 *, repeat from *-* 3-4-5-6-7 more times, marker, * P 2 tog, P 5-4-4-3-3, A.2 *, repeat from *-* 8-10-12-14-16 more times, P 2 tog, P 5-4-4-3-3, marker, * P 2 tog, P 5-4-4-3-3, A.2 *, repeat from *-* 3-4-5-6-7 more times, P 2 tog, P 8-7-7-6-6, 6 band sts in garter st = 257-285-333-349-393 sts (20-24-28-32-36 sts dec). Continue with P and pattern as before until piece measures 13-14-14-15-15 cm / 5"-5½"-5½"-6"-6". Then dec as follows: 6 band sts in garter st, P 7-6-6-5-5, P 2 tog, * A.2, P 4-3-3-2-2, P 2 tog *, repeat from *-* 3-4-5-6-7 more times, marker, * P 4-3-3-2-2, P 2 tog, A.2 *, repeat from *-* 8-10-12-14-16 more times, P 4-3-3-2-2, P 2 tog, marker, * P 4-3-3-2-2, P 2 tog, A.2 *, repeat from *-* 3-4-5-6-7 more times, P 7-6-6-5-5, P 2 tog, 6 band sts in garter st = 237-261-305-317-357 sts (20-24-28-32-36 sts dec). Dec for BUTTONHOLES on right band - see explanation above. Continue dec (i.e. dec alternately on each side of every P section) every 3-4-4-5-5 cm / 1"-1½"-1½"-2"-2" 4-3-3-2-2 more times = 157-189-221-253-285 sts. Work next row as follows: 6 band sts in garter st, P 4, * A.2, P 1 *, repeat from *-* 3-4-5-6-7 more times, marker, * P 1, A.2 *, repeat from *-* 8-10-12-14-16 more times, P 1, marker, * P 1, A.2 *, repeat from *-* 3-4-5-6-7 more times, P 4, 6 band sts in garter st. When piece measures 30 cm / 11¾", inc 1 st on each side of each marker (= 4 sts inc) - READ INCREASE TIP! Work inc sts P from RS and K from WS. Repeat inc every 1½-2-2½-3½-3½ cm / ½"-¾"-⅞"-1¼"-1¼" 9-7-6-5-5 more times = 197-221-249-277-309 sts. When piece measures 48-49-50-51-52 cm / "-19¼"-19¾"-20"-20½", divide the piece as follows: Slip the first and last 52-58-65-72-80 sts on a stitch holder for front piece, cut the yarn, then work only over the middle 93-105-119-133-149 sts (= back piece). BACK PIECE: = 93-105-119-133-149 sts. Now bind off for armholes at beg of every row in each side of piece as follows: bind off 4 sts 0-0-1-1-1 time, then 3 sts 1-1-1-1-2 times, 2 sts 2-4-4-6-7 times and 1 st 1-3-5-8-9 times = 77-77-79-79-83 sts. When piece measures 65-67-69-71-73 cm / 25½"-26½"-27"-28"-28¾", slip the middle 31-33-35-37-39 sts on a stitch holder for neck and finish each shoulder separately = 23-22-22-21-22 sts. On next row from neck, K the first 2 sts tog = 22-21-21-20-21 sts. Work sts in the side that do not fit A.2 in stockinette st. Continue to work A.2, P sts and in stockinette st as before. When piece measures 66-68-70-72-74 cm / 26"-26¾"-27½"-28½"-29", work 1 ridge in garter st over all sts, then bind off. Work the other shoulder the same way. RIGHT FRONT PIECE: = 52-58-65-72-80 sts. Now bind off for armhole at beg of every row from the side as on back piece = 44-44-45-45-47 sts. Continue to work in garter st, A.2 and P sts as before. When piece measures 57-59-61-63-65 cm / 22½"-23¼"-24"-24¾"-25½" dec for neck as follows: On next row from RS slip the 14-15-16-17-18 sts towards mid front on a stitch holder for neck (work them first), then bind off on every row from neck: 2 sts 3 times and 1 st 2 times = 22-21-21-20-21 sts remain on shoulder. Work sts in the side that do not fit A.2 in stockinette st. Continue to work A.2, P sts and in stockinette st as before. When piece measures 66-68-70-72-74 cm / 26"-26¾"-27½"-28½"-29", work 1 ridge in garter st over all sts, then bind off. LEFT FRONT PIECE: Work as right but reversed. SLEEVE: Worked in the round on double pointed needles. Cast on 96-105-105-112-112 sts on double pointed needles size 3.5 mm / US 4 with Muskat or "Belle". Work 2 ridges. Switch to double pointed needles size 4 mm / US 6. Insert 1 marker at the beg of the round. Then work as follows: * P 7-6-6-5-5, A.1 (= 9 sts) *, repeat from *-* the entire round (= 6-7-7-8-8 times in total). When A.1 has been worked 1 time vertically, there are 84-91-91-96-96 sts on needle. Work A.2 over A.1 and P as before. When piece measures 3 cm / 1", dec as follows: * P 2 tog, P 5-4-4-3-3, A.2 *, repeat from *-* the entire round (= 6-7-7-8-8 sts dec) = 78-84-84-88-88 sts. When piece measures 6-6-6-7-7 cm / 2½"-2½"-2½"-2 ¾"-2¾", dec as follows: * P 4-3-3-2-2, P 2 tog, A.2 *, repeat from *-* the entire round (= 6-7-7-8-8 sts dec) = 72-77-77-80-80 sts. Repeat dec (i.e. dec alternately on each side of every P section) every 2½-3-3-4-4 cm / ⅞"-1⅛"-1⅛"-1½"-1½" 4-3-3-2-2 more times = 48-56-56-64-64 sts. Work next round as follows: *P 1, A.2 *, repeat from *-* the entire round (= 6-7-7-8-8 times in total). Piece now measures approx. 16 cm / 6¼". When piece measures 18 cm / 7", inc on each side of marker - READ INCREASE TIP - (= 2 sts inc), repeat inc every 2½-3-2-2-1½ cm / ⅞"-1"-¾"-¾"-½" 11-9-12-11-14 more times = 72-76-82-88-94 sts. P the inc sts. Work A.2 and P until piece measures 47-46-44-43-40 cm / 18½"-18"-17¼"-17" (shorter measurements in the larger sizes because of longer sleeve cap and wider shoulders), bind off 6 sts mid under sleeve (= 3 sts on each side of marker) and work sleeve back and forth on circular needle until finished measurements. Bind off for sleeve cap at beg of every row in each side: bind off 2 sts 4 times and 1 st 1-4-7-10-14 times, then bind off 2 sts in each side until piece measures 54-55-55-56-56 cm / 21¼"-21½"-21½"-22"-22", then bind off 3 sts 1 time in each side. NOTE: Work sts in the side that do not fit A.2 in stockinette st. Bind off the remaining sts, piece measures approx. 55-56-56-57-57 cm / 21½"-22"-22"-22½"-22½". Make another sleeve. ASSEMBLY: Sew the shoulder seams. Sew in sleeves. Sew the buttons on to left front piece. NECK EDGE: Pick up 100-120 sts (includes sts on stitch holder for neck) on circular needle size 3.5 mm / US 4 with Muskat or "Belle". Work 2 ridges. Bind off. |
||||||||||
Diagram explanations |
||||||||||
|
||||||||||
 |
||||||||||
Have you finished this pattern?Tag your pictures with #dropspattern #loveisintheaircardigan or submit them to the #dropsfan gallery. Do you need help with this pattern?You'll find 26 tutorial videos, a Comments/Questions area and more by visiting the pattern on garnstudio.com. © 1982-2026 DROPS Design A/S. We reserve all rights. This document, including all its sub-sections, has copyrights. Read more about what you can do with our patterns at the bottom of each pattern on our site. |
||||||||||


With over 40 years in knitting and crochet design, DROPS Design offers one of the most extensive collections of free patterns on the internet - translated to 17 languages. As of today we count 324 catalogs and 12290 patterns - 12280 of which are translated into English (US/in).
We work hard to bring you the best knitting and crochet have to offer, inspiration and advice as well as great quality yarns at incredible prices! Would you like to use our patterns for other than personal use? You can read what you are allowed to do in the Copyright text at the bottom of all our patterns. Happy crafting!
Post a comment to pattern DROPS 160-2
We would love to hear what you have to say about this pattern!
If you want to leave a question, please make sure you select the correct category in the form below, to speed up the answering process. Required fields are marked *.