
Popular categories
Looking for a yarn?


Comments / Questions (22)
![]() Marina_M wrote:
Marina_M wrote:
Hola, quiero tejer la talla M. Los 5 puntos de la cenefa están incluídos en la cantidad de puntos del cuerpo (387) o debo incluirlos yo? Gracias.
26.09.2022 - 14:31
![]() Jane Brown wrote:
Jane Brown wrote:
What is the knitting tension for this pattern?
02.08.2022 - 14:27DROPS Design answered:
Dear Mrs Brown, you'll find it under header, ie: 24 sts x 32 rows in stockinette st = 4'' x 4'' (10 x 10 cm) with larger needles. Happy knitting!
02.08.2022 - 17:18
![]() Plessis Régine wrote:
Plessis Régine wrote:
Bonjour à toute l'équipe de Drops. Comment procéder pour les augmentations de A.5 car entre deux motifs il y a 7 mailles ce qui change après deux augmentations donc 9 mailles et le motif s'en trouvera décalé... Pouvez-vous m'aider à résoudre ce problème ? Merci de votre réponse. Cordialement
01.03.2022 - 11:16DROPS Design answered:
Bonjour Mme Plessis, tricotez les augmentations en jersey jusqu'à ce qu'il y ait suffisamment de mailles pour les tricoter en suivant A.5 (ce qui peut ne pas être le cas, vous les tricoterez alors seulement en jersey), mais veillez à bien aligner le point fantaisie comme avant, autrement dit, les motifs ajourés doivent être alignés les uns au-dessus des autres avec 6 rangs entre chaque motif ajouré. Bon tricot!
01.03.2022 - 13:53
![]() Sanguillon wrote:
Sanguillon wrote:
Bonjour Pouvez me préciser où je fais les diminutions des manches sur le dernier tour (début ou milieu du travail) et comment glisser les manches sur l aig circulaire pour l empiecement. Merci par avance
30.08.2021 - 17:45DROPS Design answered:
Bonjour Mme Sanguillon, pensez-vous aux mailles à rabattre au dernier tour de la manche? ce sont les 10 ou 12 m au milieu sous la manche, autrement dit, tricotez le dernier tour de la 2ème côte mousse à l'endroit comme avant, mais quand il reste 5-6 mailles avant la fin du tour, rabattez les 5-6 mailles suivantes (= les dernières du tour) + les 5-6 premières mailles du début du tour suivant = vous avez rabattu 10-12 mailles. Placez ensuite les mailles des manches sur l'aiguille circulaire et continuez en rond comme le montre cette vidéo. Bon tricot!
31.08.2021 - 08:05
![]() Ulla Bünger wrote:
Ulla Bünger wrote:
Har jeg ret i at der ku er mønster A 5 på ryggen
29.07.2021 - 20:49DROPS Design answered:
Hej Ulla, ja det stemmer :)
04.08.2021 - 08:40
![]() Mariechristine wrote:
Mariechristine wrote:
Buongiorno Sto finendo questo bellissimo cardigan ma ho incontrato qualche difficoltà Dopo avere finito il diagramma A10.ho lavorato tutte le maglie lasciando le ultime 20 poi ho girato il lavoro idem 20 maglie sul secondo l’atto. Ma non capisco dopo che cosa devo fare. Lavoro tutte le maglie rimanenti meno le prime 20 più adesso 36 maglie? Dunque in tutto sono 20 più 36 Grazie.
15.02.2019 - 20:37DROPS Design answered:
Buonasera Mariechristine. Non deve lavorare le ultime 36 maglie. Buon lavoro!
15.02.2019 - 23:01
![]() Delorme wrote:
Delorme wrote:
Pour dos et devant après avoir tricoter 2 cotes au point mousse , doit on commencer le diagramme A1A en commençant par la ligne 1 soit un rang tout à l endroit ou commencer à la ligne 2 soit 5 mailles endroit , 7 mailles envers , merci pour votre reponse . cordialement
11.04.2017 - 22:48DROPS Design answered:
Bonjour Mme Delorme, le 1er rang des diagrammes se tricote sur l'endroit. Bon tricot!
12.04.2017 - 12:28
![]() Chris wrote:
Chris wrote:
Ich möchte dieses sehr schöne Jäckchen mit Cotton Viskose stricken, die Maschenprobe stimmt auch. Benötigt man dann allerdings mehr Garn, da die Lauflänge ja nur 110m beträgt im Gegensatz zu Safran mit 160m?
16.08.2016 - 08:53DROPS Design answered:
Liebe Chris, ja genau, das ist richtig. Wie Sie das ausrechnen, finden Sie unter Punkt 5 unserer FAQ (Tipps und Hilfe).
17.08.2016 - 13:39Karin Stapf wrote:
Beste,ik vind het geweldig dat jullie zoveel mooie patronen aanbieden.Maar ik merk dat ze bijna allemaal op een rondbreinaald worden gemaakt!! Ik heb het al eens geprobeerd maar vind het ongemakkelijk en moeilijk te begrijpen,aangezien ik ook nog maar een middelmatige breier ben.Is er een mogelijkheid de patronen om te schrijven zodat ik ze ook gewoon met 2 naalden kan breien? Groetjes Karin Ik zou het zeer waarderen als u mij verder kunt helpen
18.02.2016 - 22:15DROPS Design answered:
Hoi Karin. Wij kunnen helaas niet helpen met individuele aanpassingen op de gratis patronen, maar je kan hier lezen hoe je eventueel een patroon kan aanpassen van ronde naar rechte naalden.
24.02.2016 - 17:00
![]() Anita Toft Jensen wrote:
Anita Toft Jensen wrote:
Har strikket denne utroligt smukke jakke i str. XXXL, men den passer slet ikke i halskanten. Den er alt for stor. Den er så stor, at jeg ikke kan bruge jakken, før jeg finder på en løsning. ( den falder ned om skuldrene ) Jeg har overholdt strikkefasrheden. Det er rigtig ærgerligt, for det ødelægger lidt helheden
19.11.2015 - 16:05
|
||||||||||||||||||||||||||||||||||
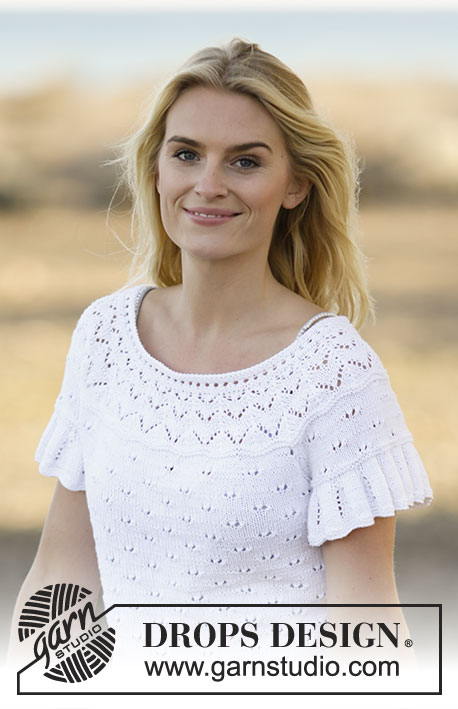
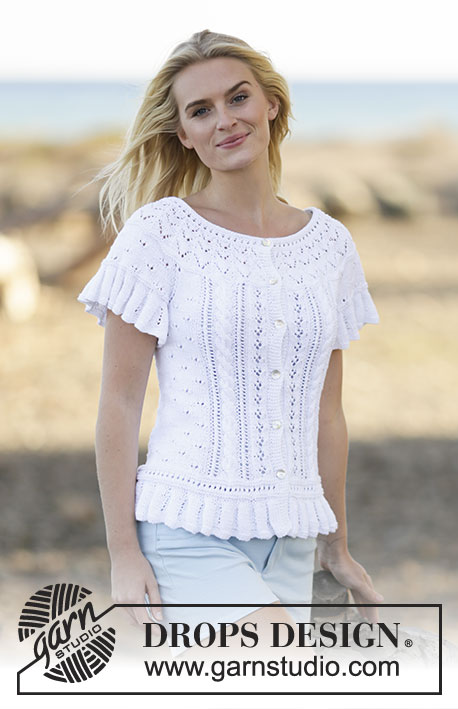
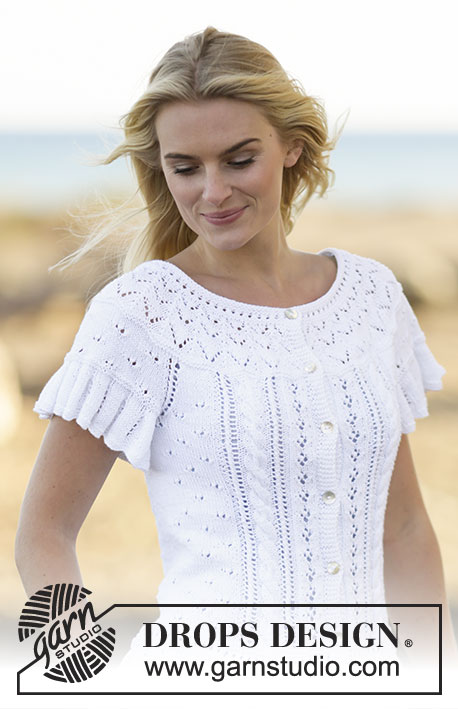
White Romance Cardigan#whiteromancecardigan |
||||||||||||||||||||||||||||||||||
 |
 |
|||||||||||||||||||||||||||||||||
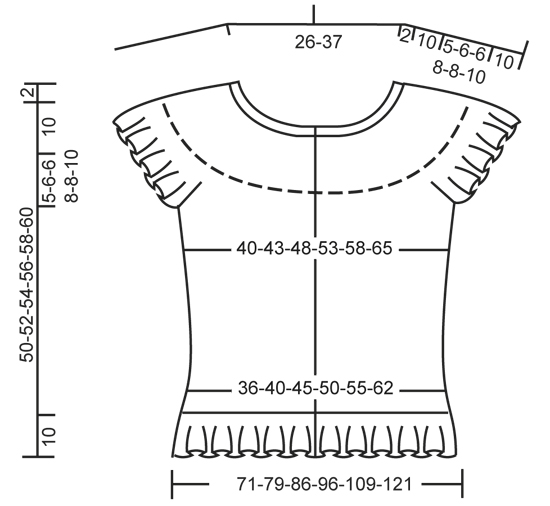
Knitted DROPS jacket with lace pattern, short sleeves and round yoke in ”Safran”. Size: S - XXXL.
DROPS 159-11 |
||||||||||||||||||||||||||||||||||
|
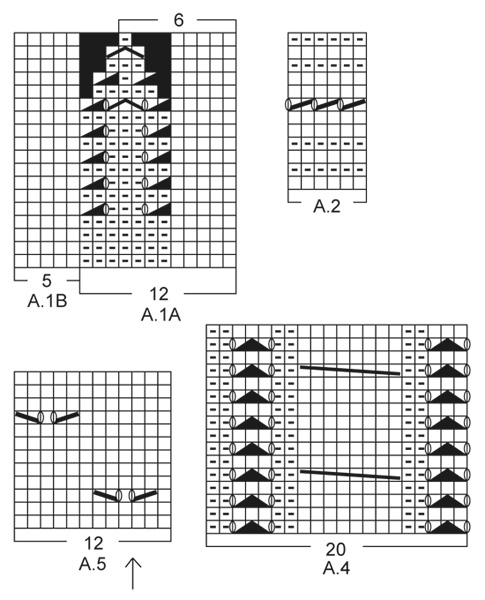
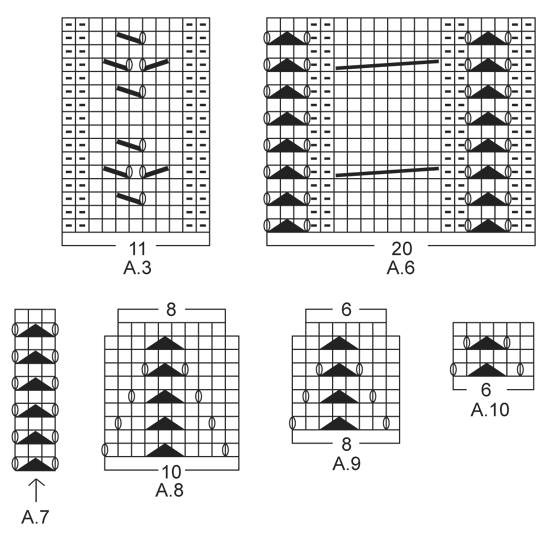
GARTER ST (back and forth on circular needle): K all rows. 1 ridge = K2 rows. GARTER ST (in the round on circular needle): * K 1 round and P 1 round *, repeat from *-*. 1 ridge = 2 rounds. PATTERN: See diagrams A.1 to A.10. The diagrams show all rows in pattern seen from RS. INCREASE TIP: Inc 1 st by making 1 YO. On next row work YO twisted to avoid holes. Work inc sts in stockinette st. BUTTONHOLES: Dec for buttonholes on right band. 1 buttonhole = K tog third and fourth st from edge and make 1 YO. Dec for buttonholes when piece measures: SIZE S: 10, 18, 26, 34, 42 and 50 cm / 4" 7", 10¼", 13½", 16½", 19¾" SIZE M: 10, 19, 27, 36, 44 and 52 cm / 4", 7½", 10½" 14¼", 17¼", 20½" SIZE L: 10, 19, 28, 37, 46 and 54 cm / 4", 7½", 11", 14½", 18", 21¼" SIZE XL: 10, 20, 29, 38, 47 and 56 cm / 4", 8", 11½", 15", 18½", 22". SIZE XXL: 10, 18, 26, 34, 42, 50 and 58 cm / 4" 7", 10¼", 13½", 16½", 19¾", 22¾" SIZE XXXL: 10, 19, 27, 36, 44, 52 and 60 cm / 4", 7½", 10½" 14¼", 17¼", 20½", 23½" (NOTE: Dec for last buttonhole right before neck edge beg to get it as high as possible). RAGLAN: Dec for raglan on each side of A.7 in every transition between sleeves and body. All dec are done from RS! Dec as follows after A.7: Slip 1 st as if to K, K 1, psso. Dec as follows 2 sts before A.7: K 2 tog. ---------------------------------------------------------- BODY: Worked back and forth on circular needle from mid front. Cast on 351-387-423-471-531-591 sts (includes 5 band sts in each side towards mid front) on circular needle size 2.5 mm / US 1.5 with Safran. Work 2 RIDGES in garter st - see explanation above (1st row = RS). Switch to circular needle size 3 mm / US 2.5 and work next row from RS as follows: 5 band sts in garter st, work pattern according to diagram A.1A until 10 sts remain, work A.1B (= 5 sts) and finish with 5 band sts in garter st. Continue pattern like this back and forth. When A.1 has been worked, there are 183-201-219-243-273-303 sts on needle. Work next row as follows from RS: 5 band sts as before (work bands in garter st until finished measurements), work pattern according to diagram A.2 until 6 sts remain on needle, work 1st st in A.2 and finish with 5 band sts. Continue like this until A.2 is done - NOTE: On 7th row in diagram K last st before band. Remember BUTTONHOLES on right band - see explanation above. When A.2 has been worked, K 1 row from RS while AT THE SAME TIME adjusting no of sts to 187-199-223-247-271-307 (do not inc/dec over the band sts). P 1 row (work bands as before). Insert 1 marker 50-52-58-64-70-79 sts in from each side (= 87-95-107-119-131-149 sts between markers on back piece). Work next row as follows from RS: 5 band sts, A.3 (= 11 sts), A.4 (= 20 sts), work pattern according to diagram A.5 until 37 sts remain on needle, 1 st in stockinette st, A.6 (= 20 sts), A.3 (= 11 sts) and 5 band sts. Continue pattern like this. REMEMBER THE KNITTING GAUGE AT THE SAME TIME when piece measures 12 cm / 4¾", inc 1 st on each side of both markers - READ INCREASE TIP (= 4 sts inc). Repeat inc every 6-6-6-7-7-7 cm / 2⅜"-2⅜"-2⅜"-2¾"-2¾"-2¾" a total of 4 times in each side = 203-215-239-263-287-323 sts - NOTE: Work inc sts in stockinette st. Continue to work until piece measures 35-36-38-38-40-40 cm / 13¾"-14¼"-15"-15"-15¾"-15¾". Work next row as follows from WS: Work 49-51-57-62-68-77 sts as before (= left front piece), bind off 10-10-10-12-12-12 sts for armhole (i.e. 5-5-5-6-6-6 sts on each side of marker), work 85-93-105-115-127-145 sts (= back piece), bind off 10-10-10-12-12-12 sts for armhole and work the remaining 49-51-57-62-68-77 sts (= right front piece). Put piece aside and knit the sleeves. SLEEVE: Worked in the round on circular needle. Cast on 144-156-156-168-168-180 sts on circular needle size 2.5 mm / US 1.5 with Safran. Work 2 ridges in GARTER ST - see explanation above. Switch to circular needle size 3 mm / US 2.5 and work pattern according to diagram A.1A. When A.1A has been worked, there are 72-78-78-84-84-90 sts on needle. Work 2 ridges. AT THE SAME TIME on last round bind off the middle 10-10-10-12-12-12 sts mid under sleeve = 62-68-68-72-72-78 sts remain on needle. Put piece aside and make another sleeve. YOKE: Slip sleeves on to same circular needle as body where armholes were bound off (without working them first) = 307-331-355-383-407-455 sts. AT THE SAME TIME insert 1 marker in first and last st on both sleeves (= 4 markers). Beg from RS and continue pattern as before on body AT THE SAME TIME work A.5 on sleeves (arrow in diagram should match middle of sleeve, beg on same row in diagram as on body). Work in addition A.7 in every transition between body and sleeves (arrow in diagram should match against st with marker). When 2 row have been worked back and forth, beg dec for RAGLAN - see explanation above (= 8 sts dec). Repeat dec every 4th row (i.e. every other row from RS) 4-5-5-7-7-8 times in total = 275-291-315-327-351-391 sts. Work 1 row from WS as before. Then work 2 ridges over all sts AT THE SAME TIME dec 4-10-4-6-10-10 sts evenly on 1st row (do not dec over band sts) = 271-281-311-321-341-381 sts. Work 2 rows in stockinette st (work bands as before). Now beg dec for round yoke and work first row as follows from RS: 5 band sts, work pattern according to diagram A.8 until 6 sts remain on row, finish 1 st in stockinette st with 5 band sts as before. Continue pattern like this. When A.8 has been worked 1 time vertically, work A.9 instead of A.8 (work the other sts as before). When A.9 has been worked 1 time vertically, there are 167-173-191-197-209-233 sts on needle. Now work A.10 instead of A.9 (work remaining sts as before). After A.10 work an elevation in back of neck as follows from RS: K until 20-20-22-22-24-24 sts remain. Turn, K back until 20-20-22-22-24-24 sts remain in the other side. Turn, K until 36-36-40-40-44-44 sts remain. Turn, K back until 36-36-40-40-44-44 sts remain in the other side. Turn, K until 52-52-58-58-64-64 sts remain. Turn, K back until 52-52-58-58-64-64 sts remain in the other side. Turn, K until 68-68-76-76-84-84 sts remain. Turn, K back until 68-68-76-76-84-84 sts remain in the other side. Turn piece and K the rest of the row. NECK EDGE: Switch to circular needle size 2.5 mm / US 1.5, beg from WS and work pattern according to diagram A.2 (beg on 2nd row in A.2). On next row from RS, dec 21-23-23-25-25-29 sts evenly = 146-150-168-172-184-204 sts. After A.2, loosely bind off with K from RS. Jacket measures approx. 52-54-56-58-60-62 cm / 20½"-21¼"-22"-22¾"-23⅝"-24⅜" from shoulder and down. ASSEMBLY: Sew the openings under the sleeves. Sew on buttons. |
||||||||||||||||||||||||||||||||||
Diagram explanations |
||||||||||||||||||||||||||||||||||
|
||||||||||||||||||||||||||||||||||
 |
||||||||||||||||||||||||||||||||||
 |
||||||||||||||||||||||||||||||||||
 |
||||||||||||||||||||||||||||||||||
Have you finished this pattern?Tag your pictures with #dropspattern #whiteromancecardigan or submit them to the #dropsfan gallery. Do you need help with this pattern?You'll find 29 tutorial videos, a Comments/Questions area and more by visiting the pattern on garnstudio.com. © 1982-2026 DROPS Design A/S. We reserve all rights. This document, including all its sub-sections, has copyrights. Read more about what you can do with our patterns at the bottom of each pattern on our site. |
||||||||||||||||||||||||||||||||||


With over 40 years in knitting and crochet design, DROPS Design offers one of the most extensive collections of free patterns on the internet - translated to 17 languages. As of today we count 324 catalogs and 12290 patterns - 12280 of which are translated into English (US/in).
We work hard to bring you the best knitting and crochet have to offer, inspiration and advice as well as great quality yarns at incredible prices! Would you like to use our patterns for other than personal use? You can read what you are allowed to do in the Copyright text at the bottom of all our patterns. Happy crafting!
Post a comment to pattern DROPS 159-11
We would love to hear what you have to say about this pattern!
If you want to leave a question, please make sure you select the correct category in the form below, to speed up the answering process. Required fields are marked *.