
Popular categories
Looking for a yarn?


Comments / Questions (83)
![]() Cristina Fernandez wrote:
Cristina Fernandez wrote:
Buenos dias!! Quisiera consultar por que no me queda el diseño del diagrama A1 ,como figura el patron? Si me coincide la cantidad de puntos, pero no el diseño.muchas gracias.saludos desde argentina.
29.07.2019 - 22:01DROPS Design answered:
Ver la respuesta arriba.
01.08.2019 - 15:45
![]() Cristina Fernandez wrote:
Cristina Fernandez wrote:
Buenos dias, me encanta su pagina!!mi pregunta es por que sigo el diagrama A 1 y no me coinsiden con los del diagrama ,si la cantidad de puntos.muchas gracias.saludos desde argentina.
29.07.2019 - 21:48
![]() Liv wrote:
Liv wrote:
Jeg strikker str XL. Etter å ha strikket alle maskene inn på en pinne skal jeg da felle til raglan på neste omgang eller skal det strikkes flere omganger før første felling
06.07.2019 - 12:59DROPS Design answered:
Hej Liv, du starter allerede raglanindtagningen på 1.omgang, hvis det bliver for svært, så er det også helt ok at starte på 2.omgang. Se forklaringen til alle 4 omgange i RAGLAN øverst i opskriften. God fornøjelse!
09.07.2019 - 10:35
![]() Liv wrote:
Liv wrote:
Mange skriver at A1 er feil og dere avviser at det er tilfelle. Forklar heller i oppskriften at man må se etter at 1.maske starter på riktig sted for at mønsteret ikke skal forskyve seg. Gjør dere det så blir det ikke så mye frustrasjon der ute
06.06.2019 - 20:29
![]() Tatiana wrote:
Tatiana wrote:
Hello, I can not understand how to knit a diagram A1. I knitted the first row, each pattern has 12 loops. Then I continue to knit the second and subsequent rows according to the scheme, and the shift to the left occurs and the pattern is broken. I use a row start marker. How do I shift and knit it loops so that there is no displacement. Thank you.
12.02.2019 - 12:01DROPS Design answered:
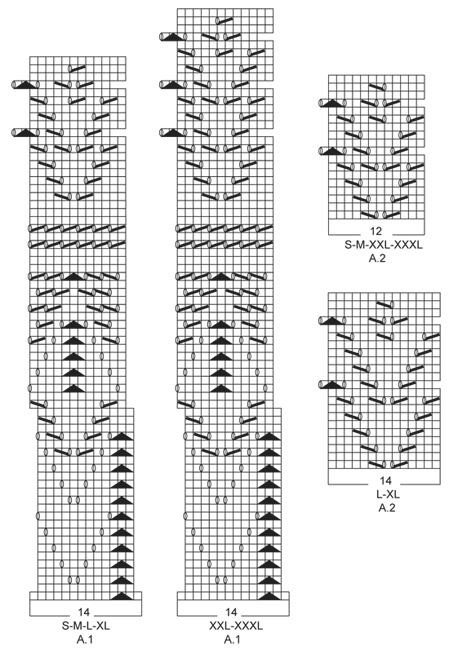
Dear Tatiana, the double decrease in A.1 has to be worked lined up, on row 3, slip the first st in A.1, work next 2 sts tog and psso. On Row 5 to 21, slip the last st on round (last st last repeat on previous round)/last st on previous repeat, work next 2 sts tog (the first and 2nd st from 1st repeat) and psso. Happy knitting!
12.02.2019 - 13:32
![]() Kerstin wrote:
Kerstin wrote:
Would it be possible to answer my question, though? Or do you need it in English?
19.01.2019 - 17:34DROPS Design answered:
Dear Kerstin, the German translator eill get back to you as soon as possible. Thank you for your patiente.
19.01.2019 - 18:33
![]() Kerstin wrote:
Kerstin wrote:
Diese Antwort war wohl nicht für meine Frage bestimmt. / I‘m sorry, but I think your answer was meant for someone else.
19.01.2019 - 14:24DROPS Design answered:
Dear Kerstin, you received this due to a technical difficulty. Sorry about that.
19.01.2019 - 17:12
![]() Kerstin wrote:
Kerstin wrote:
Ich habe vergessen, zu erwähnen, dass ich von der 5. Reihe der Strickschrift spreche.
19.01.2019 - 12:56DROPS Design answered:
Liebe Kerstin, Ihre Frage wurden jetzt an der richtigen Stelle beantwortet. Viel Spaß beim stricken!
21.01.2019 - 10:04
![]() Kerstin wrote:
Kerstin wrote:
Meine Frage ist hier schon mehrfach gestellt worden, nur leider nicht in Sprachen, derer ich ausreichend mächtig wäre, um die Antwort zu verstehen: In der Strickschrift A1 Größe S habe ich die 3 M. zusamengestrickt, dann 3 re. M., den Umschlag (der schon nicht leicht rechts von dem in der 3. R. landet), und dann habe ich nur 1, nicht wie gezeigt 3 M. zum nächsten Umschlag. Nach 3 M. landet der Umschlag auf halbem Weg zu den nächsten 3 zusammengestrickten Maschen. Was mache ich falsch?
18.01.2019 - 20:48DROPS Design answered:
Liebe Kerstin, nach 1. Reihe in A.1 nehmen Sie 2 M ab, dann sollen die doppelte Abnahme übereinander gestrickt werden, die Umschläge sollen dann einen "V" ausbilden, dh wie im Diagram gezeit. Bei der 3. Reihe in A.1 haben Sie: 2 M zs abheben, 1 M re, die 2 M über die re M überziehen, 4 M re, 1 Umschlag, 1 M re, 1 Umschlag, 4 M re. Bei der 5. Reihe haben Sie nach der Abnahme: 3 M re, 1 Umschlag, 3 M re, 1 Umschlag, 3 M re. Viel Spaß beim stricken!
19.01.2019 - 13:37
![]() Tina wrote:
Tina wrote:
Prob med A1. De fleste sætter et mærke, så man kan se hvor en omgang slutter/starter, og det er der problemet er. Man starter med et indtag, 1 m løst af, 2 sammen, trækker den løse over. Den løse maske er den sidste m på omgangen, og de 2 sammen er de 2 første på omgangen. Det giver problemer når man strikker hen til mærket, så så skubber man mønstret. Man skal slutte en maske før mærket, så passer mønstret.
08.06.2018 - 06:40
|
||||||||||||||||
Juliana#julianasweater |
||||||||||||||||
 |
 |
|||||||||||||||
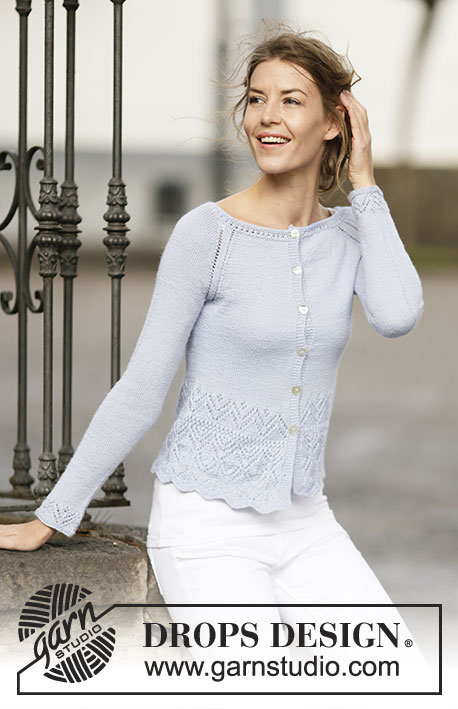
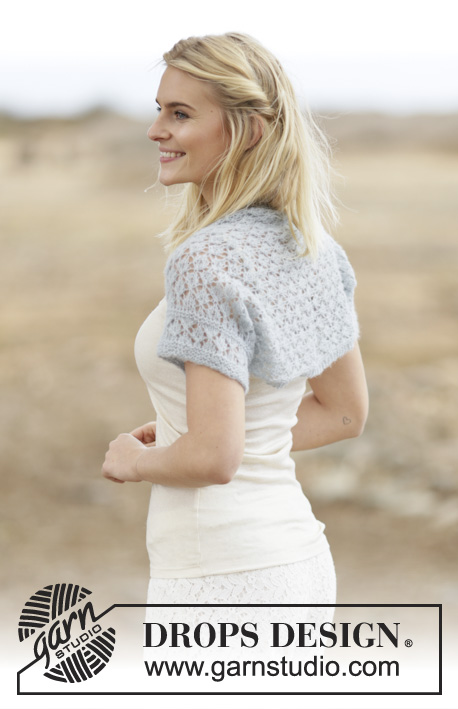
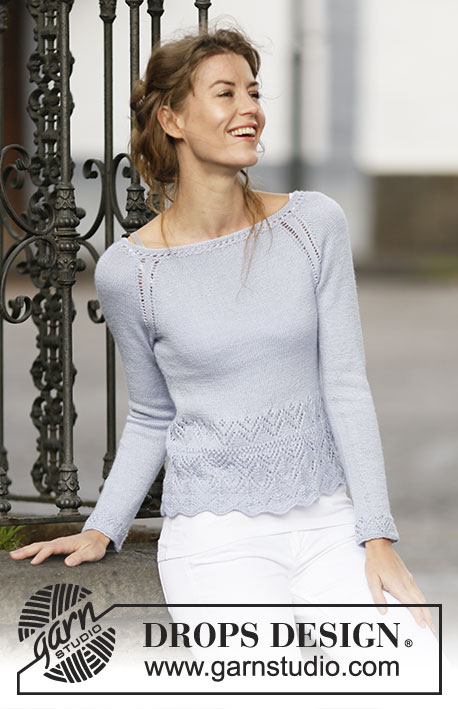
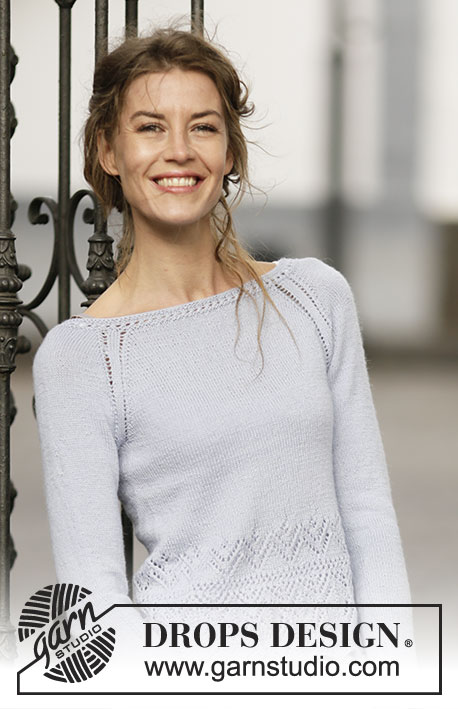
Knitted DROPS jumper with raglan and lace pattern in ”BabyAlpaca Silk” or "DROPS ♥ You #7". Size: S - XXXL.
DROPS 161-22 |
||||||||||||||||
|
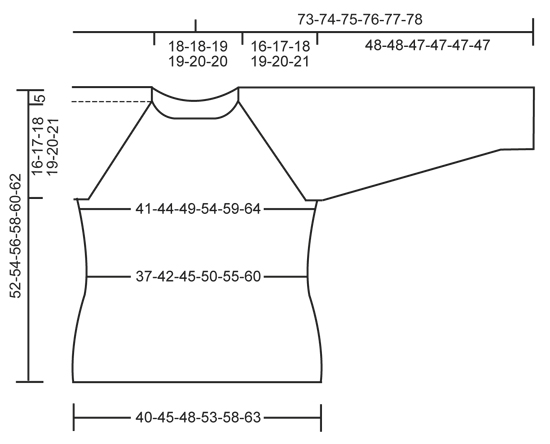
GARTER ST (worked in the round): 1 ridge = 2 rounds. * K 1 round and P 1 round *, repeat from *-*. PATTERN: See diagrams A.1-A.2. Adjust so that pattern comes above each other as in diagram A.1. INCREASE TIP: Work until 1 st remains before marker, 1 YO, K 2 (marker is in the middle of these sts), 1 YO. On next round K YO twisted (i.e. work in back loop of st instead of front) to avoid holes. RAGLAN: Dec 1 st on each side of each marker. DEC EVERY 4TH ROUND AS FOLLOWS: Dec only on 1st round but all 4 rounds are explained to continue the lace pattern. ROUND 1: Beg 5 sts before each marker and work as follows: K 3 tog, 1 YO, K 1 twisted, K 2 (marker is in the middle of these 2 sts), K 1 twisted, 1 YO, K 3 twisted tog. ROUND 2: K all sts, do not work YOs twisted; they should make holes. ROUND 3: Beg 4 sts before each marker and work as follows: K 2 tog, 1 YO, K 1 twisted, K 2 (marker is in the middle of these 2 sts), K 1 twisted, 1 YO, K 2 twisted tog. ROUND 4: Work as 2nd round. DEC EVERY OTHER ROUND AS FOLLOWS: ROUND 1: Beg 5 sts before each marker and work as follows: K 3 tog, 1 YO, K 1 twisted, K 2 (marker is in the middle of these 2 sts), K 1 twisted, 1 YO, K 3 twisted tog. ROUND 2: K all sts, do not work YOs twisted; they should make holes. PATTERN-1: ROUND 1: P all sts. ROUND 2: K all sts. ROUND 3: K all sts. ROUND 4: * K 2 tog, 1 YO *, repeat from *-* the rest of the rnd. ROUND 5: Work as 3rd round. ---------------------------------------------------------- JUMPER: Worked bottom up, in the round on circular needle. BODY: Cast on 224-252-266-294-322-350 sts on circular needle size 3 mm / US 2.5 with BabyAlpaca Silk. Work 2 ridges in GARTER ST - see explanation above - over all sts. Then work A.1 (= 14 sts) 16-18-19-21-23-25 times in total in width. When A.1 has been worked 1 time vertically, there are 192-216-228-252-276-300 sts on needle. REMEMBER THE KNITTING GAUGE On next round, dec 16-16-12-12-12-12 sts evenly = 176-200-216-240-264-288 sts. Piece measures approx. 21-21-21-21-24-24 cm / 8¼"-8¼"-8¼"-8¼"-9½"-9½". Continue in stockinette st. Insert 1 marker at beg of round, then 1 marker after 88-100-108-120-132-144 sts. There are 88-100-108-120-132-144 sts on front and back piece. When piece measures 25-25-25-25-28-28 cm / 9¾"-9¾"-9¾"-9¾"-11"-11", inc 1 st on each side of both markers (= 4 sts inc) – see INCREASE TIP. Repeat inc every 1-2-1-1-1-1 cm / ½"-¾"-½"-½"-½"-½" 4-2-4-4-4-4 more times = 196-212-236-260-284-308 sts. When piece measures 31-32-33-34-35-36 cm / 12¼"-12½"-13"-13 ⅜"-13¾"-14¼", bind off for armholes in each side as follows: bind off the first 6 sts, work until 6 sts remain before marker in the side, bind off the next 12 sts, work until 6 sts remain, bind off the last 6 sts. Fasten off. There are 86-94-106-118-130-142 sts on back piece and front piece. Put piece aside and knit the sleeves. SLEEVE: Worked in the round on double pointed needles. Cast on 46-46-50-52-56-58 sts on double pointed needles size 3 mm / US 2.5 with BabyAlpaca Silk. Work 2 ridges. On next round, K and inc 2-2-6-4-4-2 sts evenly = 48-48-56-56-60-60 sts. Then work A.2 (= 12-12-14-14-12-12 sts) 4-4-4-4-5-5 times in total in width. When A.2 has been worked 1 time vertically, continue in stockinette st. Insert 1 marker at the beg of the round. When piece measures 7-6-8-8-8-7 cm / 2¾"-2½"-3"-3"-3"-2¾", inc 1 st on each side of marker (= mid under sleeve). Repeat inc every 3-2½-2½-2-2-2 cm / 1⅛"-⅞"-⅞"-¾"-¾"-¾" 13-16-14-17-17-19 more times = 76-82-86-92-96-100 sts. When piece measures 48-48-47-47-47-47 cm / 19"-19"-18½"-18½"-18½"-18½" (shorter measurements in the larger sizes because of longer sleeve cap and wider shoulders), bind off 12 sts mid under sleeve = 64-70-74-80-84-88 sts. Put piece aside and make another sleeve. YOKE: Slip sleeves on to same circular needle as body where armholes were bound off = 300-328-360-396-428-460 sts. Insert 1 marker in all transitions between sleeves and body (= 4 markers). Continue in stockinette st AT THE SAME TIME dec for RAGLAN – see explanation above as follows: Dec every 4th round 7-5-3-0-0-0 times, then every other round 8-14-20-27-29-30 times. After all dec for raglan 180-176-176-180-196-220 sts remain on needle. P 1 round, K 1 round while AT THE SAME TIME dec 36-32-28-32-44-68 sts evenly = 144-144-148-148-152-152 sts. Then work PATTERN-1 - see explanation above. Work 2 ridges. Then loosely bind off all sts. ASSEMBLY: Sew the openings under the sleeves. |
||||||||||||||||
Diagram explanations |
||||||||||||||||
|
||||||||||||||||
 |
||||||||||||||||
 |
||||||||||||||||
Have you finished this pattern?Tag your pictures with #dropspattern #julianasweater or submit them to the #dropsfan gallery. Do you need help with this pattern?You'll find 31 tutorial videos, a Comments/Questions area and more by visiting the pattern on garnstudio.com. © 1982-2026 DROPS Design A/S. We reserve all rights. This document, including all its sub-sections, has copyrights. Read more about what you can do with our patterns at the bottom of each pattern on our site. |
||||||||||||||||


With over 40 years in knitting and crochet design, DROPS Design offers one of the most extensive collections of free patterns on the internet - translated to 17 languages. As of today we count 325 catalogs and 12298 patterns - 12288 of which are translated into English (US/in).
We work hard to bring you the best knitting and crochet have to offer, inspiration and advice as well as great quality yarns at incredible prices! Would you like to use our patterns for other than personal use? You can read what you are allowed to do in the Copyright text at the bottom of all our patterns. Happy crafting!
Post a comment to pattern DROPS 161-22
We would love to hear what you have to say about this pattern!
If you want to leave a question, please make sure you select the correct category in the form below, to speed up the answering process. Required fields are marked *.