
Popular categories
Looking for a yarn?


Comments / Questions (83)
![]() Małgorzata Urban wrote:
Małgorzata Urban wrote:
Dziękuję za odpowiedź, właśnie wzór się kształtuje prawidłowo, pozdrawiam
27.07.2020 - 21:21
![]() Małgorzata wrote:
Małgorzata wrote:
Witam jeszcze raz, w schemacie w co drugim rzędzie zaznaczone sa tylko oczka prawe, rozumiem, że po przerobieniu rzędu w którym formuje się wzor, nastepny same oczka prawe i tak przez cały schemat , nie rozumiem tego oznaczenia, pozdrawiam
25.07.2020 - 22:54DROPS Design answered:
Witaj Małgosiu! Dokładnie tak, sweterek jest przerabiany na drutach z żyłką na okrągło, więc jest przerabiany cały czas na prawej stronie robótki. Okrążenia parzyste są przerabiane oczkami prawymi (wtedy narzuty z poprzedniego okrążenia staną się dziurkami i uzyskasz piękny ażurowy wzór). Pozdrawiamy!
27.07.2020 - 09:33
![]() Małgorzata Urban wrote:
Małgorzata Urban wrote:
Witam, zrobiłam diagram A 1 dla rozmiaru S i nie zgadza mi się długość według wyjaśnienia wzoru, mój wyszedł dużo za długi, rzędy parzyste przerabiamy na prawo, proszę o pomoc
21.07.2020 - 18:19DROPS Design answered:
Witaj Malgosiu! Jeśli nie wykonywałeś próbki na początku to tak może być, sama to przerobiłam kilka razy:) Jak nie chcesz pruć, to wykonaj krótszą część dżersejem. Problem pojawi się jednak na wysokości reglanu. Jak przerabiać poszczególne okrążenia znajdziesz w części ŚCIEG FANTAZYJNY-1. Pozdrawiamy!
22.07.2020 - 09:19
![]() Kalinda wrote:
Kalinda wrote:
Hallo, ich möchte das Muster gerne von oben nach unten stricken. Geht das auch? Wie muss ich das Diagramm vom Muster dann lesen?
08.06.2020 - 12:32DROPS Design answered:
Liebe Kalinda, wahrscheinlich können Sie das Modell so anpassen, die Diagramme sollten Sie auch so anpassen (Maschenprobe stricken wäre eine gute Idee), am besten wenden Sie sich an Ihrem DROPS Laden, sicher kann man Ihnen dort weiterhelfen. Viel Spaß beim stricken!
08.06.2020 - 16:00
![]() Laura wrote:
Laura wrote:
Buongiorno! Vi ho scritto una domanda un paio di settimane fa ma penso non l’abbiate letta.. aspetto una risposta..
16.12.2019 - 09:50DROPS Design answered:
Buongiorno Laura. Per un corretto allineamento, al terzo giro di A1, passa la 1a maglia, lavora le due m successive insieme e accavalla la m passata. Dal giro 5, la m che deve passare è l'ultima del giro precedente. Inoltre, dal giro 25, l'inizio del giro viene spostato di una m a sinistra e ai giri 65 e 71 (nelle 2 taglie più grandi) di 2 maglie a sinistra. Buon lavoro!
16.12.2019 - 10:48
![]() Laura wrote:
Laura wrote:
Vorrei realizzare questo maglioncino, ci ho provato tante volte ma proprio non riesco a far quadrare il motivo. Sto lavorando il diagramma A1 ma le maglie accavallate non mi rimangono una sopra l’altra come nella foto, ma tendono verso sinistra.. eppure i punti sono giusti, è possibile che sia sbagliato il diagramma? Penso ci sia qualcosa che non va quando si passa una maglia a dritto, si lavorano 2 maglie insieme a dritto e si accavalla la prima.. non ho trovato comenti in italiano inerenti
02.12.2019 - 19:19
![]() Noelani wrote:
Noelani wrote:
Size L and XL both require same number grams of wool... is this correct?
01.12.2019 - 14:09DROPS Design answered:
Hi Noelani, Yes. This is enough yarn for both sizes, Happy knitting!
02.12.2019 - 07:32
![]() Lorinda wrote:
Lorinda wrote:
Hello. I am now on round 25 of A.1 and the diagram has a jog to the left. I figured out how to line up the center 7 stitches in the diagram and count out left and right to locate how to align the YO’s etc. I have 3 stitches from the beginning of the round not accounted for in the diagram. How to begin this round? You answered before that I use 1 stitch from the previous round to line up the triangle symbol. How do I line up a jog in diagram?
21.11.2019 - 11:48DROPS Design answered:
Dear Lorinda, at the beg of round 25, work the first stitch of the round and place the marker from beg of round here, rounds start now here, and the last stitch of each repeat will be the first stitch of next repeat. Happy knitting!
21.11.2019 - 13:08
![]() Lorinda wrote:
Lorinda wrote:
I dont see any comments in English so I do not know if you have seen this question before. I am trying to use the diagram for the lace that starts the bottom of this jumper. I am new to lace knitting but it seemed pretty straight forward. The symbol for “slip 1 st as if to k, k2tog, psso” is not Lining up with the same stitch below. In fact, it is “creeping” diagonally to the left. How am I to adjust the diagram to make the pattern line up with the stitches below?
17.11.2019 - 16:30DROPS Design answered:
Dear Lorinda, to get the black triangle lined up in A.1 you have to work (from round 5) the last stitch from previous round together with the first 2 sts of next round, then the last st in 1st repeat tog with first 2 sts next repeat and so on. Happy knitting!
18.11.2019 - 10:42
![]() Cristina Fernandez wrote:
Cristina Fernandez wrote:
Buenos dias!! Quisiera consultar por que no me queda el diseño del diagrama A1 ,como figura el patron? Si me coincide la cantidad de puntos, pero no el diseño.muchas gracias.saludos desde argentina.
29.07.2019 - 22:03DROPS Design answered:
Hola Cristina. Como entiendes es muy difícil sin ver la labor contestar a tu pregunta. Puede ser que tengas fallos en la interpretación de los diagramas. Todas las filas del diagrama se leen de derecho a izquierda de abajo arriba y como se presentan los puntos. Si el problema no es en el diagrama, intenta especificar más y estaremos encantados de ayudarte.
01.08.2019 - 15:44
|
||||||||||||||||
Juliana#julianasweater |
||||||||||||||||
 |
 |
|||||||||||||||
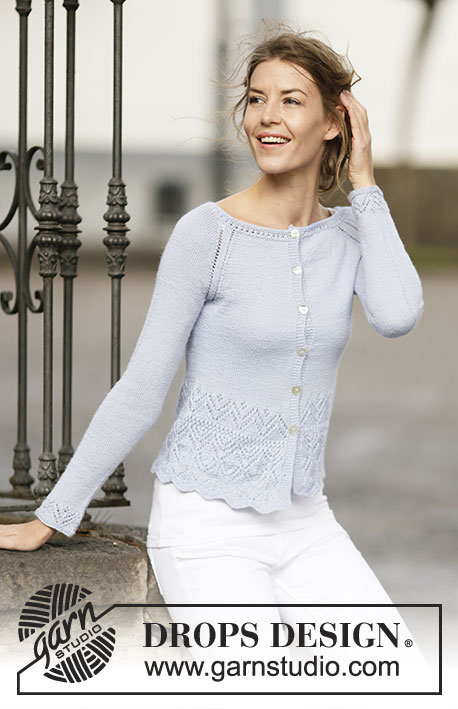
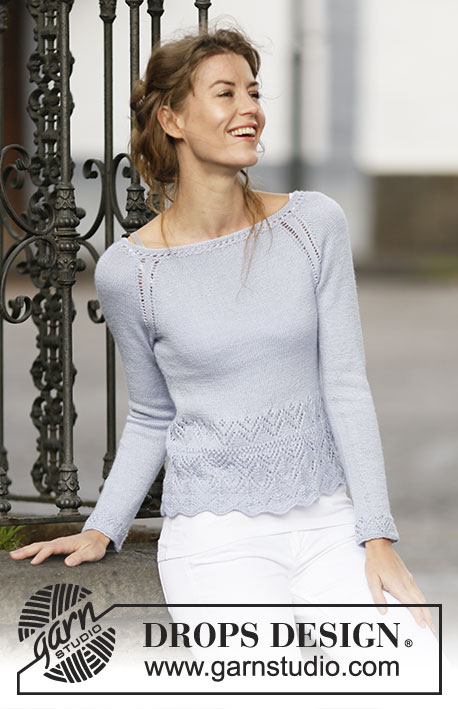
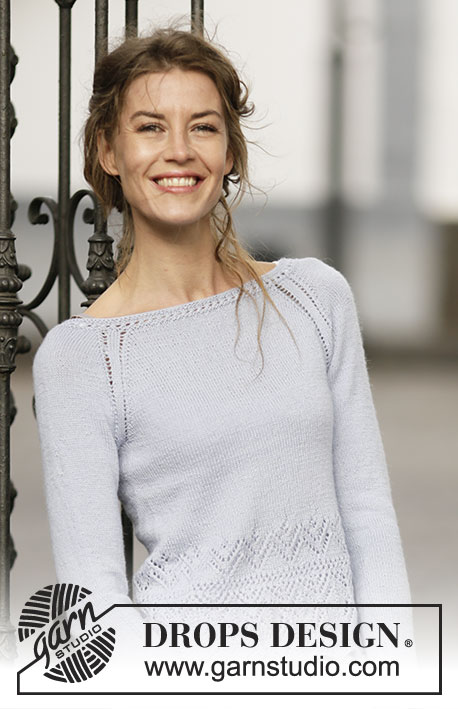
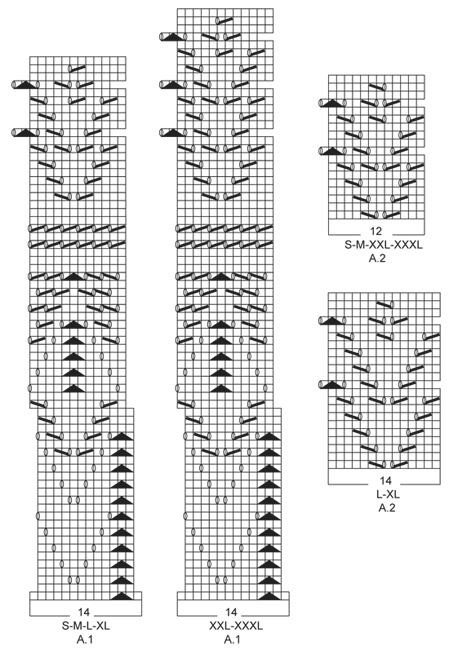
Knitted DROPS jumper with raglan and lace pattern in ”BabyAlpaca Silk” or "DROPS ♥ You #7". Size: S - XXXL.
DROPS 161-22 |
||||||||||||||||
|
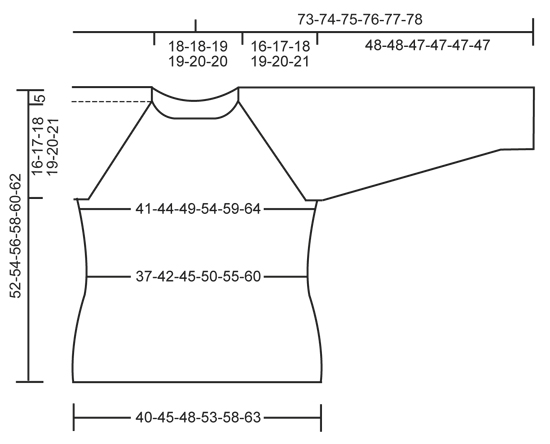
GARTER ST (worked in the round): 1 ridge = 2 rounds. * K 1 round and P 1 round *, repeat from *-*. PATTERN: See diagrams A.1-A.2. Adjust so that pattern comes above each other as in diagram A.1. INCREASE TIP: Work until 1 st remains before marker, 1 YO, K 2 (marker is in the middle of these sts), 1 YO. On next round K YO twisted (i.e. work in back loop of st instead of front) to avoid holes. RAGLAN: Dec 1 st on each side of each marker. DEC EVERY 4TH ROUND AS FOLLOWS: Dec only on 1st round but all 4 rounds are explained to continue the lace pattern. ROUND 1: Beg 5 sts before each marker and work as follows: K 3 tog, 1 YO, K 1 twisted, K 2 (marker is in the middle of these 2 sts), K 1 twisted, 1 YO, K 3 twisted tog. ROUND 2: K all sts, do not work YOs twisted; they should make holes. ROUND 3: Beg 4 sts before each marker and work as follows: K 2 tog, 1 YO, K 1 twisted, K 2 (marker is in the middle of these 2 sts), K 1 twisted, 1 YO, K 2 twisted tog. ROUND 4: Work as 2nd round. DEC EVERY OTHER ROUND AS FOLLOWS: ROUND 1: Beg 5 sts before each marker and work as follows: K 3 tog, 1 YO, K 1 twisted, K 2 (marker is in the middle of these 2 sts), K 1 twisted, 1 YO, K 3 twisted tog. ROUND 2: K all sts, do not work YOs twisted; they should make holes. PATTERN-1: ROUND 1: P all sts. ROUND 2: K all sts. ROUND 3: K all sts. ROUND 4: * K 2 tog, 1 YO *, repeat from *-* the rest of the rnd. ROUND 5: Work as 3rd round. ---------------------------------------------------------- JUMPER: Worked bottom up, in the round on circular needle. BODY: Cast on 224-252-266-294-322-350 sts on circular needle size 3 mm / US 2.5 with BabyAlpaca Silk. Work 2 ridges in GARTER ST - see explanation above - over all sts. Then work A.1 (= 14 sts) 16-18-19-21-23-25 times in total in width. When A.1 has been worked 1 time vertically, there are 192-216-228-252-276-300 sts on needle. REMEMBER THE KNITTING GAUGE On next round, dec 16-16-12-12-12-12 sts evenly = 176-200-216-240-264-288 sts. Piece measures approx. 21-21-21-21-24-24 cm / 8¼"-8¼"-8¼"-8¼"-9½"-9½". Continue in stockinette st. Insert 1 marker at beg of round, then 1 marker after 88-100-108-120-132-144 sts. There are 88-100-108-120-132-144 sts on front and back piece. When piece measures 25-25-25-25-28-28 cm / 9¾"-9¾"-9¾"-9¾"-11"-11", inc 1 st on each side of both markers (= 4 sts inc) – see INCREASE TIP. Repeat inc every 1-2-1-1-1-1 cm / ½"-¾"-½"-½"-½"-½" 4-2-4-4-4-4 more times = 196-212-236-260-284-308 sts. When piece measures 31-32-33-34-35-36 cm / 12¼"-12½"-13"-13 ⅜"-13¾"-14¼", bind off for armholes in each side as follows: bind off the first 6 sts, work until 6 sts remain before marker in the side, bind off the next 12 sts, work until 6 sts remain, bind off the last 6 sts. Fasten off. There are 86-94-106-118-130-142 sts on back piece and front piece. Put piece aside and knit the sleeves. SLEEVE: Worked in the round on double pointed needles. Cast on 46-46-50-52-56-58 sts on double pointed needles size 3 mm / US 2.5 with BabyAlpaca Silk. Work 2 ridges. On next round, K and inc 2-2-6-4-4-2 sts evenly = 48-48-56-56-60-60 sts. Then work A.2 (= 12-12-14-14-12-12 sts) 4-4-4-4-5-5 times in total in width. When A.2 has been worked 1 time vertically, continue in stockinette st. Insert 1 marker at the beg of the round. When piece measures 7-6-8-8-8-7 cm / 2¾"-2½"-3"-3"-3"-2¾", inc 1 st on each side of marker (= mid under sleeve). Repeat inc every 3-2½-2½-2-2-2 cm / 1⅛"-⅞"-⅞"-¾"-¾"-¾" 13-16-14-17-17-19 more times = 76-82-86-92-96-100 sts. When piece measures 48-48-47-47-47-47 cm / 19"-19"-18½"-18½"-18½"-18½" (shorter measurements in the larger sizes because of longer sleeve cap and wider shoulders), bind off 12 sts mid under sleeve = 64-70-74-80-84-88 sts. Put piece aside and make another sleeve. YOKE: Slip sleeves on to same circular needle as body where armholes were bound off = 300-328-360-396-428-460 sts. Insert 1 marker in all transitions between sleeves and body (= 4 markers). Continue in stockinette st AT THE SAME TIME dec for RAGLAN – see explanation above as follows: Dec every 4th round 7-5-3-0-0-0 times, then every other round 8-14-20-27-29-30 times. After all dec for raglan 180-176-176-180-196-220 sts remain on needle. P 1 round, K 1 round while AT THE SAME TIME dec 36-32-28-32-44-68 sts evenly = 144-144-148-148-152-152 sts. Then work PATTERN-1 - see explanation above. Work 2 ridges. Then loosely bind off all sts. ASSEMBLY: Sew the openings under the sleeves. |
||||||||||||||||
Diagram explanations |
||||||||||||||||
|
||||||||||||||||
 |
||||||||||||||||
 |
||||||||||||||||
Have you finished this pattern?Tag your pictures with #dropspattern #julianasweater or submit them to the #dropsfan gallery. Do you need help with this pattern?You'll find 31 tutorial videos, a Comments/Questions area and more by visiting the pattern on garnstudio.com. © 1982-2026 DROPS Design A/S. We reserve all rights. This document, including all its sub-sections, has copyrights. Read more about what you can do with our patterns at the bottom of each pattern on our site. |
||||||||||||||||


With over 40 years in knitting and crochet design, DROPS Design offers one of the most extensive collections of free patterns on the internet - translated to 17 languages. As of today we count 325 catalogs and 12298 patterns - 12288 of which are translated into English (US/in).
We work hard to bring you the best knitting and crochet have to offer, inspiration and advice as well as great quality yarns at incredible prices! Would you like to use our patterns for other than personal use? You can read what you are allowed to do in the Copyright text at the bottom of all our patterns. Happy crafting!
Post a comment to pattern DROPS 161-22
We would love to hear what you have to say about this pattern!
If you want to leave a question, please make sure you select the correct category in the form below, to speed up the answering process. Required fields are marked *.