
Popular categories
Looking for a yarn?


Comments / Questions (64)
![]() Pia Guldbech wrote:
Pia Guldbech wrote:
Jeg har et spørgsmål til denne opskrift. Hvad er strikkefastheden? glatstrikning står der 17x22, men da store dele af forstykke strikkes i retstrikning, hvad er strikke fastheden så? Det er svært at regne ud, hvormange pinde der skal strikkes, når retstriknings anvisningerne ikke er der. Med venlig hilsen Pia Guldbech P.S. Findes der en omregningstabel fra glat strikning til retstrikning? Sådan cirka mål.
02.09.2014 - 10:50DROPS Design answered:
Hej Pia. Stemmer din strikkepröve her (i glatstrik) saa passer den ogsaa til resten af denne jakke. Hvis du vil vide hvor meget det er i retstrik, saa strik en pröve med pinde 5 (eller den str du havde brug for til den rette fasthed) og se hvor mange m x p du faar paa 10x10 i ret. Vi har ingen tabel paa dette, men der gaar altid flere m/p til ret end til glat. Se evt et tilsvarende mönster hvor fastheden er i ret.
02.09.2014 - 16:22
![]() Pia Guldbech wrote:
Pia Guldbech wrote:
Jeg spurgte om nedenstående d. 2708. Hvornår mon jeg får svar? Jeg har et spørgsmål til denne opskrift. Hvad er strikkefastheden? glatstrikning står der 17x22, men da store dele af forstykke strikkes i retstrikning, hvad er strikke fastheden så? Det er svært at regne ud, hvormange pinde der skal strikkes, når retstriknings anvisningerne ikke er der. Med venlig hilsen Pia Guldbech
02.09.2014 - 10:47
![]() Torunn wrote:
Torunn wrote:
Når det skal strikkes vendinger. Det skal da begynne å telles på rillemaskene, ikke sant?
25.08.2014 - 22:21DROPS Design answered:
Hei Torunn. Det er til höyre forstk? Du har da kun rillemaske (kantmaske) i siden, saa du starter med mönstret - du har ingen rillemaske/kantmaske langs forkanten. Ellers beskriv hvor du er i mönstret.
26.08.2014 - 15:35E.D. wrote:
As the others have stated, and by doing the math (number of stitches compared to gauge), size XXXL is 48 inches and not 33... Someone needs to recheck and make sure this is corrected.
09.07.2014 - 21:35Amanda wrote:
Bust should be XXXL: 128 cm= 50 inches.
09.07.2014 - 10:22
![]() Sylvia wrote:
Sylvia wrote:
Hej! Hur gör jag när det skall ökas maskor på sista varvet med vändningar, ska jag öka till 1 m då jag börjar med omg. 2 med vändningar, alltså 9 maskor istället för 8 m på varv1
09.07.2014 - 08:51
![]() Nina T wrote:
Nina T wrote:
I think you might want to check sizing. An XXXL should be slightly larger than 33"
09.07.2014 - 06:32
![]() Joyce Rischer wrote:
Joyce Rischer wrote:
Looking at the bust sizes on this pattern and comparing them to the cm given on the diagram (sloper) there seems to be a discrepancy. It could be my error, but I would like to verify this before starting to make it. Thank you.
07.07.2014 - 18:03
![]() Marian wrote:
Marian wrote:
Mooi
01.07.2014 - 19:52Madeleine wrote:
Bien hâte d'avoir le patron. Je vais l'offrir en cadeau
30.06.2014 - 02:17
|
|||||||||||||||||||
Enchanted#enchantedcardigan |
|||||||||||||||||||
 |
 |
||||||||||||||||||
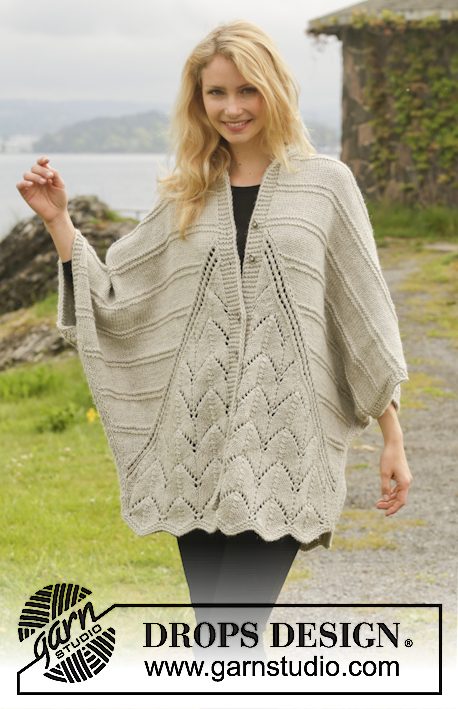
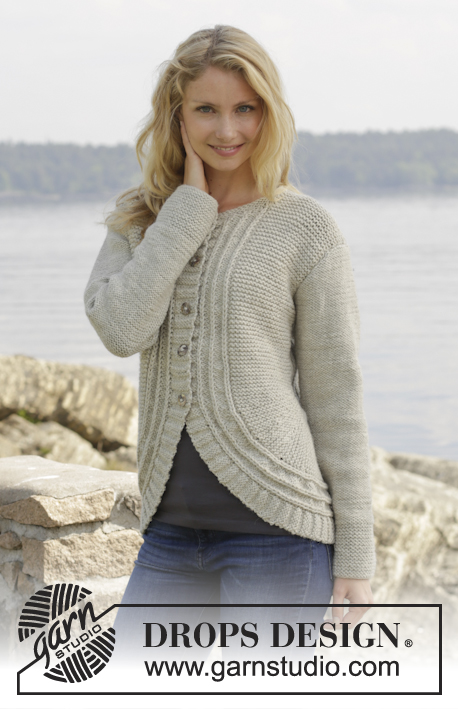
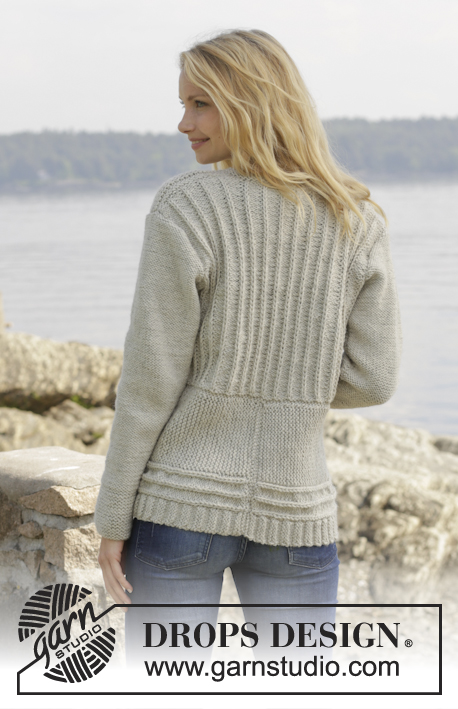
Knitted DROPS jacket with False English rib and short rows in "Nepal". Size S-XXXL
DROPS 157-25 |
|||||||||||||||||||
|
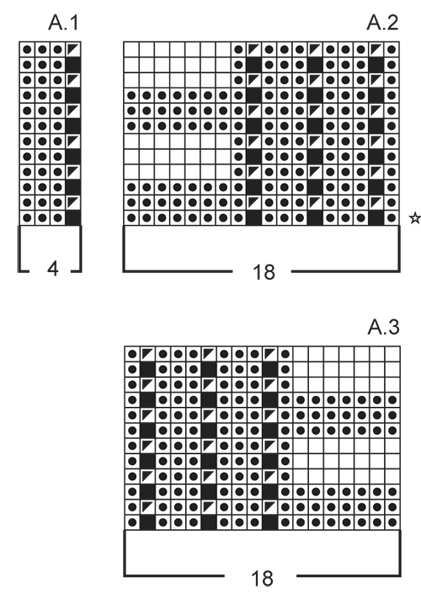
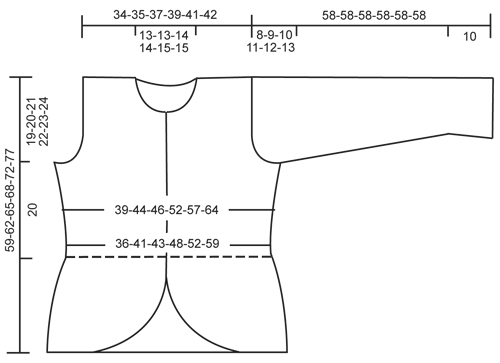
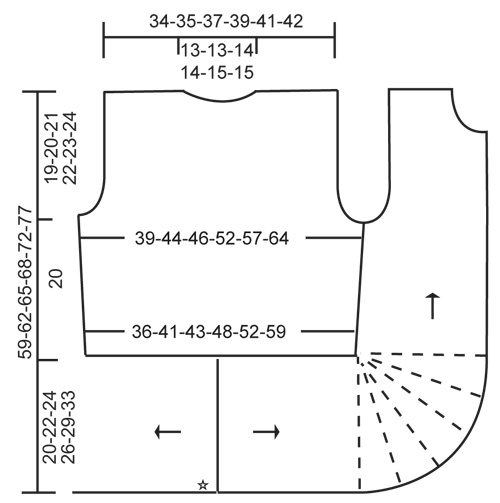
GARTER ST (back and forth on needle): K all rows. 1 ridge = K2 rows. PATTERN: See diagrams A.1-A.3. The diagram shows all rows in pattern seen from RS. INCREASE TIP (applies to sleeve): Inc inside 1 edge st in garter st and 1 P by making 1 YO. On next round work YO twisted, i.e. work in the back loop of st instead of front, to avoid holes. DECREASE TIP: Dec inside 1 edge st in garter st. All dec are done from RS! Dec before 1 edge st as follows: K 2 tog. Dec after 1 edge st as follows: Slip 1 st as if to K, K 1, psso. SHORT ROWS: Work short rows on front piece to get a rounded edge on the piece. Also work short rows between pattern A.2/A.3! Work short rows as follows with 1st row from RS: Row 1 and 2: Work 8 sts in all sizes, turn and work back. Row 3 and 4: Work 12 sts in all sizes, turn and work back. Row 5 and 6: Work 16 sts in all sizes, turn and work back. Row 7 and 8: Work 19-19-20-20-19-20 sts, turn and work back. Row 9 and 10: Work 21-21-23-23-21-23 sts, turn and work back. Continue to work 3 sts more on every turn until all sts have been worked. Repeat from 1st row a total of 5 times. (The rounded edge now measures approx. 28-31-34-37-41-46 cm / 11"-12¼"-13⅜"-14½"-16"-18" on the outer side and 3 cm / 1" on the inside.) BUTTONHOLES: Dec for buttonholes on right band. 1 buttonhole = K tog second and third st from mid front and make 1 YO. Dec for buttonholes when piece measures (measured from the marker in the side): SIZE S: 1-8-15-22-29 cm / ½"-3"-6"-8¾"-11½" SIZE M: 1-8-15-22-30 cm / ½"-3"-6"-8¾"-11¾" SIZE L: 1-8-15-22-30 cm / ½"-3"-6"-8¾"-11¾" SIZE XL: 1-8-16-23-31 cm / ½"-3"-6¼"-9"-12¼" SIZE XXL: 1-8-16-23-31 cm / ½"-3"-6¼"-9"-12¼" SIZE XXXL: 1-9-17-25-32 cm / ½"-3½"-6¾"-9¾"-12½" ---------------------------------------------------------- JACKET: Worked back and forth in parts on circular needle and sewn tog when finished. BACK PIECE: Cast on 63-71-75-83-91-103 sts (includes 1 edge st in garter st in each side) on circular needle size 5 mm / US 8 with Nepal. Work 1 ridge in GARTER ST - see explanation above. Then work as follows: 1 edge st in garter st, A.1 (= 4 sts) until 2 sts remain on row, work 1st st in A.1, 1 edge st in garter st. Continue like this with pattern, AT THE SAME TIME when piece measures 4 cm / 1½", inc inside 1 edge st in garter st in each side of piece by making 1 YO. On next row work YOs twisted to avoid holes, then P the new sts (seen from RS)! Repeat inc every 4-4-4-3-3-3 cm / 1½"-1½"-1½"-1¼"-1¼"-1¼" 2-2-2-3-3-3 more times = 69-77-81-91-99-111 sts. REMEMBER THE GAUGE! When piece measures 20 cm / 8" in all sizes, bind off for armholes each side as follows: bind off 3-4-5-6-7-8 sts 1 time and 1 st 1-3-3-6-7-11 times = 61-63-65-67-71-73 sts. Continue with pattern as before until piece measures 37-38-39-40-41-42 cm / 14½"-15"-15¼"-15¾"-16⅛"-16½". On next row from RS bind off for neck as follows: Work the first 21-22-22-23-24-25 sts, bind off the next 19-19-21-21-23-23 sts and work the remaining 21-22-22-23-24-25 sts. Then finish each shoulder separately as follows: Continue back over left shoulder and dec 1 st towards the neck on next row from RS = 20-21-21-22-23-24 sts for shoulder. When piece measures 38-39-40-41-42-43 cm / 15-15¼"-15¾"-16⅛"-16½"-17", work 1 ridge and loosely bind off. Work the other shoulder the same way. RIGHT EDGE PIECE/FRONT PIECE: Cast on 35-38-42-45-50-57 sts (includes 1 edge st in garter st) on circular needle size 5 mm / US 8 with Nepal. Work 1 ridge in garter st. Then work as follows from RS: Pattern A.3 (= 18 sts), 16-19-23-26-31-38 sts in garter st, 1 edge st in garter st. When piece measures approx. 18-21-23-24-26-30 cm / 7"-8¼"-9"-9½"-10¼"-11¾", work SHORT ROWS - see explanation above, AT THE SAME TIME on last row in 1st repetition with short rows, inc 1 st by making a YO between A.3 and sts in garter st = 36-39-43-46-51-58 sts. Work YOs twisted on next row to avoid holes. Repeat inc on last row in the remaining repetitions of short rows 3-4-1-2-0-0 more times = 39-43-44-48-51-58 sts on needle. When all short rows have been worked, insert 1 marker. NOW MEASURE PIECE FROM HERE! Continue with garter st and pattern as before. Remember BUTTONHOLES - see explanation above. When piece measures 4 cm / 1½", inc in the side as on back piece (i.e. the shorter side). After all inc, there are 42-46-47-52-55-62 sts on needle. When piece measures 20 cm / 8", bind off for armhole in the side as on back piece (i.e in same side of piece as inc) = 38-39-39-40-41-43 sts. When piece measures 30-31-31-32-32-33 cm / 11¾"-12¼"-12¼"-12½"-12½"-13", slip the first 9 sts on needle from RS on a stitch holder for neck. Then bind off sts as follows on every row from neck: 3 sts 1 time, 2 sts 2 times and 1 st 2 times = 20-21-21-22-23-25 sts remain for shoulder. When piece measures 38-39-40-41-42-43 cm / 15-15¼"-15¾"-16⅛"-16½"-17", work 1 ridge and bind off. LEFT EDGE PIECE/FRONT PIECE: Cast on and work as right edge piece/front piece but reversed. I.e. K 1 row from WS before working pattern like this: 1 edge st in garter st, 16-19-23-26-31-38 sts in garter st, A.2 over the remaining 18 sts on needle. Do not dec for buttonholes. SLEEVE: Worked back and forth on circular needle in reversed stockinette st. Cast on 42-42-44-44-46-48 sts (includes 1 edge st each side) on needle size 5 mm / US 8 with Nepal. Work 10 cm / 4" in garter st. Continue with reversed stockinette st. On next row inc 1 st in each side of sleeve - Read INCREASE TIP! Repeat inc every 4-3-3-2½-2-2 cm / 1½"-1¼"-1¼"-1"-¾"-¾" 8-10-10-12-13-14 more times = 60-64-66-70-74-78 sts. When piece measures 50-49-48-47-46-45 cm / 19¾"-19¼"-19"-18½"-18"-17¾" (shorter measurements in the larger sizes because of longer sleeve cap and wider shoulders) bind off for sleeve cap at beg of every row in each side: 3 sts 1 time, 2 sts 3 times and 1 st 1-2-3-4-5-6 times, then bind off 2 sts in each side until piece measures 57 cm / 22½", then bind off 3 sts 1 time in each side, bind off remaining sts. Piece measures approx. 58 cm / 22¾". Make another sleeve. ASSEMBLY: Sew cast on edge on edge pieces tog mid back - sew edge to edge to avoid a chunky seam. Then sew edge piece to bottom edge of back piece. Sew the shoulder seams. Sew side seams and sleeve seams inside 1 edge st and sew sleeves in body. Sew the buttons on to the left band. NECK EDGE: Pick up approx. 72 sts (includes sts on stitch holders) around the neck. Work 2 ridges and bind off from WS. Cut and fasten the yarn. |
|||||||||||||||||||
Diagram explanations |
|||||||||||||||||||
|
|||||||||||||||||||
 |
|||||||||||||||||||
 |
|||||||||||||||||||
 |
|||||||||||||||||||
Have you finished this pattern?Tag your pictures with #dropspattern #enchantedcardigan or submit them to the #dropsfan gallery. Do you need help with this pattern?You'll find 26 tutorial videos, a Comments/Questions area and more by visiting the pattern on garnstudio.com. © 1982-2026 DROPS Design A/S. We reserve all rights. This document, including all its sub-sections, has copyrights. Read more about what you can do with our patterns at the bottom of each pattern on our site. |
|||||||||||||||||||


With over 40 years in knitting and crochet design, DROPS Design offers one of the most extensive collections of free patterns on the internet - translated to 17 languages. As of today we count 324 catalogs and 12290 patterns - 12280 of which are translated into English (US/in).
We work hard to bring you the best knitting and crochet have to offer, inspiration and advice as well as great quality yarns at incredible prices! Would you like to use our patterns for other than personal use? You can read what you are allowed to do in the Copyright text at the bottom of all our patterns. Happy crafting!
Post a comment to pattern DROPS 157-25
We would love to hear what you have to say about this pattern!
If you want to leave a question, please make sure you select the correct category in the form below, to speed up the answering process. Required fields are marked *.