
Popular categories
Looking for a yarn?


Comments / Questions (64)
![]() Caroline wrote:
Caroline wrote:
So I've come back to this project having got stuck at the start the short rows in size M. I understand how to go through the short rows, but the description says to 'work short rows as follows' do I continue with the existing pattern or do I just knit and purl the short rows? My 1st row from the RS starts on the 7 rib sts. Thank you
14.08.2018 - 16:54DROPS Design answered:
Dear Caroline, the short rows on front pieces are worked in pattern, starting with the 8 first sts from RS, ie 8 sts in A.3 on right edge/front piece - start reading diagram from RS on the bottom corner on the right side towards the left -and from the left towards the right from WS). Happy knitting!
16.08.2018 - 08:48
![]() Caroline wrote:
Caroline wrote:
I\'ve just started this pattern, I\'ve finished the back piece no problem. I'm now on the right edge piece/front piece, working on size M I\'ve cast on the 38 sts worked one ridge in garter st, then worked the first row in A3, I\'ve worked the 19 stitches in garter st and assume the 1 edge st is included in this number ? as there are only 19 sts after the pattern. I've turned my work for the 2nd row but do I now have to read the second row of the pattern from L to R? thank you
06.03.2018 - 13:10DROPS Design answered:
Dear Caroline, you will work the 38 sts as follows seen from RS: A.3 ( 18 sts) reading from the bottom corner on the right side from the right towards the left, 19 sts in garter st, 1 edge st in garter st. From WS work: 1 edge st in garter st, 19 sts in garter st, A.3 reading now from WS diagram from the left towards the right. Happy knitting!
06.03.2018 - 14:22
![]() Birgit Lichterfeld wrote:
Birgit Lichterfeld wrote:
Meine Jacke ist fertig und wunderschön geworden. Es ist ein ganz besonderes Stück. Die Wolle ist super weich und sehr warm. Tolle Strickanleitung. Gute Hilfe. Vielen Dank.
26.02.2018 - 16:43
![]() Birgit Lichterfeld wrote:
Birgit Lichterfeld wrote:
Ich stricke Größe M und ich glaube, dass ich es jetzt mit den verkürzten Reihen verstanden habe: Ich stricke die verkürzten Reihen von 1 bis 10, dann ab der 11. Reihe immer 3 M. mehr vor dem Wenden, wieder 3 M. mehr in der 12. Reihe....bis ich alle M. meiner Arbeit gestrickt habe. Erst dann fange ich wieder mit der 1. verkürzten Reihe an. Korrekt? Vielen Dank für Ihre schnelle Antwort!
20.02.2018 - 23:30DROPS Design answered:
Liebe Frau Lichterfeld, ja genauso wird es gestrickt. Viel Spaß beim stricken!
21.02.2018 - 09:21
![]() Birgit Lichterfeld wrote:
Birgit Lichterfeld wrote:
Anleitung verkürzte Reihen: In dieser Weise weiter jedes Mal vor dem Wenden 3 Maschen mehr stricken bis alle Maschen gestrickt wurden. Beziehen sich diese 3 Maschen mehr immer auf die 9. Reihe? Wenn ich die 10 verkürzten Reihen 5 mal gestrickt habe sind bei dieser Methode noch nicht alle kraus rechts gestrickten Restmaschen aufgebraucht. Ich brauche mehr als 50 Reihen, etwa 69 Reihen. Schade, dass diese Stelle der Anleitung so unklar beschrieben wurde.
20.02.2018 - 00:10DROPS Design answered:
Liebe Frau Lichterfeld, ab Reihe 11 stricken Sie immer 3 M mehr in jede 2. Reihe bis alle Maschen gestrickt sind, dann die verkürtzte Reihen von Reihe 1 wie bis alle Maschen gestrickt sind noch 5 Mal wiederholen. Welche Größe stricken Sie?
20.02.2018 - 08:46
![]() Lisa Gallon wrote:
Lisa Gallon wrote:
Är det verkligen meningen att ärmen ska vara ca 26-27 cm i omkrets nertill? 44 maskor blir ju en väldigt vid ärm.
09.11.2017 - 10:57DROPS Design answered:
Hei Lisa. Det er riktig slik det står i oppskriften. Noen liker ermene vide og noen smalere. Du kan evnt. strikke rillene i en pinne str mindre eller legge opp et mindre maskeantall, og så øke ved glattstrikk (med vrange ut). God Fornøyelse!
10.11.2017 - 11:09
![]() Sheryl wrote:
Sheryl wrote:
Please can you let me have the "idiot's guide" to P YO and st tog? I cannot understand previous response because you say similar and I need exact please. Thank you very much.
01.07.2017 - 13:13DROPS Design answered:
Dear Sheryl, P YO and St together means that in the previous row there was a stitch you slipped, without knitting it, and then made a yarn over. In this row you should purl together the yarnover and slipped stitch into one stitch. I hope this helps. Happy Knitting!
03.07.2017 - 00:59Chris Ramsay wrote:
Hello - I'm confused about "Continue to work 3 sts more on every turn until all sts have been worked. Repeat from 1st row a total of 5 times. (Rounded edge now measures approx. 28-31-34-37-41-46 cm on outer side & 3 cm on inside.) " Does this mean that the next row will be "work 24 and turn" for medium size? If so, that would take 14 rows to work across all sts. Is this correct? Thanks.
07.01.2017 - 09:19DROPS Design answered:
Dear Mrs Ramsay, that's correct you will then work 24 sts in size M, then 27 sts etc.. ie 3 sts more on every short row. Happy knitting!
09.01.2017 - 09:00
![]() Camilla Furlund wrote:
Camilla Furlund wrote:
Hei. Jeg skal til å starte med vendinger på venstre forstykket. Hvor skal jeg starte vendingene? Det skal jo vendes på retten, vi, det si at jeg må "snu" vendingene og først strikke over alle maskene for å avslutte med 8 masker?
03.06.2016 - 06:01DROPS Design answered:
Hei Camilla. Du spejlvender, saa dine vendinger kommer paa vrangen paa venstre forstykke.
17.06.2016 - 12:06
![]() Angela Bunge wrote:
Angela Bunge wrote:
Anleitung verkürzte Reihen,was bedeutet: In dieser Weise weiter jedes Mal vor dem Wenden 3 M mehr stricken,bis alle M gestrickt sind?
26.02.2016 - 21:02DROPS Design answered:
Liebe Angela, das bedeutet, dass Sie nicht immer an der gleichen Stelle wenden, sondern dass sich die Stelle jeweils um 3 Maschen verschiebt.
29.02.2016 - 15:46
|
|||||||||||||||||||
Enchanted#enchantedcardigan |
|||||||||||||||||||
 |
 |
||||||||||||||||||
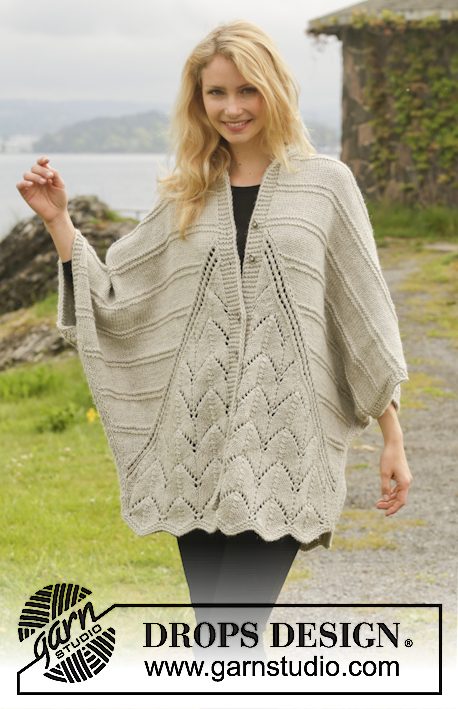
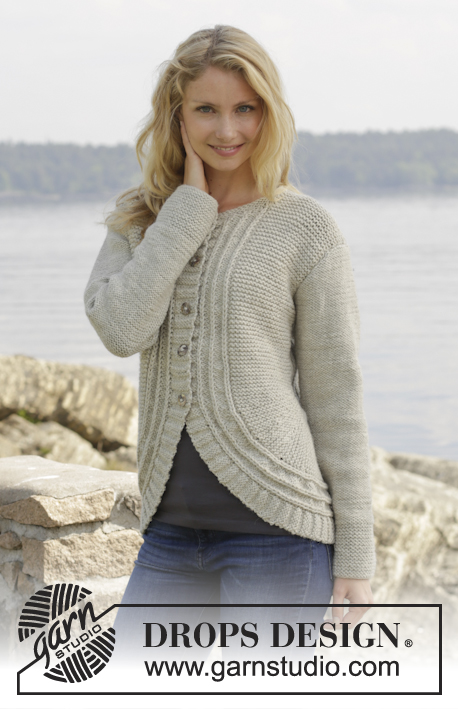
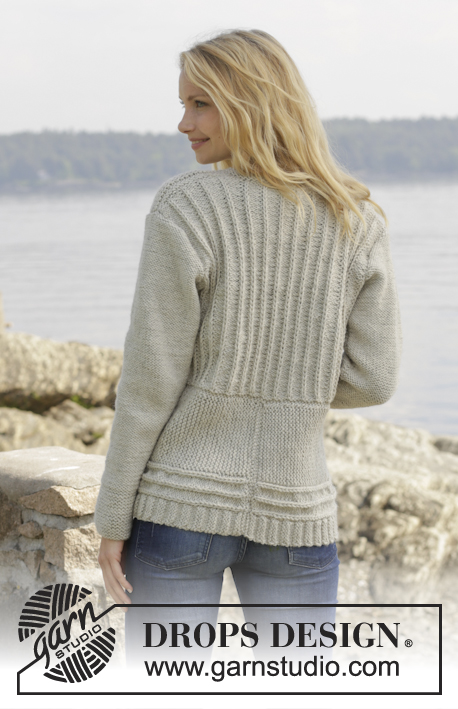
Knitted DROPS jacket with False English rib and short rows in "Nepal". Size S-XXXL
DROPS 157-25 |
|||||||||||||||||||
|
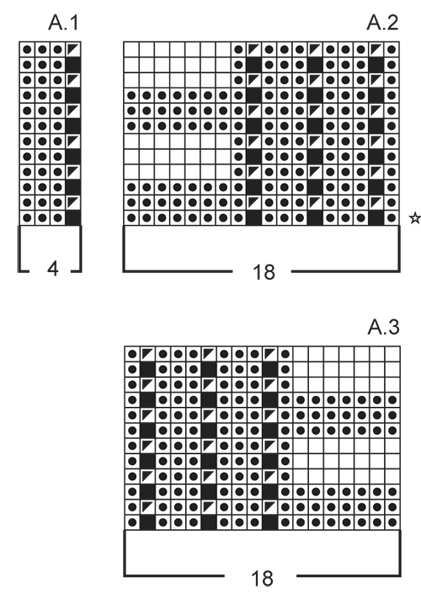
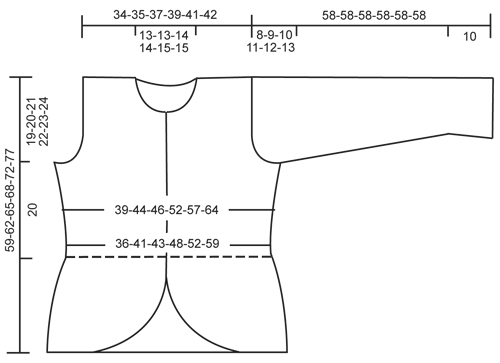
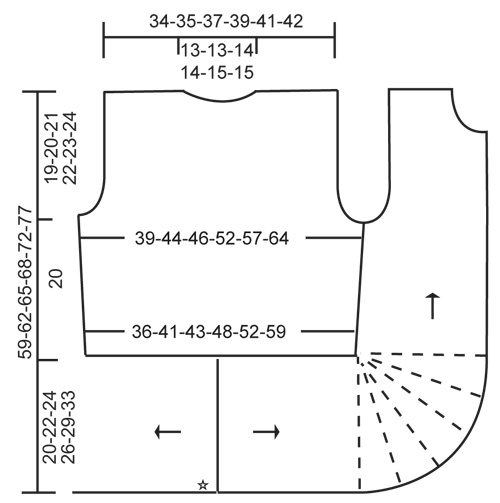
GARTER ST (back and forth on needle): K all rows. 1 ridge = K2 rows. PATTERN: See diagrams A.1-A.3. The diagram shows all rows in pattern seen from RS. INCREASE TIP (applies to sleeve): Inc inside 1 edge st in garter st and 1 P by making 1 YO. On next round work YO twisted, i.e. work in the back loop of st instead of front, to avoid holes. DECREASE TIP: Dec inside 1 edge st in garter st. All dec are done from RS! Dec before 1 edge st as follows: K 2 tog. Dec after 1 edge st as follows: Slip 1 st as if to K, K 1, psso. SHORT ROWS: Work short rows on front piece to get a rounded edge on the piece. Also work short rows between pattern A.2/A.3! Work short rows as follows with 1st row from RS: Row 1 and 2: Work 8 sts in all sizes, turn and work back. Row 3 and 4: Work 12 sts in all sizes, turn and work back. Row 5 and 6: Work 16 sts in all sizes, turn and work back. Row 7 and 8: Work 19-19-20-20-19-20 sts, turn and work back. Row 9 and 10: Work 21-21-23-23-21-23 sts, turn and work back. Continue to work 3 sts more on every turn until all sts have been worked. Repeat from 1st row a total of 5 times. (The rounded edge now measures approx. 28-31-34-37-41-46 cm / 11"-12¼"-13⅜"-14½"-16"-18" on the outer side and 3 cm / 1" on the inside.) BUTTONHOLES: Dec for buttonholes on right band. 1 buttonhole = K tog second and third st from mid front and make 1 YO. Dec for buttonholes when piece measures (measured from the marker in the side): SIZE S: 1-8-15-22-29 cm / ½"-3"-6"-8¾"-11½" SIZE M: 1-8-15-22-30 cm / ½"-3"-6"-8¾"-11¾" SIZE L: 1-8-15-22-30 cm / ½"-3"-6"-8¾"-11¾" SIZE XL: 1-8-16-23-31 cm / ½"-3"-6¼"-9"-12¼" SIZE XXL: 1-8-16-23-31 cm / ½"-3"-6¼"-9"-12¼" SIZE XXXL: 1-9-17-25-32 cm / ½"-3½"-6¾"-9¾"-12½" ---------------------------------------------------------- JACKET: Worked back and forth in parts on circular needle and sewn tog when finished. BACK PIECE: Cast on 63-71-75-83-91-103 sts (includes 1 edge st in garter st in each side) on circular needle size 5 mm / US 8 with Nepal. Work 1 ridge in GARTER ST - see explanation above. Then work as follows: 1 edge st in garter st, A.1 (= 4 sts) until 2 sts remain on row, work 1st st in A.1, 1 edge st in garter st. Continue like this with pattern, AT THE SAME TIME when piece measures 4 cm / 1½", inc inside 1 edge st in garter st in each side of piece by making 1 YO. On next row work YOs twisted to avoid holes, then P the new sts (seen from RS)! Repeat inc every 4-4-4-3-3-3 cm / 1½"-1½"-1½"-1¼"-1¼"-1¼" 2-2-2-3-3-3 more times = 69-77-81-91-99-111 sts. REMEMBER THE GAUGE! When piece measures 20 cm / 8" in all sizes, bind off for armholes each side as follows: bind off 3-4-5-6-7-8 sts 1 time and 1 st 1-3-3-6-7-11 times = 61-63-65-67-71-73 sts. Continue with pattern as before until piece measures 37-38-39-40-41-42 cm / 14½"-15"-15¼"-15¾"-16⅛"-16½". On next row from RS bind off for neck as follows: Work the first 21-22-22-23-24-25 sts, bind off the next 19-19-21-21-23-23 sts and work the remaining 21-22-22-23-24-25 sts. Then finish each shoulder separately as follows: Continue back over left shoulder and dec 1 st towards the neck on next row from RS = 20-21-21-22-23-24 sts for shoulder. When piece measures 38-39-40-41-42-43 cm / 15-15¼"-15¾"-16⅛"-16½"-17", work 1 ridge and loosely bind off. Work the other shoulder the same way. RIGHT EDGE PIECE/FRONT PIECE: Cast on 35-38-42-45-50-57 sts (includes 1 edge st in garter st) on circular needle size 5 mm / US 8 with Nepal. Work 1 ridge in garter st. Then work as follows from RS: Pattern A.3 (= 18 sts), 16-19-23-26-31-38 sts in garter st, 1 edge st in garter st. When piece measures approx. 18-21-23-24-26-30 cm / 7"-8¼"-9"-9½"-10¼"-11¾", work SHORT ROWS - see explanation above, AT THE SAME TIME on last row in 1st repetition with short rows, inc 1 st by making a YO between A.3 and sts in garter st = 36-39-43-46-51-58 sts. Work YOs twisted on next row to avoid holes. Repeat inc on last row in the remaining repetitions of short rows 3-4-1-2-0-0 more times = 39-43-44-48-51-58 sts on needle. When all short rows have been worked, insert 1 marker. NOW MEASURE PIECE FROM HERE! Continue with garter st and pattern as before. Remember BUTTONHOLES - see explanation above. When piece measures 4 cm / 1½", inc in the side as on back piece (i.e. the shorter side). After all inc, there are 42-46-47-52-55-62 sts on needle. When piece measures 20 cm / 8", bind off for armhole in the side as on back piece (i.e in same side of piece as inc) = 38-39-39-40-41-43 sts. When piece measures 30-31-31-32-32-33 cm / 11¾"-12¼"-12¼"-12½"-12½"-13", slip the first 9 sts on needle from RS on a stitch holder for neck. Then bind off sts as follows on every row from neck: 3 sts 1 time, 2 sts 2 times and 1 st 2 times = 20-21-21-22-23-25 sts remain for shoulder. When piece measures 38-39-40-41-42-43 cm / 15-15¼"-15¾"-16⅛"-16½"-17", work 1 ridge and bind off. LEFT EDGE PIECE/FRONT PIECE: Cast on and work as right edge piece/front piece but reversed. I.e. K 1 row from WS before working pattern like this: 1 edge st in garter st, 16-19-23-26-31-38 sts in garter st, A.2 over the remaining 18 sts on needle. Do not dec for buttonholes. SLEEVE: Worked back and forth on circular needle in reversed stockinette st. Cast on 42-42-44-44-46-48 sts (includes 1 edge st each side) on needle size 5 mm / US 8 with Nepal. Work 10 cm / 4" in garter st. Continue with reversed stockinette st. On next row inc 1 st in each side of sleeve - Read INCREASE TIP! Repeat inc every 4-3-3-2½-2-2 cm / 1½"-1¼"-1¼"-1"-¾"-¾" 8-10-10-12-13-14 more times = 60-64-66-70-74-78 sts. When piece measures 50-49-48-47-46-45 cm / 19¾"-19¼"-19"-18½"-18"-17¾" (shorter measurements in the larger sizes because of longer sleeve cap and wider shoulders) bind off for sleeve cap at beg of every row in each side: 3 sts 1 time, 2 sts 3 times and 1 st 1-2-3-4-5-6 times, then bind off 2 sts in each side until piece measures 57 cm / 22½", then bind off 3 sts 1 time in each side, bind off remaining sts. Piece measures approx. 58 cm / 22¾". Make another sleeve. ASSEMBLY: Sew cast on edge on edge pieces tog mid back - sew edge to edge to avoid a chunky seam. Then sew edge piece to bottom edge of back piece. Sew the shoulder seams. Sew side seams and sleeve seams inside 1 edge st and sew sleeves in body. Sew the buttons on to the left band. NECK EDGE: Pick up approx. 72 sts (includes sts on stitch holders) around the neck. Work 2 ridges and bind off from WS. Cut and fasten the yarn. |
|||||||||||||||||||
Diagram explanations |
|||||||||||||||||||
|
|||||||||||||||||||
 |
|||||||||||||||||||
 |
|||||||||||||||||||
 |
|||||||||||||||||||
Have you finished this pattern?Tag your pictures with #dropspattern #enchantedcardigan or submit them to the #dropsfan gallery. Do you need help with this pattern?You'll find 26 tutorial videos, a Comments/Questions area and more by visiting the pattern on garnstudio.com. © 1982-2026 DROPS Design A/S. We reserve all rights. This document, including all its sub-sections, has copyrights. Read more about what you can do with our patterns at the bottom of each pattern on our site. |
|||||||||||||||||||


With over 40 years in knitting and crochet design, DROPS Design offers one of the most extensive collections of free patterns on the internet - translated to 17 languages. As of today we count 324 catalogs and 12285 patterns - 12275 of which are translated into English (US/in).
We work hard to bring you the best knitting and crochet have to offer, inspiration and advice as well as great quality yarns at incredible prices! Would you like to use our patterns for other than personal use? You can read what you are allowed to do in the Copyright text at the bottom of all our patterns. Happy crafting!
Post a comment to pattern DROPS 157-25
We would love to hear what you have to say about this pattern!
If you want to leave a question, please make sure you select the correct category in the form below, to speed up the answering process. Required fields are marked *.