
Popular categories
Looking for a yarn?


Comments / Questions (119)
![]() Marimar wrote:
Marimar wrote:
Bonjour, j'ai encore une question : lorsque vous indiquez qu'il faut augmenter tous les 2 rangs 1 m de chaque côté des 57 m. centrales. Doit on l'augmenter à l'intérieur des marqueurs des 57 m centrales ou à l'extérieur ? Merci pour vtre réponse
01.08.2014 - 11:36DROPS Design answered:
Bonjour Mme Marimar, on augmente de chaque côté des 57 m centrales, c'est-à-dire 1 m avant et 1 m après (on a toujours les 57 m au milieu). Bon tricot!
01.08.2014 - 14:08
![]() Frollanni wrote:
Frollanni wrote:
Bonjour, je souhaite faire ce chale .Vous indiquer comme point , le point mousse et de suivre le diagramme pour le point fantaisie. Pouvez vous me dire à quoi correspondent les carrés blancs ? Sur la photo il apparait que c'et tricoté en jersey endroit, mais vous n'en parlez pas. Merci pour votre réponse que j'attends impatiament
31.07.2014 - 10:19DROPS Design answered:
Bonjour Mme Frollanni, la case manquante de la légende du diagramme sera ajoutée prochainement, merci. On tricote bien cette maille (case vide) en jersey end (= à l'end sur l'end, à l'env sur l'env). Bon tricot!
31.07.2014 - 13:03
![]() Marta wrote:
Marta wrote:
El diagrama representa las filas pares e impares o solo las impares? Si solo son las pares como serian las impares? Muchas gracias.
29.07.2014 - 00:02DROPS Design answered:
Hola Marta. Los diagramas muestran TODAS las filas en el patrón vistas por el LD. El cuadrado blanco que no esta incluido en las explicaciones del diagrama se trabaja de derecho por el LD y de revés por el LR.
29.07.2014 - 12:54
![]() Heike wrote:
Heike wrote:
Habe dieses Tuch gestrickt.In der Anleitung sind bei der Maschenzahl aber die 2 Randmaschen nicht berücksichtigt worden.Also einfach 2 Maschen mehr anschlagen.
17.06.2014 - 08:35DROPS Design answered:
Liebe Heike, ich weiß nicht, wann Sie das Tuch begonnen haben, aber inzwischen wurden 2 M eingefügt, sodass das Muster mit 341 M gestrickt wird. Darin sind die beiden Rand-M enthalten, es geht nun also so auf, wie es in der Anleitung steht: 1 Rand-M + 6 M A.1 + 22x 15 M A.2 + 3 M A.3 + 1 Rand-M = 341 M.
17.06.2014 - 10:08Joan wrote:
Help knitting French Riviera Chart A1 row 4 has 3 stitches but row 5 needs 4 stitches how do I solve this problem Thanking you in advance
17.06.2014 - 05:36DROPS Design answered:
Dear Joan, on row 3 in A.1 you work K1, K2 tog, YO, K2 tog. On row 5, work over the first 4 sts: K2 tog, YO, K2 tog. Happy knitting!
17.06.2014 - 11:36
![]() Lorena wrote:
Lorena wrote:
Porque cuando se remata no queda en picos como en la foto?
28.05.2014 - 23:32DROPS Design answered:
Hola Lorena. Para crear los picos has de hacer como te explica en la parte final: estirar cuando el chal está mojado en las partes donde hay 2 pts derechos. Esto lo pone cómo opción, si no se hace así el borde quedará recto.
30.05.2014 - 10:29
![]() Lorena wrote:
Lorena wrote:
Hola, se comienza de arriba para abajo o de abajo para arriba?
26.05.2014 - 22:00DROPS Design answered:
Hola Lorena. Se trabaja de arriba abajo. Buen tricot.
30.05.2014 - 10:23
![]() Lorena wrote:
Lorena wrote:
Hola, se comienza de arriba para abajo o de abajo para arriba?
26.05.2014 - 21:59
![]() Dani wrote:
Dani wrote:
Hi, Ich kann leider die Mengenangabe nirgens finden, hab ich es überlesen? Wieviel Knäul bzw. Meter brauche ich? Vielen Dank
20.05.2014 - 16:20DROPS Design answered:
Liebe Dani, die Material- und Mengenangaben finden Sie ganz oben im Kopf, neben dem Foto, unter der gestrichelten Linie. Sie benötigen 100g Drops Lace. Viel Spaß beim Stricken!
21.05.2014 - 16:45
![]() Lorena wrote:
Lorena wrote:
Hola no entiendo porque debe quedar 341 puntos cada grafico tiene 24 puntos, x 14 veces da 336, mas los 2 puntos de orillo, un total de 338 o me equivoco?
13.05.2014 - 20:28DROPS Design answered:
Hola Lorena! A.1 se hace sólo al principio 1 vez, después se repiten 22 veces los 15 pts del medio del diagrama y se finaliza con 1 repetición de A.3: 6+15x22+3 +2 pts orillo, uno a cada lado = 6+330+3+los 2 pts orillo = 341
14.05.2014 - 09:48
|
|||||||||||||||||||
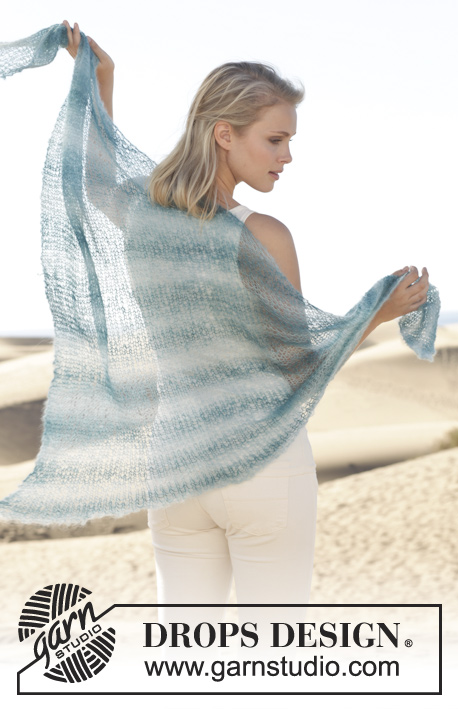
French Riviera#frenchrivierashawl |
|||||||||||||||||||
|
|
|||||||||||||||||||
Knitted DROPS shawl with lace pattern in ”Lace”.
DROPS 152-4 |
|||||||||||||||||||
|
KNITTING GAUGE: This garment is to be soaked and blocked/stretched to size afterwards so the knitting gauge is not that important. But to get a sense of whether you are working too loose/tight, work a test on needle size 3.5 mm / US 4 in stockinette st and get approx. 23 sts x 30 rows = 4'' x 4'' (10 x 10 cm). GARTER ST (back and forth on needle): K all rows. 1 ridge = K2 rows. PATTERN: See diagrams A.1 to A.6. The diagrams show all rows in pattern seen from RS. INCREASE TIP: Inc with YO, YO should not be twisted on next row but should make a hole in the piece. ---------------------------------------------------------- SHAWL: Worked back and forth on circular needle. Cast on 63 sts on circular needle size 3.5 mm / US 4 with Lace, insert 2 markers in the piece on each side of the middle 57 sts. Continue in stockinette st with 1 edge st in GARTER ST - READ EXPLANATION ABOVE in each side of piece - AT THE SAME TIME inc as follows - READ INCREASE TIP ABOVE: Inc 1 st in each side inside 1 edge st on every row and inc 1 st on each side of the middle 57 sts every other row. REMEMBER THE GAUGE! Continue like this until inc have been done 46 times in total on each side of the 57 sts and 92 times in each side = 339 sts on needle. NOTE! Adjust so that last row is from RS. On next row from WS inc 1 st inside edge st in each side = 341 sts. Piece now measures approx. 30 cm / 11 3/4'' mid back. Then work PATTERN - READ EXPLANATION ABOVE! according to diagrams A.1 to A.3, beg from RS as follows: Work 1 edge st in garter st, A.1 (= 6 sts), A.2 until 4 sts remain on needle, then work diagram A.3 and finish with 1 edge st in garter st. Work diagram 4 times vertically in total. Then work diagrams A.4 to A.6 the same way. After last row in diagram P 1 row from WS before loosely binding off with K from RS. Bind off with a YO for every YO from last row in diagram to make the edge extra elastic and easy to stretch and shape. Piece measures approx. 50 cm / 19 3/4'' vertically. BLOCKING: Place the shawl in lukewarm water until it is soaking wet. Carefully squeeze out the water from the shawl - do not twist. Then roll the shawl in a towel and squeeze to remove more water - the piece will now only be moist. Place the shawl on a carpet or mattress - carefully stretch it out to measurements. On this shawl tips can be made in the bottom edge by stretching a little extra where 2 K sts are (diagram A.5). Also stretch the edge st in each side at the bottom of edge, fasten pins in each tip and along the other edges. Leave shawl to dry. Repeat the process when the garment has been washed. |
|||||||||||||||||||
Diagram explanations |
|||||||||||||||||||
|
|||||||||||||||||||
 |
|||||||||||||||||||
Have you finished this pattern?Tag your pictures with #dropspattern #frenchrivierashawl or submit them to the #dropsfan gallery. Do you need help with this pattern?You'll find 18 tutorial videos, a Comments/Questions area and more by visiting the pattern on garnstudio.com. © 1982-2026 DROPS Design A/S. We reserve all rights. This document, including all its sub-sections, has copyrights. Read more about what you can do with our patterns at the bottom of each pattern on our site. |
|||||||||||||||||||


With over 40 years in knitting and crochet design, DROPS Design offers one of the most extensive collections of free patterns on the internet - translated to 17 languages. As of today we count 325 catalogs and 12298 patterns - 12288 of which are translated into English (US/in).
We work hard to bring you the best knitting and crochet have to offer, inspiration and advice as well as great quality yarns at incredible prices! Would you like to use our patterns for other than personal use? You can read what you are allowed to do in the Copyright text at the bottom of all our patterns. Happy crafting!
Post a comment to pattern DROPS 152-4
We would love to hear what you have to say about this pattern!
If you want to leave a question, please make sure you select the correct category in the form below, to speed up the answering process. Required fields are marked *.