
Popular categories
Looking for a yarn?


Comments / Questions (78)
![]() Pernille øemig Nielsen wrote:
Pernille øemig Nielsen wrote:
Og hvad mener du med at det kun er en maske?
23.06.2016 - 07:09
![]() Pernille øemig Nielsen wrote:
Pernille øemig Nielsen wrote:
Vil det sige at jeg skal gøre det med en nål når trøjen er færdig, altså brodere?
23.06.2016 - 07:08
![]() Pernille wrote:
Pernille wrote:
I diagrammet står der jeg skal brodere med blå henover, hvad menes der med det?
15.06.2016 - 15:51DROPS Design answered:
Hej Pernille. Du strikker den med mørk gammelrosa, men bagefter broderer du den jeansblå - det er kun 1 m og den bliver her paenere ved at blive broderet paa.
15.06.2016 - 16:13
![]() Emilie wrote:
Emilie wrote:
Jeg finner ikke forklaring på fellinger på bærestykket til Martha jakken Det står bare antall masker til slutt etter felling! Håper på raskt svar!
26.01.2016 - 20:19DROPS Design answered:
Hej. Du stickar och gör fellinger enligt diagram A.1. Lycka till!
27.01.2016 - 14:13
![]() Bernadette Van Duijvenbode wrote:
Bernadette Van Duijvenbode wrote:
Ik vind de later aangebreide voorpandbiezen niet zo mooi. Kan ik deze biezen ook meteen met de panden meebreien, bijvoorbeeld beginnen en eindigen met 7 steken boordsteek?
10.12.2015 - 10:40DROPS Design answered:
Hoi Bernadette. Je kan gerust de voorbies aanpassen als je het mooier vindt.
10.12.2015 - 14:37
![]() Kate Waldron wrote:
Kate Waldron wrote:
Absolutely stunning. Can this be done as a sweater instead of a jacket? Some of your patterns have been done both ways, but I couldn't find this one as a sweater. So many patterns so little time. Keep up the fabulous work!
05.11.2015 - 18:23DROPS Design answered:
Dear Mrs Waldron, this pattern is only a jacket - for any individual assistance, you are welcome to contact your DROPS store, they will have tips & advices for you. Happy knitting!
05.11.2015 - 19:01
![]() Mary-Ann Cole wrote:
Mary-Ann Cole wrote:
PATTERN : MARTHA - DROPS 143-11 PATTERN no use-673 I have finished pattern work, and the decreases. With 60 stitches on the needles I am at point of working "an elevation at the back.(top of page 3of pattern. I do not understand what I am supposed to be doing. Thank you for your help.
21.10.2015 - 02:16DROPS Design answered:
Dear Mrs Cole, the elevation at the back consists on some short rows to make the neckline on back piece higher: in 3rd size, work 60 sts from RS, then turn and P14 sts, turn and K21 sts, turn and P28 sts, turn and K34 sts (28+7), turn and P41 sts (34+7), continue back and forth working 7 sts more on each row until you have worked 84 sts, then turn and work remaining sts on row. On next row P 1 row from WS inc 14 sts evenly and put aside, neck edge will be worked after the front bands. Happy knitting!
21.10.2015 - 09:42
![]() Birgit wrote:
Birgit wrote:
Was ist mit :die Masche nachträglich mit ... Überstrichen ?
13.04.2015 - 12:22DROPS Design answered:
Antwort siehe unten!
13.04.2015 - 13:12
![]() Birgit wrote:
Birgit wrote:
Was ist mit :die Masche nachträglich mit ... Überstrichen ?
13.04.2015 - 12:09DROPS Design answered:
Diese Maschen werden nachträglich, also nach dem Stricken, mit einer anderen Farbe im Maschenstich bestickt. So müssen Sie für diese Stelle, die ja nur sehr wenig im Muster vorkommt, den Faden beim Stricken nicht mitführen, sondern die Farbe wird einfach nachträglich durch einen Stick-Stich hinzugefügt.
13.04.2015 - 13:11
![]() Pirjo Keränen wrote:
Pirjo Keränen wrote:
Kaarroke: puikolla on hihat ja kavennusten jälkeen on 314 silmukkaa. Nyt pitäisi jatkaa mallineuletta, mutta en saa silmukoiden lukumäärää täsmäämään kohdassa "kun kaikki kavennukset on tehty, on silmukoita 106" . Missään kohtaa ohjeesta ei löydy noin paljon kavennettavaa eli noin 200 silmukkaa pitäisi kaventaa? Kiitos avusta!
18.02.2015 - 14:59DROPS Design answered:
Hei! Ohjeesta ei löytynyt virhettä. Koossa L työhön tulee yht. 26 piirroksen A.1 mallikertaa. Kavennuskerroksia on yht. 8. Jokaisella kavennuskerroksella työstä kapenee siis 26 s. Eli 314 - 208 (8 x 26) = 106 s.
23.02.2015 - 12:59
|
|||||||||||||||||||||||||
Martha#marthacardigan |
|||||||||||||||||||||||||
 |
 |
||||||||||||||||||||||||
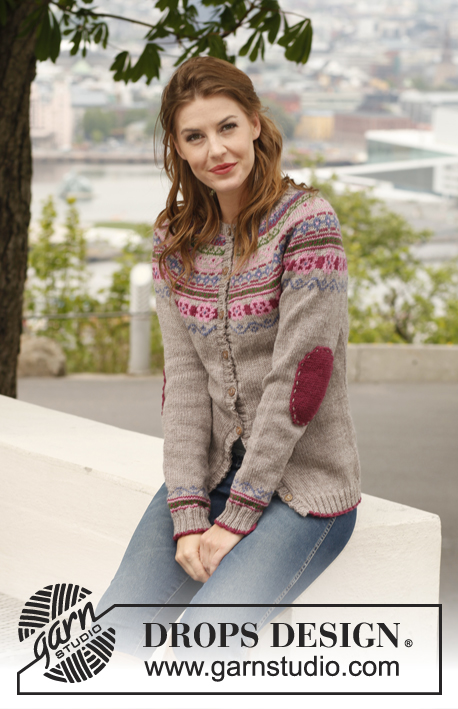
Knitted DROPS jacket with round yoke, pattern and sewn on elbow patches in "Karisma". Size S-XXXL
DROPS 143-11 |
|||||||||||||||||||||||||
|
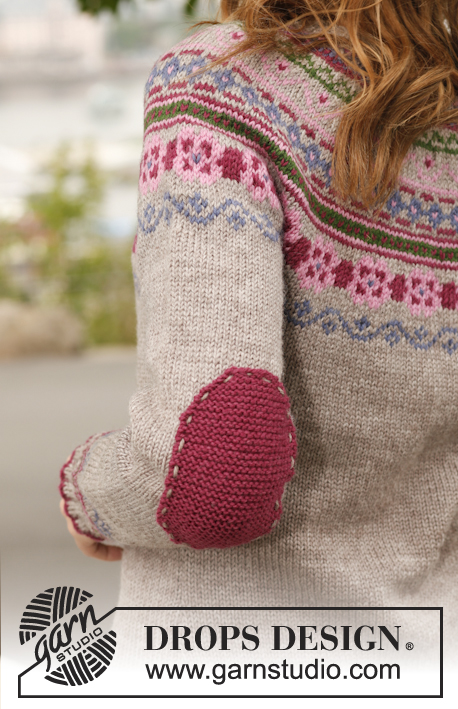
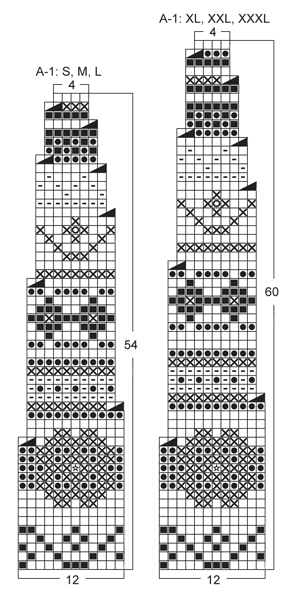
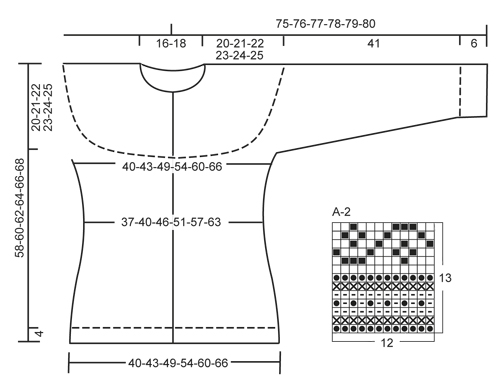
GARTER ST (back and forth on circular needle): K sts on all rows. PATTERN: See diagrams A-1 and A-2. Diagrams are worked in stockinette st and show 1 repetition of patterns. ---------------------------------------------------------- BODY: Worked back and forth on circular needle from mid front. Cast on 192-208-232-260-284-312 sts on circular needle size 3 mm / US 2.5 with dark old rose. Work 1 row rib as follows (1st row = RS): 1 edge st in GARTER ST - see explanation above - * K 2/P 2 *, repeat from *-* until 3 sts remain, K 2 and 1 edge st in garter st. When 1 row with dark old rose has been worked, switch to beige brown. Continue rib until it measures 4 cm / 1½". Switch to circular needle size 4 mm / US 6 and work 1 row in stockinette st while at the same time dec 22-26-26-30-30-34 sts evenly = 170-182-206-230-254-278 sts. Insert 2 markers in the piece; 43-46-52-58-64-70 sts in from each side (= 84-90-102-114-126-138 sts between markers on back piece). Continue in stockinette st with beige brown. REMEMBER THE GAUGE! When piece measures approx. 10 cm / 4", dec 1 st on each side of markers in the sides. Repeat dec every 4 cm / 1½" 2 more times = 158-170-194-218-242-266 sts. When piece measures 22-23-24-25-26-27 cm / 8¾"-9"-9½"-9¾"-10¼"-10⅝", inc 1 st on each side of both markers. Repeat inc every 5 cm / 2" 2 more times = 170-182-206-230-254-278 sts. When piece measures 38-39-40-41-42-43 cm / 15-15¼"-15¾"-16⅛"-16½"-17", bind off 10 sts in each side for armholes on next row from RS (i.e. 5 sts on each side of markers in the sides) = 150-162-186-210-234-258 sts. Put piece aside and knit the sleeves. SLEEVE: Worked in the round on double pointed needles. Cast on 52-56-56-60-64-64 sts with dark old rose on double pointed needles size 3 mm / US 2.5. Work 1 round in rib = K 2/P 2. Switch to beige brown, continue rib until piece measures 6 cm / 2½". Switch to double pointed needles size 4 mm / US 6, work 1 round in stockinette st while at the same time dec 4-8-8-0-4-4 sts evenly = 48-48-48-60-60-60 sts. Insert 1 marker at beg of round = mid under sleeve. Continue with diagram A-2, then continue sleeve with beige brown. When piece measures 10-10-12-10-10-12 cm / 4"-4"-4¾"-4"-4"-4¾", inc 1 st on each side of marker mid under sleeve. Repeat inc every 3-2½-2-3-2½-2 cm / 1⅛"-⅞"-¾"-1⅛"-⅞"-¾" 11-13-15-11-13-15 more times = 72-76-80-84-88-92 sts. When piece measures 47 cm / 18½" in all sizes, bind off 10 sts mid under sleeve, i.e. 5 sts on each side of marker = 62-66-70-74-78-82 sts. Put piece aside and knit another sleeve. YOKE: Slip sleeves on to same circular needle size 4 mm / US 6 as body = 274-294-326-358-390-422 sts (do not work them when slipping them on to needle). P 1 row from WS with beige brown while at the same time dec 8-4-12-8-4-12 sts evenly = 266-290-314-350-386-410 sts. Work 0-2-4-2-4-8 more rows in stockinette st with beige brown, before continuing with diagram A-1 (1st row = RS) with 1 edge st in garter st in each side – see diagram for your size. After all dec there are 90-98-106-118-130-138 sts on needle and piece measures approx. 58-60-62-64-66-68 cm / 22¾"-23⅝"-24⅜"-25¼"-26"-26¾" up to shoulder. Then work an elevation at the back with beige brown as follows: K 52-56-60-66-72-76, turn, P 14, turn, K 21, turn, P 28. Continue like this by working 7 sts more on every turn until a total of 70-70-84-84-98-98 sts have been worked, turn and work the rest of row. Now P 1 row from WS over all sts while at the same time dec 6-10-14-22-30-34 sts evenly = 84-88-92-96-100-104 sts. Insert 1 marker, neck edge is worked after bands. LEFT BAND: Worked back and forth on circular needle size 3 mm / US 2.5. Pick up approx. 144 to 168 sts (divisible by 4) inside 1 edge st along left band with beige brown. Work rib as follows from WS: 1 st in garter st, * P 2, K 2 *, repeat from *-*, finish with P 2 and 1 st in garter st. From RS beg and end rib with K 2 and 1 st in garter st. Continue with K over K and P over P until rib measures 3 cm / 1⅛", bind off with K over K and P over P. RIGHT BAND: Work as left band but after 1 cm / ⅜", bind off for 7 buttonholes evenly (buttonholes are bind off in P-sections seen from RS). 1 BUTTONHOLE = P 2 tog and make 1 YO – top buttonhole should be approx. 6-7 cm / 2⅜"-2¾" from the top (there should also be 1 buttonhole on neck edge) and bottom hole approx. 5-6 cm / 2"-2⅜" from bottom edge. NECK EDGE: Worked back and forth with beige brown on circular needle size 3 mm / US 2.5 as follows: Pick up 6 sts over right band (inside 1 edge st), work the 84-88-92-96-100-104 sts from stitch holder around the neck on to needle and knit up 6 sts over left band = 96-100-104-108-112-116 sts. Work rib as follows (1st row = WS): 1 st in garter st, * P 2, K 2 *, repeat from *-*, finish with P 2 and 1 st in garter st. Continue with K over K and P over P with 1 st in garter st in each side. When neck edge measures 1 cm / ⅜", bind off for 1 buttonhole over the other holes on right band. Continue rib until neck edge measures 3 cm / 1⅛", bind off with K over K and P over P. ELBOW PATCH: Patch is worked in garter st back and forth with dark old rose on 2 double pointed needles size 3 mm / US 2.5. Cast on 10 sts. K 1 row, on next row inc 1 st in each side by making 1 YO inside outermost st, on next row K YOs twisted to avoid holes. Repeat inc every other row 3 more times and then every 4th row 2 times = 22 sts. Work until piece measures 12 cm / 4¾", now dec 1 st in each side by K2 tog after first st and before last st. Repeat dec every 4th row 1 more time and then every other row 4 times = 10 sts remain. Bind off, patch measures approx. 15 cm / 6" vertically and 10 cm / 4" in width. ASSEMBLY: Sew tog the openings under the sleeves and sew on buttons. Sew elbow patches on to sleeves with beige brown and stitches inside outermost st. Patches are sewn on approx. 21 cm / 8¼" from bottom edge and approx. 2-3 cm / ¾"-1" from marker mid under sleeve and towards the back of sleeve. Fasten the patches with pins to see if they are placed correctly before sewing them on. |
|||||||||||||||||||||||||
Diagram explanations |
|||||||||||||||||||||||||
|
|||||||||||||||||||||||||
 |
|||||||||||||||||||||||||
 |
|||||||||||||||||||||||||
Have you finished this pattern?Tag your pictures with #dropspattern #marthacardigan or submit them to the #dropsfan gallery. Do you need help with this pattern?You'll find 19 tutorial videos, a Comments/Questions area and more by visiting the pattern on garnstudio.com. © 1982-2026 DROPS Design A/S. We reserve all rights. This document, including all its sub-sections, has copyrights. Read more about what you can do with our patterns at the bottom of each pattern on our site. |
|||||||||||||||||||||||||


With over 40 years in knitting and crochet design, DROPS Design offers one of the most extensive collections of free patterns on the internet - translated to 17 languages. As of today we count 325 catalogs and 12298 patterns - 12288 of which are translated into English (US/in).
We work hard to bring you the best knitting and crochet have to offer, inspiration and advice as well as great quality yarns at incredible prices! Would you like to use our patterns for other than personal use? You can read what you are allowed to do in the Copyright text at the bottom of all our patterns. Happy crafting!
Post a comment to pattern DROPS 143-11
We would love to hear what you have to say about this pattern!
If you want to leave a question, please make sure you select the correct category in the form below, to speed up the answering process. Required fields are marked *.