
Popular categories
Looking for a yarn?


Comments / Questions (111)
![]() Nikki wrote:
Nikki wrote:
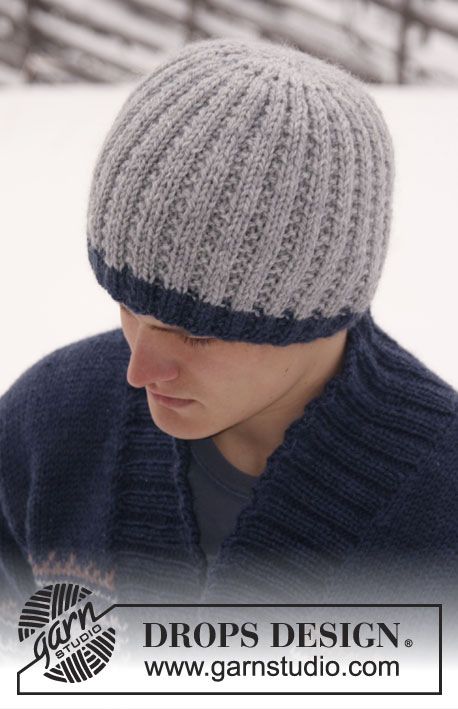
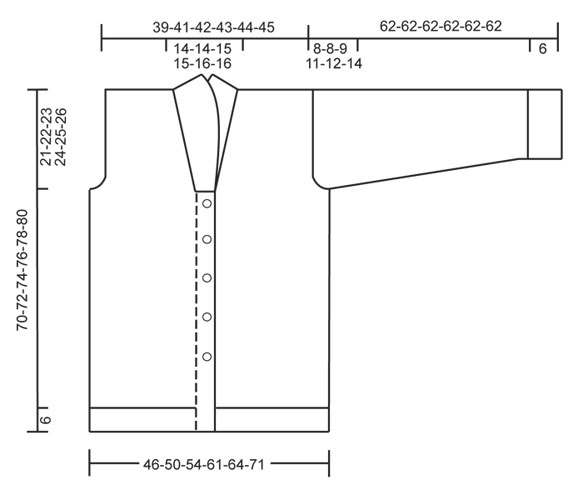
Hi- I’m trying to figure out the first part of the pattern to the button holes. I have hollowed the pattern- but the ribbing is horizontal instead of vertical as shown in the photo. What am I missing?
25.03.2026 - 19:12DROPS Design answered:
Hi Nikki, The first part of the body is the vertical ribbed section at the bottom, which consists of purl 2, knit 2, with 2 garter stitches at the beginning and end of the row (garter stitch is knitted from both the right and wrong side). The first button hole is worked at the end of this rib in most sizes (at 6 cm) or 1 cm after starting the bands in the 2 largest sizes. The bands are continued in the ribbed pattern across 14 stitches at both ends of the row while the remaining stitches are now worked in stocking stitch. Regards, Drops Team.
26.03.2026 - 06:43
![]() Lorena wrote:
Lorena wrote:
Ciao, si possono montare le maglie su ferri dritti e lavorare in piano visto che è un cardigan? Possibile che io debba usare i ferri del 3.5 e 2.5?
23.03.2026 - 21:03DROPS Design answered:
Buonasera Lorena, sì, può utilizzare i ferri dritti. Solitamente quel campione è indicato per una lavorazione con i ferri n° 5 mm. Buon lavoro!
23.03.2026 - 22:12
![]() Margien wrote:
Margien wrote:
287 stitches divided by 17 stitches for 10cms, gives a circumference of 169 cms. My son has an XL size of 105 waist. How do I rhyme that with a sweather measurinf 1 medter 68 cms?????
20.02.2026 - 17:08DROPS Design answered:
Dear Margien, note that the 286 sts cast on at the beg of piece is not the whole circumference of finished jumper, this is the number of sts required for the rib with smaller needles at the bottom of jacket, you will have afterwards 103 sts stocking sts for back piece = 61 cm in width for back piece, just as in the measurement chart Happy kniting!
23.02.2026 - 07:32
![]() Silvia wrote:
Silvia wrote:
Hi, Dankeschön nochmal für die Hilfe, hat alles gut geklappt. Ich bin jetzt bei dem Kragen, was heißt in der Beschreibung - ‚ Partiene‘ ?????
07.02.2026 - 14:00DROPS Design answered:
Liebe Silvia, es sind die links gestrickten Bereiche (Linksrippen) des Rippenmusters gemeint. Viel Spaß weiterhin!
08.02.2026 - 08:36
![]() Maya wrote:
Maya wrote:
Another question is why is there such a big decrease after the ribbing? It seems like that is a 15" decrease from the ribbing. Is that correct? Please advise. I'm confused about the sizing. Thanks!
03.02.2026 - 19:44DROPS Design answered:
Hi Maya, the rib edge is more elastic and will contract slightly compared to, for example, stocking stitch. By decreasing after the rib edge, you avoid a visible difference in width between the rib edge and the rest of the body. Happy knitting!
07.04.2026 - 09:48
![]() Maya wrote:
Maya wrote:
I am about to start the sweater for my husband. His chest measures 44". I thought I would make him an XL, as it seems that would be a 4" ease. The schematic seems like that would be correct, but the number of stitches seems weird. After you decrease from the ribbing, you should have 221 stitches. 221 divided by 4.25 = 52" Is that correct? That would be an 8" ease, which seems like to much for my husband, and looking at the picture it doesn't seem like the model has that much of an ease.
03.02.2026 - 19:43DROPS Design answered:
Hi Maya, how to choose your size you will find HERE. Happy knitting!
07.04.2026 - 09:53
![]() Silvia wrote:
Silvia wrote:
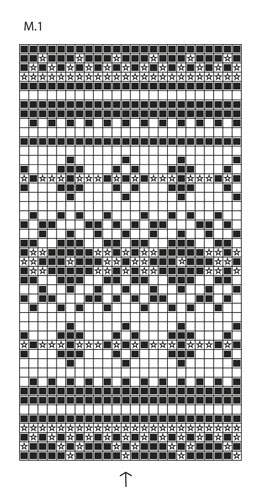
Ich verstehe nicht, wie ich das Muster für den Ärmel stricken soll. Ich beginne mit der äußeren Mitte des Ärmels und stricke nun die Symbole ab dem Pfeil in M1? Stricke ich das gesamte Muster ab Pfeil oder nur in der 1. Reihe? Und wie mache ich das mit den Zunahmen? Ich würde mich freuen wenn sie mir eine kleine Hilfestellung geben könnten. Q
27.01.2026 - 19:09DROPS Design answered:
Liebe Silvia, Sie beginnen die Runde an der unteren Ärmelmitte, nicht an der oberen. Sie zählen aber ab der oberen Ärmelmitte das Muster ab, die Pfeil-Masche (= Mitte des Musters) muss an der oberen Ärmelmitte liegen. Sie müssen also die Maschenzahl, die Sie haben, von der unteren Ärmelmitte bis zur oberen Ärmelmitte abzählen und dann ausrechnen, mit welcher Masche das Muster an der unteren Ärmelmitte beginnt. Es wird an der unteren Ärmelmitte vermutlich nicht aufgehen. Sie beginnen das Muster mit der ersten Masche, von rechts gelesen. Die Zunahmen können Sie dann nach und nach in das Muster einarbeiten. Viel Spaß beim Weiterstricken!
28.01.2026 - 20:14
![]() Hennie Reiling wrote:
Hennie Reiling wrote:
Ik ben met bovenstaand patroon bezig. Nu zegt het patroon dat ik na de boord 69 steken moet minderen. Heb het idee dat het juist meerderen moet zijn, klopt dat. Vr gr Hennie
08.01.2026 - 13:08DROPS Design answered:
Dag Hennie,
Het meerderen na de boord wordt gedaan om te voorkomen dat de boord het werk samentrekt.
10.01.2026 - 18:01
![]() Nikki wrote:
Nikki wrote:
Hi- I’m at the starting the button hole section- but I’m so confused. The ribbing looks like the collar, and how on earth does the collar get in between the two ‘sections’ of the button holes/buttons? And the measurements are just… I do not understand. I’ve knit a lot, but this is very confusing to me. Can someone explain it to me like I’m 5?
27.12.2025 - 00:15
![]() Kate wrote:
Kate wrote:
The ‘body’ section is for horizontal ribbing instead of vertical ribbing like in the photo!
24.12.2025 - 22:53
|
||||||||||
Harald#haraldjacket |
||||||||||
 |
 |
|||||||||
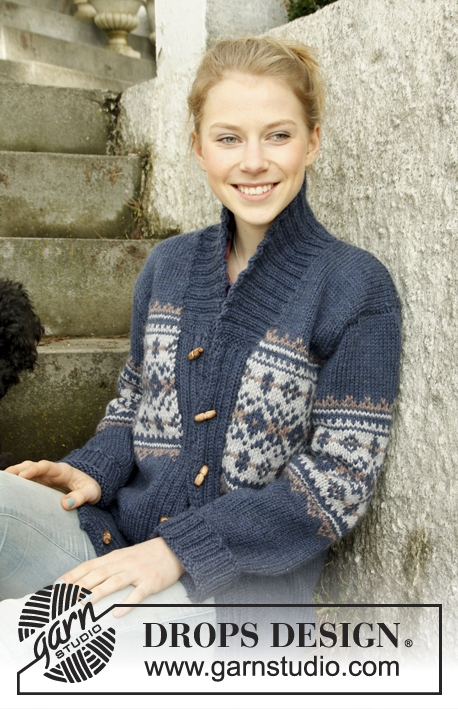
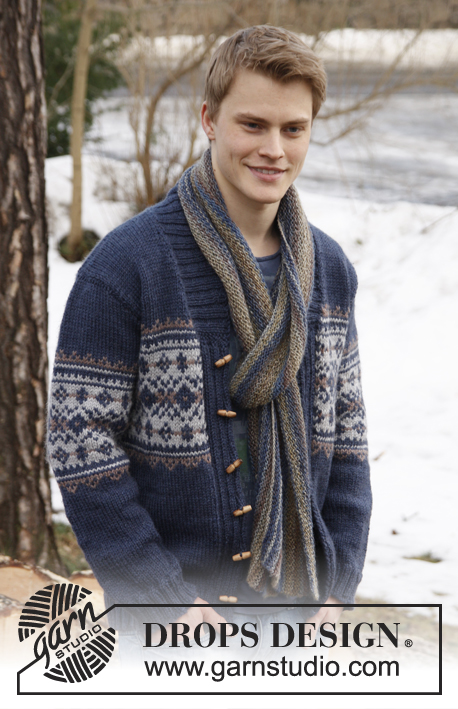
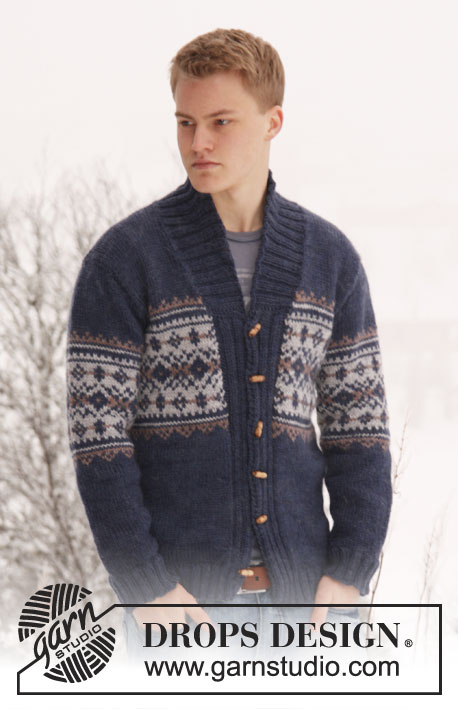
Men's knitted jacket in DROPS Alaska, with pattern and shawl collar. Size: S - XXXL.
DROPS Extra 0-813 |
||||||||||
|
GARTER ST (back and forth on needle): K all rows. BUTTON HOLES: Bind off for button holes on left band, all bind offs are done from RS. 1 button hole = P tog 5th and 6th st from mid front and make 1 YO. On next row K the YO. Bind off for button holes when piece measures: SIZE S: 6, 14, 23, 31, 40 and 48 cm / 2⅜",5½",9",12¼",15¾" and 19" SIZE M: 6, 15, 24, 32, 41 and 49 cm / 2 3/86",9½",12½",16⅛" and 19¼". SIZE L: 6, 15, 24, 33, 42 and 50 cm / 2⅜",6",9½", 13",16½" and 19¾". SIZE XL: 6, 13, 21, 28, 36, 43 and 51 cm / 2⅜",5⅛",8¼",11",14¼",17" and 20". SIZE XXL: 7, 14, 22, 29, 37, 44 and 52 cm / 2¾",5½",8¾",11⅜",14½",17¼", SIZE XXXL: 7, 15, 22, 30, 37, 45 and 53 cm / 2¾",6",8¾",11¾",14½",17¾" and 21". PATTERN: See diagram M.1 – the diagram shows 2 repetitions in breadth. Work entire pattern in stockinette st. DECREASE TIP (applies to neckline at the front): Dec inside 1 edge st in garter st. All dec are done from RS. Dec after 1 edge st as follows: Slip 1 st as if to K, K 1, psso. Dec before 1 edge st as follows: K 2 tog. -------------------------------------------------------- BODY: Worked back and forth on circular needle from mid front. Cast on 226-246-262-286-302-330 sts on circular needle size 4 mm / US 6 with dark blue Alaska. P 1 row from WS. Then work next row as follows from RS: 2 edge sts in GARTER ST - see explanation above - * K 2/P 2 *, repeat from *-* until 4 sts remain and finish with K 2 and 2 edge sts in GARTER ST. Continue rib like this until piece measures 6 cm / 2⅜". AT THE SAME TIME when piece measures 6-6-6-6-7-7 cm / 2⅜"-2⅜"-2⅜"-2⅜"-2¾"-2¾", bind off for BUTTON HOLES on left band - see explanation above. After rib, switch to circular needle size 5 mm / US 8 and work next row from RS as follows: 2 sts in garter st, K 2, P 2, K 2, P 2, K 2, P 2 (= 14 band sts), work in stockinette st until 14 sts remain while AT THE SAME TIME dec 53-61-65-65-69-73 sts evenly (do not dec over front bands), finish with P 2, K 2, P 2, K 2, P 2, K 2 and 2 sts in garter st = 173-185-197-221-233-257 sts. Insert a marker 47-50-53-59-62-68 sts in from each side (= 79-85-91-103-109-121 sts between markers on back piece). Then work in stockinette st with 14 band sts in each side towards mid front as before. REMEMBER THE GAUGE! When piece measures 32-33-34-35-36-37 cm / 12½"-13½"-13⅜"-13¾"-14¼"-14½", work diagram M.1 as follows: Work 14 band sts as before with dark blue, work diagram M.1 until 15 sts remain, work 1st st in diagram M.1 (so that pattern beg and ends the same way on each side of band) and finish with 14 band sts in dark blue as before. When piece measures 49-50-51-52-53-54 cm / 19¼"-19¾"-20"-20½"-21"-21¼", work next row from RS as follows: bind off the first 13 sts, insert a marker (this marks where to start the knit up for collar), work 31-34-37-42-45-51 sts (= right front piece), bind off 6-6-6-8-8-8 sts for armhole, work 73-79-85-95-101-113 sts (= back piece), bind off 6-6-6-8-8-8 sts for armhole and work the rest of row (= 44-47-50-55-58-64 sts on left front piece). Turn and bind off the first 13 sts, insert a marker (this marks where to end the pick up for collar), work the rest of row = 31-34-37-42-45-51 sts. Finish each part separately. BACK PIECE: = 73-79-85-95-101-113 sts. Continue diagram M.1 (when diagram M.1 has been worked 1 time vertically, continue with dark blue until finished measurements) – AT THE SAME TIME bind off for armholes at beg of every row in each side: 3 sts 0-0-0-1-1-2 times, 2 sts 1-1-2-2-3-4 times and 1 st 1-3-3-4-4-4 times = 67-69-71-73-75-77 sts remain on needle. When piece measures 68-70-72-74-76-78 cm / 26¾"-27½"-28⅜"-29⅛"-30"-30¾", bind off the middle 21-21-23-23-25-25 sts for neck. Now finish each shoulder separately. Continue to bind off 1 st on next row from neck = 22-23-23-24-24-25 sts remain on the shoulder. Bind off when piece measures 70-72-74-76-78-80 cm / 27½"-28⅜"-29⅛"-30"-30¾"-31½" RIGHT FRONT PIECE: = 31-34-37-42-45-51 sts. Continue diagram M.1 as on back piece with 1 edge st in garter st towards mid front. AT THE SAME TIME bind off for armhole in the side as on back piece. AT THE SAME TIME when piece measures 50-51-52-53-54-55 cm / 19¾"-20"-20½"-21"-21¼"-21⅝" / 19¾"-20"-20½"-21"-21¼"-21⅝", dec 1 st towards the neck - SEE DECREASE TIP! Repeat dec on every 4th row a total of 3-3-4-4-6-6 times, and on every 8th row a total of 3-3-3-3-2-2 time. After all bind offs and dec are done, 22-23-23-24-24-25 sts remain on shoulder. Bind off when piece measures 70-72-74-76-78-80 cm / 27½"-28⅜"-29⅛"-30"-30¾"-31½". LEFT FRONT PIECE: Work as right front piece but reversed. SLEEVE: Worked in the round on double pointed needles, switch to circular needle when needed. Cast on 52-52-56-56-60-60 sts on double pointed needles size 4 mm / US 6 with dark blue. K 1 round, then work rib = K 2/P 2. When piece measures 6 cm / 2⅜", switch to double pointed needles size 5 mm / US 8. K 1 round while AT THE SAME TIME dec 11-9-11-11-13-13 sts evenly = 41-43-45-45-47-47 sts. Insert a marker at beg of round (= mid under sleeve). Then work in stockinette st. When piece measures 7-7-7-7-9-10 cm / 2¾"-2¾"-2¾"-2¾"-3½"-4", inc 1 st on each side of marker mid under sleeve. Repeat inc a total of 11-13-14-16-17-19 times in Size S: On every 10th round, Size M: Every 8th round, Size L: Every 7th round, Size XL: Every 6th round, Size XXL: Every 5th round, Size XXXL: Every 4th round = 63-69-73-77-81-85 sts. AT THE SAME TIME when piece measures 30-30-29-27-26-24 cm / 11¾"-11¾"-11⅜"-10⅝"-10¼"-9½", insert a marker in the middle st on round (= mid on top of shoulder). Work diagram M.1 – NOTE: St marked with arrow in diagram should be the st with marker mid on top of sleeve. When diagram M.1 has been worked 1 time vertically, continue with dark blue until finished measurements. AT THE SAME TIME when piece measures 54-54-53-51-50-48 cm / 21¼"-21¼"-21"-20"-19¾"-19" (shorter measurements in the larger sizes because of longer sleeve cap and wider shoulders), bind off 6-6-6-8-8-8 sts mid under sleeve. Then work back and forth on needle until finished measurements. AT THE SAME TIME bind off for sleeve cap at beg of every row in each side: 2 sts 3-3-3-3-3-4 times and 1 st 2-2-2-4-4-5 times. Then bind off 2 sts in each side until piece measures 61 cm / 24" in all sizes, then bind off 3 sts 1 time in each side. Bind off the remaining sts, the piece measures approx. 62 cm / 24½" in all sizes. ASSEMBLY: Sew the shoulder seams. SHAWL COLLAR: Pick up sts (inside 1 edge st) on circular needle size 4 mm / US 6 with dark blue - start mid front at marker on right front piece: Pick up approx. 34 to 44 sts up to shoulder, then 22 to 28 sts along the neck, and 34 to 44 sts down along left front piece until marker = 90 to 116 sts. K 1 row from WS while AT THE SAME TIME inc no of sts to 126-130-138-142-150-154. Then work rib as follows (seen from RS): 2 sts in garter st, * K 2, P 2 *, repeat from *-* and finish with K 2 and 2 sts in garter st. Continue like this until collar measures approx. 5 cm / 2". Now inc 1 st in each of the middle 12 P-sections, seen from RS (= back of neck) = 138-142-150-154-162-166 sts. Then work K over K and P over P until collar measures approx. 7 cm / 2¾". Now work as follows: Work 1 row as before and slip the first 10 sts worked on a stitch holder, turn piece, work the rest of row and slip the first 10 sts worked at the beg of row on another stitch holder. Turn piece, work the rest of row and slip the first 10 sts worked at the beg of row on the first stitch holder, turn piece, work the rest of row and slip the first 10 sts worked at the beg of row on the other stitch holder. Continue like this until there are a total of 40 sts on the stitch holders in each side. Then slip sts from stitch holders back on needle and work 1 row as before over all the 138-142-150-154-162-166 sts – NOTE: To avoid holes in every transition where piece was turned, slip loop before next st twisted on needle and work tog with first st on needle. Bind off with K over K and P over P. Neatly fasten collar with stitches in each side towards band – sew edge to edge to avoid a chunky seam. MORE ASSEMBLY: Sew in sleeves and sew on buttons. |
||||||||||
Diagram explanations |
||||||||||
|
||||||||||
 |
||||||||||
 |
||||||||||
Have you finished this pattern?Tag your pictures with #dropspattern #haraldjacket or submit them to the #dropsfan gallery. Do you need help with this pattern?You'll find 27 tutorial videos, a Comments/Questions area and more by visiting the pattern on garnstudio.com. © 1982-2026 DROPS Design A/S. We reserve all rights. This document, including all its sub-sections, has copyrights. Read more about what you can do with our patterns at the bottom of each pattern on our site. |
||||||||||


With over 40 years in knitting and crochet design, DROPS Design offers one of the most extensive collections of free patterns on the internet - translated to 17 languages. As of today we count 324 catalogs and 12284 patterns - 12274 of which are translated into English (US/in).
We work hard to bring you the best knitting and crochet have to offer, inspiration and advice as well as great quality yarns at incredible prices! Would you like to use our patterns for other than personal use? You can read what you are allowed to do in the Copyright text at the bottom of all our patterns. Happy crafting!
Post a comment to pattern DROPS Extra 0-813
We would love to hear what you have to say about this pattern!
If you want to leave a question, please make sure you select the correct category in the form below, to speed up the answering process. Required fields are marked *.