
Categorie popolari
State cercando un filato?


Lasciare un commento sul modello DROPS Extra 0-813
Noi saremmo felici di ricevere i tuoi commenti e opinioni su questo modello!
Se vuoi fare una domanda, fai per favore attenzione a selezionare la categoria corretta nella casella qui sotto per velocizzare il processo di risposta. I campi richiesti sono indicati da *.
|
||||||||||
Harald |
||||||||||
 |
 |
|||||||||
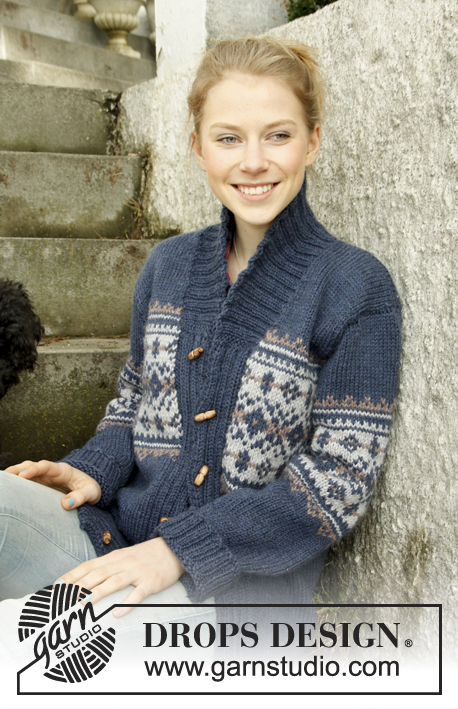
Cardigan da uomo DROPS con motivo jacquard e colletto a scialle in "Alaska". Taglie: dalla S alla XXXL.
DROPS Extra 0-813 |
||||||||||
|
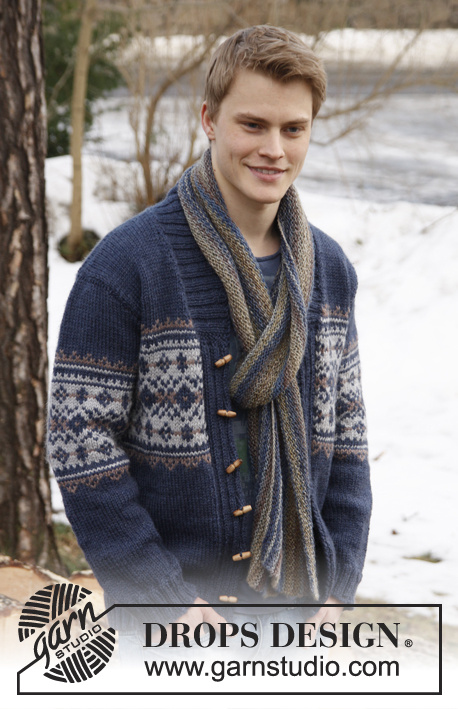
PUNTO LEGACCIO (avanti e indietro sui ferri): Lavorare tutti i ferri a dir. ASOLE: Chiudere le m per le 5 asole sul bordo davanti sinistro; tutte le diminuzioni vanno fatte sul diritto del lavoro. 1 asola = lavorare insieme a rov la 5° e la 6° m dal bordo e fare 1 gettata. Al ferro successivo, lavorare la m gettata a dir. Chiudere le m per le asole quando il lavoro misura: TAGLIA S: 6, 14, 23, 31, 40 e 48 cm TAGLIA M: 6, 15, 24, 32, 41 e 49 cm TAGLIA L: 6, 15, 24, 33, 42 e 50 cm TAGLIA XL: 6, 13, 21, 28, 36, 43 e 51 cm TAGLIA XXL: 7, 14, 22, 29, 37, 44 e 52 cm TAGLIA XXXL: 7, 15, 22, 30, 37, 45 e 53 cm MOTIVO A JACQUARD: Vedere il diagramma M.1 – il diagramma mostra 2 ripetizioni del motivo in larghezza. Lavorare tutto il motivo a maglia rasata. SUGGERIMENTO PER LE DIMINUZIONI (per il collo, sul davanti): Diminuire prima / dopo 1 m vivagno a punto legaccio. Tutte le diminuzioni vanno fatte sul diritto del lavoro. Diminuire dopo 1 m vivagno, come segue: passare 1 m a dir senza lavorarla, 1 m a dir, accavallare la m passata sulla m lavorata. Diminuire prima di 1 m vivagno, come segue: lavorare 2 m insieme a dir. -------------------------------------------------------- DAVANTI / DIETRO: Si lavorano avanti e indietro sui ferri circolari, dal centro davanti. Avviare 226-246-262-286-302-330 m sui ferri circolari n° 4 con il filato Alaska, blu scuro. Lavorare 1 ferro a rovescio sul rovescio del lavoro. Lavorare il ferro successivo, sul diritto del lavoro, come segue: 2 m vivagno a PUNTO LEGACCIO - vedere le spiegazioni sopra - * 2 m a dir / 2 m a rov *, ripetere da *-* finché non rimangono 4 m; finire con 2 m a dir e 2 vivagno a PUNTO LEGACCIO. Proseguire a coste in questo modo finché il lavoro non misura 6 cm. ALLO STESSO TEMPO quando il lavoro misura 6-6-6-6-7-7 cm, chiudere le m per le ASOLE sul bordo davanti sinistro - vedere le spiegazioni sopra. Terminate le coste, proseguire con i ferri circolari n° 5 e lavorare il ferro successivo, sul diritto del lavoro, come segue: 2 m a punto legaccio, 2 m a dir, 2 m a rov, 2 m a dir, 2 m a rov, 2 m a dir, 2 m a rov (= 14 m per il bordo al centro davanti), lavorare a maglia rasata finché non rimangono 14 m e allo stesso tempo diminuire 53-61-65-65-69-73 m in modo uniforme (non diminuire in corrispondenza delle m dei bordi davanti); finire con 2 m a rov, 2 m a dir, 2 m a rov, 2 m a dir, 2 m a rov, 2 m a dir e 2 m a punto legaccio = 173-185-197-221-233-257 m. Inserire un segno dopo le prime 47-50-53-59-62-68 m e un segno prima delle ultime 47-50-53-59-62-68 m (= tra i due segni ci sono 79-85-91-103-109-121 m per il dietro). Lavorare a maglia rasata con 14 m per i bordi al centro, come prima. RICORDARSI LA TENSIONE DEL LAVORO! Quando il lavoro misura 32-33-34-35-36-37 cm, lavorare seguendo il diagramma M.1 come segue: lavorare 14 m per il bordo davanti come prima, con il colore blu scuro, seguire il diagramma M.1 finché non rimangono 15 m , lavorare la 1a m del diagramma M.1 (in questo modo il motivo inizia e finisce in modo uguale da entrambi i lati dei bordi davanti) e finire con 14 m per il bordo davanti con il colore blu scuro, come prima. Quando il lavoro misura 49-50-51-52-53-54 cm, lavorare il ferro successivo, sul diritto del lavoro, come segue: chiudere le prime 13 m, inserire un segno (indica dove iniziare a riprendere le m per il colletto), lavorare 31-34-37-42-45-51 m (= davanti destro), chiudere 6-6-6-8-8-8 m per gli scalfi, lavorare 73-79-85-95-101-113 m (= dietro), chiudere 6-6-6-8-8-8 m per gli scalfi e lavorare le m rimaste sul ferro (= 44-47-50-55-58-64 m per il davanti sinistro). Girare il lavoro e chiudere le prime 13 m, inserire un segno (indica dove finire di riprendere le m per il colletto), lavorare le m rimaste sul ferro = 31-34-37-42-45-51 m. Finire ogni parte separatamente. DIETRO: = 73-79-85-95-101-113 m. Proseguire seguendo il diagramma M.1 (dopo aver lavorato il diagramma M.1 una volta in verticale, proseguire con il colore blu scuro fino alla fine del lavoro) – ALLO STESSO TEMPO diminuire per gli scalfi all’inizio di ogni ferro, da ciascun lato, come segue: 3 m per 0-0-0-1-1-2 volte, 2 m per 1-1-2-2-3-4 volte e 1 m per 1-3-3-4-4-4 volte = sul ferro rimangono 67-69-71-73-75-77 m. Quando il lavoro misura 68-70-72-74-76-78 cm, chiudere le 21-21-23-23-25-25 m centrali per il collo. Finire ogni spalla separatamente. Al ferro successivo, chiudere 1 m dal lato del collo = per la spalla rimangono 22-23-23-24-24-25 m. Chiudere tutte le m quando il lavoro misura 70-72-74-76-78-80 cm. DAVANTI DESTRO: = 31-34-37-42-45-51 m. Proseguire seguendo il diagramma M.1 come per il dietro, con 1 m vivagno a punto legaccio verso il centro davanti. ALLO STESSO TEMPO, chiudere le m per lo scalfo al lato, come per il dietro. ALLO STESSO TEMPO, quando il lavoro misura 50-51-52-53-54-55 cm, diminuire 1 m dal lato del collo – vedere il SUGGERIMENTO PER LE DIMINUZIONI! Ripetere queste diminuzioni ogni 4 ferri per un totale di 3-3-4-4-6-6 volte, e ogni 8 ferri per un totale di 3-3-3-3-2-2 volte. Terminate tutte le diminuzioni, per la spalla rimangono 22-23-23-24-24-25 m. Chiudere le m quando il lavoro misura 70-72-74-76-78-80 cm. DAVANTI SINISTRO: Lavorare come il davanti destro, ma in senso inverso. MANICA: Si lavora in tondo sui ferri a doppia punta; proseguire con i ferri circolari quando necessario. Avviare 52-52-56-56-60-60 m sui ferri a doppia punta n° 4 con il colore blu scuro. Lavorare 1 giro a dir. Proseguire a coste = 2 m a dir / 2 m a rov. Quando il lavoro misura 6 cm, proseguire con i ferri a doppia punta n° 5. Lavorare 1 giro a dir e ALLO STESSO TEMPO diminuire 11-9-11-11-13-13 m in modo uniforme = 41-43-45-45-47-47 m . Inserire un segno all’inizio del giro (= centro, sotto la manica). Proseguire a maglia rasata. Quando il lavoro misura 7-7-7-7-9-10 cm, aumentare 1 m da ciascun lato del segno al centro, sotto la manica. Ripetere questi aumenti un totale di 11-13-14-16-17-19 volte, come segue: Taglia S: ogni 10 giri, Taglia M: ogni 8 giri, Taglia L: ogni 7 giri, Taglia XL: ogni 6 giri, Taglia XXL: ogni 5 giri, Taglia XXXL: ogni 4 giri = 63-69-73-77-81-85 m . ALLO STESSO TEMPO, quando il lavoro misura 30-30-29-27-26-24 cm, inserire un segno nella m centrale del giro (= centro, nella parte superiore della manica). Lavorare seguendo il diagramma M.1 – ATTENZIONE: nel diagramma, la m indicata dalla freccia corrisponde alla m con il segno nella parte superiore della manica. Dopo aver lavorato il diagramma M.1 1 volta in verticale, proseguire con il colore blu scuro fino alla fine del lavoro. ALLO STESSO TEMPO, quando il lavoro misura 54-54-53-51-50-48 cm (misure più corte per le taglie maggiori perché l’arrotondamento della manica è più lungo e le spalle sono più larghe), chiudere 6-6-6-8-8-8 m al centro, sotto la manica. Lavorare ora avanti e indietro sul ferro fino alla fine del lavoro. ALLO STESSO TEMPO chiudere, per l’arrotondamento della manica, all’inizio di ogni ferro, da ciascun lato, come segue: 2 m per 3-3-3-3-3-4 volte e 1 m per 2-2-2-4-4-5 volte. Chiudere poi 2 m da ciascun lato finché il lavoro non misura 61 cm per tutte le taglie; chiudere poi 3 m per 1 volta, da ciascun lato. Chiudere le m rimaste; il lavoro misura ca. 62 cm in tutte le taglie. CONFEZIONE: Cucire le spalle. COLLETTO A SCIALLE: Con i ferri circolari n° 4 e il filato blu scuro, riprendere le m (all’interno della m vivagno) – iniziare dal centro davanti, dal segno sul davanti destro: riprendere ca. da 34 a 44 m fino alla spalla, poi da 22 a 28 m lungo il collo, e da 34 a 44 m lungo il davanti sinistro, fino al segno = da 90 a 116 m. Lavorare 1 ferro a dir sul rovescio del lavoro e ALLO STESSO TEMPO portare il n° delle m a 126-130-138-142-150-154 distribuendo degli aumenti in modo uniforme. Proseguire a coste come segue (viste sul diritto del lavoro): 2 m a punto legaccio, * 2 m a dir, 2 m a rov * ripetere da *-* e finire con 2 m a dir e 2 m a punto legaccio. Proseguire in questo modo finché il colletto non misura ca. 5 cm. Aumentare ora 1 m in ciascuno dei 12 gruppi centrali (= dietro del collo) di m a rov, viste sul diritto del lavoro = 138-142-150-154-162-166 m. Lavorare ora le m come si presentano finché il colletto non misura ca. 7 cm. Proseguire come segue: Lavorare 1 ferro come prima e mettere le prime 10 m lavorate, in attesa su un ferma maglie, girare il lavoro, lavorare le m rimaste sul ferro e mettere le prime 10 m lavorate all’inizio del ferro, in attesa su un altro ferma maglie. Girare il lavoro, lavorare le m rimaste sul ferro e mettere le prime 10 m lavorate all’inizio del ferro sul primo ferma maglie, girare il lavoro, lavorare le m rimaste sul ferro e mettere le prime 10 m lavorate all’inizio del ferro, in attesa sull’altro ferma maglie. Proseguire in questo modo finché, su ciascun ferma maglie, non ci sono 40 m. Passare poi le m dai ferma maglie ai ferri di lavoro e lavorare 1 ferro come prima su tutte le 138-142-150-154-162-166 m – ATTENZIONE: per evitare che si formi un piccolo buco dove il lavoro viene girato per i ferri accorciati, sollevare il filo prima della m successiva, metterlo ritorto sul ferro e lavorarlo insieme alla prima m sul ferro. Chiudere le m lavorandole come si presentano. Cucire accuratamente il colletto al bordo davanti - cucire bordo contro bordo per evitare una cucitura troppo spessa. CONFEZIONE, seguito: Inserire le maniche e cucire i bottoni. SCIARPA - vedere il modello 135-29 |
||||||||||
Spiegazioni del diagramma |
||||||||||
|
||||||||||

|
||||||||||

|
||||||||||
|
Avete realizzato questo o un altro dei nostri modelli? Taggate le vostre foto nei social media con #dropsdesign in modo che possiamo vederle! Avete bisogno di aiuto con questo modello?Troverete video tutorial, una sezione per i commenti/domande e molto altro guardando il modello su www.garnstudio.com © 1982-2024 DROPS Design A/S. Ci riserviamo tutti i diritti. Questo documento, compreso tutte le sue sotto-sezioni, è protetto dalle leggi sul copyright. Potete leggere quello che potete fare con i nostri modelli alla fine di ogni modello sul nostro sito. |
||||||||||


Con oltre 40 anni di esperienza nel design di modelli di maglia e uncinetto, DROPS Design offre la più estesa collezione di modelli gratuiti su internet - tradotti in 17 lingue. Ad oggi vi possiamo fornire 304 cataloghi e 11422 modelli - 8666 dei quali sono tradotti in Italiano.
Ci stiamo impegnando molto per darvi il meglio che vi possiamo offrire in termini di maglia e uncinetto, ispirazioni e consigli così come filati di grande qualità ad un prezzo incredibile! Volete utilizzare i nostri modelli per qualcosa d'altro oltre al vostro uso personale? Potete leggere tutto ciò che è consentito nel testo sul Copyright in basso su tutte le pagine dei nostri modelli. Buon lavoro!
Commenti / Domande (83)
So sorry to be a nuisance, but which two edges am I meant to stitch together? The instructions say sew them edge to edge, so the seam will not be bulky. But the two edges of what? Thank you!
25.04.2024 - 04:21DROPS Design answered:
Dear Mrs Rependa, you will just sew edge to edge the right side of collar along the cast off stitches on right front band and the left side of collar along the left front band. Happy knitting!
25.04.2024 - 08:38I am so close to finishing but I’ve hit a brick wall! The final direction of the pattern says to “neatly fasten collar with stitches in each side toward band. Sew edge to edge.” I have no idea what that is referring to, so am stuck. Any help would be greatly appreciated!
25.04.2024 - 02:15DROPS Design answered:
Dear Alyson, just put the two piece beside each other, so the edges are touching. Sew stitch by stitch, into the outer leg of the edge stitches on both sides. This way the seam will be flat, and smoth (not bulky). Happy Knitting!
25.04.2024 - 04:12Hi! I’m attempting to work the chart and when I reach the 15th stitch from the end, I know I’m supposed to make the same color stitch from the beginning, But I’m confused on what I start with when I come back. The first stitch of the chart going back (left to right) is teal, but that’s not what’s above the teal I started the previous row with. I need something for that first stitch before I start row two left to right in order to get the image lined up. Help please!
04.04.2024 - 00:52DROPS Design answered:
Dear Maddie, the chart shows the stitches as they appear if you look at the piece from the right side. HERE is a tutorial about how to read our knitting diagrams, which might help you to understand better. Happy Knitting!
04.04.2024 - 04:13Thank you for answering so many of my questions. I love the pattern but do find the instructions slightly confusing at times. For the sleeve: I'm doing size XL and it says to repeat inc a total of 16 times but bind off when the sleeves reaches 51 cm. I've done 14 inc rows and am already at 53 cm. What should I do? Also, I find carrying the yarn all the way around the sleeve makes it really bulky. Do you have any suggestions? Thank you!
10.02.2024 - 14:40DROPS Design answered:
Dear Sarah, is your gauge correct? When you start the increases you have worked 7 cm in the sleeves. From there, you increase 16 times every 6th round. That means you should have worked 96 rounds. If you divide this with your swatch gauge (22 rounds in 10cm = 2.2 rounds on every cm) it means you should have worked approx. 44cm. 44cm + 7cm = 51 cm, which is when you start binding off. If you still haven't reached the correct number of increases then there could be a problem with your gauge. To avoid having a bulky sleeve you could divide each color into smaller balls to use for specific sections; you will have more loose threads but it will be less bulky. Happy knitting!
11.02.2024 - 23:11Please ignore my previous question as I've figured out that these pieces are worked in sections, so cutting the yarn is necessary. However, I'm confused about the RIGHT FRONT PIECE section instructions. It says "At the same time bind off for armhole in the side as on the back piece". What does this mean?
04.02.2024 - 15:01DROPS Design answered:
Dear Sarah, in the back piece, you bind off at the beginning of every row from each side for the armholes. That is because you needed to cast off for both armholes on both sides. Now, as you work each front piece, you will cast off for one single armhole in each front piece, so you will cast off at the beginning of the rows that start from the side edge of the front piece (in each front piece it will be in opposite sides), that is, the side opposite from the neck. Happy knitting!
04.02.2024 - 23:38Hi again -- I'm starting the back piece of this pattern but it's not clear if I need to cut the yarn and put the other stitches on a stitch holder. I presume so in order to work the back piece independently? Thanks, Sarah
03.02.2024 - 19:00DROPS Design answered:
Dear Sarah, you will now work only the back piece so you keep the back piece stitches in the needles and put both front pieces' stitches on a stitch holder or thread. You also cut the yarn and rejoin it for working the back piece. Happy knitting!
04.02.2024 - 23:02The M1 chart section has confused me a bit. The pattern says "work diagram M.1 until 15 sts remain, work 1st st in diagram M.1 (so that pattern beg and ends the same way on each side of band)". I thought I did this and have ended up with a mess. Can someone explain to me what "work 1st st in diagram M.1" means - does it mean to knit the last stitch before the 14st section as if it were the 1st st in the next row? Thanks, Sarah
29.01.2024 - 20:24DROPS Design answered:
Dear Sarah, what you need to do is, when 15 sts remain, work the very first stitch of M.1 in that specific row. For example, in row 1, you start with the star symbol (beige), work towards the left and work as many repeats of M.1 as necessary and end with the stitch with the star (that is, the rightmost stitch in A.1). Then, in the next rows, work over it as with the other stitches , as indicated in the charts. Happy knitting!
29.01.2024 - 23:34Hi! For the first button hole, should I do it still with the 4 mm needles as a part of the rib or should I do it with the 5 mm needles as a part of the main body?
27.01.2024 - 20:08DROPS Design answered:
Dear Mrs Huang, the buttonholes are worked with the same needles as the ribbing edges, ie with the larger needles when working body/front piece. Happy knitting!
29.01.2024 - 11:59So following my previous question (now I realised that one should K on K and P on P indeed for the rib), should I start the WS with 2 garter, K2, then K2/P2 all the way till the 2 garter stitches on the end?
23.01.2024 - 01:13DROPS Design answered:
Hi Yiqi, Yes, you continue the rib, starting with 2 garter stitches and K2 and finishing with K2 and 2 garter stitches on the other side, until the rib measures 6 cm. Happy knitting!
23.01.2024 - 06:39Hi Drops! I already got a bit lost in the instruction of the bottom ribbing. If you end the row (RS) with K2 garter 2, then start the next row (WS) with garter 2 K2, aren’t you K on the K stitches and P on the P stitches? I thought for ribbing we need to K on the P stitches and vice versa on each row.
23.01.2024 - 01:00DROPS Design answered:
Dear Mrs Huang, you are right, from WS you will K over K and P over P, this means from WS you will work: K2, then repeat (P2, K2) ending with P2, K2. Happy knitting!
23.01.2024 - 07:49