
Popular categories
Looking for a yarn?


Comments / Questions (82)
![]() Paz Rodríguez Leiva wrote:
Paz Rodríguez Leiva wrote:
Que significa MP? "Insertar 4 MP en la pieza de la manera sig:" Gracias por su respuesta
30.01.2021 - 03:54DROPS Design answered:
Hola Paz Rodríguez Leiva, MP = marcapunto. Buen trabajo!
30.01.2021 - 18:45
![]() Donna Binko wrote:
Donna Binko wrote:
Which method do you use to join the sleeve sides?
16.12.2020 - 15:18DROPS Design answered:
Dear Mrs Binko, not sure to understand your question properly, do you mean when adding the sleeves together on same circular needle for yoke? Then see this video - if you mean seam mid under sleeve, you can use this technique or then this one. Hope this helps, happy knitting!
16.12.2020 - 16:12
![]() Alena wrote:
Alena wrote:
Dobrý den, prosím o radu stran spodní šířky předního/zadního dílu - domnívám se, že při dané délce svetru je spodní šíře 40 cm pro velikost S málo. Porovnávala jsem i s jinými modely, kde je šíře kolem 45 cm... Děkuji za zprávu.
21.11.2020 - 18:42DROPS Design answered:
Hi Alena, maybe you should choose another size. Please see the lesson DROPS HERE. Happy knitting!
23.11.2020 - 18:36
![]() Birgit Lünemann wrote:
Birgit Lünemann wrote:
Hallo liebes Drops-Team, Wie arbeite ich die Ärmel in die Passe ein? Vielen Dank für eure Hilfe. Mfg Lünemann
16.05.2020 - 12:08DROPS Design answered:
Liebe Frau Lünemann, dieses Video zeigt, wie man die Maschen von den Ärmeln auf die selbe Rundnadel wie Rumpfteil strickt. Die ersten Reihen sind manchmal etwas tricky aber nach einigen Reihen geht es einfacher. Viel Spaß beim stricken!
18.05.2020 - 07:53
![]() Claudia wrote:
Claudia wrote:
Salve, ho realizzato questo modello con il filato andes, secondo le vostre indicazioni e nella mia taglia. finito il lavoro era bellissimo e vestiva molto bene, dopo averlo lavato a mano in acqua fredda e asciugato steso su una superficie piana, il cardigan ha perso la sua forma e si è allungato tantissimo, come faccio a fargli riprendere la sua forma? grazie mille
05.02.2020 - 13:53
![]() Claudia wrote:
Claudia wrote:
Buongiorno, avrei una domanda, è possibile lavorare le maniche in tondo. sto realizzando questo modello e vorrei evitare le cuciture sotto le maniche. Se sì, procedo con avviare lo stesso numero di maglie della taglia scelta e le lavoro in tondo? Grazie mille!
29.01.2020 - 08:30DROPS Design answered:
Buongiorno Claudia. Può lavorare le maniche in tondo, avviando 2 maglie in meno (sono le maglie vivagno che servono per la cucitura). Il numero delle maglie quando lavora a coste deve essere divisibile per 4. Buon lavoro!
29.01.2020 - 17:07
![]() Kateřina Lofítková wrote:
Kateřina Lofítková wrote:
Dobrý den, opravdu je k velikosti "S" potřeba jen 400 g příze? Zdá se mi to málo a cena, za kolik lze model pořídit počítá s vyšší gramáží. Děkuji
02.12.2019 - 09:20DROPS Design answered:
Dobry den Katerina! K velikosti "S" potřeba jen 500 g příze. Happy knitting!
02.12.2019 - 17:52
![]() Maria wrote:
Maria wrote:
Dzień dobry! Czy rękawy zszywa się przed dołączeniem ich do robótki czy po, kiedy sweter jest już gotowy?
25.09.2019 - 18:58DROPS Design answered:
Witaj Mario! Rękawy zszywamy przed dołączeniem ich do reszty robótki. Miłej pracy!
25.09.2019 - 20:27
![]() CARMEN SÁNCHEZ wrote:
CARMEN SÁNCHEZ wrote:
Me podrían mandar este patrón para dos agujas?Gracias
17.09.2019 - 11:46DROPS Design answered:
Hola Carmen,. No enviamos patrones personalizados.
18.09.2019 - 20:26
![]() CARMEN SÁNCHEZ wrote:
CARMEN SÁNCHEZ wrote:
Buenos días, No sé si se usa mayoritariamente las agujas circulares, en España apenas se usa, de hecho no conozco a nadie. Haría más modelos pero por desgracia todos los patrones son para agujas circulares, me pregunto si no podrían hacer alguno con las agujas de toda la vida. Algunos se pueden adaptar más o menos, pero por ejemplo este modelo, que me gustaría realizar, no puedo convertirlo para hacerlo a dos agujas.
17.09.2019 - 11:45DROPS Design answered:
Hola Carmen. La aguja circular ( que es cada vez más popular entre tejedoras) permite trabajar con un mayor número de puntos y de este modo podemos trabajar las prendas sin costuras, con el canesú redondo etc. Los puntos se pueden trabajar de la misma manera (por el método inglés) que con las agujas rectas si no sabes el método continental, que es más cómodo para la aguja circular. Sin embargo, hay varios modelos que son imposibles de adaptar a agujas rectas. Este es uno de ellos.
18.09.2019 - 20:24
|
||||||||||||||||
Mist#mistcardigan |
||||||||||||||||
|
|
||||||||||||||||
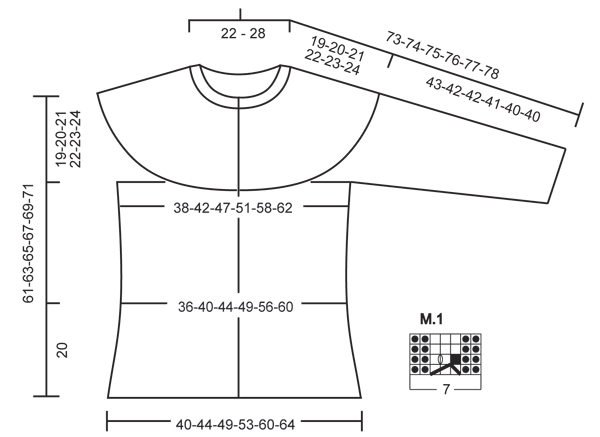
Knitted DROPS jacket in stockinette st with cables and round yoke in ”Andes” or “Snow”. Size: S - XXXL.
DROPS 134-17 |
||||||||||||||||
|
GARTER ST (back and forth on needle): K all rows. DECREASE TIP 1: All dec are done from RS. Dec as follows before 4 sts in the side: Work until 2 sts remain before marker, K tog the next 2 sts. Dec as follows after 4 sts in the side: Slip 1 st as if to K, K 1, psso. DECREASE TIP 2: Dec 1 st on each side of marker as follows: Work until 2 sts remain before marker, slip 1 st as if to K, K 1, psso, (marker), K tog the next 2 sts. INCREASE TIP: All inc are done from RS. Inc 1 st by making 1 YO. On next row P YO twisted (i.e. work in back loop of YO instead of front) to avoid holes. PATTERN: See diagram M.1 (the diagram shows the pattern from RS) -------------------------------------------------------- BODY: Worked back and forth on circular needle from mid front. Cast on 78-86-94-102-114-122 sts (includes 3 band sts in each side towards mid front) on circular needle size 10 mm / US 15 with Andes. Work 1st row (= from RS) as follows: 3 band sts in garter st - See explanation above - work diagram M.1 (= 7 sts), * K 2, P 2 *, repeat from *-* until 10 sts remain on needle, work diagram M.1 and finish with 3 band sts in garter st. NOTE: Work band sts in garter st until finished measurements. Work like this for 4 rows, work next row (= RS) as follows: 3 band sts, work diagram M.1, work in stockinette st until 10 sts remain on needle, work diagram M.1, finish with 3 band sts. Continue in stockinette st with diagram M.1 and 3 band sts in each side. Insert 4 markers in the piece as follows: Work 19-21-23-25-28-30 sts, 1 marker, work 4 sts, 1 marker, work 32-36-40-44-50-54 sts, 1 marker, work 4 sts, 1 marker, work remaining sts (= 4 sts between each marker in each side). REMEMBER THE GAUGE! When piece measures 10 cm / 4" from cast on edge, dec 1 st on each side of 4 sts in each side - see decrease tip 1 above. Repeat dec when piece measures 20 cm / 8" = 70-78-86-94-106-114 sts. Continue in stockinette st with diagram M.1 and 3 band sts in each side. When piece measures 31-32-32-33-33-34 cm / 12¼"-12½"-12½"-13"-13"-13⅜", inc 1 st on each side of 4 sts in the sides - Read increase tip above = 74-82-90-98-110-118 sts. Continue to work until piece measures 42-43-44-45-46-47 cm / 16½"-17"-17¼"-17¾"-18"-18½". Work next row from WS as follows: Work 18-20-22-24-27-29 sts, bind off the next 4 sts, work 30-34-38-42-48-52 sts, bind off the next 4 sts and work the last 18-20-22-24-27-29 sts. Put piece aside = 66-74-82-90-102-110 sts remain on needle. SLEEVE: The sleeve is worked back and forth on circular needle. Cast on 22-22-22-26-26-26 sts (includes 1 edge st in each side) on circular needle size 10 mm / US 15. Work 1st row (= RS) in rib as follows: 1 edge st in garter st, * K 2, P 2 *, repeat from *-* and finish with 1 edge st in garter st. Continue like this until rib measures approx. 4 cm / 1½". Now continue in stockinette st with 1 edge st in each side - At the same time on 1st row from RS, adjust no of sts to 22-23-23-25-27-27. When piece measures 8 cm / 3⅛", inc 1 st in each side inside 1 edge st. Repeat inc every 6-6-5-5-5-4 cm / 2⅜"-2⅜"-2"-2"-2"-1½" a total of 6-6-7-7-7-8 times = 34-35-37-39-41-43 sts. When piece measures approx. 43-42-42-41-40-40 cm / 17"-16½"-16½"-16⅛"-15¾"-15¾" (NOTE! Shorter measurements in the larger sizes because of wider shoulder width) bind off 3 sts at beg of the next 2 rows = 28-29-31-33-35-37 sts. Put piece aside and knit another sleeve. ASSEMBLY: Sew the sleeves tog inside 1 edge st. YOKE: Slip sleeves on to same circular needle as body where armholes were bound off = 122-132-144-156-172-184 sts. Insert 1 marker after 19-17-16-18-18-20 sts, then insert another 7-7-7-8-8-8 markers with 12-14-16-15-17-18 sts between each = 19-17-16-18-18-20 sts remain after last marker (= 8-8-8-9-9-9 markers). Now measure the piece from here. Continue in stockinette st with diagram M.1 and 3 band sts in each side as before. When piece measures 2 cm / ¾", dec 1 st on each side of every marker (= 16-16-16-18-18-18 sts dec) - Read decrease tip 2. Repeat dec every 4½-5-5-5½-4½-4½ cm / 1¾"-2"-2"-2¼"-1¾"-1¾" a total of 4-4-4-4-5-5 times = 58-68-80-84-82-94 sts. Continue to work until piece measures 18-19-20-21-22-23 cm / 7"-7½"-8"-8¼"-8¾"-9". NOTE: Adjust so that last row is the 4th row in diagram M.1. Continue to work an elevation in the neck with short rows as follows: 1st row (= RS): 3 band sts, work 1st row in diagram M.1, work in stockinette st while AT THE SAME TIME dec 12-18-30-30-28-36 sts evenly (do not dec over diagram M.1 and band sts), work 1st row in diagram M.1 and finish with 3 band sts = 46-50-50-54-54-58 sts, turn piece. 2nd row (= WS): 3 band sts, work 2nd row in diagram M.1, work in P sts - but turn piece when 10 sts remain on needle. 3rd row: Tighten the yarn and K from RS until 10 sts remain in the other side. Turn piece and tighten yarn . 4th row: P 1 row from WS until 10 sts remain towards mid front, work 2nd row in diagram M.1 over the next 7 sts and finish with 3 band sts. Work next row (= from RS) as follows: 3 band sts, diagram M.1, * K 2, P 2 *, repeat from *-* until 10 sts remain, work diagram M.1 and finish with 3 band sts. Continue like this until rib measures 3 cm / 1⅛", then loosely bind off with K over K and P over P. ASSEMBLY: Sew the openings under the sleeves. Sew 7 buttons evenly distributed on left front band, use the holes between sts on right front band as button holes. |
||||||||||||||||
Diagram explanations |
||||||||||||||||
|
||||||||||||||||
 |
||||||||||||||||
Have you finished this pattern?Tag your pictures with #dropspattern #mistcardigan or submit them to the #dropsfan gallery. Do you need help with this pattern?You'll find 13 tutorial videos, a Comments/Questions area and more by visiting the pattern on garnstudio.com. © 1982-2026 DROPS Design A/S. We reserve all rights. This document, including all its sub-sections, has copyrights. Read more about what you can do with our patterns at the bottom of each pattern on our site. |
||||||||||||||||


With over 40 years in knitting and crochet design, DROPS Design offers one of the most extensive collections of free patterns on the internet - translated to 17 languages. As of today we count 325 catalogs and 12298 patterns - 12288 of which are translated into English (US/in).
We work hard to bring you the best knitting and crochet have to offer, inspiration and advice as well as great quality yarns at incredible prices! Would you like to use our patterns for other than personal use? You can read what you are allowed to do in the Copyright text at the bottom of all our patterns. Happy crafting!
Post a comment to pattern DROPS 134-17
We would love to hear what you have to say about this pattern!
If you want to leave a question, please make sure you select the correct category in the form below, to speed up the answering process. Required fields are marked *.