
Popular categories
Looking for a yarn?


Comments / Questions (39)
![]() Sawnuy wrote:
Sawnuy wrote:
Was bedeutet das? Nach 40 cm.( in größer S) - bei einer R. mit Zopf - auf beiden Seiten je.6 Maschen abk. Und die Teile für sich fertig stricken. Wo muss ich abketten? Danke schön
04.02.2020 - 21:22DROPS Design answered:
Liebe Sawnuy, für die Armlöcher ketten Sie 3 Maschen auf beiden Seiten von jeder Markierung = 6 Maschen auf beiden Seiten vom Pullover. Viel Spaß beim stricken!
05.02.2020 - 08:18
![]() Jane wrote:
Jane wrote:
Help! I have found one of your patterns I love that requires 650 grams of yarn. I have found one of your yarns I love measured in meters. How many 75 meter skeins do I need to have 650:grams? The yarn is Nepal. Thank you!
03.05.2019 - 17:56DROPS Design answered:
Dear Jane, yes, this sweater is made from DROPS Nepal and 650 g is amount requred for size L. Happy knitting!
03.05.2019 - 23:45
![]() Christine wrote:
Christine wrote:
Bonjour, Je ne sais pas comment faire pour relever 5 nouvelles mailles au dos des 5 premières pour faire le col. Merci de votre aide.
25.04.2019 - 17:36DROPS Design answered:
Bonjour Christine, à la fin du 1er tour endroit, relevez 1 maille derrière chacune des 5 premières mailles relevées (le début et la fin du col vont ainsi se chevaucher sur 5 mailles) - cette vidéo montre comment faire sur 14 mailles, ce sera la même technique, même si on le fait dans la vidéo pour un ouvrage différent. Bon tricot!
26.04.2019 - 08:46
![]() Sabine Witt wrote:
Sabine Witt wrote:
Sorry liebes Team, ich habe den Fehler schon gefunden.....ich habe nicht in Runden gestrickt....vergesst bitte meine Frage und Entschuldigung für die Umstände...
24.08.2018 - 11:39DROPS Design answered:
Liebe Sabine, dann weiterhin viel Spaß beim Stricken! :-)
26.08.2018 - 10:23
![]() Sabine Witt wrote:
Sabine Witt wrote:
Leider verstehe ich den Beginn, nach dem Bündchen, der Musterfolge des Pullis nicht. Bin in der 1.R des Musters angekommen und jetzt 2 M vor der 2.Markierung....wenn ich dann die 78M rechts stricke komme ich zwar zum Ende der Reihe, aber dann habe ich das Muster nur zur Hälfte....ist das Richtig so???? Auf dem Bild sieht das anders aus...vielen Dank für ihre Mühe
24.08.2018 - 08:30DROPS Design answered:
Liebe Frau Witt, die 1. R des Musters wird so gestrickt: 10 M re, 5 M li, M.1 (= 10 M), 5 M li, M.2 (= 16 M), 5 M. li, M1(=10 M), 5 M. li (= 66 M) und dann stricken Sie noch 10 M bis zum 2. Markierer (= 76 M für den Vorderteil) und jetzt stricken Sie die nächsten 68 M. re für den Rückenteil. Viel Spaß beim stricken!
05.09.2018 - 13:59
![]() Maria Serra wrote:
Maria Serra wrote:
Buon pomeriggio,non ho capito in quali ferri si fanno gli intrecci per la treccia. Grazie in anticipo
16.07.2018 - 19:34DROPS Design answered:
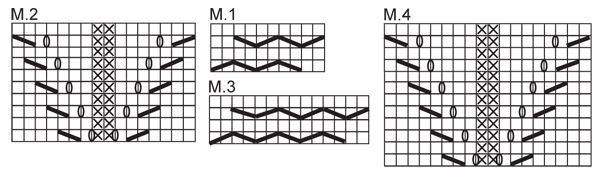
Buongiorno Maria. Intreccia ai ferri 1 e 3 dei diagrammi M1 e M3. Buon lavoro!
16.07.2018 - 19:37
![]() Fanfan wrote:
Fanfan wrote:
172 mailles comprend le dos et le devant???????
24.09.2015 - 16:07DROPS Design answered:
Bonjour Fanfan, tout à fait, en taille S, on monte 172 m pour le devant et le dos et on tricote en côtes pendant 8 cm. On continue ensuite avec l'aiguille circulaire 5 en répartissant 28 diminutions = il reste 144 m que l'on tricote ensuite comme indiqué. Pensez à bien vérifier votre échantillon, et regardez ici comment choisir votre taille. Bon tricot!
25.09.2015 - 09:16
![]() Katrin Behrmann wrote:
Katrin Behrmann wrote:
Nach 26 cm auf beiden Seiten der Markierungen je 1 M. aufnehmen und alle 5-5-5-6-6-6 cm total 3 Mal wiederholen (= 4 Abnahmen pro R.)... Liebes Drops-Team, eine kleine Korrektur in der Anleitung: In der Klammer muss es ZUnahme und nicht ABnahme heißen. Liebe Grüße Katrin
05.01.2015 - 19:23DROPS Design answered:
Vielen Dank für den Hinweis, das wurde korrigiert.
06.03.2015 - 13:45
![]() Linda Kosidlo wrote:
Linda Kosidlo wrote:
I don't understand the M1 chart. It looks like it is over 10 stitches, but after doing the Slip K stitch, K1, PSSO, and then the K2tog twice, I am left with only 6 stitches. Shouldn't I add a stitch somehow for everyone I decrease? Thank you.
28.12.2014 - 03:14DROPS Design answered:
Dear Mrs Kosidlo, M1 is worked over 10 sts with cables, on row 1, K2, then repeat twice slip 2 sts on cable needle in front of piece, K2, K2 from cable needle - on row 3, work twice slip 2 sts on cable needle behind piece, K2, K2 from cable needle then K2. Happy knitting!
30.12.2014 - 13:47
![]() Mia wrote:
Mia wrote:
Hallo ! Meinen Sie mit "Nach 12 cm" mit oder ohne Bündchen? Und "Nach 40cm -bei einer Runde mit Zopf- auf beiden Seiten 6Maschen abketten", ist das so gemeint, daß es die Runde wäre, wo man die Verschränkung für den Zopf machen müßte?
23.10.2014 - 15:24DROPS Design answered:
Die cm-Angaben beziehen sich immer auf die Gesamtlänge (soweit nicht anders angegeben), also in diesem Fall 12 cm einschl. Bündchen. Und Sie haben es richtig verstanden, mit "Runde mit Zopf" ist eine Runde mit Verzopfung gemeint. Weiterhin gutes Gelingen!
23.10.2014 - 22:25
|
||||||||||||||||||||||
Snowy Branches#snowybranchessweater |
||||||||||||||||||||||
|
|
||||||||||||||||||||||
Knitted DROPS jumper with cables in ”Nepal”. Size S to XXXL.
DROPS 122-9 |
||||||||||||||||||||||
|
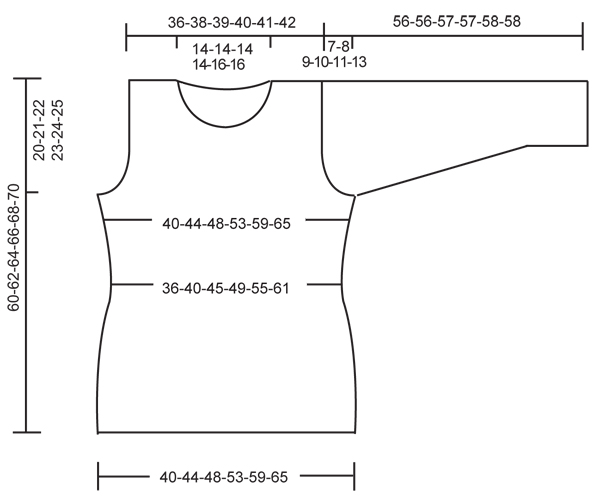
PATTERN: See diagrams M.1 to M.4. Diagrams show the pattern from RS. In size S, M, L, XL work M.1 and M.2, in size XXL and XXXL work M.3 and M.4 GARTER ST (back and forth on needle): K all rows. -------------------------------------------------------- -------------------------------------------------------- JUMPER: Worked in the round. Cast on 172-184-204-224-252-276 sts on circular needle size 4.5 mm/US 7 with Nepal. K 1 round and continue in rib K2/P2. When piece measures 8 cm/ 3" change to circular needle size 5 mm/US 8, K 1 round, AT THE SAME TIME dec 28-28-32-36-44-48 sts evenly = 144-156-172-188-208-228 sts. P 1 row. Insert 2 markers in piece, 1 at beg of round and 1 after 76-82-90-98-108-118 sts = front piece (back piece = 68-74-82-90-100-110 sts). Continue as follows – See PATTERN: 10-13-17-21-19-24 stockinette sts, 5-5-5-5-6-6 sts in reverse stockinette st, M.1/M.3, 5-5-5-5-6-6 sts in reverse stockinette st, M.2/M.4, 5-5-5-5-6-6 sts in reverse stockinette st, M.1/M.3, 5-5-5-5-6-6 sts in reverse stockinette st, 78-87-99-111-119-134 stockinette sts. Continue in pattern like this. REMEMBER THE GAUGE! When piece measures 12 cm/US 4¾" dec 1 st each side of both markers, and repeat the dec each side on every 4 cm/1½" a total of 3 times (= 4 dec per round) = 132-144-160-176-196-216 sts. When piece measures 26 cm/10¼" inc 1 sts each side of both markers, repeat the inc on every 5-5-5-6-6-6 cm a total of 3 times (= 4 inc per round) = 144-156-172-188-208-228 sts. When piece measures 40-41-42-43-44-45 cm / 15¾"-16⅛"-16½"-17"-17¼"-17¾" - adjust to a row with cables – bind off 3 sts each side of both markers (= 6 sts each side) for armhole and complete each piece separately. BACK PIECE: = 62-68-76-84-94-104 sts. Bind off for armhole each side at the beg of every row as follows: 2 sts 0-1-2-3-4-6 times and 1 st 0-0-1-2-4-4 times = 62-64-66-68-70-72 sts. When piece measures 58-60-62-64-66-68 cm / 22¾"-23⅝"-24⅜"-25¼"-26"-26¾" bind off the middle 22-22-22-22-26-26 sts for neck and complete each shoulder separately. Bind off 1 st on neckline on next row = 19-20-21-22-21-22 sts left on shoulder. Bind off when piece measures 60-62-64-66-68-70 cm / 23⅝"-24⅜"-25¼"-26"-26¾"-27½". FRONT PIECE: = 70-76-84-92-102-112 sts. Bind off for armhole as described for back piece = 70-72-74-76-78-80 sts. When piece measures 50-52-54-54-56-58 cm/19¾"-20½"-21¼"-21¼"-22"-22¾" – adjust to after a full repeat of M.2/M.4 - slip the middle 12-12-12-12-16-16 sts on a stitch holder for neck, and complete each shoulder separately. Bind off to shape the neckline at the beg of every row from neckline: 2 sts 2 times and 1 st 2 times. After all dec are complete there are 23-24-25-26-25-26 sts on needle. When piece measures 59-61-63-65-67-69 cm / 23¼"-24"-24¾"-25½"-26⅜"-27⅛" dec 4 sts evenly over M.1/M.3 = 19-20-21-22-21-22 sts left on shoulder. Bind off when piece measures 60-62-64-66-68-70 cm / 23⅝"-24⅜"-25¼"-26"-26¾"-27½". SLEEVE: Worked in the round. Cast on 52-52-52-56-56-60 sts on double pointed needles size 4.5 mm/US 7 with Nepal. K 1 row and continue in rib K2/ P2. When piece measures 8 cm/3" change to double pointed needles size 5 mm/US 8, K 1 row, AT THE SAME TIME dec 12-12-10-12-10-12 sts evenly = 40-40-42-44-46-48 sts. P 1 row. Insert a marker at beg of round. Now complete piece in stockinette st. When piece measures 9 cm/3½" inc 1 st each side of marker, and repeat the inc on every 4.5-3.5-3-2.5-2-2 cm/1¾"-1¼"-1⅛"-⅞"-¾"-¾" a total of 9-11-13-14-16-17 times = 58-62-68-72-78-82 sts. When piece measures 49-48-48-47-47-45 cm/19¼"-19"-19"-18½"-18½"-17¾" - NOTE! Less for the larger sizes because of longer sleeve cap and wider shoulder - bind off 3 sts each side of marker and complete piece back and forth on needle. Bind off for sleeve cap at the beg of every row each side as follows: 2 sts 3 times and 1 st 0-1-2-4-5-7 times, then 2 sts each side until piece measures 55-55-56-56-57-57 cm / 21⅝"-21⅝"-22"-22"-22½"-22½". Now bind off 3 sts at beg of the next 2 rows and bind off remaining sts, piece measures approx 56-56-57-57-58-58 cm / 22"-22"-22½"-22½"-22¾"-22¾". ASSEMBLY: Sew shoulder seams. Set in sleeves. COLLAR: Pick up approx 68-68-68-68-72-72 sts round neck (includes sts on stitch holder at front) on circular needle size 4.5 mm/US 7 with Nepal. Continue back and forth on needle as follows (first st on round is the first st slipped back on needle from stitch holder): K 1 round from RS, at the end of round pick up 5 new sts behind the first 5 sts = 73-73-73-73-77-77 sts. K 3 rows, AT THE SAME TIME on first row inc 19 sts evenly = 92-92-92-92-96-96 sts. Continue as follows – from RS: 5 garter sts (= front band), * K2/ P2 *, repeat from *-* and finish with K2 and 5 garter sts (= front band) – see above. When piece measures 2 cm/3/4" make buttonhole by working 3rd and 4th st on right front band tog, on next row cast on 1 new st. Repeat when piece measures 6 and 10 cm/ 2½" and 4". When rib measures 12 cm/4¾", bind off with K over K and P over P. Sew buttons on left front band. |
||||||||||||||||||||||
Diagram explanations |
||||||||||||||||||||||
|
||||||||||||||||||||||
 |
||||||||||||||||||||||
 |
||||||||||||||||||||||
Have you finished this pattern?Tag your pictures with #dropspattern #snowybranchessweater or submit them to the #dropsfan gallery. Do you need help with this pattern?You'll find 22 tutorial videos, a Comments/Questions area and more by visiting the pattern on garnstudio.com. © 1982-2026 DROPS Design A/S. We reserve all rights. This document, including all its sub-sections, has copyrights. Read more about what you can do with our patterns at the bottom of each pattern on our site. |
||||||||||||||||||||||


With over 40 years in knitting and crochet design, DROPS Design offers one of the most extensive collections of free patterns on the internet - translated to 17 languages. As of today we count 324 catalogs and 12290 patterns - 12280 of which are translated into English (US/in).
We work hard to bring you the best knitting and crochet have to offer, inspiration and advice as well as great quality yarns at incredible prices! Would you like to use our patterns for other than personal use? You can read what you are allowed to do in the Copyright text at the bottom of all our patterns. Happy crafting!
Post a comment to pattern DROPS 122-9
We would love to hear what you have to say about this pattern!
If you want to leave a question, please make sure you select the correct category in the form below, to speed up the answering process. Required fields are marked *.