
Popular categories
Looking for a yarn?


Comments / Questions (14)
![]() Ellen wrote:
Ellen wrote:
Was sind denn Blendmaschen? Und eine Krausrippe?
07.05.2024 - 22:51DROPS Design answered:
Dear Ellen, die Blendenmaschen sind die Maschen, die an den vorderen Rändern einer Jacke gestrickt werden - 1 Krausrippe ist wenn man Maschen rechts bei den Hin- sowie bei den Rück-Reihen strickt. Hier wird so die Randmaschen (die 1. + die letzte Masche) immer rechts gestrickt. Viel spaß beim Stricken!
08.05.2024 - 08:26
![]() Sandra wrote:
Sandra wrote:
Auf beiden Seiten gegen die Mitte vorne das Bündchen mit 1 M Krausrippe und 3 Re. Heißt es dann folgendes: 1 M Krausrippe, 3 Re, 3 Re, 3 Li in der Hinreihe?
16.03.2021 - 15:37DROPS Design answered:
Liebe Sandra, also bei den Hinreihen stricken Sie: 1 M kraus rechts, *3 M re, 3 M li*, von *bis* wiederholen, bis 4 M übrig sind, dann 3 M re, 1 M kraus rechts stricken. Bei den Rückreihen stricken Sie 1 M kraus rechts, *3 M li, 3 M re*, von *-* wiederholen und mit 3 M li, 1 M kraus rechts enden. Viel Spaß beim stricken!
16.03.2021 - 15:58
![]() Priscilla wrote:
Priscilla wrote:
Buongiorno, in questo passaggio: Lavorare 3 f. a coste su ogni davanti + dietro in modo separato con 1 m. a m. legaccio a ogni lato. Devo usare tre gomitoli? Scusate la domanda ma sono una principiante. Resto in attesa di una risposta e ringrazio anticipatamente
04.12.2020 - 17:18DROPS Design answered:
Buonasera Priscilla, deve dividere il lavoro e lavorare 3 ferri a coste su ogni singola parte. Può usare dei gomitolini se preferisce. Buon lavoro!
04.12.2020 - 19:46
![]() Priscilla wrote:
Priscilla wrote:
Buongiorno, in questo passaggio: Lavorare 3 f. a coste su ogni davanti + dietro in modo separato con 1 m. a m. legaccio a ogni lato. Devo usare tre gomitoli? Scusate la domanda ma sono una principiante. Resto in attesa di una risposta e ringrazio anticipatamente
04.12.2020 - 16:45DROPS Design answered:
Buonasera Priscilla, deve dividere il lavoro e lavorare 3 ferri a coste su ogni singola parte. Può usare dei gomitolini se preferisce. Buon lavoro!
06.12.2020 - 22:07
![]() Merciris wrote:
Merciris wrote:
1.Was ist damit gemeint, dass man in der Mitte vorne anfängt (ich schlage doch die Maschen an und arbeite dann die Reihe von re. nach li.). 2. Was ist mit "Blendenmaschen" gemeint (sind nicht in der Legende definiert).
20.09.2017 - 20:13DROPS Design answered:
Liebe Frau Merciris, die Jacke fängt mit dem rechten Vorderteil an, dh gegen der Mitte vorne. Die Blendemaschen sind die ersten bzw letzten 4 Maschen (= 1 Randmasche + 3 Maschen). Viel Spaß beim stricken!
21.09.2017 - 09:31Jenny Cyr wrote:
Bonjour, Pour ce modèle comment faire ceci: Tricoter 3 rangs de côtes avec 1 m lis de chaque côté. Est ce qu'il faut mettre les premières mailles en attente et les dernières aussi, pour faire le dos (83 mailles). S.V.P. me donner plus d'explications. Merci! Jenny Cyr CANADA
18.02.2014 - 00:30DROPS Design answered:
Bonjour Mme Cyr, effectivement, on tricote 3 rangs de côtes séparément sur chaque pièce (chaque devant + dos) avant de reprendre toutes les mailles ensemble (mention ajoutée). Bon tricot!
18.02.2014 - 08:37
![]() Ingrid wrote:
Ingrid wrote:
Jacke wird in einem Teil gestrickt bis zu einer gewissen Höhe, die Reihe beginnt mit 1 Randmasche und 3 Blendmaschen, dann hört aber das Wissen auf. 1 Bündchen (3 re., 3 li) aber es steht 1 M Krausrippe u. 3 re???? gegen die Mitte vorne??
16.10.2012 - 18:12DROPS Design answered:
Die Reihe beginnt und endet mit 3 M re (nicht li) und 1 Randm, darum wird es erwähnt.
17.10.2012 - 08:48Nadia Martin wrote:
Bonjour, Je viens de recevoir la laine Vivaldi pour tricoter ce chandail et je désirais confirmir avec vous que c'est bien seulement avec la laine Vivaldi que je dois tricoter le modèle 90-11. Est-ce vraiment juste le petit fil Vivaldi qui va donner cet effet ou il y a un autre laine à mettre avec qui n'est pas mentionné dans le patron. Merci à l'avance Nadia Martin
18.07.2012 - 16:44DROPS Design answered:
Bonjour Nadia, je ne suis pas sûre de voir l'effet dont vous parlez mais ce gilet se tricote bien en Vivaldi. Bon tricot !
19.07.2012 - 09:08
![]() DROPS Design France wrote:
DROPS Design France wrote:
Bonjour Cindy, effectivement, il fallait lire 43 m pour la taille S. Le nombre de mailles a été corrigé, merci.
13.02.2012 - 08:54
![]() Cindy Le Gleuher wrote:
Cindy Le Gleuher wrote:
Bonjour, sur le modèle du gilet je lis pour monter les mailles des manches à droite : monter 53-49-49-55-61m Ne serait ce pas plutôt 43 pour la taille S?
12.02.2012 - 11:19
|
|
DROPS 90-11 |
|
|
|
|
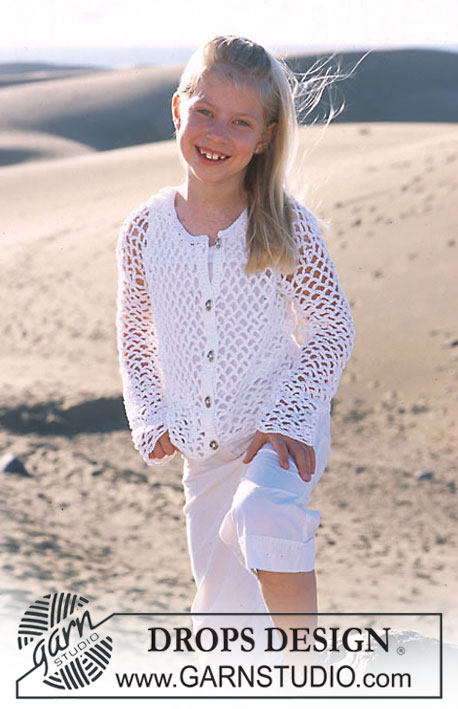
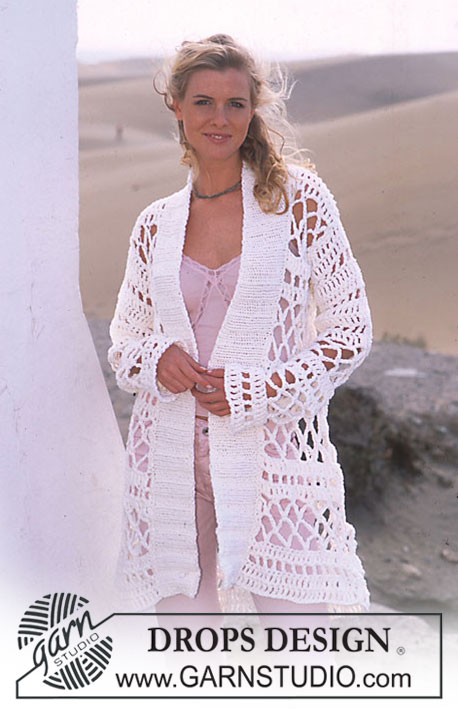
Cardigan Vest with cap sleeves and Necklace in Vivaldi
DROPS 90-11 |
|
|
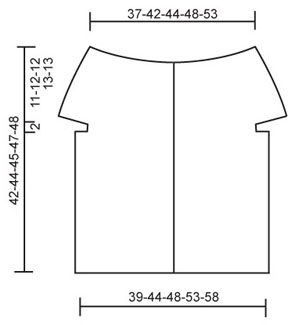
CARDIGAN: Gauge: 18 sts x 25 rows in rib (slightly stretched) = 10 x 10 cm. Rib: * K 3, P 3 *, repeat from * - *. Cardigan: Loosely cast on 149-167-179-197-215 sts. Knit rib, keeping 1 st at each edge in garter st, and begin rib with K 3 (as seen from the right side). Put a marker in the 39th-45th-48th-51st-57th st in from each edge (this will be a K st for Sizes S + M + XL + XXL and a P st for size L) – there are 71-77-83-95-101 sts between markers for back. When the piece measures 31-32-33-34-35 cm knit the next row as follows from right side: K 1 (edge st in garter st), rib over the following 30-36-39-39-45 sts, K 1 (edge st knit in garter st), bind off the following 13-13-13-19-19 sts loosely in rib (= armhole), K 1 (edge st knit in garter st), rib over the following 57-63-69-75-81 sts, K 1 (edge st knit in garter st), bind off the following 13-13-13-19-19 sts loosely in rib (= armhole), K 1 (edge st knit in garter st), rib over the following 30-36-39-39-45 sts and finish with K 1 (edge st knit in garter st). Knit 3 rows in rib with garter st edge sts over fronts and back as established. Knit the next row as follows (right side row, beginning on right front): K 1 (edge st), rib over the following 30-36-39-39-45 sts, K 1 for Sizes S + M and P 1 for Sizes L + XL + XXL, loosely cast on 43-49-49-55-61 new sts on needle (= right sleeve), K 1 for Sizes S + M and P 1 for Sizes L + XL + XXL, rib over following 57-63-69-75-81 sts (= back), K 1 for Sizes S + M and P 1 for Sizes L + XL + XXL, loosely cast on 43-49-49-55-61 new sts on needles (= left sleeve), K 1 for Sizes S + M and P 1 for Sizes L + XL + XXL, rib over the following 30-36-39-39-45 sts (= left front) and finish with K 1 (edge st) = 209-239-251-269-299 sts. Measure the work from here. Continue in rib as before, with 1 st in garter st at each center front edge. When the piece measures 4 cm dec all P 3 to P 2 (as seen from the right side) = 175-200-210-225-250 sts. When the piece measures 8-9-9-10-10 cm dec all K 3 to K 2 (as seen from the right side) = 140-160-168-180-200 sts. When the piece measures 14-15-15-16-16 cm inc all K 2 to K 3 = 175-200-210-225-250 sts. When the piece measures 22-24-24-26-26 cm bind off all sts loosely in rib – the collar folds in half outward and measures 11-12-12-13-13 cm. Crocheted edge: Crochet 1 row of ch-loops along both front edges as follows: 1 sc in first st, * ch 5, skip over 2 rows, 1 sc in the next row *, repeat * - * and finish with 1 sl st in last st. Sew 4 buttons evenly distributed on left front (use ch-loops as buttonholes), the top button places approx. 16-17-17-18-18 cm from top (before collar fold) and bottom approx. 22-24 cm from bottom edge. NECKLACE: Measurements: approx. 15 x 38 cm + tie [5-⅞" x 14-⅞"] Materials: Garnstudio VIVALDI Approx. 5 gr. nr 09, light blue Accessories: approx. 38 cm lace (approx. 40 mm wide), or a length comfortable for your neck measurement + approx. 90 cm ribbon (10 mm wide) for DROPS 20 mm [US 35] needles, or size needed to obtain correct gauge. Gauge: 4 sts x 8 rows in garter st = 10 x 10 cm. Necklace: Cast on 40 sts around 2 needles (so that the cast-on edge will be elastic). Pull out one needle and knit garter st until the piece measures approx. 15 cm (= approx. 12 rows). Bind off – so that the bound-off edge will not be too tight, make and bind off a yo after every 2 sts. Assembly: Lace a strand of yarn through the center of the necklace lengthwise. Gather the piece together until it is the same length as the lace. Sew the lace onto the knitted piece (sew on the machine). Then sew ribbon on the center of the lace (through both layers) – center the necklace on the ribbon so that the ends are equal length to tie. |
|
 |
|
Have you finished this pattern?Tag your pictures with #dropspattern or submit them to the #dropsfan gallery. Do you need help with this pattern?You'll find 18 tutorial videos, a Comments/Questions area and more by visiting the pattern on garnstudio.com. © 1982-2026 DROPS Design A/S. We reserve all rights. This document, including all its sub-sections, has copyrights. Read more about what you can do with our patterns at the bottom of each pattern on our site. |


With over 40 years in knitting and crochet design, DROPS Design offers one of the most extensive collections of free patterns on the internet - translated to 17 languages. As of today we count 324 catalogs and 12290 patterns - 12280 of which are translated into English (US/in).
We work hard to bring you the best knitting and crochet have to offer, inspiration and advice as well as great quality yarns at incredible prices! Would you like to use our patterns for other than personal use? You can read what you are allowed to do in the Copyright text at the bottom of all our patterns. Happy crafting!
Post a comment to pattern DROPS 90-11
We would love to hear what you have to say about this pattern!
If you want to leave a question, please make sure you select the correct category in the form below, to speed up the answering process. Required fields are marked *.