
Popular categories
Looking for a yarn?


Comments / Questions (88)
Gunnel Kevin wrote:
Little Jamboree 16-3 står mätt mitt på arbetet från uppläggningskanten och ut åt sidan var mäter man egentligen Tacksam för svar Mvh Gunnel Kevin
08.05.2016 - 14:55
![]() Resi wrote:
Resi wrote:
Hallo, zu der wunderbaren Mütze habe ich folgende Frage: Nachdem in der zweiten Reihe nach Anleitung auf-, und abgenommen wurde, gilt dann auch die vierte Reihe als zweite Reihe? D.h.: muss ich bei der vierten Reihe (die ja auch eine zweite Reihe ist), nach Anleitung auf-, oder abnehmen? Beispielsweise bei der vierten Reihesowohl vor, als auch nach dem dritten Markierungsfaden eine Masche aufnehmen? Oder werden zweite und vierte Reihe unabhängig voneinander gestrickt? Danke!
08.12.2015 - 10:54DROPS Design answered:
Sie müssen die Zunahmen und Abnahmen an den Markierern wie beschrieben machen, also immer dann, wenn Sie in einer zweiten R abnehmen/zunehmen sollen, machen Sie dies an dem entsprechenden Markierer, das Gleiche gilt für die Abnahmen/Zunahmen, die in jeder 4. R gemacht werden. In Ihrem Beispiel nehmen Sie also an dem 3. Markierer in jeder 4. R sowohl vor als auch nach dem Markierer zu, denn im Rhythmus ergibt es sich, dass es auch eine 2. Reihe ist.
12.12.2015 - 21:02
![]() Eva Pedersen wrote:
Eva Pedersen wrote:
Hvordan samles den øverst ved skuldre og arme.
18.10.2015 - 16:43DROPS Design answered:
Hej Eva. Du skal ikke samle den der, naar du har strikket aermerne iflg opskriften, saa skal du lukke dem paa undersiden, se ogsaa MONTERING: "Sy sømmene under æmerne yderst i kanten så der ikke bliver en tyk søm"
23.10.2015 - 13:18
![]() Aga Paulsen wrote:
Aga Paulsen wrote:
Hei, skjønner ikke hvordan jeg skal måle bolen. "Når arb måler ca 15 cm (str 6-9) (målt midt på arb fra oppleggskanten og ut til siden)" Takk for hjelpen.
08.08.2015 - 13:50DROPS Design answered:
Hej Aga, Du måler midt på arb, fra oppleggskanten og lige ud mod siden (mod "sidesømmen" under ærmet). God fornøjelse!
10.08.2015 - 10:19
![]() Jeanne Brown wrote:
Jeanne Brown wrote:
Thank you for your response regarding the gauge for this little jacket. I knit another swatch on a US size 3 and achieved the right gauge. I am busy knitting with the Blue Sea 162 color way and it is turning out beautifully. Thank you.
08.08.2015 - 09:15
![]() Jeanne Brown wrote:
Jeanne Brown wrote:
Hi - I am wondering if the printed gauge is correct? I usually knit a bit loose sometimes requiring a smaller needle. My first swatch on a #1 was too tight. The second swatch on a #2 is 27 stitches, 62 rows. Is the gauge for ridges and not rows? That would put me at 31 ridges which seems closer to the gauge on the yarn label. I can't see how I will ever knit a swatch with 51 rows! Please let me know, thank you.
03.08.2015 - 04:51DROPS Design answered:
Dear Mrs Brown, this is an usual tension for Fabel worked in garter st, you can try different way of work your K sts to get and keep correct tension. You can also work a swatch, watch and block it to check your tension. Happy knitting!
03.08.2015 - 10:08
![]() PARNOIS wrote:
PARNOIS wrote:
Bonjour, je suis en realisation de la veste et sur la photo le bas devant de la veste apres qq rgs me parait avec une pointe , mon travail realisé est droit , ai je fait une erreur avec les rgs raccourcis?? de plus je ne comprends pas le diagramme a b c d.... derniere question , combien de rgs cela fait il environ ou d'aller et retour en raccourcis pour avoir les 15cm , où doit on mesurer..?? ((milieu de l'ouvrage a partir du rg de montage????))je ne comprends pas... Merci d'avance.
12.04.2015 - 09:44DROPS Design answered:
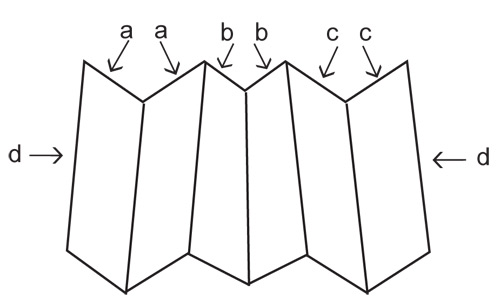
Bonjour Mme Parnois, le schéma abcd concerne uniquement le bonnet. Pour la veste, on tricote *2 rangs sur 22 m (taille 6/9 mois), 2 rangs sur 50 m, 2 rangs sur 70 m, 2 rangs sur 50 m, 2 rangs sur 22 m et 2 rangs sur toutes les mailles* soit 12 rangs en bas de la veste et 2 rangs seulement côté encolure. Les 15 cm sont mesurés à partir du rang de montage, placez votre mètre ruban au milieu de l'ouvrage en largeur. Bon tricot!
13.04.2015 - 09:21
![]() Beata wrote:
Beata wrote:
Cudo! I love It! Wlsnie probuje przerobic wzor na siebie. I trying to do for themselves
28.04.2014 - 09:03
![]() Casse-bonbec wrote:
Casse-bonbec wrote:
Bonjour, j'aimerais faire ce modèle pour le bébé d'une amie. je suis étonnée en lisant l'échantillon : 51 rangs pour 10 cm, est-ce vraiment exact ? ça me paraît énorme ! Merci d'avance de votre réponse, c'est urgent (BB est prévue le 8 janvier !) Casse-bonbec
29.12.2013 - 11:06DROPS Design answered:
Bonjour Casse-bonbec, l'échantillon est exact, on doit avoir pour 10 x 10 cm: 26 m x 51 rangs endroit (= au point mousse, soit 25 côtes mousse + 1 rang). Bon tricot!
30.12.2013 - 15:38
![]() Rhonda wrote:
Rhonda wrote:
After doing the 10 rows front band I did the short rows body piece once with repeat. Now what??? Where do I measure for the 7" so I can slip the 60 stitches towards bottom on stitch holder. Do I continue with garter stitch rows until I have 7 inches from top to cast on edge. From mid way from stitches on needle to cast on edge is 3". Thank you
03.11.2013 - 20:46DROPS Design answered:
Dear Rhonda, for armhole, measured mid piece from cast on row to the side (= to the needle). Because of short rows, it will be shorter towards neckline and longer towards bottom edge. Happy knitting!
04.11.2013 - 09:18
|
|||||||||||||
Little Jamboree#littlejamboreeset |
|||||||||||||
 |
 |
||||||||||||
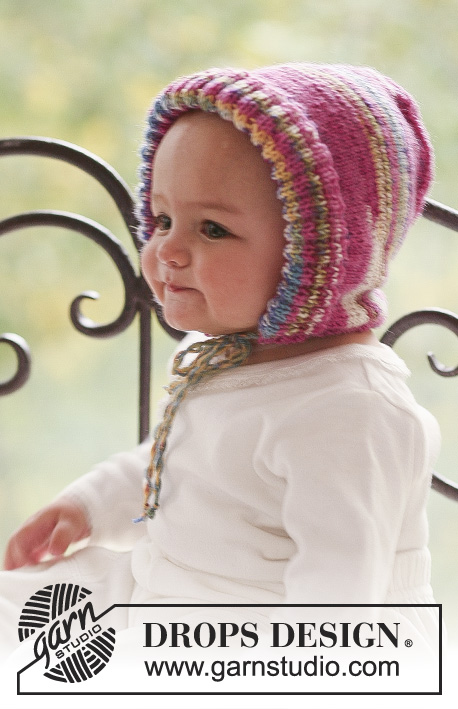
Set of jacket knitted from side to side, socks and bonnet for baby and children in DROPS Fabel
DROPS Baby 16-3 |
|||||||||||||
|
GARTER ST (back and forth on needle): K all rows. ---------------------------------------------------------- ---------------------------------------------------------- JACKET SHORTENED ROWS, BODY PIECE: To make jacket wider at the bottom work shortened rows as follows: * Work 20-22-24 (26-28) sts, turn piece, slip first st as if to K, tighten thread and work return row, work 46-50-57 (65-70) sts, turn piece, slip first st as if to K, tighten thread and work return row, work 64-70-80 (90-98) sts, turn piece, slip first st as if to K, tighten thread and work return row, work 46-50-57 (65-70) sts, turn piece, slip first st as if to K, tighten thread and work return row, work 20-22-24 (26-28), turn piece, slip first st as if to K, tighten thread and work return row, work all 70-76-86 (96-104) sts, turn piece and work return row *. Repeat from *-* 1 repeat of the above = 12 rows on sts at the bottom and 2 rows on sts at the top. SHORTENED ROWS, SLEEVES: * Work 41-47-51 (63-72) sts, turn piece, slip first st as if to K, tighten thread and work return row, work 59-67-74 (88-100) sts, turn piece, slip first st as if to K, tighten thread and work return row, work all 65-73-80 (94-106) sts, turn piece and work return row *. Repeat from *-*. 1 repeat of the above = 6 rows on sts at the bottom and 2 rows on sts at the top. ---------------------------------------------------------- JACKET Worked from side to side in garter st, beg on left front piece, then work sleeve, back piece, the other sleeve and right front piece. BODY PIECE: LOOSELY cast on 70-76-86 (96-104) sts on needle size 2.5 mm [US 1] with Fabel. Work 10 rows garter st back and forth on needle = front band (first row = RS, this row beg at the bottom of jacket). Now work shortened rows – SEE ABOVE FOR BODY PIECE. REMEMBER THE KNITTING GAUGE! When piece measures approx 13½-15-17 (18-19½) cm [5¼"-6"-6¾" (7"-7¾")] (measured mid piece from cast on row to the side) slip the first 41-45-52 (60-65) sts (towards bottom) on a stitch holder (= the side). Cut the thread and now beg again by casting on 36-42-46 (58-67) new sts at the beg of row (for sleeve) = 65-73-80 (94-106) sts on row. Work remaining sts on row, turn piece and work return row. Continue with shortened rows – SEE ABOVE FOR SLEEVES. When piece measures 16-17-18 (18-20) cm [6¼"-6¾"-7" (7"-8")] from where new sts were cast on for sleeve (measured where widest) bind off the first 36-42-46 (58-67) sts on next row from RS, work remaining sts on row, turn piece and work return row and now work the 41-45-52 (60-65) sts from stitch holder back on needle = 70-76-86 (96-104) sts. Insert a marker in the middle st on row and continue with shortened rows – SEE ABOVE FOR BODY PIECE. When piece measures 23-26-30 (32-35) cm [9"-10¼"-11¾" (12½"-13¾")] (measured mid piece from marker) slip the first 41-45-52 (60-65) sts (towards bottom) on a stitch holder (= the other side). Cut the thread and beg again by casting on 36-42-46 (58-67) new sts at the beg of row (for sleeve) = 65-73-80 (94-106) sts on row. Work remaining sts on row and work return row. Continue with shortened rows – SEE ABOVE FOR SLEEVE – until sleeve measures the same as the first sleeve. On next row from RS bind off the first 36-42-46 (58-67) sts and work remaining sts on row. Turn piece and work return row and now work the 41-45-52 (60-65) sts from stitch holder back on needle = 70-76-86 (96-104) sts. Continue with shortened rows – SEE ABOVE FOR BODY PIECE. When right front piece measure the same as left front piece (less the 10 rows on front band) work front band as follows (first row = RS): 4 rows on all sts, on next row bind off for 5 buttonholes as follows: work 14-16-18 (20-24) sts, bind off 2 sts, * work 11-12-14 (16-17) sts, bind off 2 sts *, repeat from *-* a total of 4 times, work the last 2 sts. Turn piece and work return row, AT THE SAME TIME cast on 2 new sts over each buttonhole. Work 4 rows on all sts, bind off LOOSELY. ASSEMBLY: Sew under arm seams, edge to edge, and sew on buttons. ---------------------------------------------------------- HAT INCREASING TIP: Make all inc from RS. Inc 1 st before and after st with marker by making 1 YO. Work YO into back of loop on return row to avoid a hole. DECREASING TIP: Make all dec from RS. Dec 1 st on each side of st with marker. Beg 1 st before st with marker. Slip 1 st on cable needle behind piece, slip 1 st as if to K (= st with marker), K tog next st and st on cable needle, psso. ------------------------------------------------------------ HAT: Worked back and forth on needle in garter st. Cast on 119-127-135 (139-145) sts on needle size 2.5 mm [US 1] with Fabel and work 6 rows garter st (first row = RS). Insert 7 markers in piece from RS as follows: M-1 in the first st on row M-2 in st 22-24-26 (28-31) M-3 in st 43-47-51 (55-61) M-4 in st 60-64-68 (70-73) M-5 in st 77-81-85 (85-85) M-6 in st 98-104-110 (112-115) M-7 in the last st on row. Continue in garter st, AT THE SAME TIME beg inc and dec – SEE INCREASING and DECREASING TIP! Inc 1 st after M-1 on every other row, dec 1 st on each side of M.2 on every other row, inc 1 st before M-3 on every other row, inc 1 st after M-3 on every 4th row, dec 1 st on each side of M.4 on every 4th row, inc 1 st before M-5 on every 4th row, inc 1 st after M-5 on every other row, dec 1 st on each side of M-6 on every other row, inc 1 st before M-7 on every other row. When piece measures 13-15-16 (18-19) cm [5⅛"-6"-6¼" (7"-7½")] (measured from lowest point by M-2 or M-6) work next row as follows from RS: * K1, K2 tog *, repeat from *-* AT THE SAME TIME as binding off. ASSEMBLY: Back of hat = bind off row, i.e. 2 whole points and 2 half points. The middle of the 3 whole points on the other side of piece = cast on row, mid front. Sew hat tog, edge to edge, along bind off row as follows: sew first half point to first whole point. Sew the other side of first whole point to first half of the second whole point. Sew the other side of the second whole point to the last half point. Sew hat tog mid back, edge to edge, to avoid a chunky seam. TIE STRINGS: Cast on 4 sts on needle size 4 mm [US 6] with Fabel and work a tube as follows: * K1, place yarn in front of piece (towards you), slip 1 st as if to P, place yarn behind piece again *, repeat from *-* across row and repeat on all rows. Bind off when string measures approx 20-22-24 (26-28) cm [8"-8¾"-9½" (10¼"-11")]. Make 2 and sew to hat each side at bottom of point. ---------------------------------------------------------- SOCKS: Worked in the round on double pointed needles. HEEL DECREASES: ROW 1 (= RS): work row until 6-7-7 (7-8) sts remain, slip 1 st as if to K, K1, psso, turn piece, ROW 2 (= WS): work row until 6-7-7 (7-8) sts remain, slip 1 st as if to P, P1, psso, turn piece, ROW 3 (= RS): work row until 5-6-6 (6-7) sts remain, slip 1 st as if to K, K1, psso, turn piece, ROW 4 (= WS): work row until 5-6-6 (6-7) sts remain, slip 1 st as if to P, P1, psso, turn piece. Continue dec like this with 1 less st between each dec until there are 8-10-10 (10-12) sts on row. DECREASING TIP-1: Dec as follows before rib: K2 tog. Dec as follows after rib: slip 1 st as if to K, K1, psso. DECREASING TIP-2: Dec as follows before marker: K2 tog. Dec as follows after marker: slip 1 st as if to K, K1, psso. ---------------------------------------------------------- SOCK: Cast on 44-48-48 (52-56) sts on double pointed needles size 2.5 mm [US 1] with Fabel. Work 7-8-9 (10-11) cm [2 ¾"-3⅛"-3½" (4"-4⅜")] rib, K2/P2. Now keep the first 18-22-22 (22-26) sts on needle for heel (slip the remaining 26-26-26 (30-30) sts on a stitch holder = upper foot). Work stockinette st back and forth on needle on heel sts for 3-3½-4 (4-4½) cm [1⅛"-1¼"-1½" (1½"-1¾")] – insert a marker. Now work heel decreases – SEE ABOVE – and then pick up 8-9-10 (11-12) sts on each side of heel and slip sts from stitch holder back on needle = 50-54-56 (62-66) sts. Continue in rib on the 26-26-26 (30-30) sts on upper foot and stockinette st on remaining sts. AT THE SAME TIME dec 1 st on either side of rib – SEE DECREASING TIP-1 on every other round a total of 5-7-6 (7-9) times = 40-40-44 (48-48) sts. Work K over K and P over P until sock measures 7-8-9 (10-12) cm [2¾"-3⅛"-3½" (4"-4¾")] from marker on heel (3-3-3 (4-4) cm [1⅛"-1⅛"-1⅛" (1½"-1½")] remain). Insert 1 marker each side with 20-20-22 (24-24) sts on upper foot and 20-20-22 (24-24) sts under foot. Continue in stockinette st on all sts, AT THE SAME TIME dec 1 st on each side of both markers –SEE DECREASING TIP-2 – on every other round 3 times and then on every round 5-5-6 (7-7) times = 8 sts. Cut the thread, pull through remaining sts and fasten. Sock measures approx 10-11-12 (14-16) cm [4"-4⅜"-4¾" (5½"-6¼")]. |
|||||||||||||
Diagram explanations |
|||||||||||||
|
|||||||||||||
 |
|||||||||||||
 |
|||||||||||||
Have you finished this pattern?Tag your pictures with #dropspattern #littlejamboreeset or submit them to the #dropsfan gallery. Do you need help with this pattern?You'll find 19 tutorial videos, a Comments/Questions area and more by visiting the pattern on garnstudio.com. © 1982-2026 DROPS Design A/S. We reserve all rights. This document, including all its sub-sections, has copyrights. Read more about what you can do with our patterns at the bottom of each pattern on our site. |
|||||||||||||


With over 40 years in knitting and crochet design, DROPS Design offers one of the most extensive collections of free patterns on the internet - translated to 17 languages. As of today we count 325 catalogs and 12298 patterns - 12288 of which are translated into English (US/in).
We work hard to bring you the best knitting and crochet have to offer, inspiration and advice as well as great quality yarns at incredible prices! Would you like to use our patterns for other than personal use? You can read what you are allowed to do in the Copyright text at the bottom of all our patterns. Happy crafting!
Post a comment to pattern DROPS Baby 16-3
We would love to hear what you have to say about this pattern!
If you want to leave a question, please make sure you select the correct category in the form below, to speed up the answering process. Required fields are marked *.