
Popular categories
Looking for a yarn?


Comments / Questions (27)
![]() Ulle Uustal wrote:
Ulle Uustal wrote:
Tere jõudu, mitu gr. lõnga läheb barettile ?
05.12.2024 - 19:36
![]() Deanna Platt wrote:
Deanna Platt wrote:
Is the hat pattern also have written directions please. I’m not good at diagrams. Thanks
21.04.2024 - 01:03
![]() Josiane wrote:
Josiane wrote:
Bonjour Le béret est-il tricoté en rond sur les aiguilles circulaires. Merci . Josiane
17.12.2023 - 19:45DROPS Design answered:
Bonjour Josiane, tout à fait, on continuera avec les aiguilles doubles pointes quand il n'y aura plus suffisamment de mailles pour l'aiguille circulaire. Bon tricot!
18.12.2023 - 09:17
![]() Otte Corine wrote:
Otte Corine wrote:
Bonjour j ai bien compris le diagramme merci
18.12.2019 - 10:12
![]() Otte Corine wrote:
Otte Corine wrote:
Voilà on a 11 maille au rang 3 on tricote 2 maille ensemble de chaque côté donc on se retrouve avec 9 maille au rang suivant avec les deux augmentations on devrais avoir 11 maille et la il y a 13 croix
17.12.2019 - 10:26DROPS Design answered:
Bonjour Mme Otte, vous diminuez 2 m mais faites 4 jetés = vous avez bien 13 mailles à la fin de ce rang, au tour suivant, vous tricotez ces 13 m à l'envers. Le tour 3 de M.1 se tricote ainsi: 2 m ens à l'end, 2 m end, *1 jeté, 1 m end*, répétez de *-* 4 fois au total, 1 m end, 2 m ens à l'end. Bon tricot!
17.12.2019 - 14:46
![]() Otte Corine wrote:
Otte Corine wrote:
Voilà au rang 3 j ai deux mailles ensemble à l endroit donc je me retrouve avec 1 maille en moins au rang suivant les mailles envers n indique pas que il y aille une maille en moins puisque il y a deux croix au-dessus du dessin de 2 mailles ensemble merci
17.12.2019 - 09:54DROPS Design answered:
Bonjour Mme Otte, vous parlez du diagramme M.1? Au 3ème rang de M.1, vous augmentez 2 m par motif (= on passe de 11 à 13 m sur ce rang): on diminue 2 m (= 1 au début + 1 à la fin du diagramme) et on va faire 4 jetés = on a bien 2 m en plus soit 13 m. Bon tricot!
17.12.2019 - 10:05
![]() Otte Corine wrote:
Otte Corine wrote:
Les jeter se tricote en meilleure torse au rang suivant ou pas merci
16.12.2019 - 21:12DROPS Design answered:
Bonjour Mme Otte Corine, les jetes ne sont pas tricotes torse. Bon tricot!
17.12.2019 - 08:42
![]() K. Hammersley wrote:
K. Hammersley wrote:
I've been trying to find this all day to complete a pattern I found on Pinterest!
16.11.2018 - 16:25
![]() Petit wrote:
Petit wrote:
Bonjour je voudrais savoir quel est le métrage pour une pelote pour l adapter à la taille que je voudrais faire. Merci
19.04.2018 - 11:56DROPS Design answered:
Bonjour Mme Petit, vous trouverez toutes ces informations sur le nuancier de chacune de ces qualités que vous retrouvez ici classées dans le groupe B. Bon tricot!
19.04.2018 - 13:19
![]() Sandrine wrote:
Sandrine wrote:
Combien faut il de laine pour réaliser uniquement les gants ? merci
18.08.2015 - 15:07DROPS Design answered:
Bonjour Sandrine, 2 pelotes devraient suffire pour les gants. Bon tricot!
18.08.2015 - 18:40
|
|||||||||||||
DROPS 109-51 |
|||||||||||||
|
|
|||||||||||||
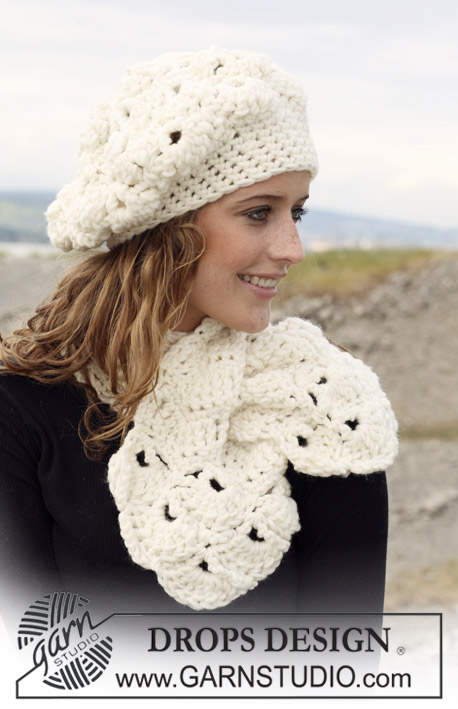
DROPS Basque hat and gloves in ”Karisma Superwash” with wavy pattern. Yarn alternative ”Merino”.
DROPS 109-51 |
|||||||||||||
|
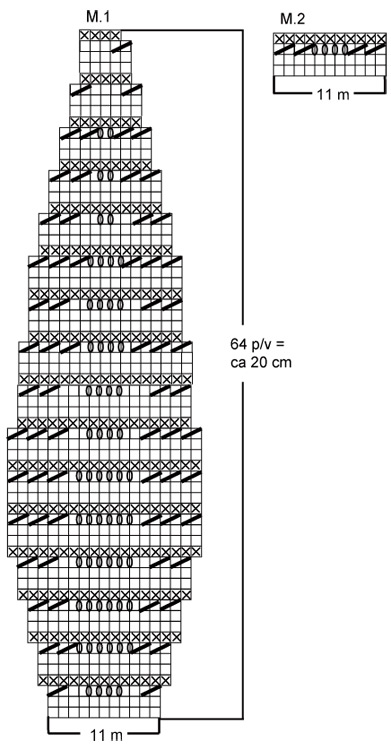
Pattern: Hat: See diagram M.1, diagram inc from 11 to 19 sts and dec again to 4 sts. Gloves: See diagram M.2. Diagrams show the pattern from RS. HAT Cast on 110 sts on small circular needle size 3.5 mm [US 4] with Karisma. Work 2 rounds stockinette st and then 6 rounds rib, K1/P1. Continue in M.1 (= 10 repeats round the hat). Remember the knitting gauge! After M.1 piece measures approx 22 cm [8¾"] and there are 40 sts left on round. Work 2 rounds stockinette st. Work next round as follows: * K2, K2 tog *, repeat from *-* = 30 sts. Work 1 round stockinette st. Work next round as follows: * K1, K2 tog *, repeat from *-* = 20 sts. Now work 1 round K all sts tog 2 by 2 = 10 sts. Cut the thread and pull through remaining sts. Tighten thread and fasten. Hat measures approx 24 cm [9½"]. RIGHT GLOVE Cast on 44 sts on double pointed needles size 3.5 mm [US 4] with Karisma. P 1 round and continue in M.2 (= 4 repeats round the glove). When piece measures 5 cm [2"] (adjust to a full pattern repeat) work 1 round stockinette st and now continue in rib, K1/P1, for 4 cm [1½"] – on the last round dec 4 sts evenly = 40 sts. Now measure piece from here! Continue as follows: 2 repeats of M.2 (= upper hand), stockinette st on the remaining 18 sts (= under hand) – insert a marker in the first stockinette st (= thumb st). After 4 rows in M.2 inc for thumb as follows: inc 1 st on both sides of thumb st – inc by making 1 YO, on next round work YO into back of loop to avoid a hole. Inc like this on every 3rd round a total of 5 times = 11 thumb sts. When piece measures 6 cm [2⅜"] slip the 11 thumb sts on a stitch holder. On next round cast on 1 new st over thumb sts = 40 sts in total. Continue in pattern and stockinette st as before until piece measures 9 cm [3½"] (from rib). Now keep the first 5 sts on needle, slip the next 32 sts on a stitch holder and keep the last 3 sts on needle. Little finger: = 8 sts, cast on 2 new sts towards the hand = 10 sts. Work 6 cm [2½"] stockinette st in the round, and now K tog all sts 2 by 2. Cut the thread, pull through remaining sts and fasten. Hand: Slip sts from stitch holder back on needle, pick up 3 sts towards little finger = 35 sts. Work 2 rounds stockinette st. Now keep the 3 new sts towards little finger + 5 sts either side of these on needle. Slip the remaining 22 sts back on stitch holder. Ring finger: = 13 sts, cast on 1 new st towards sts on stitch holder = 14 sts. Work 7.5 cm [3"] stockinette st in the round, and now K tog all sts 2 by 2. Cut the thread, pull through remaining sts and fasten. Middle finger: Slip 5 sts from each end of stitch holder back on needle, pick up 3 sts towards ring finger and cast on 1 new st towards sts on stitch holder = 14 sts. Work 8.5 cm [3¼"] stockinette st in the round, and now K tog all sts 2 by 2. Cut the thread, pull through remaining sts and fasten. Index finger: Slip the remaining 12 sts from stitch holder back on needle, pick up 3 sts towards middle finger = 15 sts. Work 7 cm [2¾"] stockinette st in the round, and now K tog all sts 2 by 2. Cut the thread, pull through remaining sts and fasten. Thumb: Slip thumb sts on stitch holder back on needle and pick up 3 sts in the edge behind thumb st (= st with marker) = 14 sts. Work 6 cm [2½"] stockinette st in the round, and now K tog all sts 2 by 2. Cut the thread, pull through remaining sts and fasten. LEFT GLOVE Like right glove, but mirrored, i.e. inc for thumb on each side of the last st on round. When working little finger beg as follows: Slip the first 17 sts on a stitch holder (= upper hand), keep the next 8 sts on needle and slip the last 15 sts on another stitch holder (= under hand). |
|||||||||||||
Diagram explanations |
|||||||||||||
|
|||||||||||||
 |
|||||||||||||
Have you finished this pattern?Tag your pictures with #dropspattern or submit them to the #dropsfan gallery. Do you need help with this pattern?You'll find 18 tutorial videos, a Comments/Questions area and more by visiting the pattern on garnstudio.com. © 1982-2026 DROPS Design A/S. We reserve all rights. This document, including all its sub-sections, has copyrights. Read more about what you can do with our patterns at the bottom of each pattern on our site. |
|||||||||||||


With over 40 years in knitting and crochet design, DROPS Design offers one of the most extensive collections of free patterns on the internet - translated to 17 languages. As of today we count 324 catalogs and 12290 patterns - 12280 of which are translated into English (US/in).
We work hard to bring you the best knitting and crochet have to offer, inspiration and advice as well as great quality yarns at incredible prices! Would you like to use our patterns for other than personal use? You can read what you are allowed to do in the Copyright text at the bottom of all our patterns. Happy crafting!
Post a comment to pattern DROPS 109-51
We would love to hear what you have to say about this pattern!
If you want to leave a question, please make sure you select the correct category in the form below, to speed up the answering process. Required fields are marked *.