
Popular categories
Looking for a yarn?


Comments / Questions (62)
![]() Guylaine Rondeau wrote:
Guylaine Rondeau wrote:
Dans vos explications :au motif M4 1rang se fait ainsi , avec 137m, 1mlis,3mjersey, M4A sur 120m, suiv,M4B(9M),3m jersey,1mlis Puis tricoter 1 MOTIF M4...question Est ce que je fais comme le 1rang sinon le motif complet comprends 17m ce qui Ne correspond pas avec les 129m restante pour le motifM4 sur les 137m Avec m lisière et jersey. (8M) en tout. Merci réponse serais apprécié
26.04.2026 - 04:08DROPS Design answered:
Bonjour Mem Rondeau, vous devez ici tricoter 1 motif de M.4 complet en hauteur (20 rangs) en commençant par M.4A et en terminant par M.4B (avec 1 m lis et 3 m jersey de chaque côté dans votre taille). autrement dit ainsi: 1 m lis, 3 m jersey, M.4A sur 120 m = 15 fois les 8 m de M.4A, puis tricotez les 9 m de M.4B et terminez par 3 m jersey et 1 m lis soit 1+3+120+9+3+1= 137 mailles. Bon tricot!
27.04.2026 - 09:27
![]() Carole wrote:
Carole wrote:
A 10 cm de hauteur totale, tricoter 1 rang end sur l’end, en même temps, ajuster le nombre de m à 102-110-120-130-142 m. Dois je diminuer 1m. Des m. Envers comme les diminutions rang 2? Merci
04.06.2025 - 23:00DROPS Design answered:
Bonjour Carole, ces mailles doivent être diminuées à intervalles réguliers tout le rang, par ex en taille S, vous aviez 132 mailles et vous devez ajuster à 102 mailles = vous devez donc diminuer 30 mailles; utilisez le calculateur (cf sous Explications ou la petite calculatrice en bas de page pour savoir quand diminuer. Ce rang de diminutions se tricote entièrement à l'endroit sur l'endroit. Bon tricot!
05.06.2025 - 08:57
![]() Nadine wrote:
Nadine wrote:
Bjr, je suis perdue en faisant la ligne5 du schéma M1/M2. Combien de mailles faut il répéter ? Les 8 mailles M1 ? Mais comment faire les 2 mailles ensemble ? Faut il cumuler avec les mailles de M2 ? La ligne 7 est encore plus difficile à interpréter. Merci d’avance pour votre secours !
23.05.2025 - 03:15DROPS Design answered:
Bonjour Nadine, les diagrammes M.1 et M.2 ne sont pas tricotés en même temps mais l'un après l'autre; lisez les diagrammes de bas en haut, de droite à gauche sur l'endroit et de gauche à droite sur l'envers. Lorsque vous tricotez M.1, vous répétez les 8 mailles du diagramme sur les mailles indiquées (les mailles jersey de chaque côté se tricoteront à l'endroit sur l'envers aux rangs de M.1 à tricoter à l'endroit sur l'envers) Lorsque vous tricotez M.2, vous répétez d'abord le diagramme M.2A et vous terminez le rang par le diagramme M.2B. Bon tricot!
23.05.2025 - 09:09
![]() Nathalie wrote:
Nathalie wrote:
Bonjour, je n'arrive pas à comprendre si on tricote l'empiècement en rond ou en allers retours, après avoir mis toutes les pièces sur l'aiguille...
29.09.2024 - 12:05DROPS Design answered:
Bonjour Nathalie, l'empiècement se tricote en rond jusqu'à ce que l'on mette les mailles du milieu devant en attente pour l'encolure, on termine alors en allers et retours, puis on tricote la bordure d'encolure en rond. Bon tricot!
30.09.2024 - 09:20
![]() Elizabeth W wrote:
Elizabeth W wrote:
Hej Jag förstår inte hur jag ska sticka nacken. Halsens maskor sätts på tråd. Men hur fortsätter jag över ärm, nacke, ärm? Stickar jag med rundsticka fortfarande?
12.01.2024 - 12:11DROPS Design answered:
Hej Elizabeth, når du har sat masker på en tråd foran til hals, fortsætter du frem og tilbage samtidig som du tager 2 masker ind i starten af næste 2 pinde :)
16.01.2024 - 11:50
![]() Anne Hill wrote:
Anne Hill wrote:
I’m going to try this pattern on my knitting machine & I do have a lace attachment I also will try the pattern on a punchcard or something similar
05.05.2023 - 10:43
![]() Linda Mortensen wrote:
Linda Mortensen wrote:
Jeg vil spørge om der ikke er fejl i opskriften da mønster nr. M 2A kun har atten pinde i stedet for 20 pinde som er skrevet på opskriften og så er der fejl i mønster M 4A hvor der står at der skal være 20 pinde og der er kun 12 pinde i mønsteret jeg vil gerne høre om det er en fejl. Med venlig hilsen Linda Mortensen
21.02.2021 - 15:28DROPS Design answered:
Hej Linda, nej det siger bare at 20 pinde i dette mønster = 7 cm i højden. God fornøjelse!
23.02.2021 - 14:17
![]() Marion wrote:
Marion wrote:
Danke für die Rückmeldung, mir geht es um die Reihen 7 und 8, die bei der Wiederholung von M5 fehlen, wenn ich nach Reihe 18 mit Reihe 1 weiter mache 🙂
18.08.2020 - 14:17DROPS Design answered:
Liebe Marion, ich habe M.5 2 Mal in der Höhe gestrickt, um sicher zu sein ob es klappt oder nicht und bei mir wird die Diagramme schön in der Höhe wiederholt, diese Zunahme von 7. Reihe brauche ich nicht zwischen die Wiederholungen. Viel Spaß beim stricken!
18.08.2020 - 16:56
![]() Marion wrote:
Marion wrote:
Ich habe eine Frage zu M5. Ich wiederhole dieses Muster ja mindestens einmal, wenn ich aber nach der Strickschrift gehe, wird die Zacke im Übergang von letzter zu erster Reihe schmäler als die ersten beiden Zacken. Hier müsste doch eigentlich auch wieder die Zwischenreihe mit der Verdoppelung einzelner Maschen wiederholt werden, oder ? Auf dem Foto sind die Zacken jeweils gleich breit. Danke 😊
18.08.2020 - 12:05DROPS Design answered:
Liebe Marion, Diagramme muss wahrscheinlich korrigiert sein (Anfang 3. Reihe + 13. Reihe in A wenn man A wiederholt + 9. Reihe in B) damit alle Maschen stimmen, aber bei der 17 Reihe haben Sie K5, 1 Umschlag, 2 Re zs, 1 M re und bei der 1. Reihe haben Sie 3 M, 1 Abnahme, 1 Umschlag, 1 M re (= der Umschlag von 17. Reihe), 1 Umschlag, 2 M re zs. Dh, Muster kann in der Höhe wiederholt sein. Viel Spaß beim stricken!
18.08.2020 - 14:04
![]() Megan wrote:
Megan wrote:
Hi! This is about diagram M. 2A. It's supposed to be worked over eight stitches and, for example in size S, be repeated 11 times before working M. 2B, but on row 5 I would need 9 stitches to complete the yarn over/knit2together pattern. Does it mean that I only need to work yarn over without knit2together? Thanks and Regards, Megan
05.04.2020 - 23:42DROPS Design answered:
Dear Megan, on 5th round, work the last stitch in M.2A together with the first stitch next M.2A (and then M.2B), the yarn over is now the last stitch M.2A and the decrease is now the first stitch next M.2A/M.2B. Happy knitting!
09.04.2020 - 14:04
|
||||||||||||||||||||||
Lovely in Lace |
||||||||||||||||||||||
|
|
||||||||||||||||||||||
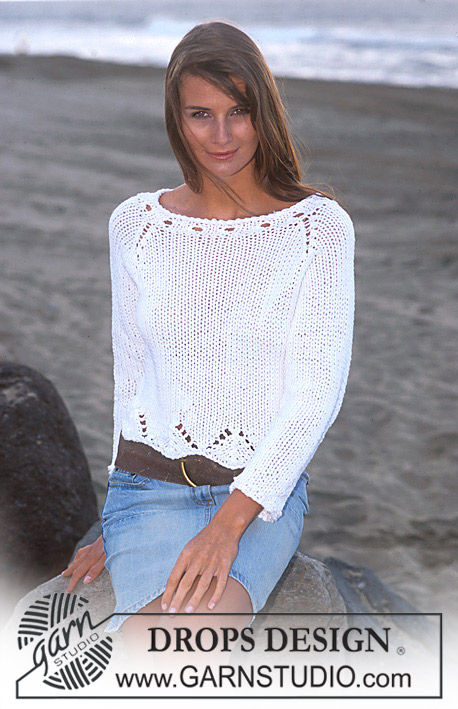
DROPS Long top with lace pattern knitted in Safran.
DROPS 94-24 |
||||||||||||||||||||||
|
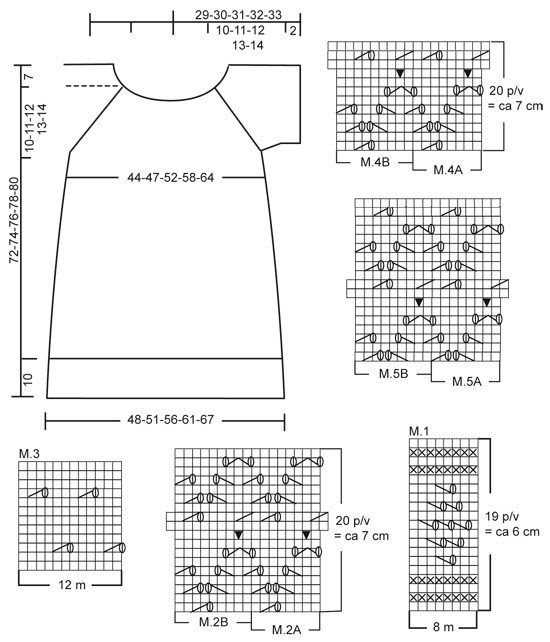
Knitting Gauge: 21 sts x 30 rows on needles size 3.5 mm / US 4 in lace pattern with Safran = 10 x 10 cm / 4" x 4", and 25 sts x 30 rows of rib-2 = 10 x 10 cm / 4" x 4". Rib-1: *K2, P4*, repeat from *-* Rib-2: *K2, P3*, repeat from *-* Lace pattern: See diagrams M.1 to M.5. The diagrams are seen from the right side. Decreasing tips (for raglan): Dec as follows at every transition between the sleeve and the front and back piece (begin 3 sts before the marking thread): K2 tog, K2 (marking thread is now in between these 2 sts), slip 1 st as if to knit, K1, psso. Front piece: Please read the entire pattern before starting – Work forward and backward on circular needle. Cast on 146-158-170-182-206 sts (inclusive of 1 seam st each side) on needles size 3.5 mm / US 4 in Safran. P 1st row from the wrong side, and continue in Rib-1 and a seam st each side. After 2 rows dec. all P4’s to P3 = 122-132-142-152-172 sts, and continue the rib K2/P3 (seen from the right side). When the piece measures 10 cm / 4" K1 row from the right side, at the same time adjusting number of sts evenly on row to 102-110-120-130-142. Knit the next row from the wrong side as follows: 1 seam st, 2-2-3-0-2 stockinette sts, diagram M.1 over the next 96-104-112-128-136 sts, 2-2-3-0-2 sts of stockinette sts and 1 seam st. Knit 1 repeat – Note: On the rows where the pattern says P from the right side, P over all sts including the 2-2-3-0-2 stockinette sts at each side of M.1. At the same time, on the second but last row in M.1 adjust the number of sts to 99-107-123-131-139. Continue the next row from the right side as follows: 1 seam st, M.2A over the next 88-96-112-120-128 sts, M.2B (= 9 sts) and 1 seam st. Knit 1 repeat – at the same time on the last row in M.2 adjust the number of sts to 98-104-116-128-140. Continue in M.3 with a seam st at each side. At the same time when the piece measures 26 and 38 cm / 10¼" and 15" dec 1 st each side = 94-100-112-124-136 sts – work the sts not fitting into pattern in stockinette sts. When the piece measures approx. 46-47-48-49-50 cm / 18"-18½"-19"-19¼"-19¾" – adjust M.3 so that you have worked 2 rows of stockinette sts after a row of lace holes and the next row is from the wrong side – continue as follows: 1 seam st, 2-1-3-1-3 sts of stockinette sts, M.1 over the next 88-96-104-120-128 sts, 2-1-3-1-3 sts of stockinette sts and 1 seam st. Work 1 repeat (remember to P from the right side over all sts) – at the same time on the last row of M.1 adjust the number of sts to 95-101-111-123-137. After M.1 knit the next row as follows from the right side: 1 seam st, 2-1-2-0-3 sts of stockinette sts, M.4A over the next 80-88-96-112-120 sts, M.4B (= 9 sts), 2-1-2-0-3 sts of stockinette sts and 1 seam st. Work 1 repeat of M.4 and continue in M.5 the same way until finished measurements. At the same time when the piece measures 55-56-57-58-59 cm / 21⅝"-22"-22½"-22¾"-23¼" bind off 7-7-7-9-9 sts each side = 81-87-97-105-119 sts left. Put the sts on a thread and knit the back piece. Back piece: Cast on and knit as front piece. Sleeve: Knit the sleeve forward and backward on circular needle. Cast on 72-77-82-87-92 sts (inclusive of a seam st each side) on circular needle size 3.5 mm / US 4 in Safran. P 1st row from the wrong side, and continue in Rib-2 and a seam st each side. When the piece measures 2 cm / ¾" – make sure the next row is from the right side – knit 4 rows of garter sts – at the same time dec 1-2-3-2-1 sts evenly distributed on on 1st row = 71-75-79-85-91 sts. Now bind off 7-7-7-9-9 sts each side and put the remaining sts on a thread. Make 1 more sleeve. Assembly: Sew the front and back pieces tog inside the seam sts. Sew the sleeves tog inside the seam sts. Yoke: Insert the sleeves on the same circular needle as the front and back where you bound off for the armholes = 276-296-324-344-384 sts. Insert a marking thread at all transitions between front and back and sleeves = 4 marking threads. Knit 1-2-1-2-1 rounds before decreasing – Note: continue the pattern (M.5) on the front and back pieces as well as the sleeves (make sure to begin the pattern on the sleeves on the same pattern row as front and back pieces and knit 0-2-0-1-0 sts of stockinette sts each side (M.5A are knitted over the first 48-48-56-56-64 sts and M.5B over the last 9 sts). Knit sts not fitting into pattern in stockinette sts, and make sure to dec. as many sts as you make yo’s so that the number of sts outside the raglan decreases is constant. Raglan decreases: Dec 1 st each side of the marking threads (= 8 decreases per round) – see Decreasing tips above: Dec on every other row 15-16-18-19-21 times – Note: Knit sts not fitting into pattern in stockinette sts. Neck: At the same time when the piece measures 63-65-67-68-70 cm / 24¾"-25½"-26⅜"-26¾"-27½" put the centre front 39-43-47-51-57 sts on a thread for neck. Bind off on each neckline on every other row as follows: 2 sts 1-1-1-2-2 times and 1 st 2 times. After all dec for raglan and neck there are 109-117-125-129-147 sts left on row. Bind off. Neck edge: Pick up approx. 156-212 sts around the neck (including the sts from the thread at the centre front) on a small circular needle size 3.5 mm / US 4 with Safran. P 1 round, K 1 round at the same time dec evenly on round to 120-130-130-140-140 sts. Continue in Rib-2 until the neck edge measures 2.5 cm / ⅞". Bind off loosely in rib. Insert the silk ribbon in the top row of M.3 and tie a knot/bow. |
||||||||||||||||||||||
Diagram explanations |
||||||||||||||||||||||
|
||||||||||||||||||||||
 |
||||||||||||||||||||||
Have you finished this pattern?Tag your pictures with #dropspattern or submit them to the #dropsfan gallery. Do you need help with this pattern?You'll find 23 tutorial videos, a Comments/Questions area and more by visiting the pattern on garnstudio.com. © 1982-2026 DROPS Design A/S. We reserve all rights. This document, including all its sub-sections, has copyrights. Read more about what you can do with our patterns at the bottom of each pattern on our site. |
||||||||||||||||||||||


With over 40 years in knitting and crochet design, DROPS Design offers one of the most extensive collections of free patterns on the internet - translated to 17 languages. As of today we count 324 catalogs and 12290 patterns - 12280 of which are translated into English (US/in).
We work hard to bring you the best knitting and crochet have to offer, inspiration and advice as well as great quality yarns at incredible prices! Would you like to use our patterns for other than personal use? You can read what you are allowed to do in the Copyright text at the bottom of all our patterns. Happy crafting!
Post a comment to pattern DROPS 94-24
We would love to hear what you have to say about this pattern!
If you want to leave a question, please make sure you select the correct category in the form below, to speed up the answering process. Required fields are marked *.