
Popular categories
Looking for a yarn?


Comments / Questions (7)
![]() Jolene Furdek wrote:
Jolene Furdek wrote:
Can you give finished measurements of this garment - chest, sleeve length, back length? There is only one size given. Can this be modified? thanks.
26.12.2018 - 00:53DROPS Design answered:
Hi Jolene, please see the schematic drawing under the description. The measurements are given in cm. Happy knitting!
27.12.2018 - 18:36
![]() Pauline Wilcox wrote:
Pauline Wilcox wrote:
Hi im struggling with the right size needles for the rib its on 2.25 mm needle i asked the ladies i knit with they were wondering if this is the correct size needle they were wondering if this shouldn't be a 3.5mm needle many thanks pauline
06.12.2017 - 18:19DROPS Design answered:
Dear Mrs Wilcox, this pattern has been written for rib worked with needle size 2,5 mm, you may adjust needle size to larger one, but remember you may have to adjust on some places (ribbing are here tigthening the bottom of jacket/sleeves). Happy knitting!
07.12.2017 - 08:49
![]() Charlotte Petersen wrote:
Charlotte Petersen wrote:
Jeg har præcis det samme problem med ryggen som Inga Jensen. Er der slet ingen hjælp at hente?
10.07.2013 - 15:57DROPS Design answered:
Hej Charlotte. Det er en aeldre model, saa vi har desvaerre ikke noget billede af ryggen. Men se vores svar til Inga ogsaa.
11.07.2013 - 13:20Inga Jensen wrote:
Kan det lade gøre at vise et billede af trøjens ryg,så kan jeg måske bedre forstå mønstret på ryggen.
16.11.2012 - 17:46DROPS Design answered:
Det har vi desværre ikke, men jeg kan se i opskriften at du har et sidemønster på midten af ryggen og så en sterne på hver side. God fornøjelse!
04.12.2012 - 12:09
![]() Linda Nielsen wrote:
Linda Nielsen wrote:
Hej Kirsten, på nogle af de helt gamle opskrifter findes teksten ikke på dansk. Du er nødt til at vælge et andet sprog fx norsk - det virker på denne
17.01.2012 - 18:30
![]() Kirsten Junker wrote:
Kirsten Junker wrote:
Jeg kan ikke finde opskriften til denne model. Med venlig hilsen Kirsten Junker.
17.01.2012 - 15:24
![]() Inga Jensen wrote:
Inga Jensen wrote:
Har strikket op til hvor stjernerne skal vende vandret,mønstret passer bare ikke på ryggen imellem de to lodrette stjerner.har kontaktet flere for at finde en løsning,men ingen kunne hjælpe.Er der en fejl i mønstret?
28.02.2011 - 19:52
|
|||||||||||||||||||||||||||||||||||||
Polarized |
|||||||||||||||||||||||||||||||||||||
|
|
|||||||||||||||||||||||||||||||||||||
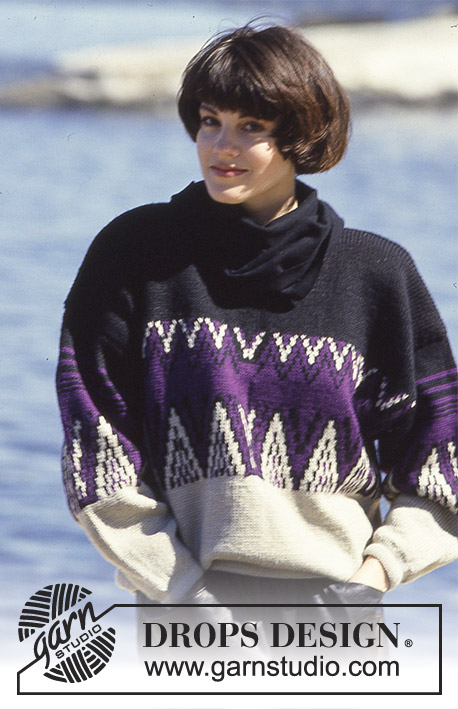
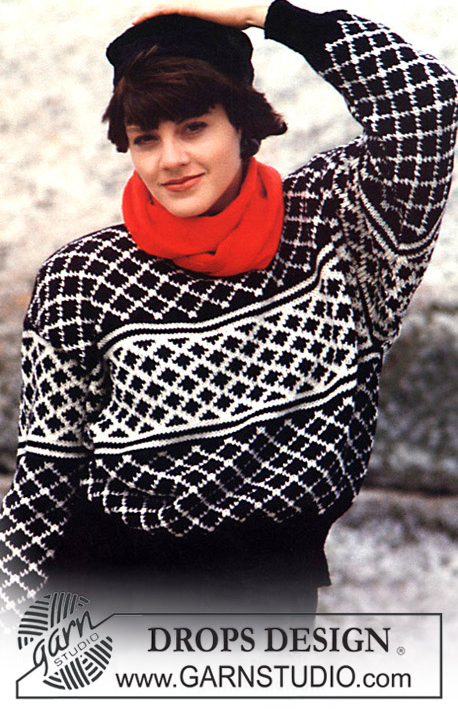
DROPS jacket with star pattern in “Karisma Superwash”. Size M
DROPS 8-1 |
|||||||||||||||||||||||||||||||||||||
|
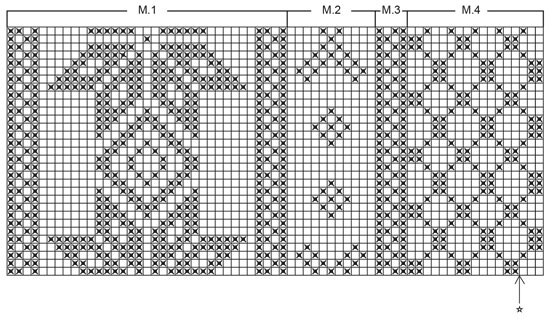
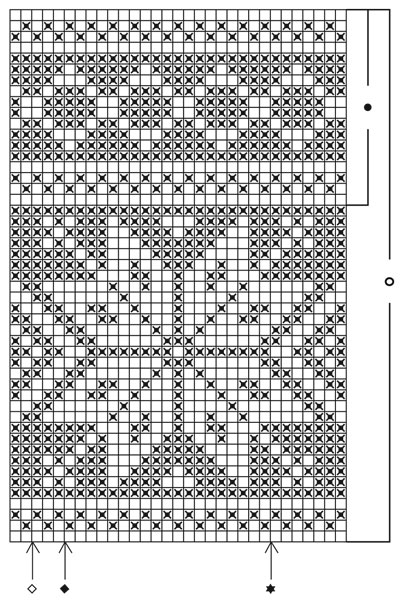
Rib: * K1 into back of loop, P1 *, repeat from *-*. Edge: Mid front: 3 cm stocking st, P 1 row (= folding edge), 3 cm stocking st. Neckline: 1.5 cm stocking st, P 1 round (= folding edge), 1.5 cm stocking st. Fold all edges double towards WS and fasten. Pattern: See diagram. The diagram shows the pattern from the RS and the entire pattern is worked in stocking st. Diagram for mønster øverst på bol og ermer = horizontal pattern for body piece and sleeves 1 square = 1 st x 1 row Mønster øverst på ermet = pattern at top of sleeve, 18 rows. Mønster øverst på bolen = pattern at top of jacket, 49 rows. Start mønster bak= beg pattern back piece Start mønster forstk midt foran = beg pattern mid front Start siden på venstre forstk = beg side left front piece Lodret stjernemønster = vertical star pattern, 35 sts Mønster II = M.2, 11 sts Kant = Border, 4 sts Sidemønster = Side pattern, 17 sts Start mønster midt bak = beg pattern mid back Body: The jacket is worked in the round on circular needle and cut mid front and for armholes afterwards. Cast on 194 sts on circular needle size 2.5 mm with black and work 4 cm rib, but work the middle 18 sts on front piece in stocking st (for cutting mid front afterwards). Change to circular needle size 4 mm and K 1 round, at the same time inc 72 sts evenly = 266 sts. Continue in pattern as follows (front piece = 132 sts, back piece = 134 sts) – see diagram at bottom of page: beg mid front with 18 black stocking sts, 1 star pattern (35 sts), 1 repeat of M.2 (11 sts), 1 Border (4 sts), 1 Side pattern (17 sts), 1 Border (4 sts), 1 repeat of M.2 (11 sts), 1 star pattern (35 sts), 14 sts of Side pattern (mid back, see diagram), 1 star pattern (35 sts), 1 repeat of M.2 (11 sts), 1 Border (4 sts), 1 side pattern (17 sts), 1 Border (4 sts), 1 repeat of M.2 (11 sts), 1 star pattern (35 sts). Continue in pattern like this. Remember the knitting tension! When piece measures 27 cm inc 4 sts each side (to be cut for armhole and not included in pattern). After 2 full and 2 half vertical star pattern repeats work horizontal pattern – see diagram – make sure the middle st from vertical and horizontal stars sit over each other. After 49 pattern rows work 1 round white stocking st on all sts and cast off. Piece measures approx 58 cm. Sleeve: Cast on 64 sts on double pointed needles size 2.5 mm with black and work 6 cm rib and then 3 cm stocking st. Change to needle size 4 mm, K 1 round, at the same time inc 2 sts evenly = 66 sts. Continue in pattern as follows – see diagram: 1 Border (4 sts), 1 repeat of M.2 (11 sts), 1 star pattern (35 sts), 1 repeat of M.2 (11 sts), 1 Border (4 sts). Work 1 st mid under arm in black throughout and inc 1 st on each side of this on every 3rd round a total of 31 times = 128 sts. Work inc sts in Side pattern, as you go along. After 2 ½ vertical stars work horizontal pattern – see diagram. After 18 rounds work 1 round in white stocking st and then 7 rounds in reverse stocking (for sewing sleeve to body piece), cast off. Sleeve now measures approx 51 cm. Assembly: Insert a marking thread in the middle of the inc sts each side for armhole, cm and a marking thread in the middle of the 18 black sts mid front. Sew 2 seams on a sewing machine around the marking threads for armhole and mid front, 1st seam = ½ st from the MT, 2nd seam = ½ st from the 1st seam. Cut for armhole and mid. Sew shoulder seams = 23 cm. Pick up 130 sts along left front piece on needle size 2.5 mm with black and work Edge – see above. Repeat along right front piece, but after 1 cm make 6 buttonholes evenly distributed. 1 buttonhole = cast off 3 sts and cast on 3 sts on return row – remember buttonholes on piece in stocking st to be folded towards WS! Pick up approx 80 sts round the neck on needle size 2.5 mm with black and work Edge – see above. Set in sleeves as follows: sew the last row in stocking st on sleeves to row after machine seam on armhole. Turn jumper inside out and fasten piece in reverse stocking st on sleeve to body piece. Sew on buttons. |
|||||||||||||||||||||||||||||||||||||
Diagram explanations |
|||||||||||||||||||||||||||||||||||||
|
|||||||||||||||||||||||||||||||||||||
 |
|||||||||||||||||||||||||||||||||||||
 |
|||||||||||||||||||||||||||||||||||||
 |
|||||||||||||||||||||||||||||||||||||
Have you finished this pattern?Tag your pictures with #dropspattern or submit them to the #dropsfan gallery. Do you need help with this pattern?You'll find 20 tutorial videos, a Comments/Questions area and more by visiting the pattern on garnstudio.com. © 1982-2026 DROPS Design A/S. We reserve all rights. This document, including all its sub-sections, has copyrights. Read more about what you can do with our patterns at the bottom of each pattern on our site. |
|||||||||||||||||||||||||||||||||||||


With over 40 years in knitting and crochet design, DROPS Design offers one of the most extensive collections of free patterns on the internet - translated to 17 languages. As of today we count 325 catalogs and 12298 patterns - 12288 of which are translated into English (US/in).
We work hard to bring you the best knitting and crochet have to offer, inspiration and advice as well as great quality yarns at incredible prices! Would you like to use our patterns for other than personal use? You can read what you are allowed to do in the Copyright text at the bottom of all our patterns. Happy crafting!
Post a comment to pattern DROPS 8-1
We would love to hear what you have to say about this pattern!
If you want to leave a question, please make sure you select the correct category in the form below, to speed up the answering process. Required fields are marked *.