
Popular categories
Looking for a yarn?


Comments / Questions (29)
![]() Susanne Zeijlon wrote:
Susanne Zeijlon wrote:
Kan ni förklara delen när man stickar ärm och har maskat av 6 maskor , sedan ska maskor sättas på tråd ? Hamnar inte dem väldigt långt nedanför arbetet ? Man ska ju sätta på tråd vartannat varv tills arbetet mäter ...... sen ska de sättas tillbaks på stickan , tillsammans med övriga arbetet eller .? Jag har frågat vänner men ingen förstår
14.11.2020 - 12:17DROPS Design answered:
Hej Susanne. De maskor du maskar av hamnar under ärmen men de maskor du sätter på tråd blir till ärmkulle så det är riktigt att de 6 som du avmaskar kommer längre ner. Mvh DROPS Design
17.11.2020 - 11:41
![]() Satu Haaranen wrote:
Satu Haaranen wrote:
Onko 70-6 sweet marie neuletakin viimeistely ohje löydettävissä jostain?
29.07.2018 - 17:02
![]() Satu Haaranen wrote:
Satu Haaranen wrote:
Mistä löytyy nuo luvatut viimeistely ohjeet?
27.06.2018 - 16:19Adela wrote:
Copa manga finalizada con 2cmJersey revés El reves del jersey queda en el LD. Se cose la manga ensamblando(ocultando) por dentro del cuerpo estos 2cm Jersey reves?Hay algún video de esto? Gracias Abrazo Adela
26.05.2016 - 11:49DROPS Design answered:
Hola Adela. No hay más vídeos aparte de los que te mencionamos anteriormente. La parte de pt jersey revés se esconde dentro de la costura.
28.05.2016 - 16:40Adela wrote:
Estoy muy agradecida por tu respuesta.Te saludo Adela
22.05.2016 - 16:56Adela wrote:
Explicame por favor, ,una vez ya cortado el frente y las sisas, cómo sigo?explicame todo lo que puedas, es que nunca lo hice(desconocia esta forma)Desde que Pts levanto para las cenefas? y las mangas?Desde el borde cortado? o se doblan y cosen y luego se toman los pts.del borde doble o doblado? Al cortar hay riesgos de que se destejan los bordes?Muchas gracias y tdisculpa por mi insistencia
17.05.2016 - 15:57DROPS Design answered:
Hola Adela. Para que no se destejan los bordes cortados hacemos una doble costura con la maquina de coser. Tienes que seguir paso a paso lo explicado en el patrón. Es muy importante que la puntada de la maquina no sea demasiado larga.
21.05.2016 - 19:15Adela wrote:
T12 a);Cómo se sujetan los bordes hacia adentro,una vez que hice el corte en el centro de los 5pt?_ b) Queda un borde doble y bastante grueso?. Las cenefas delanteras _ c ) ¿:sobre que línea de la hilera levanto los 135pts? Gracias por respuesta de ESTAS 3 Preguntas
10.05.2016 - 14:00DROPS Design answered:
Hola Adela. En primer lugar comentarte que tenemos espacio limitado para las respuestas (aprox 6-8 líneas) así que es imposible contestar a varias preguntas en una respuesta. Te recomiendo ver los vídeos que acompañan al patrón. Los pts se recogen por el LD sobre la costura/borde del delantero. Este modelo requiere bastante experiencia por su complejidad.
21.05.2016 - 19:06Adela wrote:
Después del corte se dobla hacia adentro ,pensé que el orillo se deja para levantar los pts.de las cenefas delanteras ¿,Si no desarmo lo hecho.... y sigo como me decis,(los 5 en jersey) se notará como desprolijjo?Que harias?
19.04.2016 - 12:09DROPS Design answered:
Hola Adela, sigue como hasta ahora para tener todo igual y ten en cuenta esta técnica para la siguiente labor.
21.04.2016 - 17:05Adela wrote:
Después del corte se dobla hacia adentro ,pensé que el orillo se deja para levantar los pts.de las cenefas delanteras ¿,Si no desarmo lo hecho.... y sigo como me decis,(los 5 en jersey) se notará como desprolijjo?Que harias?
19.04.2016 - 11:44Adela wrote:
Las indicaciones dicen: " Cuando la labor mida 8-9-11-12-13 cm trabajar el Patrón 1-" excepto sobre los pts del corte" .en esos 5 pts teji :1p orillo 3pts jersey sin jackard y 1p orilloPuedo continuar asi ? porque ya teji la 3° parte del patron.Abrazo(.Dime la solución mejor)
18.04.2016 - 14:41DROPS Design answered:
Hola Adela. Si trabajamos en redondo no hay pts orillo, los 5 pts se trabajan siempre de derecho. Si trabajas el pt orillo siempre de derecho es lo mismo que trabajar pt jersey. Si trabajas el pt orillo en pt musgo (en redondo es 1 vta de derecho, 1 vta de revés) tendrás un nudo en el medio de la labor. Depende de como quieras que quede tu trabajo. Personalmente trabajaría todo de derecho.
19.04.2016 - 10:10
|
|||||||||||||
Sweet Marie |
|||||||||||||
 |
 |
||||||||||||
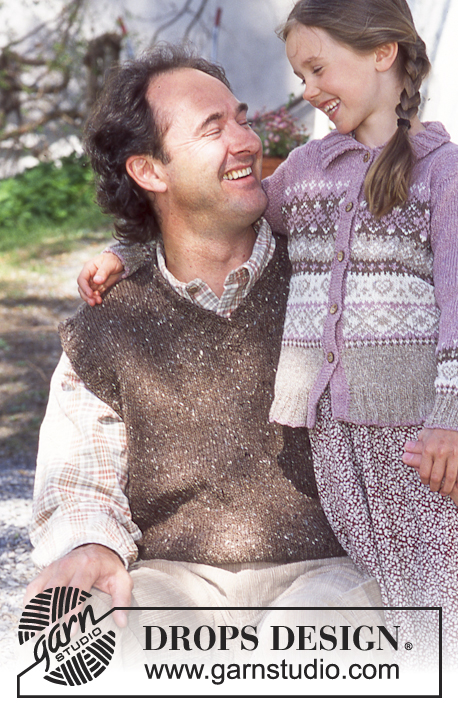
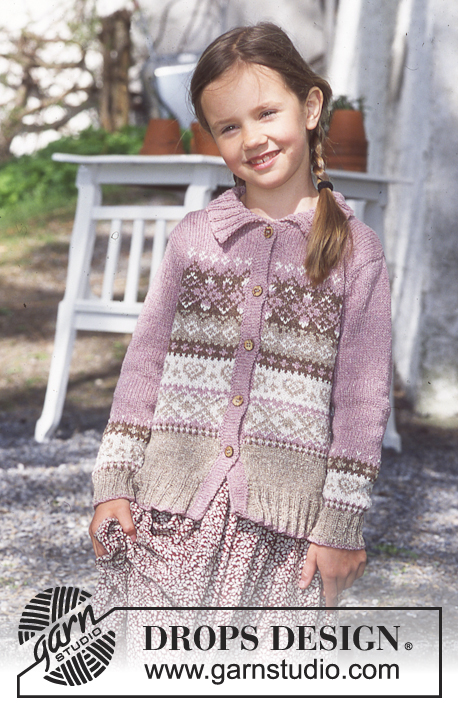
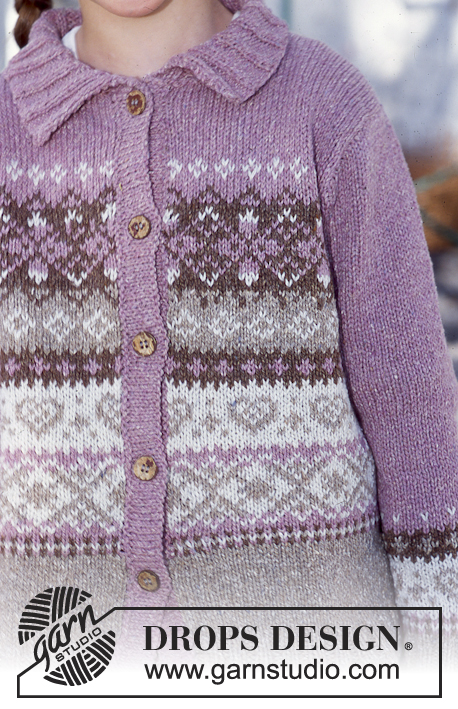
DROPS Cardigan in Silke-Tweed or BabyAlpaca Silk.
DROPS 70-6 |
|||||||||||||
|
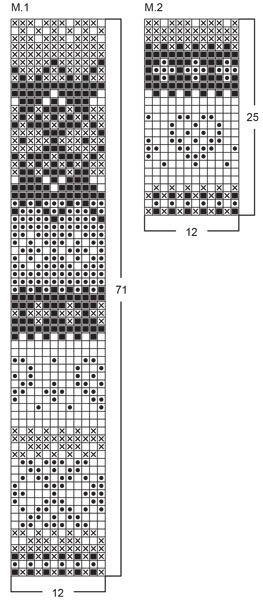
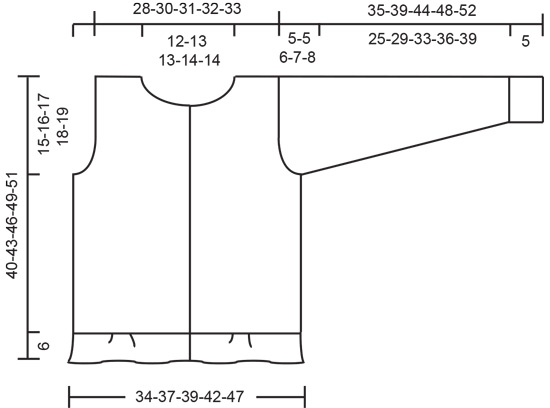
Gauge: 23 sts x 30 rows on larger needles in stockinette st = 10 x 10 cm [4" x 4"] Garter st, when knitting flat: Knit all sts, all rows. Rib-1: * K 2, P 4 *, repeat from * - *. Rib-2: * K 2, P 2 *, repeat from * - *. Pattern: See charts. The pattern is seen from the right side and is knit entirely in stockinette st. The charts are placed sideways on the page, with the bottom of the charts closest to the inside edge of the page. Body: The cardigan is knit in the round after the rib with steeks cut at center front and for armholes. Cast on 226-244-268-286-316 sts on smaller circular needles with pink. Knit 1 row of Rib-1, keeping 1 st at each edge in garter st throughout and beginning rib with K 2 after the 1 garter st. Change to beige and continue in Rib-1. When the piece measures 2 cm [0.75"] dec all P 4 ribs to P 3 = 189-204-224-239-264 sts. When the piece measures 4 cm [1.5"] dec all P 3 ribs to P 2 = 152-164-180-192-212 sts. You are now knitting Rib-2. When the piece measures 6 cm [2-⅜"] change to larger circular needles and stockinette st, increasing 7-7-3-3-7 sts evenly distributed on the row and cast on 3 new sts at center front (these 3 sts + 2 edge sts = 5 steek sts which are not knit in the pattern) = 162-174-186-198-222 sts. Join and continue with beige in stockinette st over all sts. When the piece measures 8-9-11-12-13 cm [3⅛"-3.5"-4.25"-4.75"-5⅛"] knit Pattern 1 (except over steek sts). After Pattern 1 knit the rest with pink. At the same time when the piece measures 25-27-29-31-32 cm [9⅞"-10⅝"-11⅜"-12.25"-12⅝"] knit the next row as follows: 5 steek sts, 36-39-42-44-49 st for the front, bind off 6-6-6-8-10 sts for armhole, 73-79-85-89-99 sts for the back, bind off 6-6-6-8-10 sts for armhole, 36-39-42-44-49 sts for the front. On the next row cast on 5 new sts over the bound-off armhole sts at each side (these 5 sts are for the armhole steek and are not knit in the pattern) = 160-172-184-192-212 sts. Now dec 1 st for armhole at each side of the 5 armhole steek sts at each side every other row 4-5-7-8-12 times = 144-152-156-160-164 sts remain on needles. When the piece measures 36-38-41-44-45 cm [14⅛"-14⅞"-16⅛"-17.25"-17.75"] bind off 17-17-17-19-19 sts (incl. 5 steek sts) at center front for neck = 127-135-139-141-145 sts and knit the rest back and forth on the needles. Now bind off at each neck edge every other row: 3 sts 1 time, 2 sts 1 time and 1 st 3-4-4-4-4 times = 111-117-121-123-127 sts remain on needles. When the piece measures 38-41-44-47-49 cm [14⅞"-16⅛"-17.25"-18.5"-19.25"] bind off the 25-27-27-29-29 sts at center back for the neck. Then bind off 2 sts at each back neck edge on the next row. Bind off the remaining 41-43-45-45-47 sts on each side (incl. 5 armhole steek sts) when the piece measures 40-43-46-49-51 cm [15.75"-16⅞"-18⅛"-19.25"-20"]. Sleeve: Cast on 40-44-44-48-48 sts on smaller double-pointed needles with pink. Join and place a marker at the join. Knit 1 row of Rib-2, change to beige and continue the rib. When the piece measures 5 cm [2"] change to larger double-pointed needles. Continue with Pattern 2 - centering the pattern on sleeves. At the same time when the piece measures 7 cm [2.75"] inc 1 st each side of marker 12-12-15-16-18 times: Size 3/4: alternately every 5th and 6th row. Size 5/6: alternately every 6th and 7th row. Sizes 7/8, 9/10 and 11/12: every 6 rows = 64-68-74-80-84 sts. After Pattern 2 is complete, knit the rest with pink. When the piece measures 30-34-38-41-44 cm [11.75"-13⅜"-14⅞"-16⅛"-17.25"] bind off 3 sts each side of marker and knit back and forth on needles. Now put sts on a st holder at each side for sleeve caps every other row: 3 sts 1 time, then 2 sts at each side until the piece measures 35-39-44-48-52 cm [13.75"-15.25"-17.25"-18⅞"-20.5"]. Put all sts from st holders back on the same needles and knit 2 cm [0.75"] reverse stockinette st back and forth on needles (for seam allowance over cut edge on body), increasing 12 sts evenly distributed on first row. Bind off. Assembly: Sew a marker thread in the center of the steek sts on either side and at the center front. Sew two machine seams around the marker thread, 1st seam = 1/2 st from the marker thread, 2nd seam = 1/2 st from first seam. Cut steeks for armholes and at the center front. Left button band: Pick up approx. 110 to 135 sts along left front on smaller needles with pink. P 1 row (seen from the right side) then continue in stockinette st. When button band measures 2 cm [0.75"] P 1 row (seen from the right side) for folding edge, then knit 2 cm [0.75"] stockinette st, bind off. Right button band: Knit the same as the left, but after 1 cm [⅜"] make 5-5-6-6-6 buttonholes evenly distributed along button band - put bottom buttonhole approx. 9 cm [3.5"] from bottom edge and top buttonhole approx. 1 cm [⅜"] from top edge. 1 buttonhole = bind off 2 sts and cast on 2 new sts over the bound-off sts on on the next row. Make corresponding buttonholes on facing after folding edge. Fold button bands against wrong side and sew in place. Collar: Pick up from right side: approx. 68 to 80 sts (divisible by 4) around the neck (including over button bands) on smaller circular needles with pink. K 1 row, then knit Rib-2, keeping 1 st at each edge in garter st throughout and beginning with K 2 after the edge st. When the collar measures 2.5 cm [1"] inc all P 2 ribs to P 3 and when the collar measures 5 cm [2"] inc all P 3 ribs to P 4. Continue in Rib-1 until the collar measures 8 cm [3-⅛"]; bind off in pattern. Sew in sleeves. Fold seam allowance from sleeve cap over cut edge on Body and sew in place. Sew on buttons. |
|||||||||||||
Diagram explanations |
|||||||||||||
|
|||||||||||||
 |
|||||||||||||
 |
|||||||||||||
Have you finished this pattern?Tag your pictures with #dropspattern or submit them to the #dropsfan gallery. Do you need help with this pattern?You'll find 22 tutorial videos, a Comments/Questions area and more by visiting the pattern on garnstudio.com. © 1982-2026 DROPS Design A/S. We reserve all rights. This document, including all its sub-sections, has copyrights. Read more about what you can do with our patterns at the bottom of each pattern on our site. |
|||||||||||||


With over 40 years in knitting and crochet design, DROPS Design offers one of the most extensive collections of free patterns on the internet - translated to 17 languages. As of today we count 325 catalogs and 12298 patterns - 12288 of which are translated into English (US/in).
We work hard to bring you the best knitting and crochet have to offer, inspiration and advice as well as great quality yarns at incredible prices! Would you like to use our patterns for other than personal use? You can read what you are allowed to do in the Copyright text at the bottom of all our patterns. Happy crafting!
Post a comment to pattern DROPS 70-6
We would love to hear what you have to say about this pattern!
If you want to leave a question, please make sure you select the correct category in the form below, to speed up the answering process. Required fields are marked *.