
Popular categories
Looking for a yarn?


Comments / Questions (13)
![]() DROPS Deutsch wrote:
DROPS Deutsch wrote:
Die Erklärung zum daigramm steht am Ende der Anleitung.
14.02.2010 - 19:58
![]() Susanne Hofmann wrote:
Susanne Hofmann wrote:
Hallo, dieser Pulli ist super , kann man das Diagramm auch noch ins deutsche übersetzen ? Vielen Dank und liebe Grüße Susanne Hofmann
13.02.2010 - 17:52
![]() Chris Sullivan wrote:
Chris Sullivan wrote:
The diagram is not in english, do you have it in english?
09.11.2007 - 21:25
|
||||||||||||||||||||||||||||
DROPS 92-3 |
||||||||||||||||||||||||||||
|
|
||||||||||||||||||||||||||||
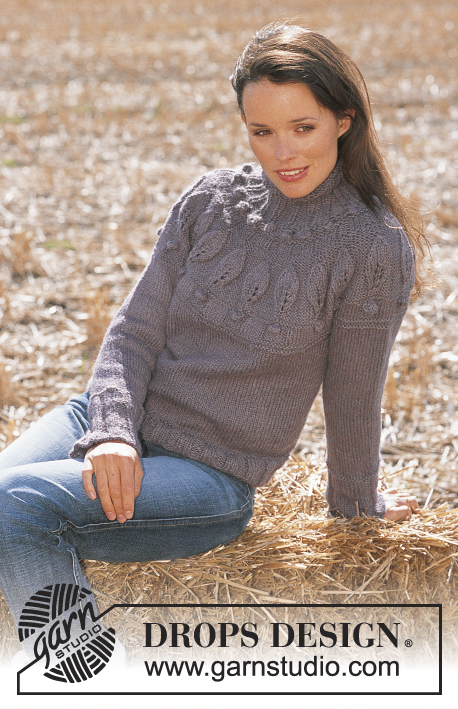
Pullover in Snow
DROPS 92-3 |
||||||||||||||||||||||||||||
|
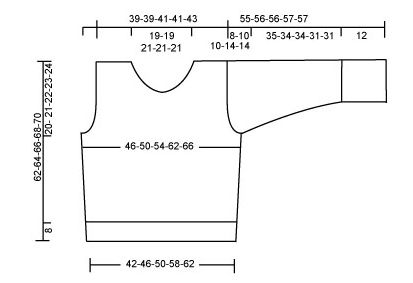
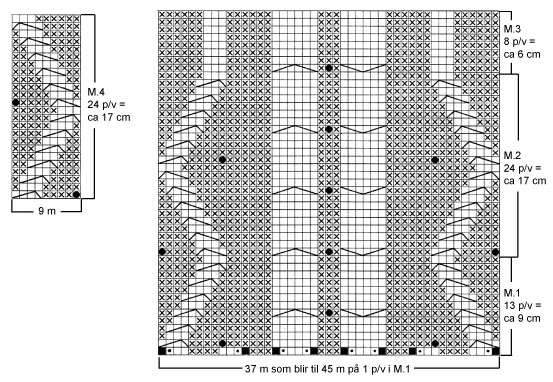
Gauge: 10 sts x 14 rows on larger needles in stockinette st = 10 x 10 cm. Pattern: See the charts. The pattern is seen from the right side. Rib (for neck): * K 1, P 3 *, repeat from * - *. Body: Cast on 84-92-100-116-124 sts on smaller circular needles; join and place a marker at the join. K 1 row, then establish rib on the next row as follows: Size S: * K 3, P 1, K 3, P 4, K 3, P 3, K 4, P 3, K 4, P 3, K 3, P 4, K 3, P 1 *, repeat from * - * one time more. Size M: * K 3, P 3, K 3, P 4, K 3, P 3, K 4, P 3, K 4, P 3, K 3, P 4, K 3, P 3 *, repeat from * - * one time more. Size L: * K 3, P 5, K 3, P 4, K 3, P 3, K 4, P 3, K 4, P 3, K 3, P 4, K 3, P 5 *, repeat from * - * one time more. Size XL: * K 3, P 3, K 3, P 3, K 3, P 4, K 3, P 3, K 4, P 3, K 4, P 3, K 3, P 4, K 3, P 3, K 3, P 3 *, repeat from * - * one time more. Size XL: * K 3, P 4, K 3, P 4, K 3, P 4, K 3, P 3, K 4, P 3, K 4, P 3, K 3, P 4, K 3, P 4, K 3, P 4 *, repeat from * - * one time more. Continue the rib as established until piece measures 8 cm. Change to larger circular needles and Pattern 1 as follows: * K 3 (place a marker in the center of these sts = side), P 1-3-5-9-11, Pattern 1 (= 37 sts which become 45 sts on row 1 because of incs), P 1-3-5-9-11 *, repeat from * - * one time more = 100-108-116-132-140 sts. When Pattern 1 has been knit once, continue with Pattern 2 over the center 45 sts in front and back (the remaining sts knit the same as before). When the piece measures 15 and 30 cm inc 1 st at each side of the 3 knit sts at each side = 108-116-124-140-148 sts on needles – P the increased sts. When the piece measures 42-43-44-45-46 cm bind off 5-5-7-7-7 sts at each side for armhole (= sts with marker + 2-2-3-3-3 sts each side of these). Front: = 49-53-55-63-67 sts. Continue to bind off for armhole at each side every other row: 2 sts 0-1-1-2-2 times and 1 st 1-1-1-3-4 times = 47-47-49-49-51 sts. When the piece measures approx. 51 cm – adjust to end after a complete repeat (in height) of Pattern 2 – knit Pattern 3 over the center 45 sts to finished measurements (the remaining sts knit the same as before). When the piece measures approx. 52-53-54-56-58 cm – adjust so that you have knit at least 2-4 rows after a cable at center front – bind off the center 3 sts for the neck. Then dec 1 st at each neck edge every row 11-11-12-12-12 times = 11-11-11-11-12 sts remain on each shoulder. Continue the pattern until piece measures 61-63-65-67-69 cm. Now dec 1 st over the 3 sts in stockinette st on each shoulder = 10-10-10-10-11 sts, then bind off all sts. The piece measures approx. 62-64-66-68-70 cm. Back: = 49-53-55-63-67 sts. Bind off for armhole as on front and continue as on front. When the piece measures approx. 51 cm – adjust to end after a complete repeat (in height) of Pattern 2 – knit Pattern 3 over the center 45 sts to finished measurements (the remaining sts knit the same as before). When the piece measures approx. 59-61-63-65-67 cm – adjust so that you have knit at least 2-4 rows after a cable at center back – dec 6 sts evenly distributed over the center 15 sts (this is so the neckband will not stretch out). On the next row bind off the center 17-17-19-19-19 sts for the neck. On the next row dec 1 st at each neck edge. At the same time when the piece measures 61-63-65-67-69 cm dec 1 st over the 3 sts in stockinette st on each shoulder = 10-10-10-10-11 sts, then bind off all sts, the piece measures approx. 62-64-66-68-70 cm. Right Sleeve: Cast on 28-28-28-30-30 sts on smaller double-pointed needles; join and K 1 row. Then knit rib as follows: Sizes S + M + L: K 3 (place a marker in the center of these sts), * P 4, K 3 *, repeat from * - * and finish with P 4. Size XL + XXL: K 3 (place a marker in the center of these sts), P 5, K 3, P 4, K 3, P 5, K 3, P 4. Continue the rib as established until piece measures 11 cm, then knit 1 row rib, increasing the K 3 with the marker to K 4 = 29-29-29-31-31 sts. Change to larger double-pointed needles and continue as follows: P 9-9-9-10-10, Pattern 4 (= 9 sts) and P 11-11-11-12-12. When the piece measures 12 cm inc 1 st at each side of the 4 knit sts with marker every 11-8-5-4.5-4 cm a total of 4-5-7-7-8 times = 37-39-43-45-47 sts – P the increased sts. When sleeve measures 47-46-46-43-43 cm bind off 5-5-7-7-7 sts at marker (2-2-3-3-3 sts each side of marker + st with marker in it) and knit the rest back and forth on needles. Bind off for sleeve cap at each side every other row: 2 sts 1 time and 1 st 1-3-3-4-4 times. Then bind off 2 sts at each side until piece measures 54-55-55-56-56 cm, then bind off 3 sts 1 time at each side. Bind off the remaining sts, the piece measures approx. 55-56-56-57-57 cm. Left sleeve: Knit as right sleeve but reversed so that the placement of the cable pattern will be correct when sleeve is sewn into body. Assembly: Sew shoulder seams. Collar: Pick up approx. 56-64 sts (divisible by 4) around the neck on smaller double-pointed needles; join and place a marker at the join. P 1 row and K 1 row. Then knit rib – see instructions above. Be sure that you get a P 3 precisely at center front of neck so that the 3 purl sts on front continue up in the collar. At the same time on 1st row with rib knit 1 bobble in the center of each of the 3 purl sts around the neck (knit the bobbles in the same manner as in Pattern). When the piece measures 8 cm bind off the 3 P sts at center front and knit collar back and forth on needles, keeping 1 st in garter st at each side. When the collar measures 12-12-12-14-14 cm bind off all sts in rib. |
||||||||||||||||||||||||||||
Diagram explanations |
||||||||||||||||||||||||||||
|
||||||||||||||||||||||||||||
 |
||||||||||||||||||||||||||||
 |
||||||||||||||||||||||||||||
Have you finished this pattern?Tag your pictures with #dropspattern or submit them to the #dropsfan gallery. Do you need help with this pattern?You'll find 21 tutorial videos, a Comments/Questions area and more by visiting the pattern on garnstudio.com. © 1982-2026 DROPS Design A/S. We reserve all rights. This document, including all its sub-sections, has copyrights. Read more about what you can do with our patterns at the bottom of each pattern on our site. |
||||||||||||||||||||||||||||


With over 40 years in knitting and crochet design, DROPS Design offers one of the most extensive collections of free patterns on the internet - translated to 17 languages. As of today we count 324 catalogs and 12290 patterns - 12280 of which are translated into English (US/in).
We work hard to bring you the best knitting and crochet have to offer, inspiration and advice as well as great quality yarns at incredible prices! Would you like to use our patterns for other than personal use? You can read what you are allowed to do in the Copyright text at the bottom of all our patterns. Happy crafting!
Post a comment to pattern DROPS 92-3
We would love to hear what you have to say about this pattern!
If you want to leave a question, please make sure you select the correct category in the form below, to speed up the answering process. Required fields are marked *.