
Popular categories
Looking for a yarn?


Comments / Questions (13)
![]() Heather wrote:
Heather wrote:
Hi, I would like to knit the pattern 92-3 in medium size, but don't know how many balls of Drop Snow I will need. Please help! Thanjs
28.08.2025 - 20:16DROPS Design answered:
Dear Heather, for the medium size you will need 800 g of DROPS Snow - this means you will need 16 balls in total. Happy knitting!
30.08.2025 - 16:05
![]() Anita wrote:
Anita wrote:
Ach so, auch mit dem cm zum Schluss ist es komisch…bei 65 cm soll ich noch Maschen abketten und bei 64 cm beenden? Sie haben bestimmt eine Erklärung dafür 😊Dankeschön
28.07.2022 - 19:30DROPS Design answered:
Liebe Anita, hier gibt es ein Typo, in die 2. Größe nehmen Sie nach 63 cm ab (die 1. Größe fehlt hier), und 1 cm danach ketten Sie alle Maschen ab. Viel Spaß beim stricken!
01.08.2022 - 11:47
![]() Anita wrote:
Anita wrote:
Hallo ich verstehe beim Rückenteil die Rechnung nicht…wenn ich die mittleren 3 M. Abgenommen habe, befinden sich noch je 22 M. Rechts und 22 M. Auf der Nadel. Wenn ich dann rechts und links je 6 M. Für den Hals abnehme, habe ich noch 18 M. Alles was danach geschrieben steht, kommt nicht mehr hin. Können Sie mir bitte noch einmal weiterhelfen? Vielen Dank!!!
28.07.2022 - 18:15DROPS Design answered:
Liebe Anita, beim Hals soll man 6 Maschen über die 15 mittleren Maschen abnehmen, und dann bei der nächsten Reihe ketten Sie die mittleren 17-17-19-19-19 M. für den Hals ab. Viel Spaß beim stricken!
01.08.2022 - 11:45
![]() Anita wrote:
Anita wrote:
Hallo, ich habe es herausgefunden 😄👍🏻👋🏻
17.07.2022 - 17:41
![]() Anita wrote:
Anita wrote:
Hallo, ich habe es herausgefunden. 😄👍🏻👋🏻
17.07.2022 - 17:40
![]() Anita wrote:
Anita wrote:
Hallo, ich komme mit der ersten Reihe nach dem Bündchen nicht zurecht, denn wenn ich bei dem leeren Kästchen mit dem kleinen Punkt 2 Maschen zusammen stricke, dann habe ich zu wenig Maschen. Können Sie mir bitte helfen! Vielen Dank und herzliche Grüße Anita
17.07.2022 - 16:42DROPS Design answered:
Liebe Anita, Sie stricken bei Symbol "leeres Kästchen mit kleinem Punkt" nicht 2 Maschen zusammen, sondern stricken 2 Maschen aus 1 Masche heraus, d.h. Sie stechen 2x in dieselbe Masche ein und haben dann 1 Masche zugenommen. Dann passt es auch mit der Maschenzahl. Die Beschreibung des Symbols wurde nun etwas verdeutlicht. Gutes Gelingen weiterhin!
18.07.2022 - 09:49
![]() Stella wrote:
Stella wrote:
Est il possible d'avoir des tutos videos en entier pas à pas pour les débutants ? is it possible to have step by step videos of this sweater (and others patterns) for beginners ? thanks a lot
23.04.2020 - 11:59DROPS Design answered:
Bonjour Stella, il n'est malheureusement pas possible d'avoir une vidéo pour chacun de nos modèles, toutefois, vous trouverez en bas de page des leçons et des vidéos expliquant les différentes techniques qui pourront vous aider. N'hésitez pas à poser votre question ici et si besoin, contactez votre magasin DROPS, même par mail ou téléphone, pour toute assistance individualisée. Bon tricot!
23.04.2020 - 14:58
![]() Sophie wrote:
Sophie wrote:
Bonjour et tout d\'abord merci pour votre site merveilleux. J\'ai l\'habitude de tricoter sur des aiguilles droites et à la manière anglaise, j\'ai donc un peu de mal à comprendre toutes les explications de ce modèle. Pour les manches, combien faut-il d\'aiguilles double pointe,2 ou 5? Merci d\'avance pour votre réponse même si ma question est un peu bête.
13.10.2018 - 21:21DROPS Design answered:
Bonjour Sophie, n'hésitez à vous aider de nos différentes vidéos qui montrent comment tricoter sur aiguille circulaire (c'est la même façon de faire avec le fil dans la main droite). Pour les manches, on va monter les mailles sur 4 aiguilles doubles-pointes et tricoter avec la 5ème ainsi. Bon tricot!
15.10.2018 - 09:15
![]() Joëlle LAGRANGE wrote:
Joëlle LAGRANGE wrote:
Bonjour T. M emmanchures. On a 53 m devant. Il faut rab 0x2 donc 0 et 1x1 chaque côté = 2 m. 53 - 2 = 51. Comment trouvez vous 47 svp ? Merci
02.01.2018 - 12:46DROPS Design answered:
Bonjour Mme Lagrange, en taille M, on va diminuer 1 x 2 m et 1 x 1 m, la correction a été faite, merci. Bon tricot!
03.01.2018 - 13:47
![]() Charade wrote:
Charade wrote:
Bonjour dans le model DROPS 92-3 , la grille des explications commence la première ligne sur l'envers puisque après il y a les torsades. Merci de me confirmer
30.12.2014 - 13:25DROPS Design answered:
Bonjour Mme Charade, le dos et le devant se tricotent en rond jusqu'aux emmanchures, le 1er rang de M1 sera donc tricoté sur l'endroit (comme les autres rangs) - quand vous rabattez les mailles des emmanchures, vérifiez bien que les rangs des torsades seront bien des rangs sur l'endroit. Bon tricot!
30.12.2014 - 14:36
|
||||||||||||||||||||||||||||
DROPS 92-3 |
||||||||||||||||||||||||||||
|
|
||||||||||||||||||||||||||||
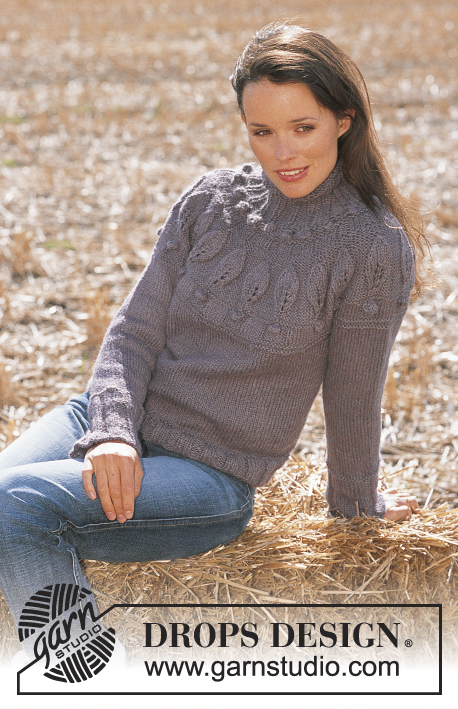
Pullover in Snow
DROPS 92-3 |
||||||||||||||||||||||||||||
|
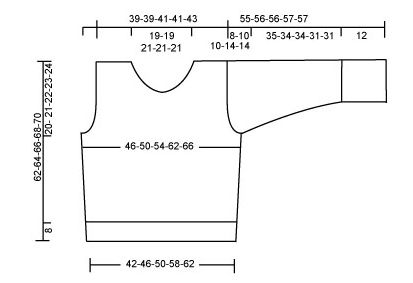
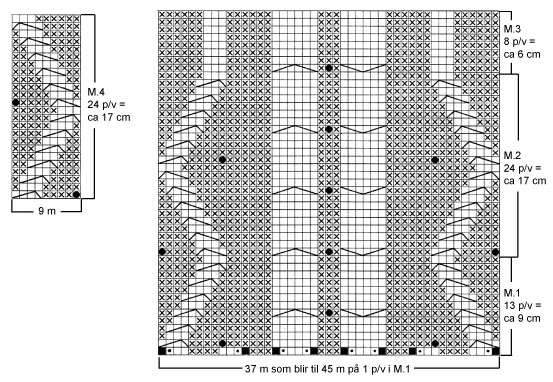
Gauge: 10 sts x 14 rows on larger needles in stockinette st = 10 x 10 cm. Pattern: See the charts. The pattern is seen from the right side. Rib (for neck): * K 1, P 3 *, repeat from * - *. Body: Cast on 84-92-100-116-124 sts on smaller circular needles; join and place a marker at the join. K 1 row, then establish rib on the next row as follows: Size S: * K 3, P 1, K 3, P 4, K 3, P 3, K 4, P 3, K 4, P 3, K 3, P 4, K 3, P 1 *, repeat from * - * one time more. Size M: * K 3, P 3, K 3, P 4, K 3, P 3, K 4, P 3, K 4, P 3, K 3, P 4, K 3, P 3 *, repeat from * - * one time more. Size L: * K 3, P 5, K 3, P 4, K 3, P 3, K 4, P 3, K 4, P 3, K 3, P 4, K 3, P 5 *, repeat from * - * one time more. Size XL: * K 3, P 3, K 3, P 3, K 3, P 4, K 3, P 3, K 4, P 3, K 4, P 3, K 3, P 4, K 3, P 3, K 3, P 3 *, repeat from * - * one time more. Size XL: * K 3, P 4, K 3, P 4, K 3, P 4, K 3, P 3, K 4, P 3, K 4, P 3, K 3, P 4, K 3, P 4, K 3, P 4 *, repeat from * - * one time more. Continue the rib as established until piece measures 8 cm. Change to larger circular needles and Pattern 1 as follows: * K 3 (place a marker in the center of these sts = side), P 1-3-5-9-11, Pattern 1 (= 37 sts which become 45 sts on row 1 because of incs), P 1-3-5-9-11 *, repeat from * - * one time more = 100-108-116-132-140 sts. When Pattern 1 has been knit once, continue with Pattern 2 over the center 45 sts in front and back (the remaining sts knit the same as before). When the piece measures 15 and 30 cm inc 1 st at each side of the 3 knit sts at each side = 108-116-124-140-148 sts on needles – P the increased sts. When the piece measures 42-43-44-45-46 cm bind off 5-5-7-7-7 sts at each side for armhole (= sts with marker + 2-2-3-3-3 sts each side of these). Front: = 49-53-55-63-67 sts. Continue to bind off for armhole at each side every other row: 2 sts 0-1-1-2-2 times and 1 st 1-1-1-3-4 times = 47-47-49-49-51 sts. When the piece measures approx. 51 cm – adjust to end after a complete repeat (in height) of Pattern 2 – knit Pattern 3 over the center 45 sts to finished measurements (the remaining sts knit the same as before). When the piece measures approx. 52-53-54-56-58 cm – adjust so that you have knit at least 2-4 rows after a cable at center front – bind off the center 3 sts for the neck. Then dec 1 st at each neck edge every row 11-11-12-12-12 times = 11-11-11-11-12 sts remain on each shoulder. Continue the pattern until piece measures 61-63-65-67-69 cm. Now dec 1 st over the 3 sts in stockinette st on each shoulder = 10-10-10-10-11 sts, then bind off all sts. The piece measures approx. 62-64-66-68-70 cm. Back: = 49-53-55-63-67 sts. Bind off for armhole as on front and continue as on front. When the piece measures approx. 51 cm – adjust to end after a complete repeat (in height) of Pattern 2 – knit Pattern 3 over the center 45 sts to finished measurements (the remaining sts knit the same as before). When the piece measures approx. 59-61-63-65-67 cm – adjust so that you have knit at least 2-4 rows after a cable at center back – dec 6 sts evenly distributed over the center 15 sts (this is so the neckband will not stretch out). On the next row bind off the center 17-17-19-19-19 sts for the neck. On the next row dec 1 st at each neck edge. At the same time when the piece measures 61-63-65-67-69 cm dec 1 st over the 3 sts in stockinette st on each shoulder = 10-10-10-10-11 sts, then bind off all sts, the piece measures approx. 62-64-66-68-70 cm. Right Sleeve: Cast on 28-28-28-30-30 sts on smaller double-pointed needles; join and K 1 row. Then knit rib as follows: Sizes S + M + L: K 3 (place a marker in the center of these sts), * P 4, K 3 *, repeat from * - * and finish with P 4. Size XL + XXL: K 3 (place a marker in the center of these sts), P 5, K 3, P 4, K 3, P 5, K 3, P 4. Continue the rib as established until piece measures 11 cm, then knit 1 row rib, increasing the K 3 with the marker to K 4 = 29-29-29-31-31 sts. Change to larger double-pointed needles and continue as follows: P 9-9-9-10-10, Pattern 4 (= 9 sts) and P 11-11-11-12-12. When the piece measures 12 cm inc 1 st at each side of the 4 knit sts with marker every 11-8-5-4.5-4 cm a total of 4-5-7-7-8 times = 37-39-43-45-47 sts – P the increased sts. When sleeve measures 47-46-46-43-43 cm bind off 5-5-7-7-7 sts at marker (2-2-3-3-3 sts each side of marker + st with marker in it) and knit the rest back and forth on needles. Bind off for sleeve cap at each side every other row: 2 sts 1 time and 1 st 1-3-3-4-4 times. Then bind off 2 sts at each side until piece measures 54-55-55-56-56 cm, then bind off 3 sts 1 time at each side. Bind off the remaining sts, the piece measures approx. 55-56-56-57-57 cm. Left sleeve: Knit as right sleeve but reversed so that the placement of the cable pattern will be correct when sleeve is sewn into body. Assembly: Sew shoulder seams. Collar: Pick up approx. 56-64 sts (divisible by 4) around the neck on smaller double-pointed needles; join and place a marker at the join. P 1 row and K 1 row. Then knit rib – see instructions above. Be sure that you get a P 3 precisely at center front of neck so that the 3 purl sts on front continue up in the collar. At the same time on 1st row with rib knit 1 bobble in the center of each of the 3 purl sts around the neck (knit the bobbles in the same manner as in Pattern). When the piece measures 8 cm bind off the 3 P sts at center front and knit collar back and forth on needles, keeping 1 st in garter st at each side. When the collar measures 12-12-12-14-14 cm bind off all sts in rib. |
||||||||||||||||||||||||||||
Diagram explanations |
||||||||||||||||||||||||||||
|
||||||||||||||||||||||||||||
 |
||||||||||||||||||||||||||||
 |
||||||||||||||||||||||||||||
Have you finished this pattern?Tag your pictures with #dropspattern or submit them to the #dropsfan gallery. Do you need help with this pattern?You'll find 21 tutorial videos, a Comments/Questions area and more by visiting the pattern on garnstudio.com. © 1982-2026 DROPS Design A/S. We reserve all rights. This document, including all its sub-sections, has copyrights. Read more about what you can do with our patterns at the bottom of each pattern on our site. |
||||||||||||||||||||||||||||


With over 40 years in knitting and crochet design, DROPS Design offers one of the most extensive collections of free patterns on the internet - translated to 17 languages. As of today we count 324 catalogs and 12290 patterns - 12280 of which are translated into English (US/in).
We work hard to bring you the best knitting and crochet have to offer, inspiration and advice as well as great quality yarns at incredible prices! Would you like to use our patterns for other than personal use? You can read what you are allowed to do in the Copyright text at the bottom of all our patterns. Happy crafting!
Post a comment to pattern DROPS 92-3
We would love to hear what you have to say about this pattern!
If you want to leave a question, please make sure you select the correct category in the form below, to speed up the answering process. Required fields are marked *.