
Popular categories
Looking for a yarn?


Comments / Questions (36)
![]() Angie wrote:
Angie wrote:
Nee ik heb het over M2, maar ik heb de extra steek niet gedaan en dat gaat veel beter
24.09.2025 - 09:42
![]() Angie wrote:
Angie wrote:
Comment peut on faire la torsade? Si on ajoute une maille au rang précédent c’est possible mais le rang suivant la torsade n’est pas possible car on a maintenant une maille en trop
20.09.2025 - 12:33DROPS Design answered:
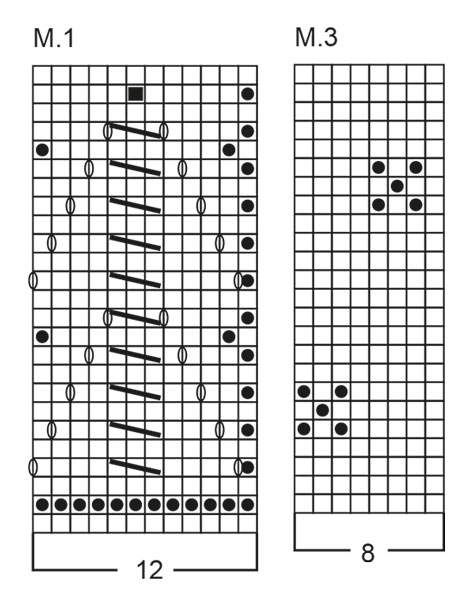
Bonjour Angie, parlez-vous du milieu de M.1? Vous diminuez 2 mailles au milieu de M.1: (cf dernier symbole): vous glissez 1 m, vous tricotez les 2 m suivantes ensemble à l'endroit et vous passez la maille glissée par-dessus les mailles tricotées = vous avez diminué 2 mailles, compensées par les jetés au début/à la fin de M.1 (ou de chaque côté de cette diminution). Bon tricot!
24.09.2025 - 07:20
![]() Angie wrote:
Angie wrote:
« Brei bij een hoogte van 22-24-26 (28-29) cm » Is dat een totale hoogte of hoogte na de 10 cm?
05.09.2025 - 20:28DROPS Design answered:
Dag Angie,
Dit is de totale hoogte, dus vanaf het opzetten.
07.09.2025 - 19:24
![]() Kirsten wrote:
Kirsten wrote:
Snoning i sommerfuglen passer ikke i maskeantal efter diagram
15.09.2023 - 08:23DROPS Design answered:
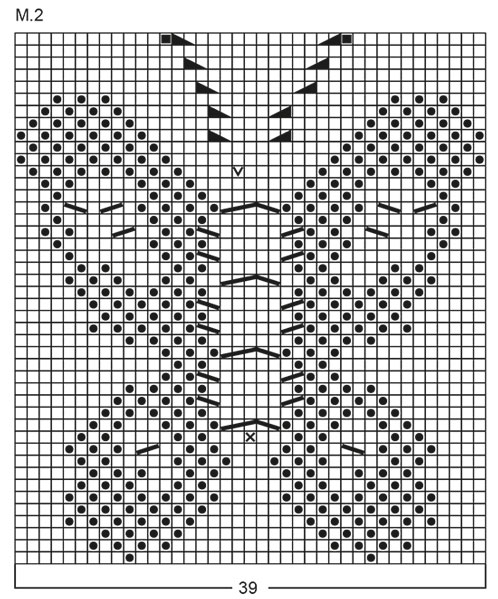
Hei Kirsten. Dette er en gammel oppskrift, så mulig det er tenkt litt annerledes. Men om du ser på diagram M.2 og på rad 11, så skal det økes 1 maske (X). Den økte masken vises ikke på diagrammet i radene over, men når fletten skal strikkes, strikker man etter diagramforklaringen "= 3 m på hj.p foran arb, 3 r, 3 r fra hj.p" (altså over 6 masker). Dette gjøres over de 4 flettepinnene i midten av sommerfugl, men når man kommer til rad 33, så felles det en maske (V) og maskeantallet i diagrammet stemmer igjen. mvh DROPS Design
18.09.2023 - 13:51
![]() Trudy wrote:
Trudy wrote:
Ik begrijp de “Maten in cm: 78-84-90 (96-102) cm” niet. Dit komt niet overeen met de tekening en ook niet met de lengte van de leeftijden erboven.
26.01.2023 - 18:34DROPS Design answered:
Dag Trudy,
Deze maten komen ongeveer overeen met de hoogte van het kind in centimeters.
29.01.2023 - 18:58
![]() Mirjam Goudswaard wrote:
Mirjam Goudswaard wrote:
Goeden avond lieve handwerkers/sters, Er is een klein foutje in jullie patroontje geslopen, namelijk; bij de mouwen staat dat je steken op moet zetten met nld nr 3,5 en na patroon M1 verder moet gaan met nld nr 3,5 maar dit moet nld. nr 4 zijn ;) Fijne feestdagen nog!
27.12.2021 - 22:35
![]() Hélène wrote:
Hélène wrote:
Si je reprend la question de Sandrine sur le diagramme on travaille sur 6 mailles (a cause de l’augmentation au rang précédent) mais sur l’explication du 9e symbole on travaille avec 5 mailles. Alors on doit faire comment
20.10.2019 - 20:46DROPS Design answered:
Bonjour Hélène, une correction va bientôt être faite sur cette torsade, on doit mettre 3 m devant, tricoter 3 m end, et reprendre les 3 m en attente et les tricoter à l'endroit. Bon tricot!
21.10.2019 - 12:03
![]() Nicole Champagne wrote:
Nicole Champagne wrote:
Je ne comprend pas la maille ajouté au centre du diagramme car par la suite on a toujours 39 mailles mais si on ajoute une maille on est rendu a 40 ????
19.10.2019 - 03:31
![]() Hanny wrote:
Hanny wrote:
Zijn de heen en teruggaa nee naalden aangegeven in het telpatroon dus totaal 25 nld
28.07.2019 - 11:38DROPS Design answered:
Dag Hanny,
Ja, dat klopt! Zowel de heengaande als de teruggaande naalden zijn aangegeven in het patroon.
10.08.2019 - 16:47
![]() Elke wrote:
Elke wrote:
Hallo, vielen Dank für die Antwort, aber jetzt weiß ich immer noch nicht die Einteilung. Bin das gewohnt, dass z.B. angegeben wird: RM, 1 Mustersatz M1, danach 5 Mustersätze M3, 1 Mustersatz M1, RM
21.05.2019 - 11:11DROPS Design answered:
Liebe Elke, M.1 wird beim Vorder- und Rückenteil "allein" in der Runde gestrickt, dh die 12 Maschen in M.1 in der Runde wiederholen gleichzeitig wird 1 Masche bei der 1. Runde nur zugenommen: 13-14-15 (16-17) x M.1 in der Breite, die Runde enden Sie mit der 1. Masche in M.1. Wenn Sie beim Vorder- & Rückenteil M.3 stricken, wiederholen Sie das Diagram in der Breite über alle Maschen, mit 1 Randmasche beidseitig. Viel Spaß beim stricken!
21.05.2019 - 13:20
|
|||||||||||||||||||||||||||||||||||||
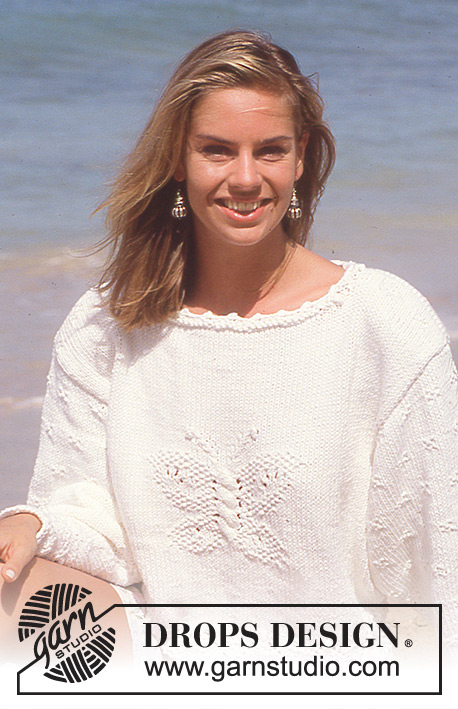
White Butterfly#whitebutterflysweater |
|||||||||||||||||||||||||||||||||||||
|
|
|||||||||||||||||||||||||||||||||||||
Sweater in Muskat with butterfly
DROPS Children 6-12 |
|||||||||||||||||||||||||||||||||||||
|
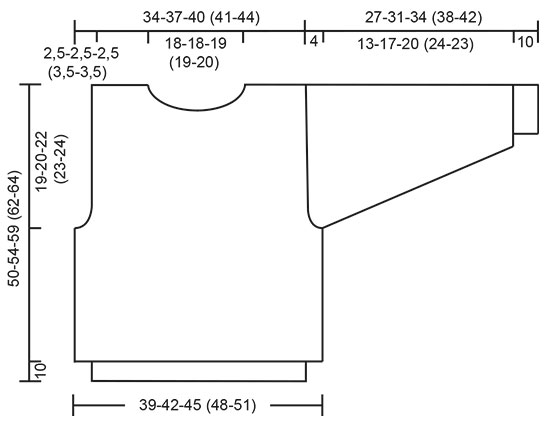
Gauge: 20 sts x 26 rows on needle 4 and stockinette st = 10 x 10 cm [4" x 4"]. Bobble: Knit 3 sts into 1 st, knit 3 rows stockinette st over these, on 4th row knit all sts together into 1 st. Pattern: See charts. (1 chart=1 repeat). The pattern is seen from the right side. BODY Cast on 156-168-180 (192-204) sts on smaller circular needles; join and place a marker at the join. Knit Pattern 1 - 1 repeat is approx. 10 cm [4"]. Change to larger circular needles and stockinette st, increasing 1 st on the 1st row = 157-169-181 (193-205) sts. Attach a second marker for the other side: 79-85-91 (97-103) sts front and 78-84-90 (96-102) sts back. When the work measures 22-24-26 (28-29) cm [8-⅝" - 9.5" - 10.25" (11" - 11-⅜")] knit Pattern 2 over the center 39 sts on the front (do not knit Pattern 2 on the back). At the same time, when the work measures 31-34-37 (39-40) cm [12.25" - 13-⅜" - 14.5" (15.25" - 15.75")], knit the next row as follows: bind off 1 st for armhole, work 77-83-89 (95-101) sts for the front, bind off 2 sts for armhole, work 76-82-88 (94-100) sts for the back, bind off 1 st for armhole. Knit the rest of the front and back separately. Front: = 77-83-89 (95-101) sts. Then bind off for armholes every other row: 2 sts 1-1-1 (2-2) times, dec 1 st 2 times = 69-75-81 (83-89) sts. After Pattern 2 continue knitting in stockinette st. When the work measures 45-49-54 (57-59) cm [17.75" - 19.25" - 21.25" (22.5" - 23.25")], bind off the center 29-29-31 (31-33) sts for the neck, and at the same time knit Pattern 3 on each side of the neck (be sure that the two sides are alike). Then bind off for the neck every other row: 2 sts 1 time, dec 1 st 2 times. Bind off all sts when the work measures 50-54-59 (62-64) cm [19.75" - 21.25" - 23.25" (24-⅜" - 25.25")]. Back: = 76-82-88 (94-100) sts. Bind off for armholes as on the front. When the work measures 45-49-54 (57-59) cm [17.75" - 19.25" - 21.25" (22.5" - 23.25")], knit Pattern 3. At the same time, when the work measures 48-52-57 (60-62) cm [18-⅞" - 20.5" - 22.5" (23-⅝" - 24-⅜")], bind off the center 34-34-36 (36-38) sts for the neck. Then dec 1 st at each neck edge on the next row. Bind off when the work measures 50-54-59 (62-64) cm [19.75" - 21.25" - 23.25" (24-⅜" - 25.25")]. Sleeves: Cast on 36-36-36 (36-48) sts on smaller double pointed needles; join and place a marker at the join. Knit Pattern 1 (approx. 10 cm [4"]). Change to larger double pointed needles, knit Pattern 3 (centering the pattern on the sleeve) and inc 4-4-8 (12-0) sts evenly distributed on the 1st row = 40-40-44 (48-48) sts. At the same time, after Pattern 1 inc 1 st each side of marker 18-20-22 (22-24) times: Size 3/4: alternately every and every 2nd row Sizes 5/6 + 7/8: every 2nd row Sizes 9/10 + 11/12: alternately every 2nd and 3rd row = 76-80-88 (92-96) sts (knit the increased sts into the pattern as you go along). When the work measures 23-27-30 (34-38) cm [9" - 10-⅝" - 11.75" (13-⅜" - 14-⅞")], bind off 3 sts each side of marker and knit the rest back and forth on needle. Then bind off on each side every other row: 4 sts 4 times, bind off all sts. The work measures approx. 27-31-34 (38-42) cm [10-⅝" - 12.25" - 13-⅜" (14-⅞" - 16.5")]. Assembly: Sew shoulder seams. Pick up approx. 80-96 sts around the neck on larger double pointed needles and knit 1 row stockinette st. At the same time knit 3 bobbles on each shoulder as follows: 1 bobble directly centered on the shoulder and 6 sts stockinette sts on each side to the next bobble (1 toward the front and 1 toward the back). Then purl 1 row, bind off. Crochet 1 row as follows: * 3 sc, ch 3, 1 sl st in the first ch st *. Sew on the sleeves. |
|||||||||||||||||||||||||||||||||||||
Diagram explanations |
|||||||||||||||||||||||||||||||||||||
|
|||||||||||||||||||||||||||||||||||||
 |
|||||||||||||||||||||||||||||||||||||
 |
|||||||||||||||||||||||||||||||||||||
 |
|||||||||||||||||||||||||||||||||||||
Have you finished this pattern?Tag your pictures with #dropspattern #whitebutterflysweater or submit them to the #dropsfan gallery. Do you need help with this pattern?You'll find 26 tutorial videos, a Comments/Questions area and more by visiting the pattern on garnstudio.com. © 1982-2026 DROPS Design A/S. We reserve all rights. This document, including all its sub-sections, has copyrights. Read more about what you can do with our patterns at the bottom of each pattern on our site. |
|||||||||||||||||||||||||||||||||||||


With over 40 years in knitting and crochet design, DROPS Design offers one of the most extensive collections of free patterns on the internet - translated to 17 languages. As of today we count 324 catalogs and 12290 patterns - 12280 of which are translated into English (US/in).
We work hard to bring you the best knitting and crochet have to offer, inspiration and advice as well as great quality yarns at incredible prices! Would you like to use our patterns for other than personal use? You can read what you are allowed to do in the Copyright text at the bottom of all our patterns. Happy crafting!
Post a comment to pattern DROPS Children 6-12
We would love to hear what you have to say about this pattern!
If you want to leave a question, please make sure you select the correct category in the form below, to speed up the answering process. Required fields are marked *.