
Popular categories
Looking for a yarn?


Comments / Questions (10)
![]() Katharine Gratton wrote:
Katharine Gratton wrote:
Can you tell me which yarn group Vivaldi belonged to? Thankyou.
07.11.2022 - 12:19DROPS Design answered:
Dear Mrs Gratton, sure, Vivaldi was yarn group C - you can replace Vivaldi with 2 strands Kid-Silk (see this lesson or with 1 strand Brushed Alpaca Silk. Happy knitting!
07.11.2022 - 16:05
![]() Kleine-König wrote:
Kleine-König wrote:
Guten Tag, ich würde gerne diese Jacke stricken. 1. Die angegeben Farbnummer von Drops Alpaka stimmt nicht mit der in der Anleitung angegeben überein....? 2. Welches Garn kann anstatt des Vivaldigarns genommen werden, da diese ja nicht mehr in Ihrem Sortiment ist? Mit freundlichen Grüßen Bärbel Kleine-König
09.08.2021 - 15:10DROPS Design answered:
Liebe Kleine-König, die Farbkarte von DROPS Alpaca wurde geändert, nach diese Anleitung veröffentlicht war (vor einigen Jahren schon), gerne wird Ihnen Ihr DROPS Laden damit helfen, die besten passenden Farben zu wählen - als Alternativ zu Vivaldi können Sie 2 Fäden Kid-Silk oder 1 Faden Brushed Alpaca Silk benutzen (siehe auch den Garnumrechner). Viel Spaß beim stricken!
09.08.2021 - 15:40
![]() Anna wrote:
Anna wrote:
Det står att på framstycket ska det vara 4 kantm mot mitt fram? lite senare står det fortsätt i släts samtidigt som den yttersta m mot mitt fram rätstickas.. Ska det vara 4 räta som framkant eller inte? Ser inte ut så på bilden.Kan ni förklara enkelt så jag förstår vad det ska vara i framkanten?
19.05.2014 - 22:10DROPS Design answered:
Hej Anna. De 4 förste masker mot mitt fram er stolpemasker (= kantmasker), men du skal kun strikke den yttersta m rät, resten strikker du i släss.
20.05.2014 - 16:56
![]() Chtikat wrote:
Chtikat wrote:
Bonjour, j'aimerai bien faire ce gilet mais je ne sais pas quelle taille faire, y a-t-il un endroit où il y a les mensurations correspondantes aux différentes tailles, je ne les ai pas trouvées ? Merci
23.12.2013 - 16:43DROPS Design answered:
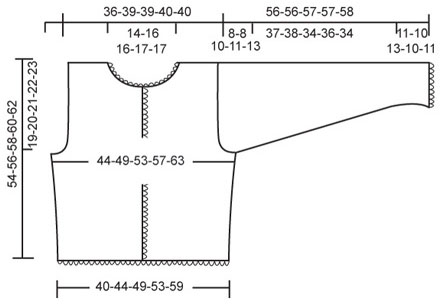
Bonjour Mme Chtikat, vous trouverez à la fin de chaque modèle un schéma avec les mesures pour chaque taille, ces indications pourront vous permettre de choisir votre taille pour chaque modèle de chaque catalogue (la mode évolue au fil des années et les tailles sont différentes d'un pays à l'autre). Bon tricot!
27.12.2013 - 13:19
![]() Mia wrote:
Mia wrote:
Tänkte nog fel, det väl bara sidan som ökas annars blir väl framkanten sned.
10.02.2013 - 20:40
![]() Mia wrote:
Mia wrote:
Hej, står det inte fel på höger framstycke om man stickar small =33m då kan det väl inte bli 36m efter ökningarna?
10.02.2013 - 20:01DROPS Design answered:
Jo du ökar 3 ggr i sidan (som på bakstycket) = 36 m.
11.02.2013 - 16:05
![]() Drops Design France wrote:
Drops Design France wrote:
Bonjour Nicole, la bordure au crochet masque un peu les 2 rangs point mousse tricotés au début du dos, des devants et en bas des manches.
01.02.2011 - 11:22Nicole wrote:
Bonjour, en tricotant ce modèle, je constate une différence entre les explications et la photo du modèle, elle consiste dans les mailles au point mousse au niveau des bordures qui sont inexistants sur la photo
01.02.2011 - 10:51
![]() Drops Design wrote:
Drops Design wrote:
Hej Gitte Tak for dit mail. De 4 kantm foran er de masker som overlapper hinanden midt foran med knap og knaphul. Hvis du tæller m vil du se at der er 4 m mere på hver forstykke i forhold til bagstykket. Disse 4 masker skal strikkes som der står i opskriften, altså i glat men den yderste m i retstrik. Venlige hilsner Garnstudio
07.06.2006 - 10:17
![]() gitte berg wrote:
gitte berg wrote:
vedr. forstykket. Der står anført at der skal slås masker op som er incl. 1 kantmaske i siden og 4 foran. Er en kantmaske ikke en maske der strikkes ret? Hvis det er det hvad betyder det så at der videre står "fortsæt i glatstrik samtidig med at den yderste maske mod midt for strikkes ret?
03.06.2006 - 23:39
|
|
DROPS 88-7 |
|
|
|
|
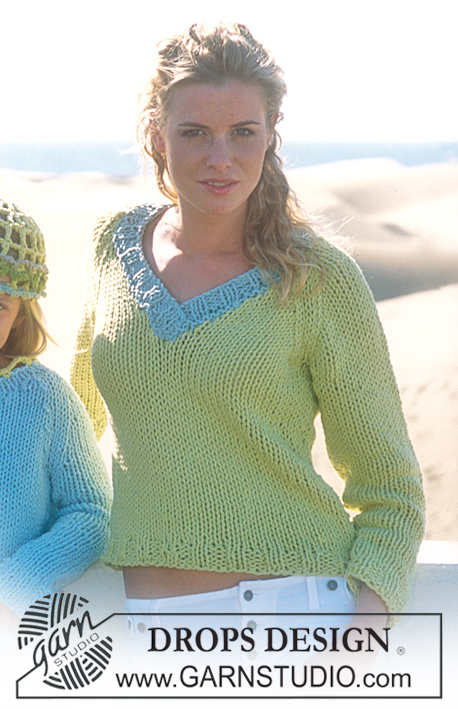
DROPS Cardigan in Alpaca and Vivaldi with crocheted edge and Brooch in Snow
DROPS 88-7 |
|
|
Gauge: 14 sts x 20 rows with 1 strand of each yarn (2 strands) in stockinette st = 10 x 10 cm. Knitting tips (for neck shaping): All decs are made on right side! Dec inside of 1 edge st in garter st as follows: After 1 edge st: Slip 1 st as if to knit, K 1, psso. Before 1 edge st: K 2 tog. Back: Cast on 58-64-70-76-84 sts with 1 strand each Alpaca and Vivaldi (= 2 strands). Knit 2 rows garter st and then continue in stockinette st. When the piece measures 10 cm/4" inc 1 st at each side every 10 cm/4" a total of 3 times = 64-70-76-82-90 sts. When the piece measures 35-36-37-38-39 cm/13¾"-14¼"-14½"-15"-15¼" bind off for armhole at each side every other row: 3 sts 1 time, 2 sts 1-1-2-3-4 times and 1 st 2-3-4-4-6 times = 50-54-54-56-56 sts. When the piece measures 50-52-54-56-58 cm/19¾"-20½"-21¼"-22"-22¾" knit 2 rows with garter st over the center 18-20-20-22-22 sts (knit the other sts in stockinette st as before). Then bind off the center 16-18-18-20-20 sts for the neck. Keep 1 st at neck edge in garter st and dec 1 st at each neck edge every other row – see knitting tips above – 2 times = 15-16-16-16-16 sts remain on each shoulder. Bind off when the piece measures 54-56-58-60-62 cm/21¼"-22"-22¾"-23½"-24½". Right front: Cast on 33-36-39-42-46 sts with 1 strand each Alpaca and Vivaldi (= 2 strands). Knit 2 rows garter st and then continue in stockinette st, keeping the 4 outermost sts at the center front edge in garter st until neck shaping begins. When the piece measures 10 cm/4" inc at the side as on back = 36-39-42-45-49 sts. When the piece measures 35-36-37-38-39 cm/13¾"-14¼"-14½"-15"-15¼" bind off for armhole at the side as on back = 29-31-31-32-32 sts. When the piece measures 45-46-48-49-51 cm/17¾"-18"-19"-19¼"-20" knit 2 rows with garter st over the outermost 10-11-11-12-12 sts at the center front edge. Then bind off 9-10-10-11-11 sts at center front edge for neck. Keep the outermost st at neck edge in garter st and dec 1 st at neck edge every other row – see knitting tips above: 5 times = 15-16-16-16-16 sts remain on shoulder. Continue until piece measures 54-56-58-60-62 cm/21¼"-22"-22¾"-23½"-24½". Bind off. Left front: Cast on and knit the same as the right, reversing shaping. Sleeve: Cast on 32-34-36-36-38 sts with 1 strand each Alpaca and Vivaldi (= 2 strands). Knit 2 rows garter st and then continue in stockinette st, decreasing 6 sts evenly distributed on the 1st row = 26-28-30-30-32 sts. When the piece measures 11-10-13-10-11 cm/4½"-4"-5⅛"-4"-4½" inc 1 st at each side every 3-3-2.5-2.5-2 cm a total of 12-13-13-15-16 times = 50-54-56-60-64 sts. When sleeve measures 48-48-47-47-45 cm/19"-19"-18½"-18½"-17¾" bind off for sleeve cap at each side every other row: 3 sts 1 time, 2 sts 2-2-2-2-3 times and 1 st 2-2-4-5-6 times, then bind off 2 sts at each side until the piece measures 55-55-56-56-57 cm/21½"-21½"-22"-22"-22½", then bind off 3 sts 1 time at each side. Bind off the remaining sts, the piece measures approx. 56-56-57-57-58 cm/22"-22"-22½"-22½"-22¾". Assembly: Sew shoulder seams. Crocheted edge: Crochet loosely with Snow around lower edge of the sleeves and around entire edge of body (begin at center back lower edge, up along right front, around the back of the neck, down along left front and along bottom edge to center back). Crochet as follows: 1 sc in first st, * ch 4, skip over approx. 1.5 - 2 cm/½", 1 sc in the next st *, repeat from * - * and finish with ch 4 and 1 sl st in first sc at start of row. Sew in sleeves. Sew sleeve and side seams using edge sts as a seam allowance. Sew on buttons evenly distributed (use the crocheted edge as buttonholes). Crocheted blossom: Ch 17 loosely with Snow. Turn piece and crochet back as follows: in 2nd and 3rd ch: 3 sc in each ch. in 4th through 8th ch: 3 hdc in each ch in 9th through 13th ch: 3 dc in each ch in 14th through 16th ch: 3 tr in each ch in 17th ch: 5 tr. Cut yarn and fasten. Wrap spiral together into a blossom and fasten together with a small st. Crochet 2 flowers and sew to left side of sweater. |
|
 |
|
Have you finished this pattern?Tag your pictures with #dropspattern or submit them to the #dropsfan gallery. Do you need help with this pattern?You'll find 25 tutorial videos, a Comments/Questions area and more by visiting the pattern on garnstudio.com. © 1982-2026 DROPS Design A/S. We reserve all rights. This document, including all its sub-sections, has copyrights. Read more about what you can do with our patterns at the bottom of each pattern on our site. |


With over 40 years in knitting and crochet design, DROPS Design offers one of the most extensive collections of free patterns on the internet - translated to 17 languages. As of today we count 324 catalogs and 12291 patterns - 12281 of which are translated into English (US/in).
We work hard to bring you the best knitting and crochet have to offer, inspiration and advice as well as great quality yarns at incredible prices! Would you like to use our patterns for other than personal use? You can read what you are allowed to do in the Copyright text at the bottom of all our patterns. Happy crafting!
Post a comment to pattern DROPS 88-7
We would love to hear what you have to say about this pattern!
If you want to leave a question, please make sure you select the correct category in the form below, to speed up the answering process. Required fields are marked *.