
Popular categories
Looking for a yarn?


Comments / Questions (17)
![]() Kerstin Liljegren wrote:
Kerstin Liljegren wrote:
Hej, stämmer verkligen beskrivningen på oket? Jag kan inte få det till 8 ökade maskor på första ökningsvarvet. Jag upplever det som att det fattas markörer för raglan, men får inte ihop det.
05.05.2026 - 21:38DROPS Design answered:
Hej Kerstin, när du kommer till OK, sätter du 4 markörer (1 vid varje raglanmaska). Du ökar på varje sida om de 4 maskorna enligt VARV 2 från rätsidan, det blir totalt 8 ökade maskor :)
06.05.2026 - 08:53
![]() Andrea wrote:
Andrea wrote:
Liebes Drops Team Ich komme am Schlusd Bindeband und Rumpfteilabnahme nicht klar. Wie muss ich am Rumpfteil abnehmen? Und check ich das richtig dass zugleich an einem Vorderteil auch abgenommen wird. Sorry ist mir absolut nicht klar. Herzlichrn Dank für eure Hilfe. Lg
25.04.2026 - 09:35DROPS Design answered:
Liebe Andrea, am Ende Rumfpteil haben Sie 221-353 Maschen stillgelegt, jetzt stricken Sie den Bindeband über 17 Maschen bis er ca 55-85 cm misst. Dann wird man die letzte Masche der Hinreihe zusammen mit der 1. Masche vom linken Vorderteil zusammenstricken (Reihe 1), dann die 2. Reihe /Rückreihe stricken und so immer wiederholen: bei jeder Hinreihe die letzte Masche vom Band zusammen mit der nächste stillgelegten Maschen vom Rumpfteil (zuerst vom linken Vorderteil, dann Rückenteil und rechten Vorderteil) stricken. Wenn alle Maschen vom Rumpfteil gestrickt wurden, dann den Band ca 55-85 cm noch stricken. Kann das Ihnen helfen? Viel Spaß beim Stricken!
27.04.2026 - 08:14
![]() Siv wrote:
Siv wrote:
Hei. Er oppskriften riktig på båndet? Dobbelstrikk slik det er beskrevet får jeg ikke til å se slik ut som på bildet.
31.03.2026 - 21:08DROPS Design answered:
Hei Siv. Ja, oppskriften er riktig, man skal få et knytebånd som er dobbeltstrikket (glattstrikk på begge sider) som man ser på bildet. Hvordan blir ditt resultat? mvh DROPS Design
07.04.2026 - 10:38
![]() Michèle wrote:
Michèle wrote:
Bonjour j'ai tricoté le lien de 75 cm mais je ne comprends pas comment le relier au bas du gilet. Pouvez-vous m'expliquer comment tricoter la dernière maille du lien avec la maille suivante du bas du gilet? Merci beaucoup de votre aide
30.03.2026 - 17:56DROPS Design answered:
Bonjour Michèle, sur l'endroit, vous tricoterez la dernière des 17 mailles avec la 1ère des mailles en attente (tricotez ces 2 mailles ensemble torse à l'endroit), tournez et tricotez les 17 m rang suivant sur l'envers comme avant. Tournez et tricotez la dernière des 17 m sur l'endroit avec la maille suivante en attente (tricotez ces 2 m ensemble torse à l'endroit), tournez et tricotez les 17 m sur l'envers comme avant. Continuez ainsi jusqu'à ce que toutes les mailles en attente aient été tricotées ensemble avec la dernière des 17 mailles de la bordure/du lien. Bon tricot!
07.04.2026 - 14:25
![]() Migcha wrote:
Migcha wrote:
Bonjour je me permet de soumettre une suggetinons d'améliorations si possible. Dans la section commentaire/Questions , il serait bien de pouvoir filtrer les différents questions et répoinses obtenues par choix de langue pour pour cibler plus rapidement les communications dans la langue de notre choix sans défiler toute les pages. Merci pour votre bon service et très beaux patrons!
28.03.2026 - 03:01DROPS Design answered:
Bonjour Migcha et merci pour votre retour et fidélité. Un filtre de ce type serait relativement compliqué à instaurer car le drapeau choisi pour le pays ne correspond pas forcément à la langue parlée dans le commentaire, d'où une certaine difficulté à créer un tel filtre. Merci pour votre compréhension. Rappelez-vous que vous pouvez poser votre question à tout moment, nous ferons notre maximum pour vous aider. Bon tricot!
07.04.2026 - 08:46
![]() Christiane wrote:
Christiane wrote:
Ich habe jetzt das Bindeband gesttickt und verstfhe nicht wie das zweite Bindeband entsteht Können sie mir helfen?
10.03.2026 - 06:14DROPS Design answered:
Liebe Christiane, wenn das 1. Bindeband fertig ist, wird man es mit dem stillgelegten Maschen von der unteren Kante der Jacke (= Rumpfteil) stricken, dann wenn das Bindeband mit allen Maschen gestrickt wurde, strickt man die 17 Maschen vom Bindeband bis es 55-85 cm misst. Viel Spaß beim Stricken!
10.03.2026 - 14:40
![]() Silvia wrote:
Silvia wrote:
Bei mir ist die nächste Reihe nach der Maschenaufnahme aus der Blende eine Rückreihe. In der Beschreibung steht, die 1. Reihe ist eine Hinreihe? Wird hier die Seite gewechselt?
06.03.2026 - 12:18DROPS Design answered:
Liebe Silvia, ich habe Ihren Kommentar unserer Designerinnen weitergeleitet, ich würde aber einfach eine Rückreihe stricken = die BlendenMaschen wie zuvor und die neuen Maschen dazwischen links. Viel Spaß beim Stricken!
06.03.2026 - 16:44
![]() Mäenpää Sirpa wrote:
Mäenpää Sirpa wrote:
Solmimisnauhan kiinnittäminen neuleeseen ongelma
02.03.2026 - 13:34
![]() Mäenpää Sirpa wrote:
Mäenpää Sirpa wrote:
Neuletaanko etukappaleet yhteen alareunasta puseroksi vai onko malli villatakkimalli. Solmimisnauhan kiinnitys epäselvä
01.03.2026 - 20:24DROPS Design answered:
Aluksi etureunat neulotaan erikseen, sitten etureunat yhdistetään ja samalla poimitaan silmukat kaarroketta varten. Kaarroke neulotaan tasona. Jakku on edestä auki.
02.03.2026 - 18:51
![]() Sirpa wrote:
Sirpa wrote:
Kuinka solmimisnauha liitetään muehustaan Neulotaanko kaksi solmimisnauhaa
01.03.2026 - 18:29DROPS Design answered:
Hei, solmimisnauhan silmukat yhdistetään miehustan silmukoihin. Neulo aina solmimisnauhan viimeinen silmukka ja miehustan seuraava silmukka yhteen ohjeen mukaan. Aluksi neulotaan solmimisnauhan ensimmäinen puolikas, nauha yhdistetään miehustaan ja sitten neulotaan nauhan toinen puolikas.
02.03.2026 - 18:46
|
|
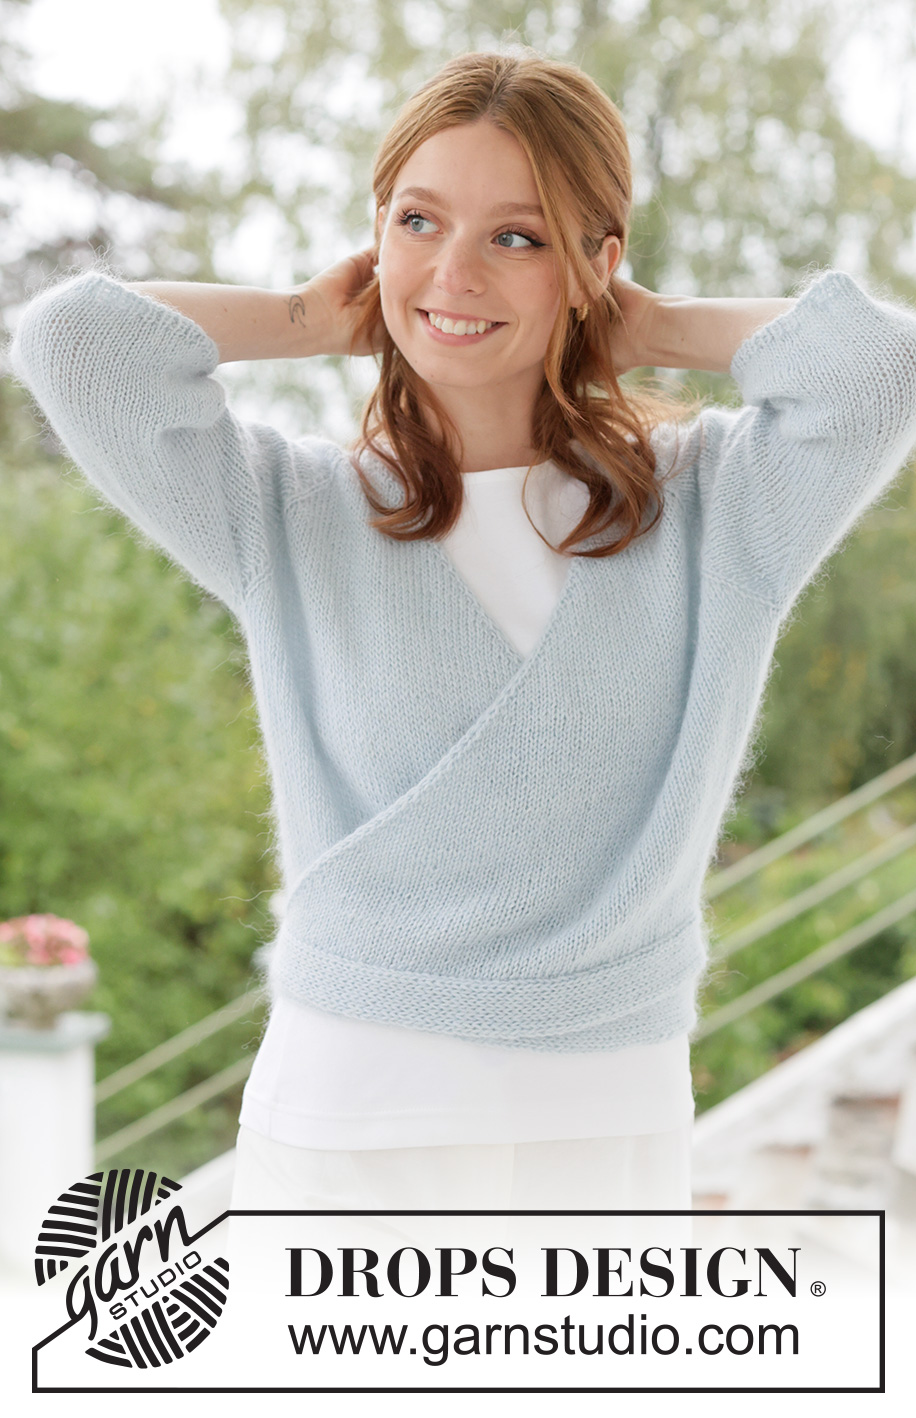
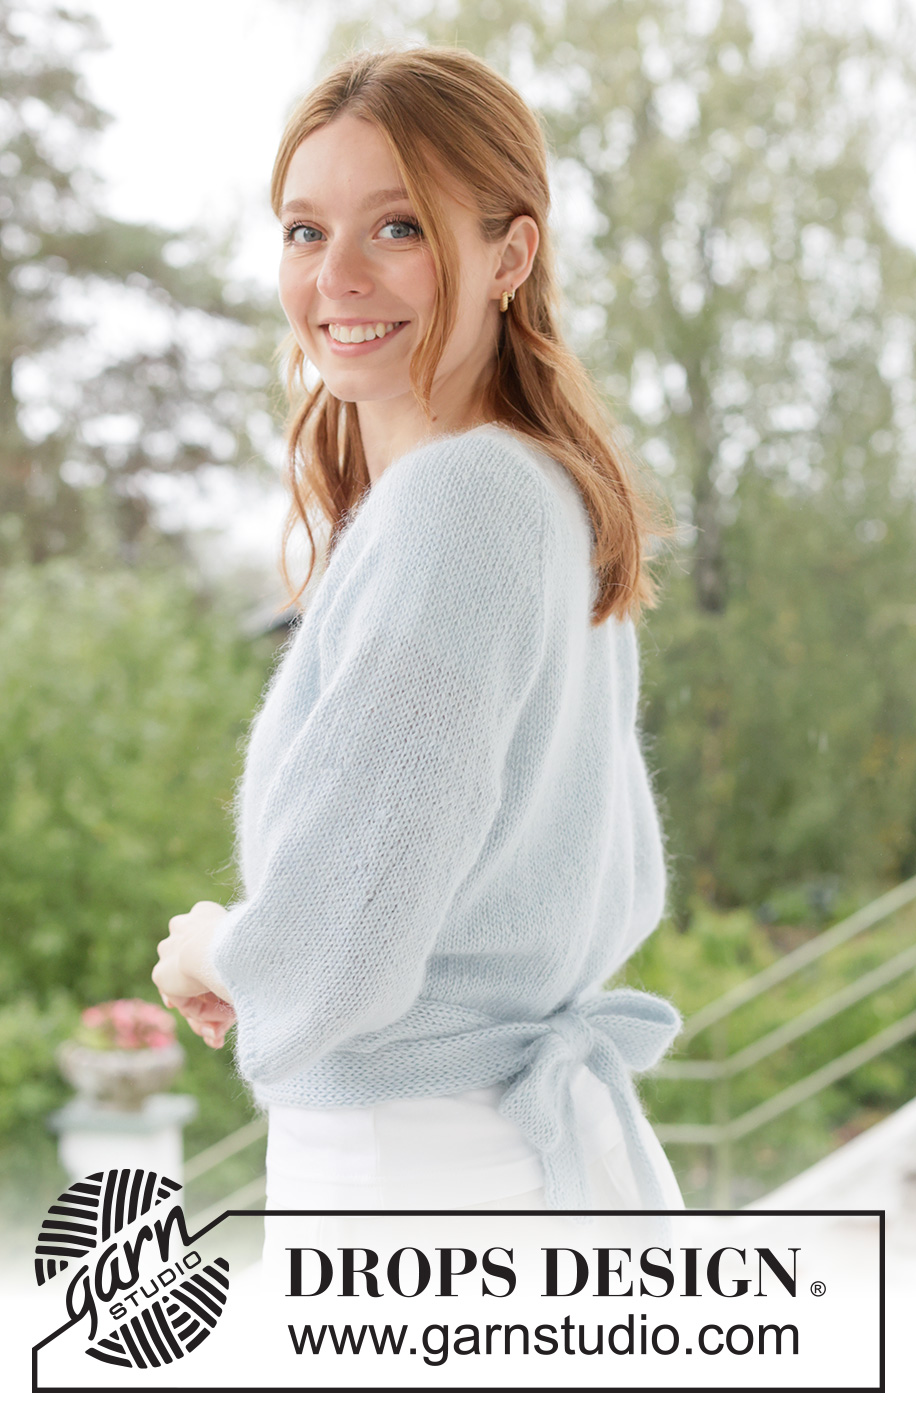
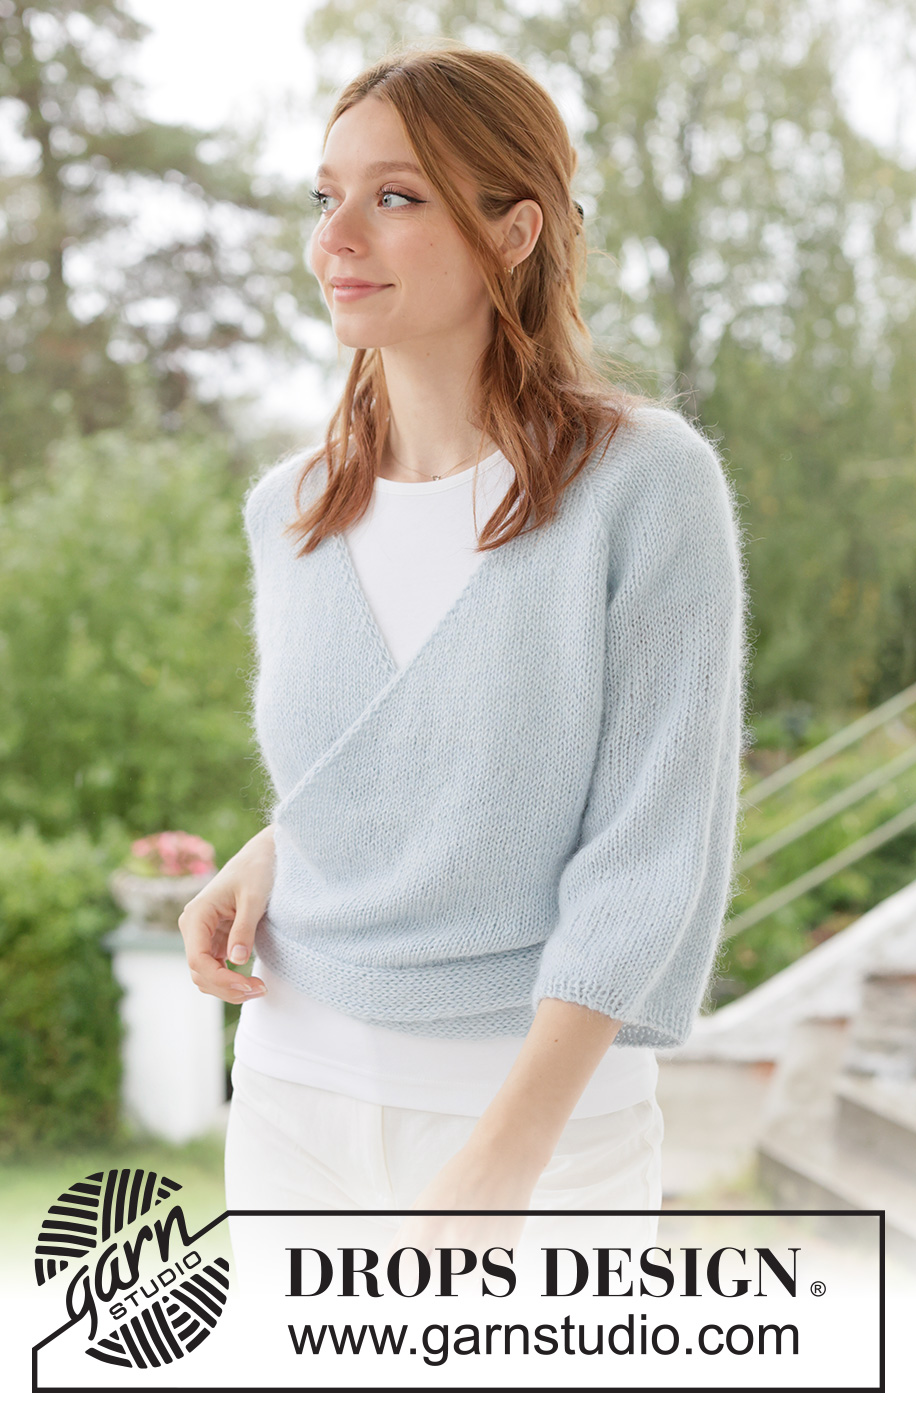
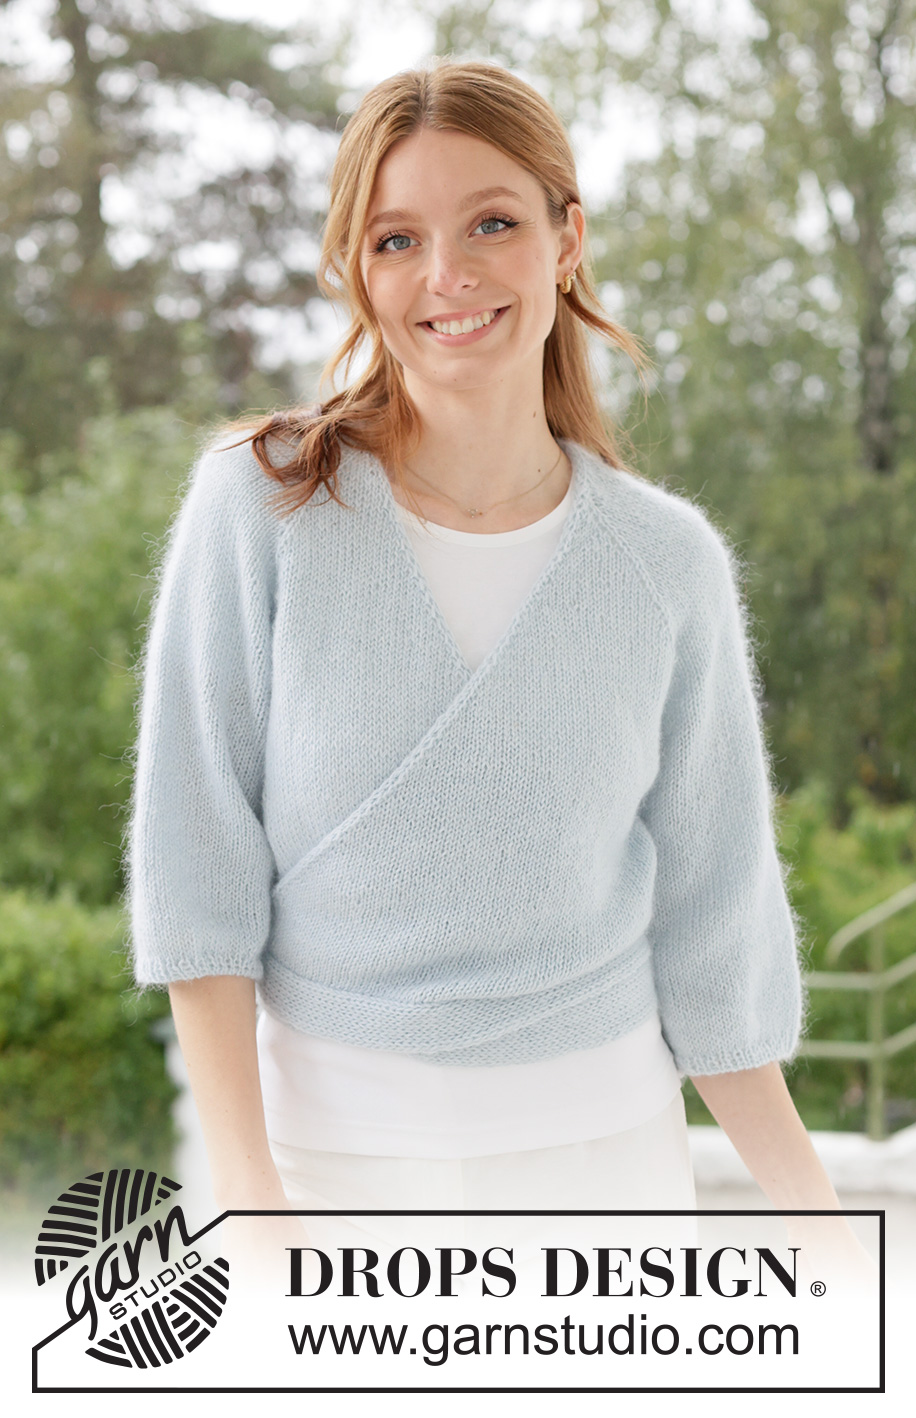
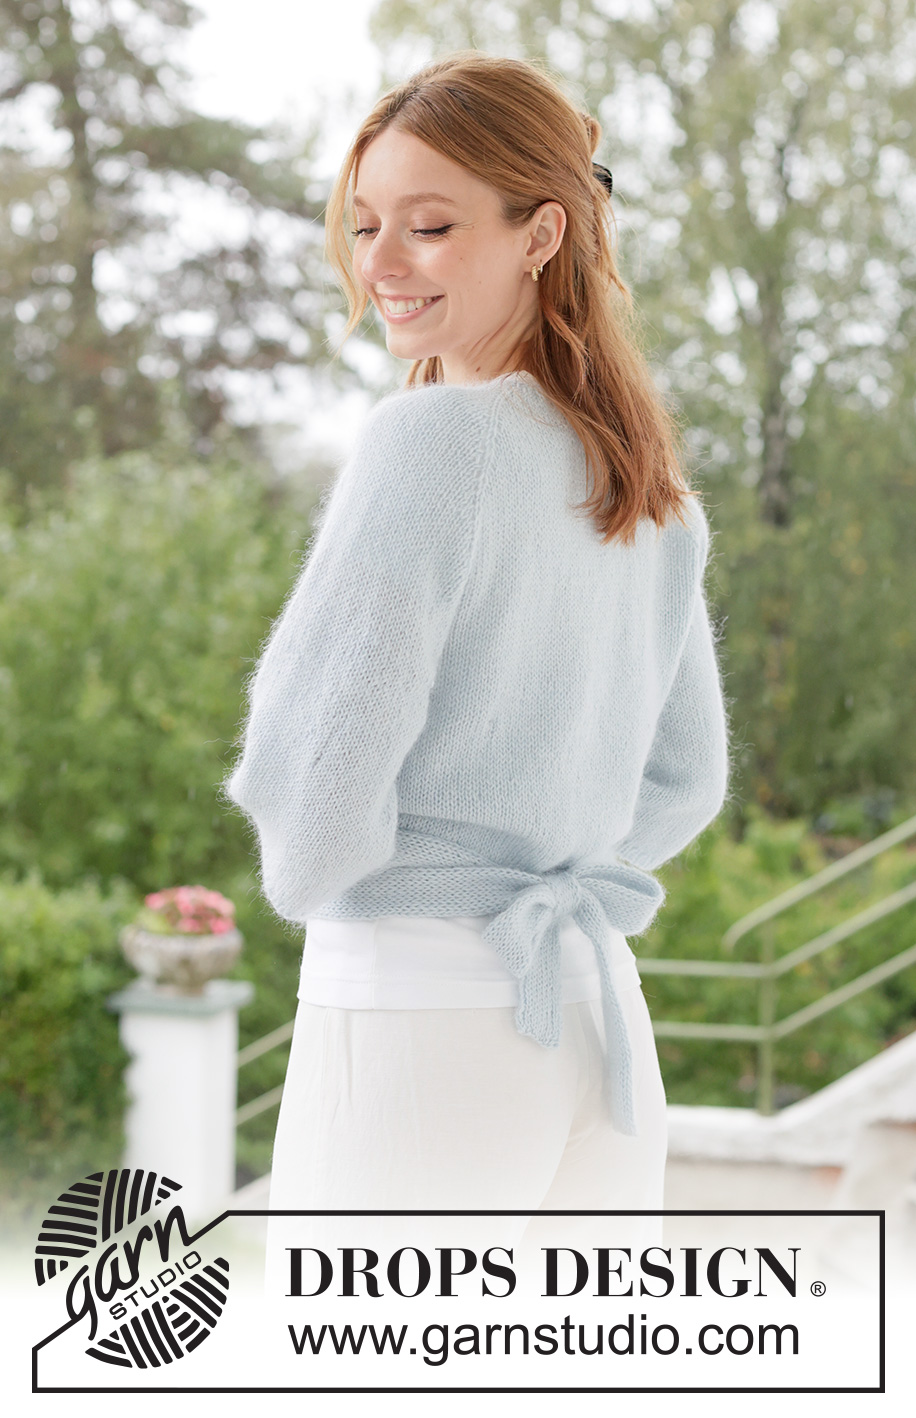
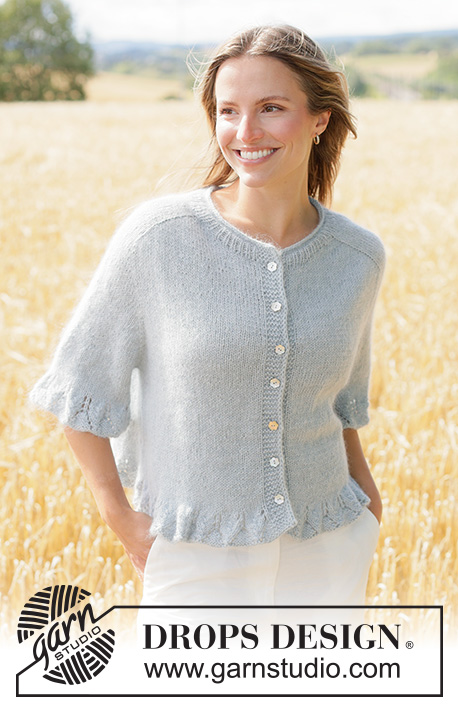
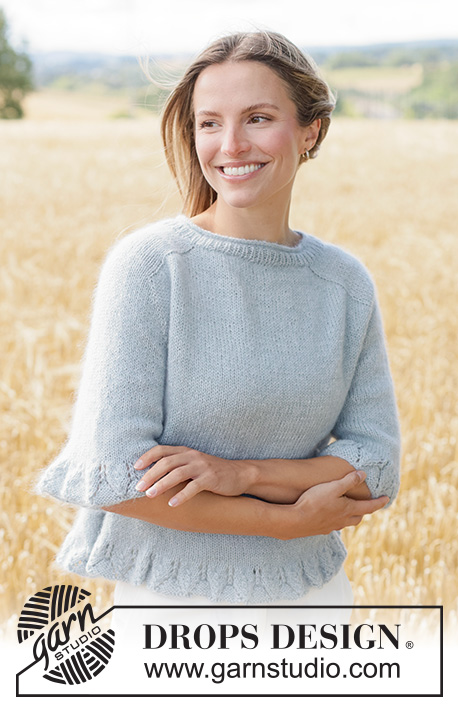
Icy Ballerina Wrap#icyballerinawrap |
|
 |
 |
Knitted jacket in DROPS Flora and DROPS Kid-Silk or DROPS Alpaca and DROPS Kid-Silk. The piece is worked top down with wrap-around, raglan and I-cord. Sizes XS - XXXL.
DROPS 266-3 |
|
|
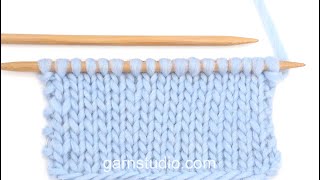
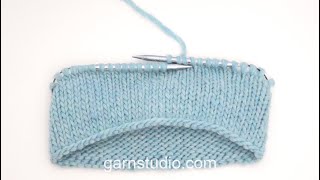
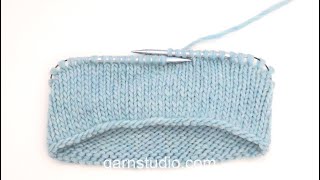
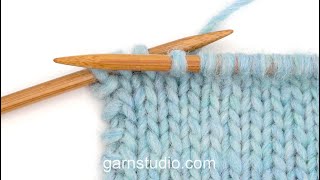
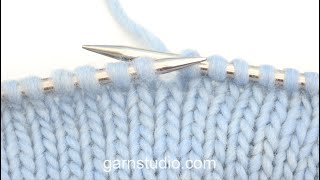
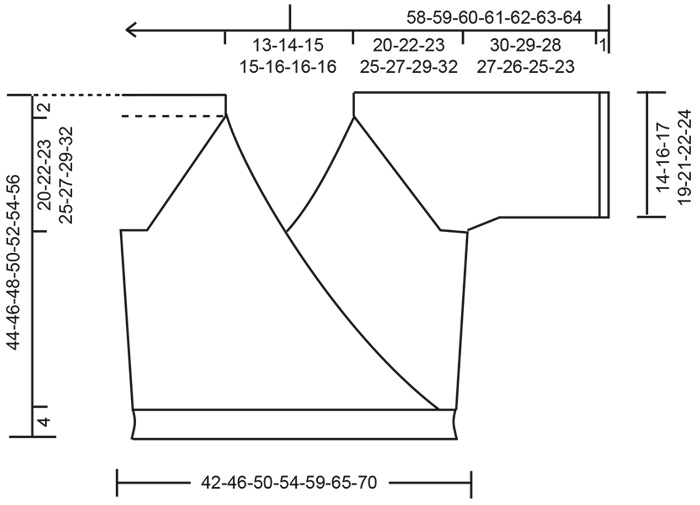
------------------------------------------------------- EXPLANATIONS FOR THE PATTERN: ------------------------------------------------------- GARTER STITCH: Knit all rows, from both the right and wrong side. 1 ridge in height = knit 2 rows. 2 STITCHES I-CORD: BEGINNING OF ROW: Slip 1 stitch purl-wise with the strand in front, knit 1. END OF ROW: Work until there are 2 stitches left on the row, slip 1 stitch purl-wise with the strand in front, knit 1. Continue like this from both the right and wrong side. RAGLAN: All increases are worked from the right side! Increase 1 stitch by making 1 yarn over, which is worked as follows on the next row: BEFORE MARKER (yarn over twists to the left): Purl through the stitch loop that lies on the back of the needle (avoids a hole). AFTER MARKER (yarn over twists to the right): Slip the yarn over from the left needle to the right needle purl-wise, then replace it by inserting the left needle through the back (the yarn over is the other way round). Purl through the stitch loop that lies on the front of the needle (avoids a hole). Continue the new stitches in stockinette stitch. WRAP-AROUND: All increases are worked from the right side! Increase 1 stitch by making 1 yarn over, which is worked as follows on the next row: BEGINNING OF ROW (yarn over twists to the right): Slip the yarn over from the left needle to the right needle purl-wise, then replace it by inserting the left needle through the back (the yarn over is the other way round). Purl through the stitch loop that lies on the front of the needle (avoids a hole). Continue the new stitches in stockinette stitch. END OF ROW (yarn over twists to the left): Purl through the stitch loop that lies on the back of the needle (avoids a hole). Continue the new stitches in stockinette stitch. SLEEVE TIP: When knitting up stitches under the sleeve, you can get a small hole in the transition between stitches on the body and sleeve. This hole can be closed by picking up the strand between 2 stitches and working this strand twisted together with the first stitch between body and sleeve. DECREASE TIP: Decrease 1 stitch on each side of the marker-thread as follows: Work until there are 4 stitches left before the marker-thread, knit 2 together, knit 4 (marker-thread sits in the middle of these 4 stitches), slip 1 stitch knit-wise, knit 1 and pass the slipped stitch over the knitted stitch (2 stitches decreased). ------------------------------------------------------- START THE PIECE HERE: ------------------------------------------------------- JACKET – SHORT OVERVIEW OF THE PIECE. The pattern uses both long and short needles; start with the length which fits the number of stitches and change when necessary. First the bands are worked back and forth, then stitches are knitted up for the yoke along each band. The neck and yoke are worked back and forth with circular needle, from mid front and top down, while increasing for raglan and the wrap-around. When the yoke is finished, it is divided for body and sleeves and the body continued back and forth, while the sleeves wait. The sleeves are worked in the round, top down. A tie-band is worked back and forth in double knit to finish. If there is a «0» in your chosen size, skip the information and go straight to the next instruction. RIGHT BAND WITH I-CORD: Cast on 4 stitches with double pointed needles size 4 MM = US 6, DROPS Kid-Silk and DROPS Flora or DROPS Kid-Silk and DROPS Alpaca (2 strands). Work as follows: RIGHT SIDE: 1 GARTER STITCH, knit 1, work 2 STITCHES I-CORD – read explanations above. WRONG SIDE: Work 2 stitches I-cord, purl 1, 1 garter stitch. Repeat these rows until the band measures 10½-11-11½-11½-12-12-12 cm = 4⅛"-4⅜"-4⅝"-4⅝"-4¾"-4¾"-4¾", with the last row from the wrong side. Cut the strand and place the stitches on a stitch holder. LEFT BAND WITH I-CORD: Knit up 4 stitches along the cast-on edge on the right band with double pointed needles and 1 strand of each quality (2 strands), making sure to match the garter stitches and I-cord onwards from the right band. Stitches will later be knitted up inside the 1 garter stitch for the yoke. Work as follows: RIGHT SIDE: Work 2 stitches I-cord, knit 1, 1 garter stitch. WRONG SIDE: Work 1 garter stitch, purl 1 and 2 stitches I-cord. Repeat these rows until the band measures 10½-11-11½-11½-12-12-12 cm = 4⅛"-4⅜"-4⅝"-4⅝"-4¾"-4¾"-4¾", with the last row from the wrong side. The whole band measures 21-22-23-23-24-24-24 cm = 8¼"-8¾"-9"-9"-9½"-9½"-9½", with the join mid-back. Now knit up stitches along the band, inside the 1 garter stitch and from the right side, as follows: Work 2 stitches I-cord, slip 1 stitch knit-wise, knit 1, pass the slipped stitch over (= 3 band-stitches), knit up 45-47-49-49-51-51-51 stitches along the band, with equal numbers of stitches on each side of the cast-on edge mid-back, then work across the right band as follows: knit 2 together, work 2 stitches I-cord (= 3 band- stitches) = 51-53-55-55-57-57-57 stitches. YOKE: Insert 4 markers, without working the stitches and inserting each marker in a stitch (the raglan-stitches) and you increase for raglan on each side of the raglan-stitches). Count 3 stitches (= left front piece), insert marker-1 in the next stitch, count 9 stitches (= sleeve), insert marker-2 in the next stitch, count 23-25-27-27-29-29-29 stitches (= back piece), insert marker-3 in the next stitch, count 9 stitches (= sleeve), insert marker-4 in the next stitch. There are 3 stitches left (= right front piece). Continue stockinette stitch back and forth with 2 stitches I-cord on each side, while increasing for RAGLAN on each side of the raglan-stitches every 2nd row and increasing for the WRAP-AROUND inside 3 stitches on each side every 4th row – read explanations above describing how to increase. ROW 1 (wrong side): Purl with 2 stitches I-cord on each side as before. ROW 2 (right side): Work 2 stitches I-cord, knit until there are 2 stitches left on the row, increasing for raglan on each side of all the raglan-stitches, finish with 2 stitches I-cord (8 increased stitches). ROW 3 (wrong side): Purl with 2 stitches I-cord on each side (remember to work the yarn overs as described under RAGLAN). ROW 4 (right side): Work 2 stitches I-cord, knit 1, increase 1 stitch for the wrap-around, knit until there are 3 stitches left on the row, increasing for raglan on each side of all the raglan-stitches, increase 1 stitch for the wrap-around, knit 1, work 2 stitches I-cord (10 increased stitches; 2 for the wrap-around and 8 for raglan). ROW 5 (wrong side): Purl with 2 stitches I-cord on each side (remember to work the yarn overs as described under raglan and wrap-around). Work ROWS 2 to 5 a total of 3 times (12 rows worked) = 105-107-109-109-111-111-111 stitches. A total of 3 increases in height for the wrap-around and 6 increases in height for raglan. Remember to maintain the knitting gauge. Now increase for both raglan and the wrap-around every 2nd row: ROW 1 (right side): Work 2 stitches I-cord, knit 1, increase 1 stitch for the wrap-around, knit until there are 3 stitches left on the row, increasing for raglan on each side of all the raglan-stitches, increase 1 stitch for the wrap-around, knit 1, work 2 stitches I-cord (10 increased stitches; 2 for the wrap-around and 8 for raglan). ROW 2 (wrong side): Purl with 2 stitches I-cord on each side (remember to work the yarn overs as described under raglan and wrap-around). Work ROWS 1 and 2 a total of 18-20-22-24-25-25-26 times (36-40-44-48-50-50-52 rows worked) = 285-307-329-349-361-361-371 stitches. A total of 21-23-25-27-28-28-29 increases in height for the wrap-around and 24-26-28-30-31-31-32 increases in height for raglan. Now only increase for raglan on the front and back pieces (do not increase across the sleeves) as well as increasing for the wrap-around every 2nd row: ROW 1 (right side): Work 2 stitches I-cord, knit 1, increase 1 stitch for the wrap-around, knit until there are 3 stitches left on the row, while increasing for raglan before 1st and 3rd raglan stitch and after 2nd and 4th raglan stitch, increase 1 stitch for the wrap-around, knit 1, work 2 stitches I-cord (6 increased stitches; 2 for the wrap-around and 4 for raglan). ROW 2 (wrong side): Purl with 2 stitches I-cord on each side (remember to work the yarn overs as described under raglan and wrap-around). Work ROWS 1 and 2 a total of 1-1-1-1-2-5-8 times (2-2-2-2-4-10-16 rows worked) = 291-313-335-355-373-391-419 stitches. A total of 22-24-26-28-30-33-37 increases in height for the wrap-around and 24-26-28-30-31-31-32 increases for raglan on the sleeves and 25-27-29-31-33-36-40 increases in height for raglan on the front and back pieces. The yoke measures approx. 20-22-23-25-27-29-32 cm = 8"-8¾"-9"-9¾"-10⅝"-11⅜"-12½" from mid-back. Now divide for the body and sleeves. DIVIDE FOR BODY AND SLEEVES: Divide and continue increasing for the wrap-around as follows: Work 2 stitches I-cord, work 1 stockinette stitch, increase 1 stitch for the wrap-around, work 48-52-56-60-64-70-78 stockinette stitches (includes marker-stitch-1 = front piece), place the next 57-61-65-69-71-71-73 stitches on a stitch holder for the sleeve, cast on 4-6-8-12-16-20-22 stitches (mid-under the sleeve), work 75-81-87-91-97-103-111 stockinette stitches (from marker-stitch-2 up to and including marker-stitch-3 = back piece), place the next 57-61-65-69-71-71-73 stitches on a stitch holder for the sleeve, cast on 4-6-8-12-16-20-22 stitches (mid-under the sleeve), work 48-52-56-60-64-70-78 stockinette stitches (3 stitches left), increase 1 stitch for the wrap-around, work 1 stockinette stitch and 2 stitches I-cord (= front piece). The body and sleeves are finished separately. BODY: = 187-205-223-243-265-291-319 stitches. Insert 1 marker-thread in the middle of the 4-6-8-12-16-20-22 cast-on stitches under each sleeve. Allow these threads to follow your work onwards, they are used when decreasing each side of the body. Continue stockinette stitch with 2 stitches I-cord on each side while increasing for the wrap-around every 2nd row as before (2 increased stitches on each increase-row). When the body measures 4 cm = 1½" from the division, decrease 1 stitch on each side of both marker-threads – read DECREASE TIP (4 decreased stitches). Decrease like this every 5 cm = 2" a total of 3 times (12 decreased stitches). When the decreases are finished, continue stockinette stitch with 2 stitches I-cord on each side while increasing for the wrap-around every 2nd row as before until the piece measures 38-40-42-44-46-48-50 cm = 15"-15¾"-16½"-17¼"-18"-19"-19¾" from mid-back = 221-239-259-279-301-327-353 stitches. Leave the stitches on the needle. Work a tie-band which will be worked into these stitches. TIE-BAND: Cast on 17 stitches with double pointed needles size 4 MM = US 6 and 1 strand of each quality (2 strands). Work double knit as follows back and forth: ROW 1: * Knit 1, slip 1 stitch purl-wise with the strand in front *, work from *-* until there is 1 stitch left, knit 1. ROW 2: * Slip 1 stitch purl-wise with the strand in front, knit 1 *, work from *-* until there is 1 stitch left, slip 1 stitch purl-wise with the strand in front. Repeat ROWS 1 and 2 until the cord measures 55-60-65-70-75-80-85 cm = 21⅝"-23⅝"-25½"-27½"-29½"-31½"-33½". Stretch the cord slightly before measuring. Finish after row 2. Now work this band into the body, working the last stitch on tie-band together with the next stitch on body, starting with left front piece and continuing as follows: ROW 1: * Knit 1, slip 1 stitch purl-wise with the strand in front *, work from *-* until there is 1 stitch left, knit this stitch twisted together with the first stitch on the body (1 stitch on the body decreased). Turn. ROW 2: * Slip 1 stitch purl-wise with the strand in front, knit 1 *, work from*-* until there is 1 stitch left, slip 1 stitch purl-wise with the strand in front. Repeat ROWS 1 and 2 until all the body-stitches are bind off. Continue double knit as before back and forth across the cord until it is of equal length on the other side = 55-60-65-70-75-80-85 cm = 21⅝"-23⅝"-25½"-27½"-29½"-31½"-33½". Bind off. The band measures approx. 4 cm = 1½" in width. The jacket measures approx. 42-44-46-48-50-52-54 cm = 16½"-17¼"-18"-19"-19¾"-20½"-21¼" from mid-back and 44-46-48-50-52-54-56 cm = 17¼"-18"-19"-19¾"-20½"-21¼"-22" from the shoulder. SLEEVES: Place the 57-61-65-69-71-71-73 sleeve-stitches from one stitch holder onto circular needle size 4 MM = US 6 and knit up 1 stitch in each of the 4-6-8-12-16-20-22 cast-on stitches under the sleeve – read SLEEVE TIP = 61-67-73-81-87-91-95 stitches. Insert a marker-thread in the middle of the 4-6-8-12-16-20-22 new stitches under the sleeve. The round starts by the marker-thread. Work stockinette stitch in the round. AT THE SAME TIME, when the sleeve measures 1 cm = ⅜" from the division, decrease mid-under the sleeve – remember DECREASE TIP as follows: Decrease 2 stitches every 2nd round 3-3-4-4-4-3-2 times = 55-61-65-73-79-85-91 stitches. Continue working until the sleeve measures 30-29-28-27-26-25-23 cm = 11¾"-11⅜"-11"-10⅝"-10¼"-9¾"-9" from the division. Work 3 rounds of rib (knit 1, purl 1), decreasing 1 stitch on the first round = 54-60-64-72-78-84-90 stitches. Bind off with rib. The sleeve measures approx. 31-30-29-28-27-26-24 cm = 12¼"-11¾"-11⅜"-11"-10⅝"-10¼"-9½" from the division. |
|
 |
|
Have you finished this pattern?Tag your pictures with #dropspattern #icyballerinawrap or submit them to the #dropsfan gallery. Do you need help with this pattern?You'll find 39 tutorial videos, a Comments/Questions area and more by visiting the pattern on garnstudio.com. © 1982-2026 DROPS Design A/S. We reserve all rights. This document, including all its sub-sections, has copyrights. Read more about what you can do with our patterns at the bottom of each pattern on our site. |
|


With over 40 years in knitting and crochet design, DROPS Design offers one of the most extensive collections of free patterns on the internet - translated to 17 languages. As of today we count 325 catalogs and 12298 patterns - 12288 of which are translated into English (US/in).
We work hard to bring you the best knitting and crochet have to offer, inspiration and advice as well as great quality yarns at incredible prices! Would you like to use our patterns for other than personal use? You can read what you are allowed to do in the Copyright text at the bottom of all our patterns. Happy crafting!
Post a comment to pattern DROPS 266-3
We would love to hear what you have to say about this pattern!
If you want to leave a question, please make sure you select the correct category in the form below, to speed up the answering process. Required fields are marked *.