
Popular categories
Looking for a yarn?


Comments / Questions (23)
![]() Denise Sealey wrote:
Denise Sealey wrote:
I’m knitting the XS size. Sleeve states: From division knit 1cm (2 rows), then decrease 2 stitches every 2nd row a total of 2 times (total 6 rows) so my work measures approx 3cm then the pattern states decrease 3 stitches every 12cm for a total of 3 times which adds another 36cm to make a total of 39cm However, the pattern then says to continue working until sleeve measures 34cm Please advise!
15.03.2026 - 17:26DROPS Design answered:
Hi Denise, The last part of the paragraph, where you decrease every 12 cm, you decrease once, then work 12 cm, decrease again, work 12 cm and decrease the third time. This is 24 cm + 3 cms at the beginning = 27 cms. Regards, Drops Team.
16.03.2026 - 07:07
![]() Gitte wrote:
Gitte wrote:
Kan jeg strikke Frosted Oats Sweater med én tråd DROPS Air plus én tråd DROPS Kid-Silk i stedet for to tråde DROPS Brushed Alpaca Silk?
16.02.2026 - 14:45DROPS Design answered:
Hei Gitte. Nei. Du kan evnt strikke med 1 tråd Air og 2 tråder Kid-Silk. Bare husk å overholde strikkefastheten. mvh DROPS Design
23.02.2026 - 11:48
![]() Karoline wrote:
Karoline wrote:
Hei! Jeg lurer på det samme som Therese fra Sverige. Fra hvilket merke skal forstykket måle 14 cm? Oppskriften sier at man skal sette et merke i arbeidet inn mot halsen på høyre skulder. Gøy å strikke denne oppskriften, vil gjerne komme meg videre
15.02.2026 - 11:30DROPS Design answered:
Hei Karoline, Ja, du skal måle fra merket ved halsen. Hilsen Drops Team.
16.02.2026 - 06:48
![]() Cath wrote:
Cath wrote:
Bonjour, Je viens de finir ce pull qui me plaît beaucoup. Par contre, le col n’est pas très seyant. Il est un peu trop haut et il fait une espèce de bosse dans le dos. Comment puis-je rectifier cela ? Merci.
12.02.2026 - 10:55DROPS Design answered:
Bonjour Cath, je ne suis pas bien sûre de visualiser la bosse dont vous parlez, dans cette vidéo, nous montrons comment tricoter un col, on a des épaules européennes dans la vidéo, mais c'est la même technique / le même résultat qu'avec un empiècement européen. Bon tricot!
12.02.2026 - 18:11
![]() Legrand wrote:
Legrand wrote:
Bonjour, entre la vidéo et les explications il y a des différences. Faut il suivre les explications à la lettre et juste s’aider de la vidéo pour visualiser les différentes étape ? Merci d’avance pour votre réponse. Cordialement
19.01.2026 - 22:04DROPS Design answered:
Bonjour Mme Legrand, les vidéos montrent la technique, mais le nombre de mailles/de rangs/d'augmentations etc;.; varie en fonction du modèle/de la laine/de l'échantillon, etc..; Suivez attentivement les indications des explications. Bon tricot!
20.01.2026 - 10:33
![]() Andriana Vakleva wrote:
Andriana Vakleva wrote:
Hello! The pattern looks wonderful and I'm knitting it now. This is my first time using Drops Brushed Alpaca Silk. I think there's a typo in the description for the number of stitches for the left shoulder /20-20-20-22-22-24-24-24/. I've matched the number of stitches for the right shoulder /20-20-22-22-24-24-24/. Thanks for the wonderful yarn and the free pattern!
14.01.2026 - 09:58DROPS Design answered:
Thanks for noticing, pattern has been fixed. Happy knitting!
15.01.2026 - 09:41
![]() Marlou wrote:
Marlou wrote:
Hei, kjempefin fall og snitt på genseren sånn som den sitter på modellen. Jeg ønsker samme effekten og lurer derfor på hvor mye bevegelsesrom modellen har, gjerne målt over brystvidden. Da er det enklere for meg å velge hvilken størrelse jeg skal strikke. Tusen takk.
09.01.2026 - 20:47DROPS Design answered:
Hei Marlou. Ta en titt på målskissen til genseren, scroll helt nederst på oppskriften og se på cm målene og velg deretter den størrelsen og bevegelserom du ønsker. mvh DROPS Design
12.01.2026 - 11:47
![]() Emelie wrote:
Emelie wrote:
Hallo! Ich frage mich bei den Ärmeln was es bedeutet in der Höhe abzunehmen? „ ABNAHMETIPP lesen: 2 Maschen in jeder 2. Runde 2-2-3-3-3-4-4 x in der Höhe abnehmen, dann 2 Maschen alle 12-6-5-3-3)-2½-2½ cm 3-5-5-7-7-7-7 x in der Höhe abnehmen“ Vielen Dank !
31.12.2025 - 16:35DROPS Design answered:
Liebe Emelie, das bezieht sich auf die Reihen, z.B. 4 x in der Höhe: Sie nehmen 2 Maschen in 4 Abnahme-Runden ab. Also 1 Runde mit 2 Abnahmen, dann 1 Runde ohne Abnahmen, 1 Runde mit 2 Abnahmen, 1 Runde ohne Abnahmen, 1 Runde mit 2 Abnahmen, 1 Runde ohne, 1 Runde mit 2 Abnahmen = 4 x in der Höhe abgenommen. Viel Spaß beim Stricken!
24.02.2026 - 21:51
![]() Can You Brush This Yarn? wrote:
Can You Brush This Yarn? wrote:
Hi! I would like to mix Brushed Alpaca Silk with Kid Silk, but I was wondering if I could brush them to make the garnment look fluffier?
12.12.2025 - 22:53DROPS Design answered:
Hi, you can but try on a swatch first. Happy knitting!
15.12.2025 - 14:28
![]() Lene wrote:
Lene wrote:
Hejsa Jeg har et spørgsmål ang. ærme og indtagning. I str. xs skal der tages ind på hver 12. cm 3 gange, det giver 36 cm. Men allerede ved 34 cm skal der laves rib . Er der ikke en fejl der? Dbh Lene
03.12.2025 - 21:22DROPS Design answered:
Hej Lene, du tager ind når ærmet måler 1cm+4 omgange = ca 3 cm, 15cm og 27cm :)
04.12.2025 - 14:03
|
|
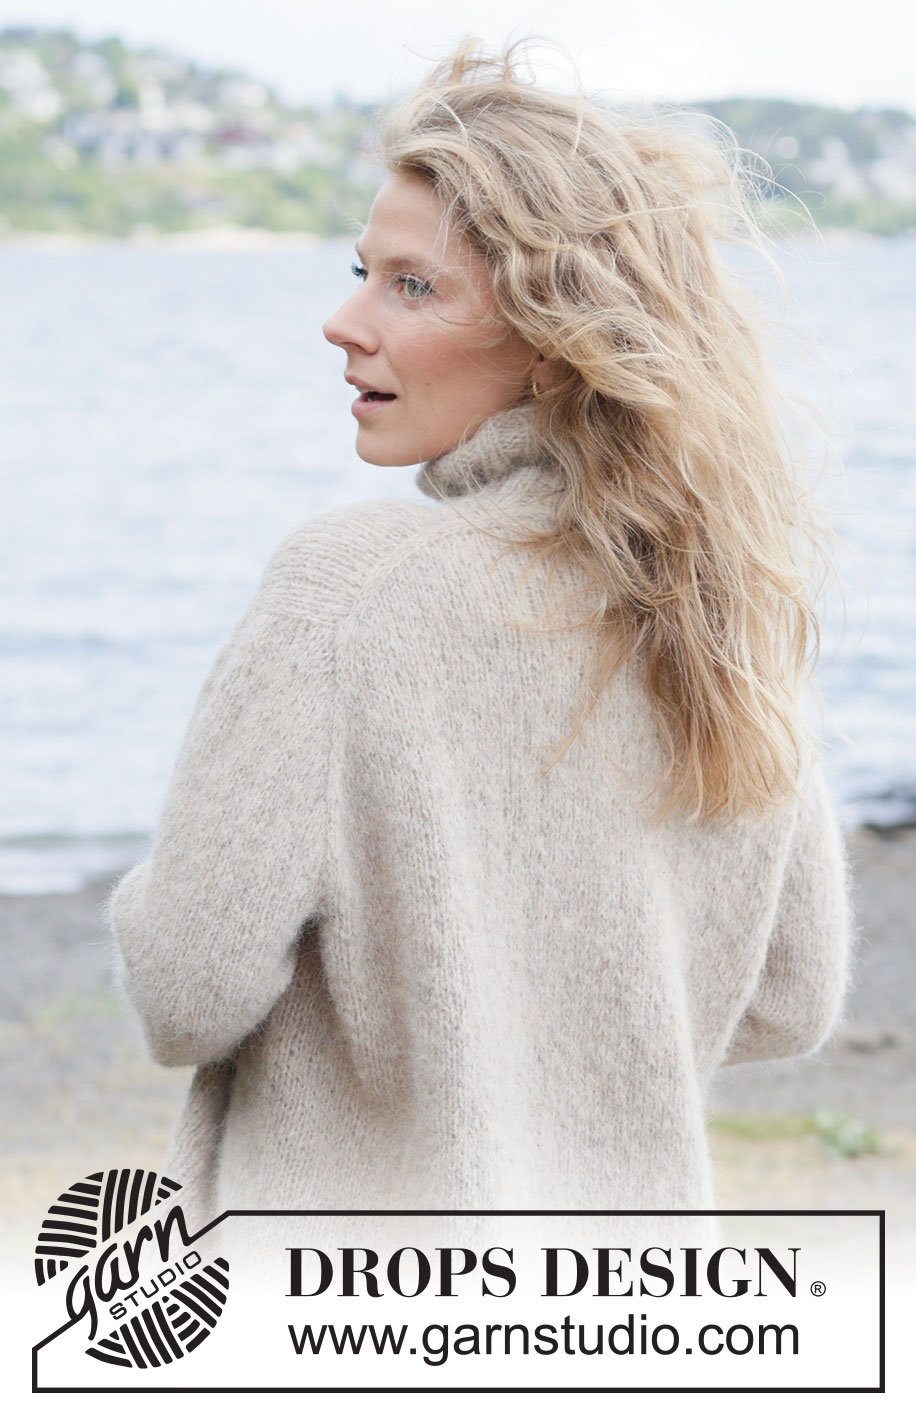
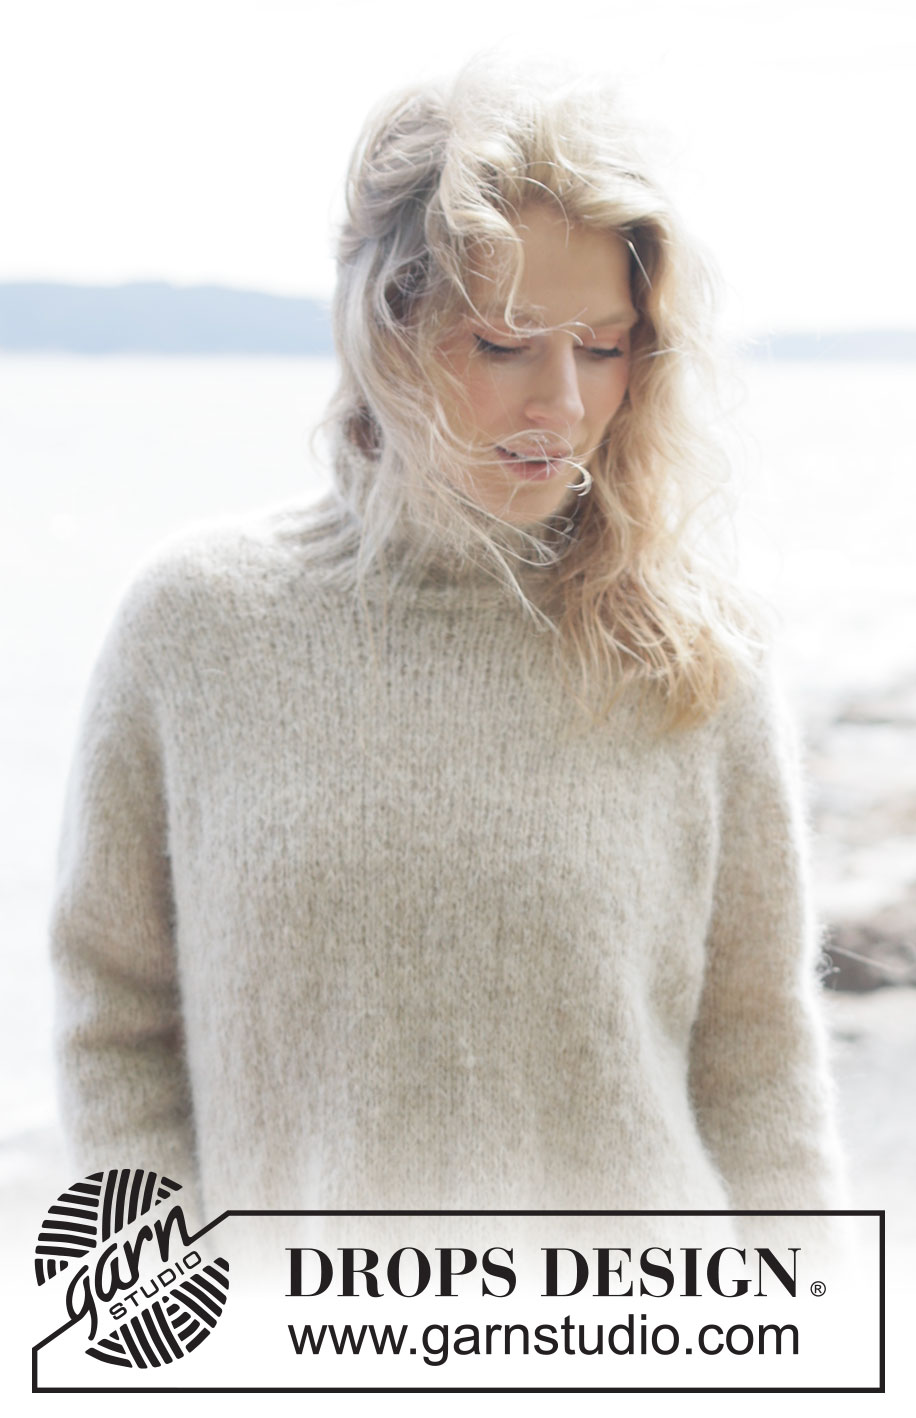
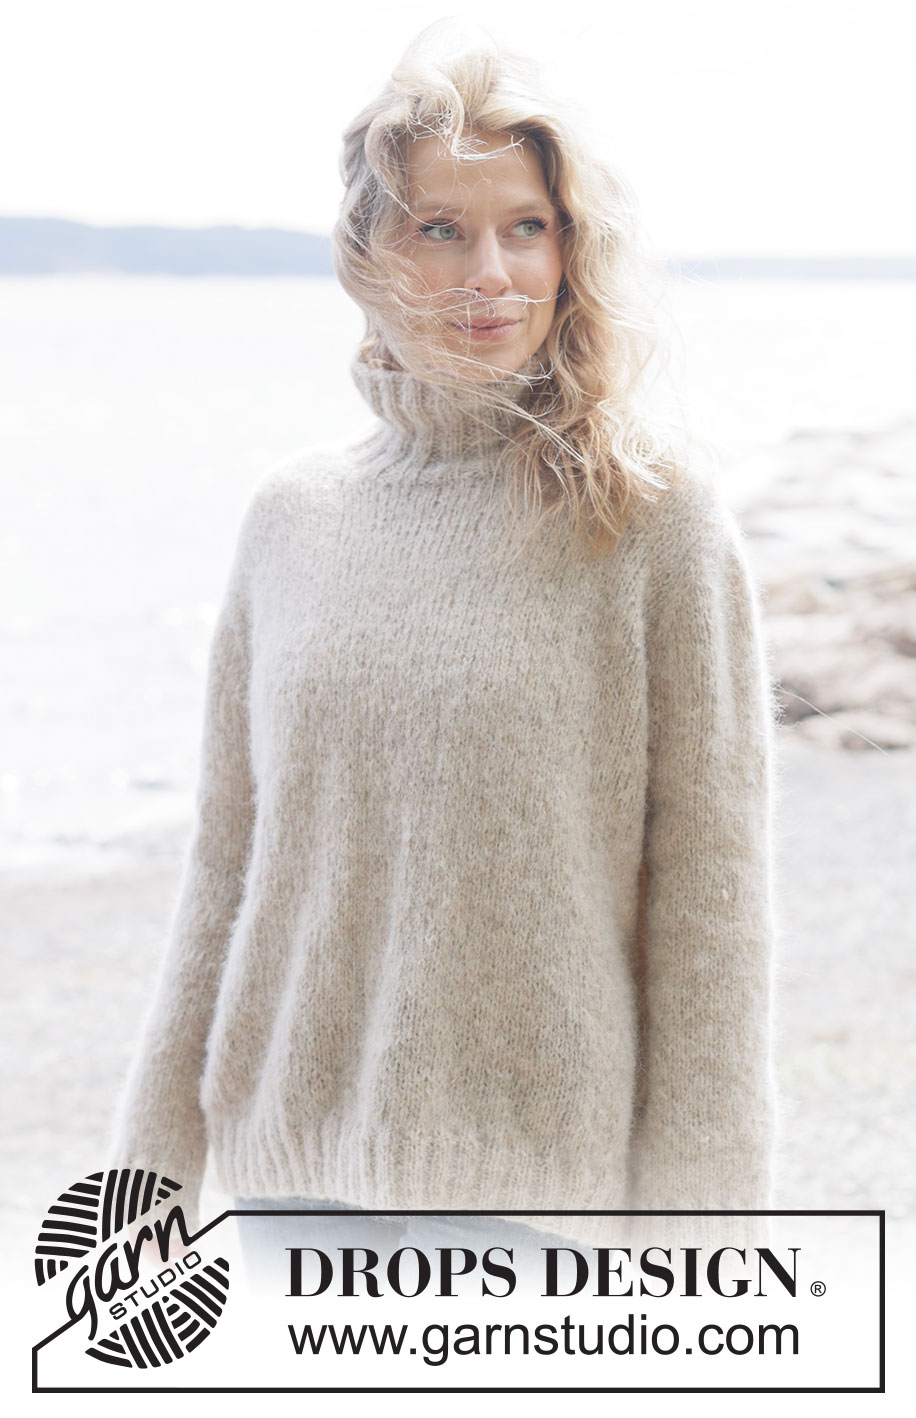
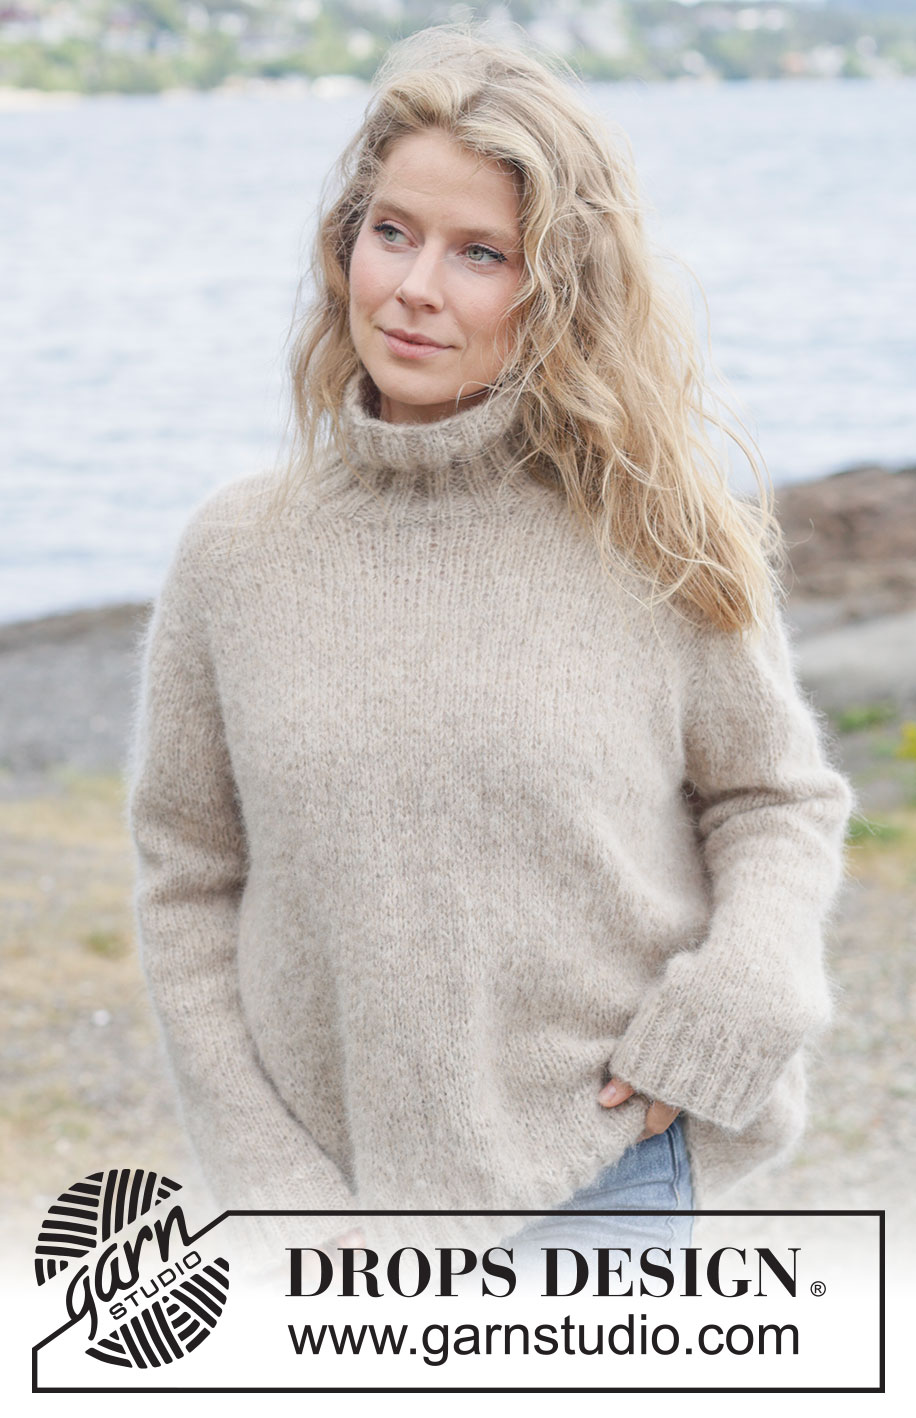
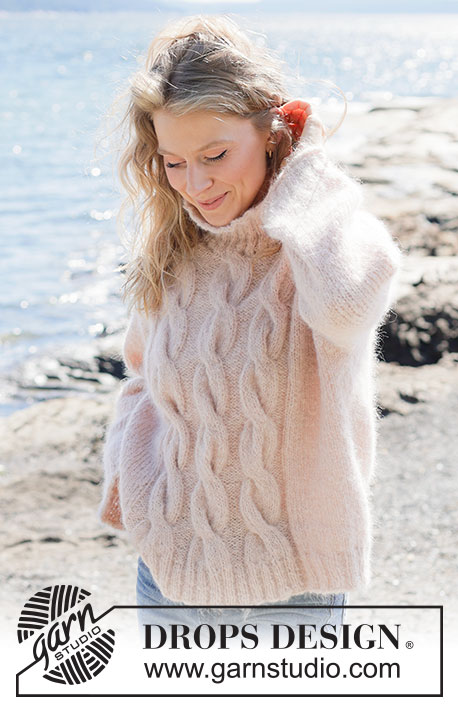
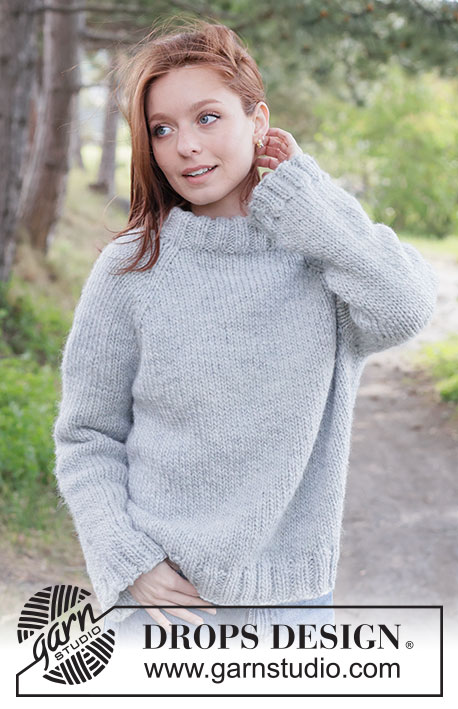
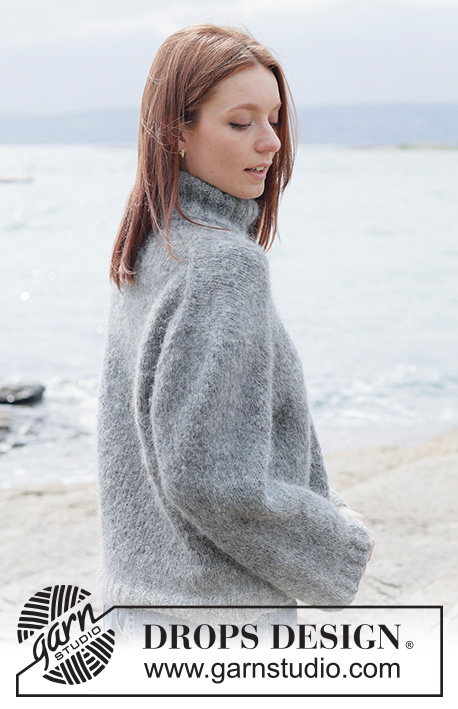
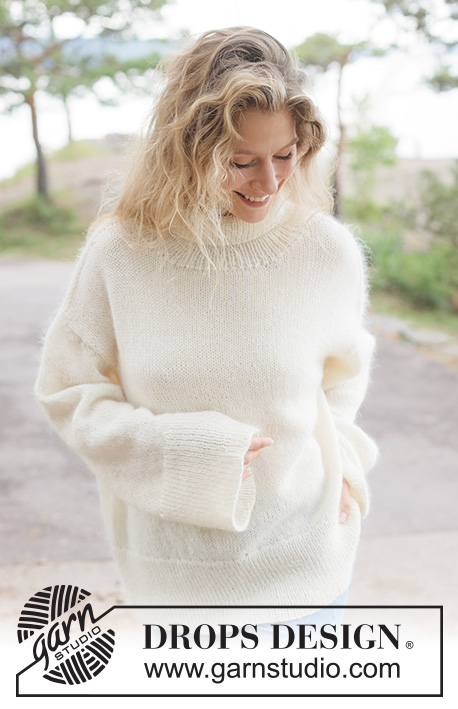
Frosted Oats Sweater#frostedoatssweater |
|
 |
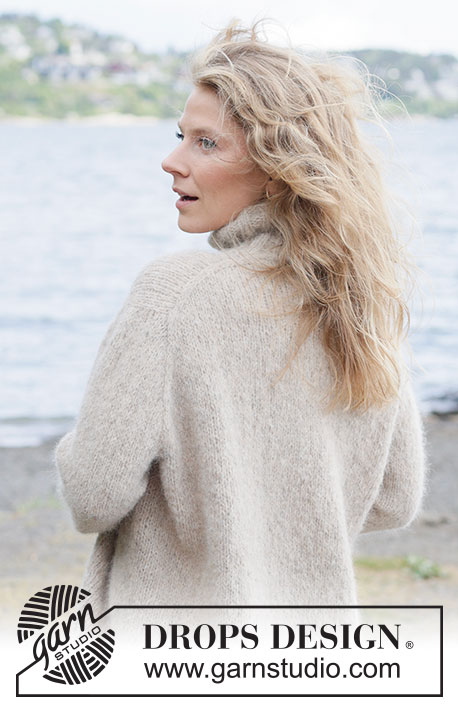 |
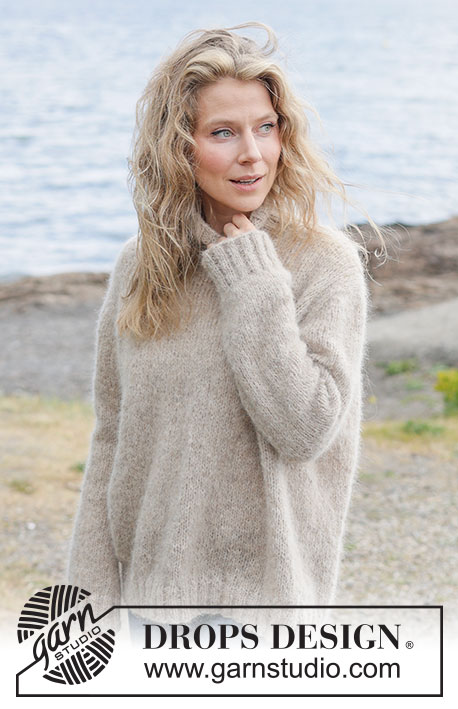
Knitted sweater in 2 strands DROPS Brushed Alpaca Silk. The piece is worked top down with European yoke and high neck. Sizes XS - XXXL.
DROPS 262-24 |
|
|
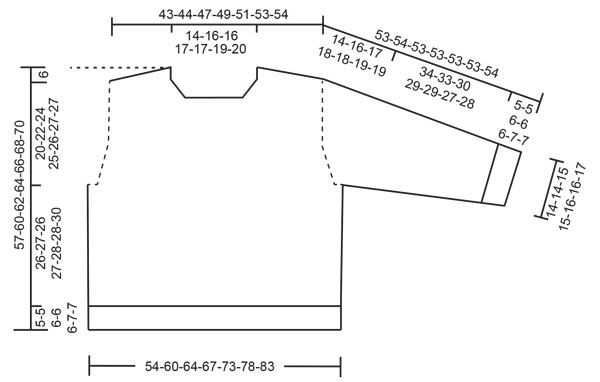
------------------------------------------------------- EXPLANATIONS FOR THE PATTERN: ------------------------------------------------------- INCREASE TIP-1: INCREASE 1 STITCH TOWARDS THE LEFT - from RIGHT SIDE: Use left needle to pick up yarn between 2 stitches from row below, pick up yarn from the front and knit in the stitch loop that is on the back of the needle. INCREASE 1 STITCH TOWARDS THE RIGHT - from RIGHT SIDE: Use left needle to pick up yarn between 2 stitches from row below, pick up yarn from the back and knit in the stitch loop that is on the front side of the needle. . INCREASE TIP-2: INCREASE 1 STITCH TOWARDS THE RIGHT - from WRONG SIDE: Use left needle to pick up yarn between 2 stitches from row below, pick up yarn from the back and purl in the stitch loop that is on the front side of the needle. INCREASE 1 STITCH TOWARDS THE LEFT - from WRONG SIDE: Use left needle to pick up yarn between 2 stitches from row below, pick up yarn from the front and purl in the stitch loop that is on the back side of the needle. SLEEVE TIP: When knitting up stitches under the sleeve, you can get a small hole in the transition between stitches on the body and sleeve. This hole can be closed by picking up the strand between 2 stitches and working this strand twisted together with the first stitch between body and sleeve. DECREASE TIP: Decrease 1 stitch on each side of the marker-thread as follows: Work until there are 3 stitches left before the marker-thread, knit 2 together, knit 2 (marker-thread sits between these 2 stitches), slip 1 stitch knit-wise, knit 1 and pass the slipped stitch over the knitted stitch (2 stitches decreased). ------------------------------------------------------- START THE PIECE HERE: ------------------------------------------------------- SWEATER - SHORT OVERVIEW OF THE PIECE: The pattern uses both long and short needles; start with the length which fits the number of stitches and change when necessary. Work according to points 1 – 5. 1 BACK PIECE: Cast on stitches for the back of the neck. Work the back piece back and forth, increasing stitches on each side until the shoulder stitch count has been achieved. The back piece has slightly diagonal shoulder. 2 FRONT PIECE: Worked in 2 sections to begin with (each side of neck). You knit up stitches along the back shoulder, working downwards and increasing for the neckline. Repeat on the other shoulder. Then stitches are cast on for the neckline and the 2 shoulders are joined. The front piece is worked back and forth to the correct measurement. 3 YOKE: Place the front and back pieces on the same needle, working first the front piece, knitting up stitches for one sleeve along one side of the front piece, then working the back piece and knitting up stitches for the second sleeve along the other side of the front piece. Continue in the round. 4 INCREASE FOR BODY AND SLEEVES: While working the yoke, you increase stitches first for the sleeves and later for both the body and sleeves. 5 BODY AND SLEEVES: When the yoke is finished, it is divided and the body is continued in the round while the sleeves wait. Then the sleeves are worked in the round, top down. Stitches are knitted up around the neckline and the neck is worked in the round to finish. If there is a «0» in your chosen size, skip the information and go straight to the next instruction. BACK PIECE: Cast on 22-24-24-26-26-28-30 stitches with circular needle size 6 MM = US 10 and 2 strands DROPS Brushed Alpaca Silk. ROW 1 (wrong side): Purl. ROW 2 (right side): Read INCREASE TIP-1. Knit 3, increase 1 stitch towards the left, knit until there are 3 stitches left, increase 1 stitch towards the right, knit 3. ROW 3 (wrong side): Read INCREASE TIP-2. Purl 3, increase 1 stitch towards the right, purl until there are 3 stitches left, increase 1 stitch towards the left, purl 3. Work ROWS 2 and 3 a total of 10-10-11-11-12-12-12 times (20-20-22-22-24-24-24 rows worked) = 62-64-68-70-74-76-78 stitches. Remember to maintain the knitting gauge. Cut the strand and place the stitches on a thread/stitch holder. LEFT SHOULDER: Find the left back shoulder as follows: Lay the back piece flat, right side up, with the thread/stitch holder towards you; left side of piece = left shoulder. Start from the right side by the neck and knit up 1 stitch in each row along the back left shoulder inside the outermost stitch = 20-20-22-22-24-24-24 shoulder-stitches. Insert 1 marker by the neck. All lengths on the front piece are measured from here. Work stockinette stitch, with the first row from the wrong side, until the piece measures 5 cm = 2". Now increase for the neckline as follows: ROW 1 (right side): Remember INCREASE TIP-1. Knit 3, increase 1 stitch towards the left, work to end of row. ROW 2 (wrong side): Purl. Work ROWS 1 and 2 a total of 4-4-5-5-6-6-6 times (8-8-10-10-12-12-12 rows worked) = 24-24-27-27-30-30-30 stitches. The increases for the neckline are finished and the piece measures approx. 10-10-11-11-12-12-12 cm = 4"-4"-4⅜"-4⅜"-4¾"-4¾"-4¾" from the marker. Some of this neckline will lie on the back piece. Neckline in front = 9-9-10-10-11-11-11 cm = 3½"-3½"-4"-4"-4⅜"-4⅜"-4⅜". Neckline at back = 1 cm = ⅜". Cut the strand and place the stitches on a thread/stitch holder. Work the right shoulder. RIGHT SHOULDER: Start from the right side by the armhole and knit up 1 stitch in each row along the shoulder to the neckline, inside the outermost stitch = 20-20-22-22-24-24-24 shoulder-stitches. Insert 1 marker by the neck. All lengths on the front piece are measured from here. Work stockinette stitch, with the first row from the wrong side, until the piece measures 5 cm = 2". Now increase for the neckline as follows: ROW 1 (right side): Knit until there are 3 stitches left, increase 1 stitch towards the right, knit 3 - remember INCREASE TIP-1. ROW 2 (wrong side): Purl. Work ROWS 1 and 2 a total of 4-4-5-5-6-6-6 stitches (8-8-10-10-12-12-12 rows worked) = 24-24-27-27-30-30-30 stitches. The increases for the neckline are finished and the piece measures approx. 10-10-11-11-12-12-12 cm = 4"-4"-4⅜"-4⅜"-4¾"-4¾"-4¾" from the marker. Some of this neckline will lie on the back piece. Neckline in front = 9-9-10-10-11-11-11 cm = 3½"-3½"-4"-4"-4⅜"-4⅜"-4⅜". Neckline at back = 1 cm = ⅜". FRONT PIECE: On the next row from the right side, join the 2 shoulders together for the front piece as follows: Knit the 24-24-27-27-30-30-30 stitches on the right front shoulder, cast on 14-16-14-16-14-16-18 stitches for the neckline, knit the 24-24-27-27-30-30-30 stitches from the left front shoulder = 62-64-68-70-74-76-78 stitches. Work stockinette stitch back and forth until the piece measures 13-13-14-14-15-15-15 cm = 5⅛"-5⅛"-5½"-5½"-6"-6"-6" from the marker, with the last row from the wrong side. The front and back pieces are now joined for the yoke, and stitches are knitted up for the sleeves as follows: ROW 1 (right side): Knit together the first 2 stitches on the front piece (1 stitch decreased), knit until there are 2 stitches left on the front piece, slip 1 stitch, knit 1 and pass the slipped stitch over (1 stitch decreased), insert 1 marker here, knit up 18-18-20-20-22-22-22 stitches along the left-hand side of the front piece inside the outermost stitch (= sleeve-stitches), insert 1 marker, knit together the first 2 stitches on the back piece (1 stitch decreased), knit until there are 2 stitches left on the back piece, slip 1 stitch, knit 1 and pass the slipped stitch over (1 stitch decreased), insert 1 marker here, knit up 18-18-20-20-22-22-22 stitches along the right-hand side of the front piece inside the outermost stitch (= sleeve-stitches), insert 1 marker here = 156-160-172-176-188-192-196 stitches. YOKE: Continue in the round. ROUND 1: Knit and increase 1 stitch on each side of both sleeves – remember INCREASE TIP-1 – increasing 1 stitch towards the left at the beginning of the sleeve and 1 stitch towards the right at the end of the sleeve, the stitch count on the sleeves increases but remains the same on the front and back pieces. Work this round 3 times = 24-24-26-26-28-28-28 stitches on the sleeves, 60-62-66-68-72-74-76 stitches on the front and back pieces) = 168-172-184-188-200-204-208 stitches Continue as follows: ROUND 1: Knit and increase 1 stitch on each side of both sleeves – remember INCREASE TIP-1, the stitch count on the sleeves increases but remains the same on the front and back pieces. ROUND 2: Knit. Work ROUNDS 1 and 2 a total of 4-4-4-5-3-2-1 times (8-8-8-10-6-4-2 rounds worked; a total of 7-7-7-8-6-5-4 increases in height on the sleeves, with 32-32-34-36-34-32-30 sleeve-stitches and 60-62-66-68-72-74-76 stitches on the front and back pieces) = 184-188-200-208-212-212-212 stitches. Work the next round as follows: ROUND 1: Knit 2, increase 1 stitch towards the left, knit until there are 2 stitches left on the front piece before the first marker, increase 1 stitch towards the right, knit 2, move the marker onto the right needle, increase 1 stitch towards the left, knit to the next marker (= sleeve), increase 1 stitch towards the right, move the marker onto the right needle, knit 2, increase 1 stitch towards the left, knit until there are 2 stitches left on the back piece, before the next marker, increase 1 stitch towards the right, knit 2, move the marker onto the right needle, increase 1 stitch towards the left, knit to the next marker (= sleeve), increase 1 stitch towards the right, move the marker onto the right needle (= 8 increased stitches, with 1 increased stitch on each side of 2 stitches in each transition between body and sleeves). ROUND 2: Knit. Work ROUNDS 1 and 2 a total of 2 6-8-9-9-11-13-14 times (12-16-18-18-22-26-28 rounds worked. A total of 13-15-16-17-17-18-18 increases in height on the sleeves and 6-8-9-9-11-13-14 increases in height on the body. There are 44-48-52-54-56-58-58 sleeve-stitches and 72-78-84-86-94-100-104 stitches on the front and back pieces) = 232-252-272-280-300-316-324 stitches. The sleeve measures approx. 14-16-17-18-18-19-19 cm = 5½"-6¼"-6¾"-7"-7"-7½"-7½" – NOTE: If the sweater is folded double at the shoulder, it measures approx. 20-22-24-25-26-27-27 cm = 8"-8¾"-9½"-9¾"-10¼"-10⅝"-10⅝" from the top of the shoulder and down the armhole. If the piece is shorter than this, continue working to the correct measurement without increasing. Now divide for the body and sleeves. DIVIDE FOR BODY AND SLEEVES: Knit the first 72-78-84-86-94-100-104 stitches (= front piece), place the next 44-48-52-54-56-58-58 stitches on a thread for the sleeve, cast on 4-6-6-8-8-10-12 stitches (mid-under the sleeve), knit 72-78-84-86-94-100-104 (= back piece) place the next 44-48-52-54-56-58-58 stitches on a thread for the sleeve, cast on 4-6-6-8-8-10-12 stitches (mid-under the sleeve). The body and sleeves are finished separately. BODY: = 152-168-180-188-204-220-232 stitches. Work stockinette stitch in the round until the piece measures 26-27-26-27-28-28-30 cm = 10¼"-10⅝"-10¼"-10⅝"-11"-11"-11¾", from the cast-on stitches under the sleeve. Change to circular needle size 5 MM = US 8. Work rib (knit 2, purl 2), AT THE SAME TIME increase 20-24-24-28-28-32-32 stitches evenly on the first round = 172-192-204-216-232-252-264 stitches. When the rib measures 5-5-6-6-6-7-7 cm = 2"-2"-2⅜"-2⅜"-2⅜"-2¾"-2¾", bind off. The sweater measures approx. 57-60-62-64-66-68-70 cm = 22½"-23⅝"-24⅜"-25¼"-26"-26¾"-27½". SLEEVES: Place the 44-48-52-54-56-58-58 sleeve-stitches from one thread on circular needle size 6 MM = US 10 and knit up 1 stitch in each of the 4-6-6-8-8-10-12 stitches cast on under the sleeve – read SLEEVE TIP = 48-54-58-62-64-68-70 stitches. Insert a marker-thread in the middle of the 4-6-6-8-8-10-12stitches under the sleeve- the round starts by the marker-thread. Work stockinette stitch in the round. AT THE SAME TIME, when the sleeve measures 1 cm = ⅜" from the division, decrease mid-under the sleeve – read DECREASE TIP as follows: Decrease 2 stitches every 2nd round a total of 2-2-3-3-3-4-4 times, then every 12-6-5-3-3-2½-2½ cm = 4¾"-2⅜"-2"-1⅛"-1⅛"-1"-1" 3-5-5-7-7-7-7 times = 38-40-42-42-44-46-48 stitches. Continue working until the sleeve measures 34-33-30-29-29-27-28 cm = 13⅜"-13"-11¾"-11⅜"-11⅜"-10⅝"-11" from the division. Change to double pointed needles size 5 MM = US 8. Work rib (knit 2, purl 2), AT THE SAME TIME increase 6-4-6-6-8-6-8 stitches evenly on the first round = 44-44-48-48-52-52-56 stitches. When the rib measures 5-5-6-6-6-7-7 cm = 2"-2"-2⅜"-2⅜"-2⅜"-2¾"-2¾", bind off slightly loosely with rib. The sleeve measures approx. 39-38-36-35-35-34-35 cm = 15¼"-15"-14¼"-13¾"-13¾"-13⅜"-13¾" from the division. HIGH NECK: Use circular needle size 5 MM = US 8 and 2 strands DROPS Brushed Alpaca Silk. Start from the right side on one shoulder line and knit up approx. 72-80-84-88-88-96-104 stitches inside 1 stitch around the neckline. Knit 1 round and adjust the stitch count if necessary (must be divisible by 4). Work rib in the round (knit 2, purl 2) for 11-12-12-12-13-13-13 cm = 4⅜"-4¾"-4¾"-4¾"-5⅛"-5⅛"-5⅛". Bind off slightly loosely with rib. |
|
 |
|
Have you finished this pattern?Tag your pictures with #dropspattern #frostedoatssweater or submit them to the #dropsfan gallery. Do you need help with this pattern?You'll find 30 tutorial videos, a Comments/Questions area and more by visiting the pattern on garnstudio.com. © 1982-2026 DROPS Design A/S. We reserve all rights. This document, including all its sub-sections, has copyrights. Read more about what you can do with our patterns at the bottom of each pattern on our site. |
|


With over 40 years in knitting and crochet design, DROPS Design offers one of the most extensive collections of free patterns on the internet - translated to 17 languages. As of today we count 325 catalogs and 12298 patterns - 12288 of which are translated into English (US/in).
We work hard to bring you the best knitting and crochet have to offer, inspiration and advice as well as great quality yarns at incredible prices! Would you like to use our patterns for other than personal use? You can read what you are allowed to do in the Copyright text at the bottom of all our patterns. Happy crafting!
Post a comment to pattern DROPS 262-24
We would love to hear what you have to say about this pattern!
If you want to leave a question, please make sure you select the correct category in the form below, to speed up the answering process. Required fields are marked *.