
Popular categories
Looking for a yarn?


Comments / Questions (46)
![]() Luisa wrote:
Luisa wrote:
Ich stricke den Pullover in XS und frage mich ab wo gemessen werden soll nach dem zusammensetzen der beiden Vorderteile um die benötigten 24cm zu kommen?
25.05.2026 - 12:56DROPS Design answered:
Liebe Luisa, diese 24 cm beim Vorderteil messen Sie ab Anfang Vorderteil, dh ab die Reihe, wenn Sie die Maschen für die Schulter aufgefassen haben. Viel Spaß beim Stricken!
26.05.2026 - 17:05
![]() Hanna wrote:
Hanna wrote:
Aiempaan kysymykseeni: Kuvioneuleeni leveys (12 silmukkaa =5,3 cm) täsmää ohjeessa ilmoitettuun, mutta kuvioneuleen korkeutta ei ole ilmoitettu. Mikä pitäisi olla koon S takappaleen pituus ennen kädentien lisäyksiä jotta voin korjata sen?
19.05.2026 - 13:02DROPS Design answered:
Mikäli neuletiheytesi on sama kuin ohjeessa annettu tiheys, takakappaleen pituus luomisreunasta mitattuna (ennen kädentien lisäyksiä) on n. 22 cm.
20.05.2026 - 17:15
![]() Hanna wrote:
Hanna wrote:
Neulon kokoa S ja nyt etukappaleet on yhdellä puikolla. Jos neulon etukappaleen 26 cm pitkäksi (olkasaumasta mitattuna), se on pitempi kuin takakappale ennen kädentien lisäyksiä. Onko se oikein? Ja kuuluuko takakappaleen kädentien lisäyksen olla täss vaiheessa vain noin 10 cm?
17.05.2026 - 20:01DROPS Design answered:
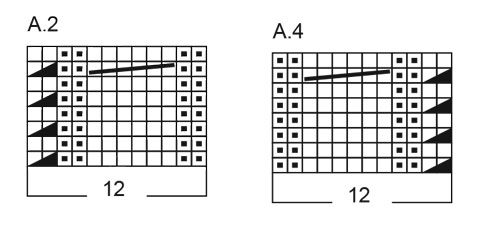
Hei, ohjeessa on oikeat mitat. Oletko tarkistanut neuletiheytesi? Sinun tulee saada 17 silmukkaa sileää neuletta ja 22 kerrosta per 10 cm. 12 silmukkaa piirroksen A.2 mallineuletta leveyssuunnassa, puikoilla nro 5 = n. 5,3 cm.
18.05.2026 - 17:29
![]() Agneta Damgaard wrote:
Agneta Damgaard wrote:
Det går ju att räkna ut att stycket bara ska ha 132 m (tillsammans med 132 m från framstycket ska det bli 264) men texten behöver ändras!
18.04.2026 - 17:12
![]() Agneta wrote:
Agneta wrote:
Jag stickar stl M. Under "ökning till ärmhål" (bakstycket, där man innan ökningen har 124 m) står det: "Sticka varv 1 och 2 totalt 4 gånger= 132 maskor på varvet. Arbetet mäter 9 cm." Om man stickar två varv totalt 4 gånger, blir det 8 varv. Eftersom man ökar 2 m per varv, borde ökningen bli 16 m, dvs = 140 m på varvet. För att få 132 m på varvet, ska man bara sticka varv 1 och 2 totalt 2 gånger (= ökning 8 m. Arbetet mäter då bara 7 cm. Hur ska det vara?
17.04.2026 - 13:20DROPS Design answered:
Hei Agneta. Når man strikker 1. VARV og 2. VARV, økes det kun når man strikker 1. VARV. Man strikker 1. og 2. varv totalt 4 ganger = 8 varv, men det økes kun på 4 varv = 132 masker. mvh DROPS Design
20.04.2026 - 14:24
![]() Juliet wrote:
Juliet wrote:
I have already knit size L in this and loved it so much that I have immediately started another in a different colour. This time I have knit the XL as I wanted a bit more positive ease in the body. I started the sleeves and the cuffs are way too big so I am following the pattern for the L sleeves. Will they still fit into the XL or do I need to make adjustments? Where should I adjust to fit? Do I need to increase more? If so where? Thank you ☺️
20.03.2026 - 07:13DROPS Design answered:
Dear Juliet, we are unfortunately not able to adjust every pattern to every request, your store might be able to help you even per mail or telephone Thanks for your comprehension. Happy knitting!
20.03.2026 - 08:12
![]() Juliet wrote:
Juliet wrote:
I have a question about the sleeves, I am knitting size L. I have knit the rib and then it says A4 (7 times), continue pattern until sleeve measures 30cm. I have completed A4 5 times and it already measures 19cm. I am a tight knitter so I am confused. Should it be measured from after the ribbing? If not then should I start the increases from now or should I continue to complete A4 (7 times) then adjust length later?
21.02.2026 - 08:49DROPS Design answered:
Hi Juliet, The 7 times mentioned is in width on the round (not in height). Regards, Drops Team.
23.02.2026 - 07:32
![]() Juliet wrote:
Juliet wrote:
I'm having trouble with the increases on the right side of the bodice. The pattern says "2-6-2-2-6-2-6 purl stitches, 2 knit stitches, ribbing (= 2 knit stitches/2 purl stitches/2 knit stitches/6 purl stitches) until 3 stitches remain." When I knit it like that, I end up with four knit stitches next to each other on the front. Could there be a mistake in the pattern? I'm really stuck. Many thanks for all the great patterns!
13.02.2026 - 07:43
![]() Christine wrote:
Christine wrote:
Grüezi! Beim VT muss ich stricken, „bis die Arbeit 36 cm hat“. Von wo gemessen? Beim RT musste ich an der Schulter eine MM setzen „weil ab hier alles gemessen wird“. Mein RT hat aber eine Länge ab Nacken bis stillgelegte Maschen von 31 cm. Wo also messe ich die 36 vorne und ist es korrekt, dass das 5 cm mehr sind als hinten? Wenn ich das RT ab gesetztem mm messe, sind es noch viel weniger… und messe ich vorne schön entlang eines Zopfs oder ungeachtet des Maschenbilds? Danke!
08.02.2026 - 19:28
![]() Katarzyna wrote:
Katarzyna wrote:
Pierwsze dodawanie oczek na lewy przód rozmiar M - czy tu na pewno trzeba dodawać oczka z obu stron? Wychodziło by wtedy, że po dodaniu jest 51 oczek (43+8) a w opisie jest 47
23.01.2026 - 10:06DROPS Design answered:
Witaj Kasiu, zdecydowanie jest coś nie tak. Zgłaszam korektę. Na ten moment wydaje mi się, że powinny być dodawane oczka z jednej strony, czyli od strony dekoltu. Proszę o chwilę cierpliwości. Korekta powinna pojawić się lada moment. Pozdrawiamy!
23.01.2026 - 15:22
|
||||||||||||||||
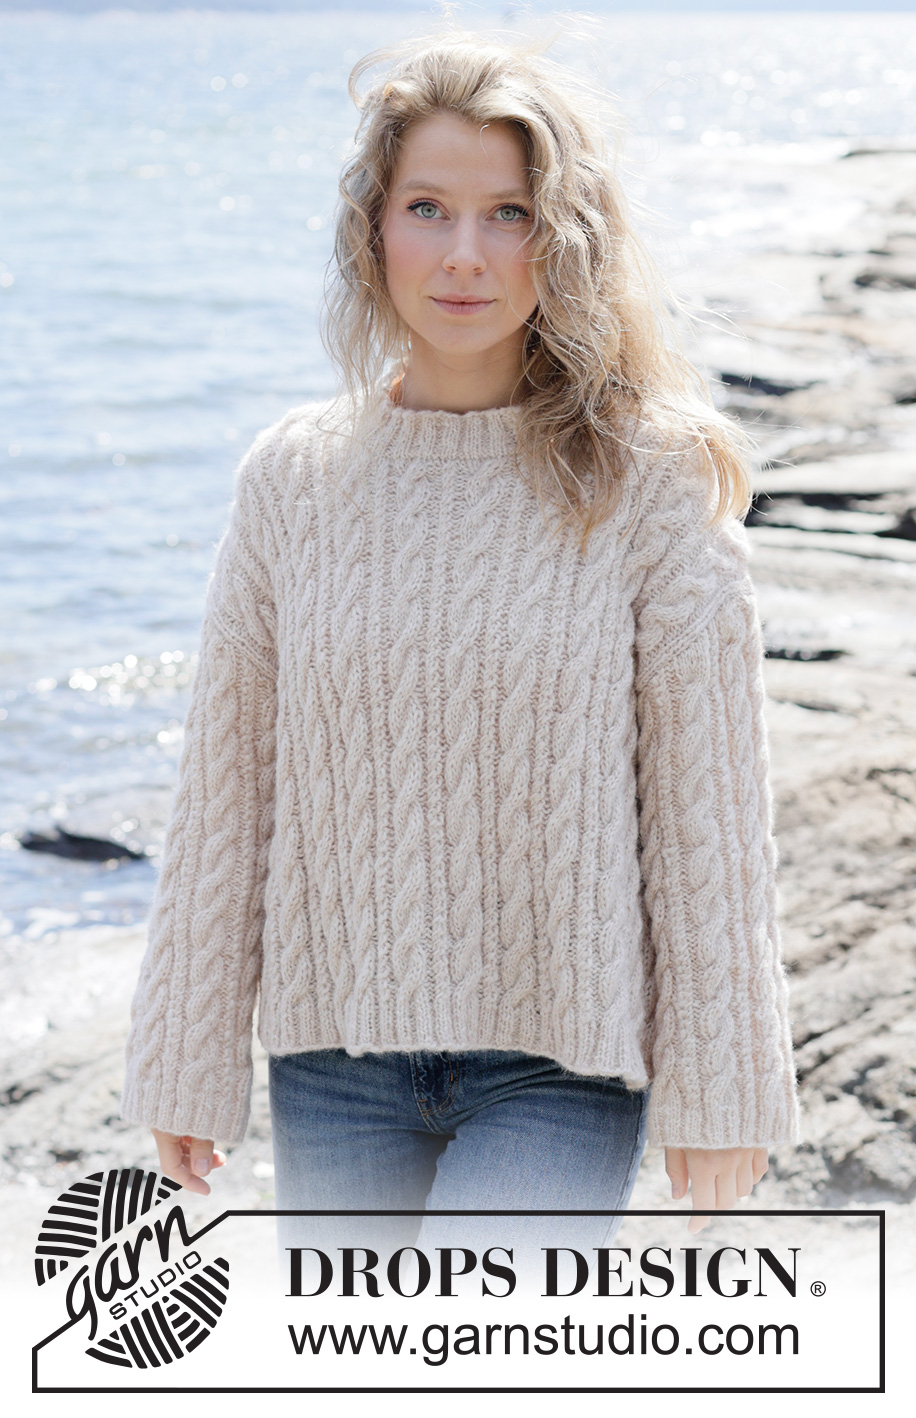
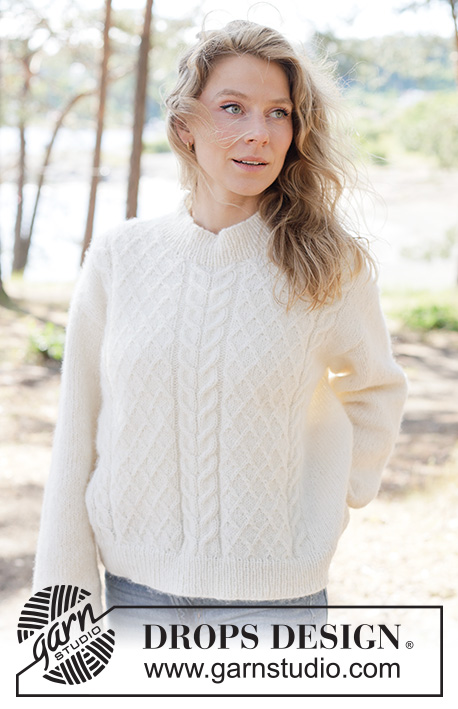
Winter Sketch Sweater#wintersketchsweater |
||||||||||||||||
 |
 |
|||||||||||||||
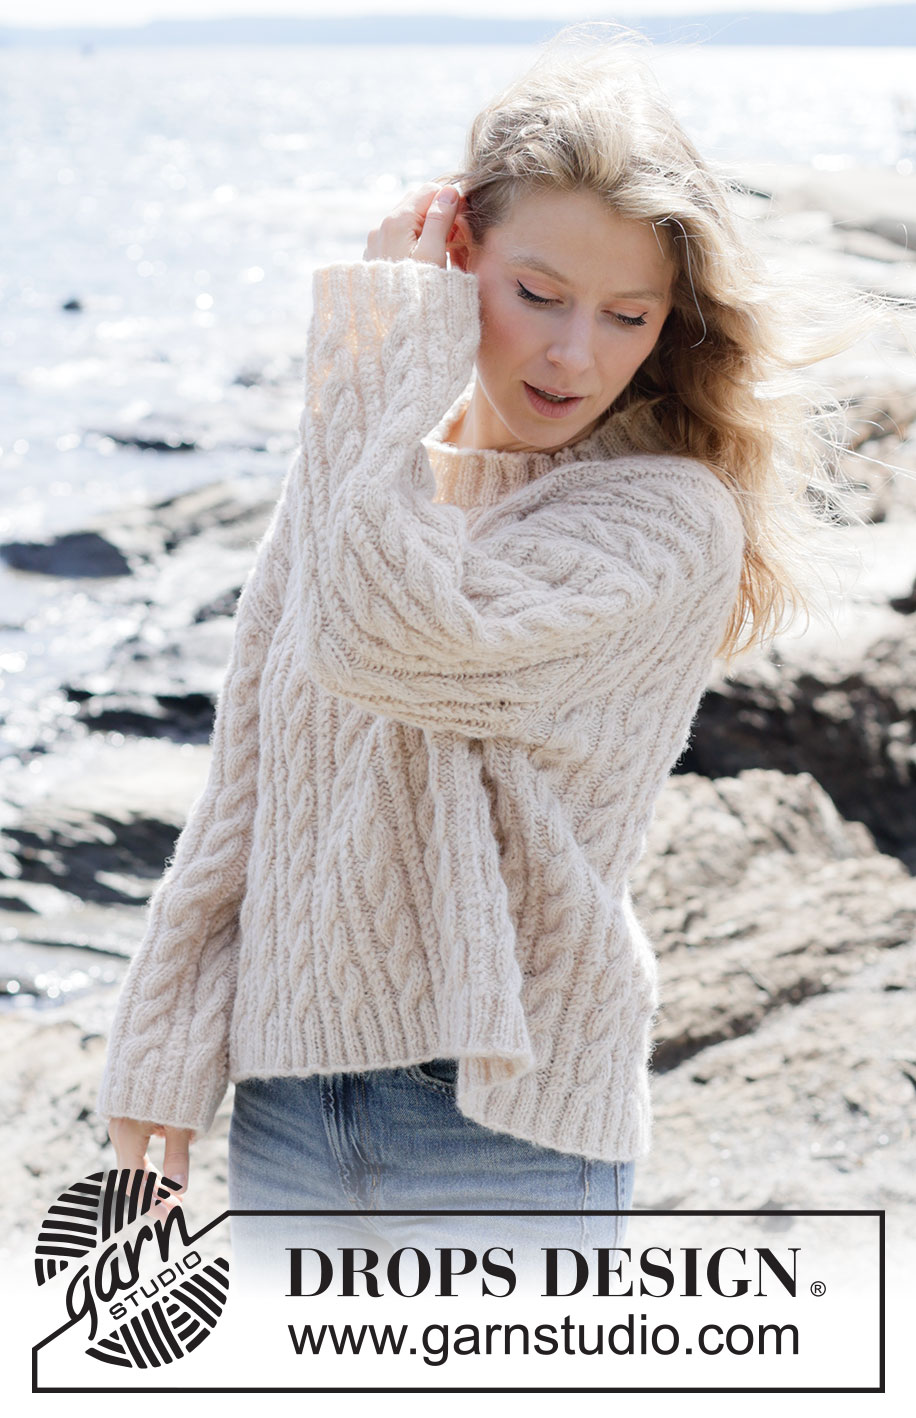
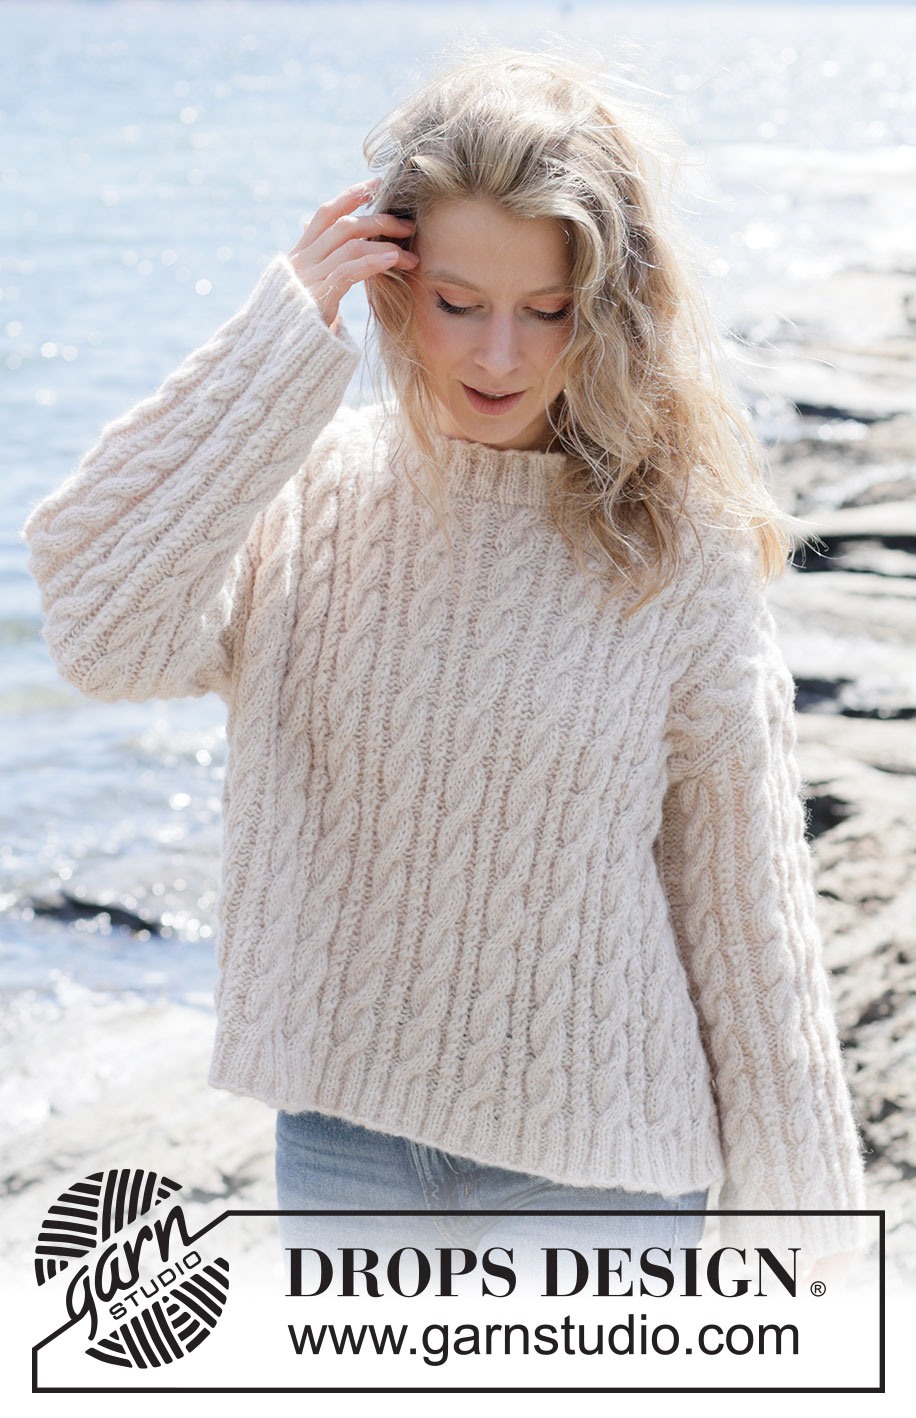
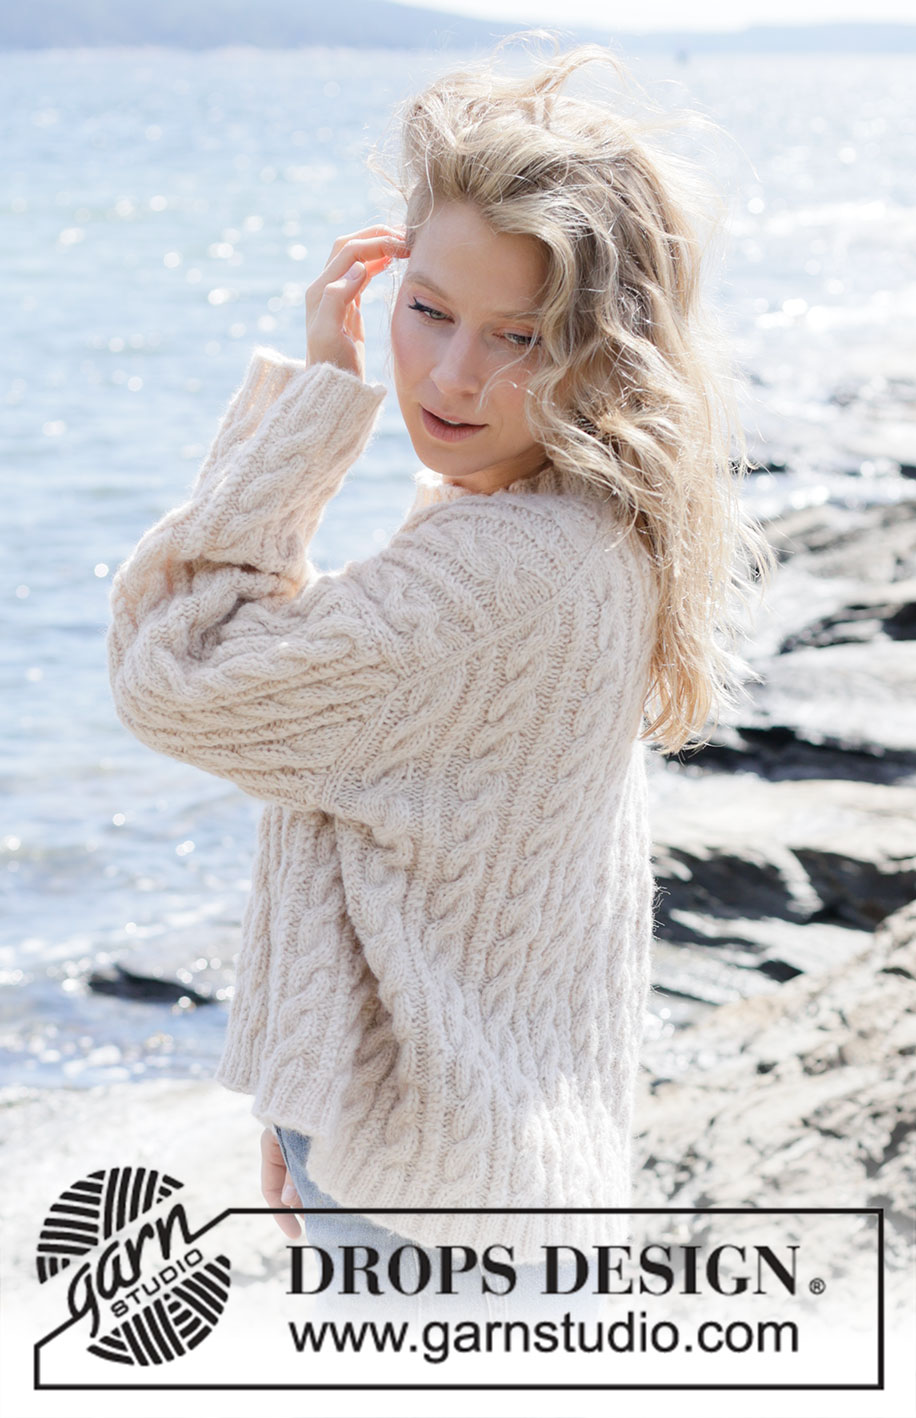
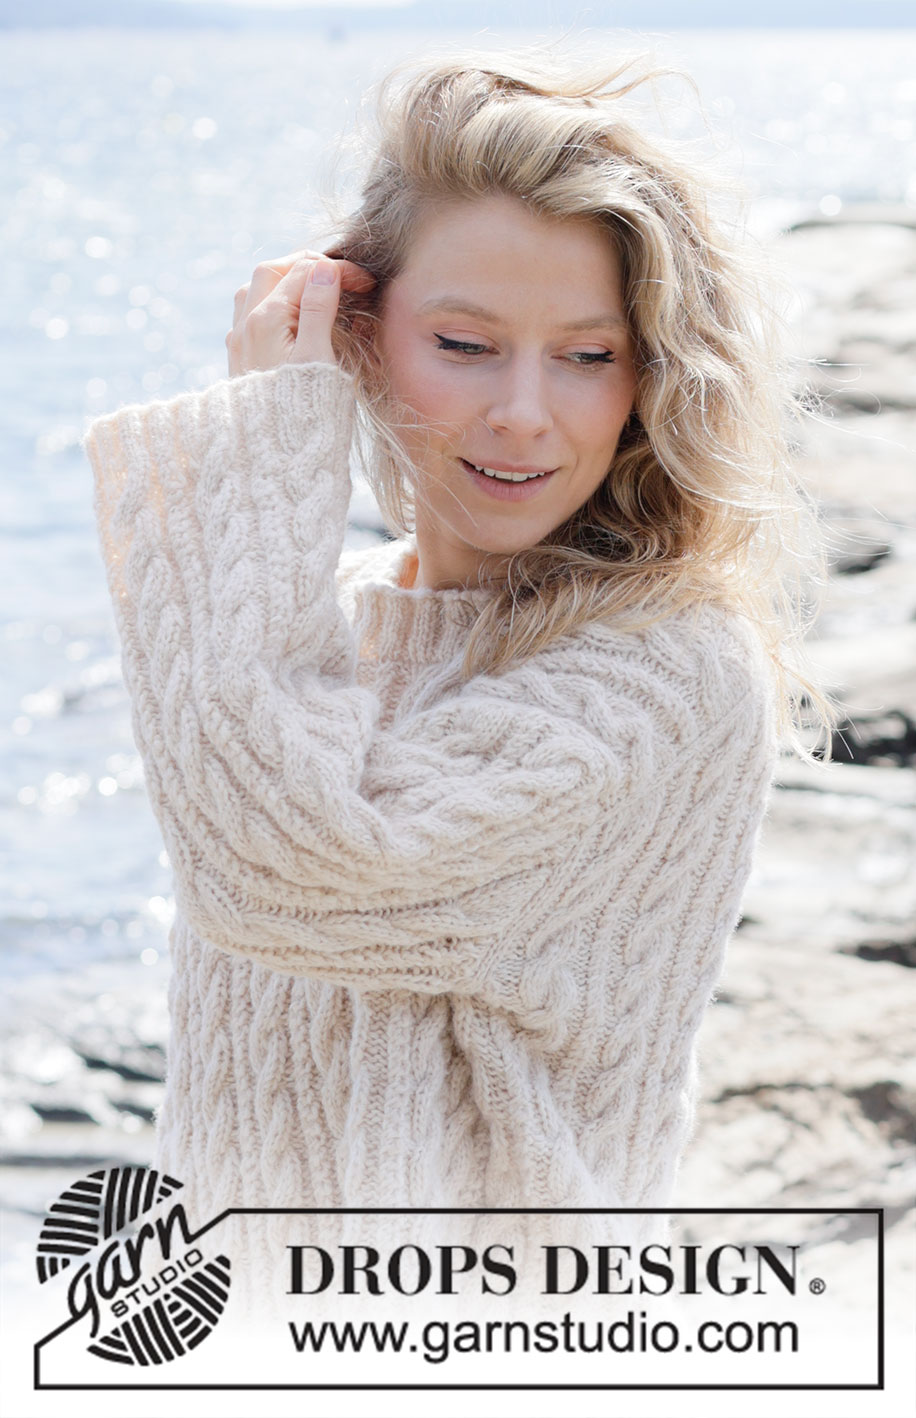
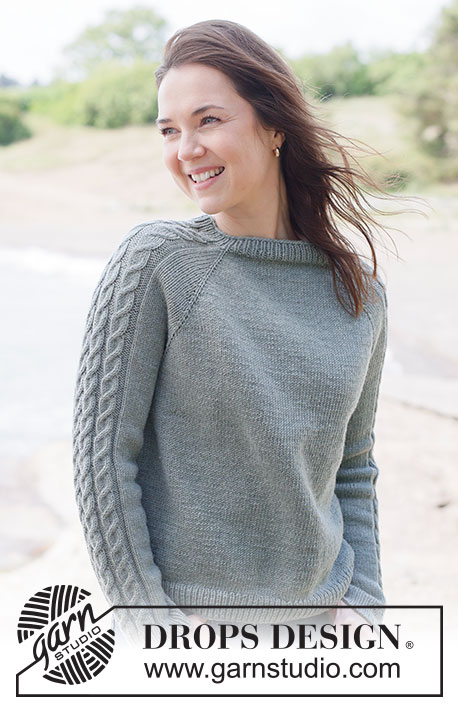
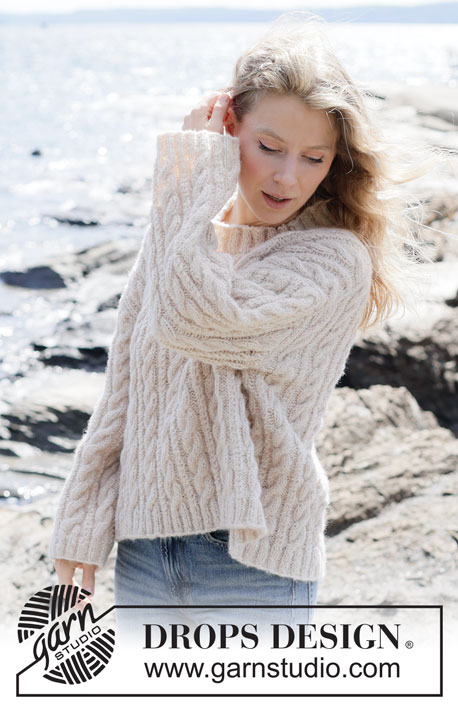
Knitted sweater in DROPS Air. The piece is worked top down with European/diagonal shoulders and cables. Sizes XS - XXXL.
DROPS 264-1 |
||||||||||||||||
|
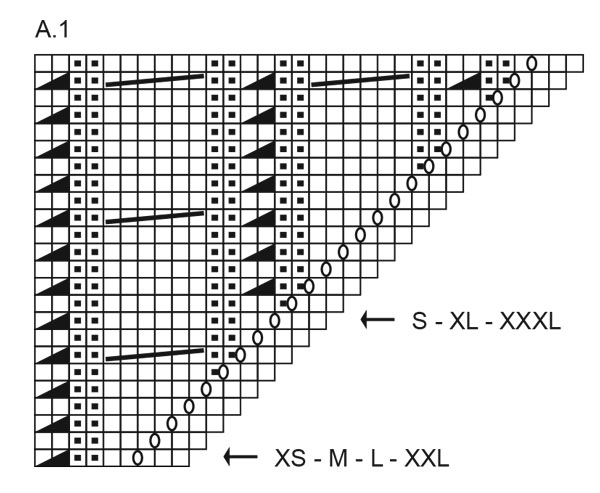
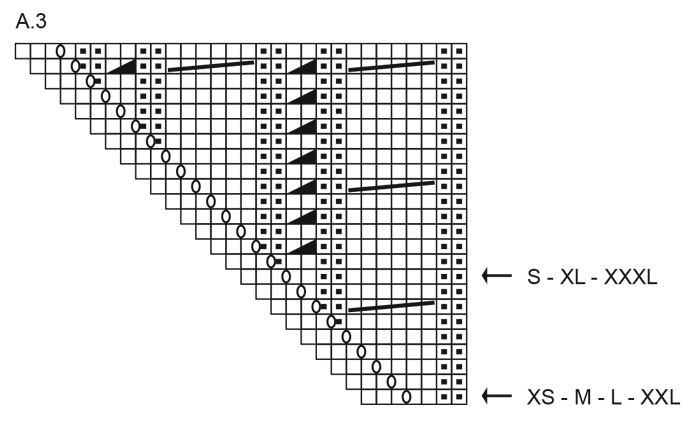
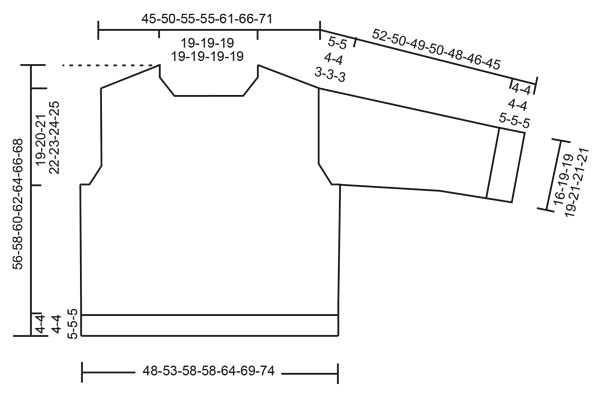
------------------------------------------------------- EXPLANATIONS FOR THE PATTERN: ------------------------------------------------------- PATTERN: See diagrams A.1 to A.4. Start at the arrow for your size (applies to A.1 and A.3). If there are not enough stitches for a cable, work in stockinette stitch. The diagrams show the pattern from the right side. INCREASE TIP-1: INCREASE 1 STITCH TOWARDS THE LEFT - from RIGHT SIDE: Use left needle to pick up yarn between 2 stitches from row below, pick up yarn from the front and knit in the stitch loop that is on the back of the needle. INCREASE 1 STITCH TOWARDS THE RIGHT - from RIGHT SIDE: Use left needle to pick up yarn between 2 stitches from row below, pick up yarn from the back and knit in the stitch loop that is on the front side of the needle. INCREASE TIP-2: INCREASE 1 STITCH TOWARDS THE RIGHT - from WRONG SIDE: Use left needle to pick up yarn between 2 stitches from row below, pick up yarn from the back and purl in the stitch loop that is on the front side of the needle. INCREASE 1 STITCH TOWARDS THE LEFT - from WRONG SIDE: Use left needle to pick up yarn between 2 stitches from row below, pick up yarn from the front and purl in the stitch loop that is on the back side of the needle. ------------------------------------------------------- START THE PIECE HERE: ------------------------------------------------------- SWEATER – SHORT OVERVIEW OF THE PIECE: The pattern uses both long and short needles; start with the length which fits the number of stitches and change when necessary. The piece is started back and forth, casting on stitches at the back of the neck and working top down with pattern, while increasing stitches on each side for the back shoulders, which become slightly diagonal. The back piece is worked as far as the armholes. The front piece is then worked in 2 sections, knitting up stitches along 1 back shoulder, working pattern and increasing for the neckline. This is repeated on the other shoulder, the 2 front sections are joined when the neckline is finished and worked as far as the armholes. The front and back pieces are joined on the same circular needle and the body worked in the round. The sleeves are worked in the round, bottom up as far as the sleeve cap, which is finished back and forth. Stitches are knitted up around the neckline and the neck worked in the round. If there is a «0» in your chosen size, skip the information and go straight to the next instruction. BACK PIECE: The piece is started back and forth. Cast on 34-34-34-34-34-34-34 stitches with circular needle size 5 MM = US 8 and DROPS Air. Purl 1 row from the wrong side, increasing 6-10-6-6-10-6-10 stitches evenly on this row = 40-44-40-40-44-40-44 stitches. Now work PATTERN, starting at the arrow for your size in diagrams A.1 and A.3: ROW 1 (right side): Read INCREASE TIP-1. Work A.1, then A.2 2-1-2-2-1-2-1 times (= 24-12-24-24-12-24-12 stitches), work A.3 – increase leans towards the left at the beginning of the row and towards the right at the end of the row. ROW 2 (wrong side): Read INCREASE TIP-2. Purl 3, increase 1 stitch towards the right, knit above knit and purl above purl until there are 3 stitches left, increase 1 stitch towards the left, purl 3. The increases should fit into the pattern inside 3 stockinette stitches on each side. Work ROWS 1 and 2 a total of 12-8-12-12-8-12-8 times (24-16-24-24-16-24-16 rows worked) = 88-76-88-88-76-88-76 stitches. Now work as follows, all sizes beginning on the first row in the diagrams: ROW 1 (right side): Remember INCREASE TIP-1. Work A.1, then A.2 6-5-6-6-5-6-5 times (= 72-60-72-72-60-72-60 stitches), work A.3. ROW 2 (wrong side): Remember INCREASE TIP-2. Purl 3, increase 1 stitch towards the left, knit above knit and purl above purl until there are 3 stitches left, increase 1 stitch towards the right, purl 3. Work ROWS 1 and 2 a total of 3-9-9-9-12-12-12 times (6-18-18-18-24-24-24 rows worked) = 100-112-124-124-124-136-124 stitches. The increases are finished in sizes XS, S, M and L and the pattern has been established. Skip the next paragraph in these sizes. Continue as follows in sizes XL, XXL and XXXL: ROW 1 (right side): Work A.1, then A.2 0-0-0-0-9-10-9 times (0-0-0-0-108-120-108 stitches), work A.3. ROW 2 (wrong side): Purl 3, increase 1 stitch towards the left, knit above knit and purl above purl until there are 3 stitches left, increase 1 stitch towards the right, purl 3. Work ROWS 1 and 2 a total of 0-0-0-0-3-3-9 times (0-0-0-0-6-6-18 rows worked) = 100-112-124-124-136-148-160 stitches. The pattern is now established. From the right side the pattern ends with the first 10 stitches in A.2 before the 3 stockinette stitches. Insert 1 marker outermost on one side. The piece is now measured from here! Continue pattern A.2 with 3 stockinette stitches on each side (remember to maintain the knitting gauge) until the piece measures 6-6-5-6-6-5-6 cm = 2⅜"-2⅜"-2"-2⅜"-2⅜"-2"-2⅜" from the marker, down the armhole and with the last row from the wrong side. Now increase for the armholes. INCREASE FOR ARMHOLES: ROW 1 (right side): Remember INCREASE TIP-1. Knit 3, increase 1 stitch towards the left, work pattern as before until there are 3 stitches left, increase 1 stitch towards the right, knit 3. ROW 2 (wrong side): Knit above knit and purl above purl– work the new stitches into A.2 as you go. Work ROWS 1 and 2 a total of 4 times = 108-120-132-132-144-156-168 stitches. The piece measures 10-10-9-10-10-9-10 cm = 4"-4"-3½"-4"-4"-3½"-4" from the marker and down the armhole. Make a note of the last row worked in A.2 so you can match the back and front pieces later on, before joining them together. Cut the strand, place the stitches on a stitch holder/thread. Work the left front piece along the left back shoulder as follows: LEFT FRONT PIECE: Find the left back shoulder as follows: Lay the back piece flat, right side up, with the stitch holder towards you; left side of piece = left shoulder. Start from the right side by the neckline on the left back shoulder and knit up 1 stitch in each row worked, inside the outermost stitch (= 30-34-42-42-46-54-58 stitches), then knit up 1 stitch outermost on the shoulder = 31-35-43-43-47-55-59 shoulder-stitches. All length-measurements on the front piece are taken from this knitted up row. Work the first row from the wrong side as follows: Purl 3, then work rib (knit 2, purl 6, knit 2, purl 2) to end of row – the pattern reflects the outermost stitches on the back piece. Continue the pattern back and forth as follows: ROW 1 (right side): Knit 2, knit 0-4-0-0-4-0-4, purl 2, work A.4 until there are 3 stitches left, knit 3. ROW 2 (wrong side): Knit above knit and purl above purl. Work until the piece measures 6-7-8-9-10-11-12 cm = 2⅜"-2¾"-3⅛"-3½"-4"-4⅜"-4¾", with the last row from the wrong side. Make a note of the last row worked in A.4, so the two front pieces match before they are increased for the neckline. Increase as follows: ROW 1 (right side): Remember INCREASE TIP-1. Knit 2, increase 1 stitch towards the left, work pattern as before until there are 3 stitches left, knit 3. ROW 2 (wrong side): Knit above knit and purl above purl– work the new stitches into A.4 as you go. Work ROWS 1 and 2 a total of 4 times (8 rows worked) = 35-39-47-47-51-59-63 stitches, with the next row from the right side. Cut the strand, place the stitches on a stitch holder/thread. Work the right front piece along the right back shoulder as follows: RIGHT FRONT PIECE: Start from the right side by the armhole on the right back shoulder and knit up 1 edge stitch in the outermost stitch, then 1 stitch in each row worked inside the outermost stitch as far as the neckline = 31-35-43-43-47-55-59 shoulder-stitches. All length-measurements on the front piece are taken from this knitted up row. Work the first row from the wrong side as follows: Purl 2-6-2-2-6-2-6, knit 2, work rib (knit 2, purl 2, knit 2, purl 6) until there are 3 stitches left, purl 3 - the pattern reflects the outermost stitches on the back piece. Now work pattern back and forth as follows: ROW 1 (right side): Knit 3, work A.2 until there are 2 stitches left, knit 2. ROW 2 (wrong side): Knit above knit and purl above purl. Work until the piece measures 6-7-8-9-10-11-12 cm = 2⅜"-2¾"-3⅛"-3½"-4"-4⅜"-4¾", make sure the pattern has been worked to the same row as on the left front piece. Increase for the neckline as follows: ROW 1 (right side): Knit 3, continue the pattern until there are 2 stitches left, increase 1 stitch towards the right, knit 2 – remember INCREASE TIP-1. ROW 2 (wrong side): Knit above knit and purl above purl – work the new stitches into A.2 as you go. Work ROWS 1 and 2 a total of 4 times (8 rows worked) = 35-39-47-47-51-59-63 stitches, with the next row from the right side. The 2 front pieces are now joined as follows – make sure the pattern matches on both front pieces. FRONT PIECE: From the right side, work pattern as before across the right front piece, then cast on 30-34-30-30-34-30-34 stitches, work pattern across the left front piece as before until there are 3 stitches left, knit 3 = 100-112-124-124-136-148-160 stitches. The cast-on stitches for the neckline will fit into pattern A.2, continue the pattern on the next row from the wrong side. From the right side the pattern finishes with the first 10 stitches in A.2 before the 3 knitted stitches. Continue A.2 back and forth with 3 stockinette stitches on each side until the piece measures 24-26-29-30-32-35-36 cm = 9½"-10¼"-11⅜"-11¾"-12½"-13¾"-14¼", making sure you finish on the same row as on the back piece before increasing for the armholes. INCREASE FOR ARMHOLES: ROW 1 (right side): Remember INCREASE TIP-1. Knit 3, increase 1 stitch towards the left, continue the pattern until there are 3 stitches left, increase 1 stitch towards the right, knit 3. ROW 2 (wrong side): Knit above knit and purl above purl– work the new stitches into A.2 as you go. Work ROWS 1 and 2 a total of 4 times = 108-120-132-132-144-156-168 stitches. The front piece measures 28-30-33-34-36-39-40 cm = 11"-11¾"-13"-13⅜"-14¼"-15¼"-15¾", with the last row from the wrong side, finishing on the same row as on the back piece. Now join the front and back pieces for the body. BODY: From the right side, continue the pattern across the front piece, then across the back piece and knit the first 3 stitches on the front piece = 216-240-264-264-288-312-336 stitches. Insert 1 marker (beginning of round). The piece is now measured from here! Continue the pattern in the round (the pattern fits under each sleeve). Make sure the cables are worked on the same round. Work until the body measures 26-26-25-26-25-24-25 cm = 10¼"-10¼"-9¾"-10¼"-9¾"-9½"-9¾" from the marker. Change to circular needle size 3 MM = US 2.5. Work rib (knit 2, purl 2), which should neatly match the pattern. When the rib measures 4-4-4-4-5-5-5 cm = 1½"-1½"-1½"-1½"-2"-2"-2", bind off with rib. The sweater measures approx. 56-58-60-62-64-66-68 cm = 22"-22¾"-23⅝"-24⅜"-25¼"-26"-26¾", from by the neckline. The front piece is approx. 2 cm = ¾" longer because some of the front piece is on the back. SLEEVES: The sleeves are worked in the round as far as the sleeve cap, then finished back and forth. Cast on 72-84-84-84-96-96-96 stitches with double pointed needles size 3 MM = US 2.5. Work rib in the round (knit 2, purl 2) for 4-4-4-4-5-5-5 cm = 1½"-1½"-1½"-1½"-2"-2"-2". Change to double pointed needles size 5 MM = US 8 and work A.4 6-7-7-7-8-8-8 times on the round. Insert 1 marker-thread at the beginning of the round; this is used when increasing under the sleeve. Allow the thread to follow your work onwards. Work pattern until the sleeve measures 20 cm = 8". Now increase in purled stitches on each side of the marker-thread as follows: Work until there is 1 stitch left on the round, make 1 yarn over, work 4 stitches as before (the cable sits in the middle of these 4 stitches), make 1 yarn over (= 2 increased stitches, which are purled and lie on each side of 2 cabled stitches). Increase like this every 10-0-10-8-10-10-5 cm = 4"-0"-4"-3⅛"-4"-4"-2" a total of 3-0-2-4-2-3-5 times = 78-84-88-92-100-102-106 stitches. When the sleeve measures 47-45-45-46-45-43-42 cm = 18½"-17¾"-17¾"-18"-17¾"-17"-16½", work the sleeve cap as follows, with the next row an odd row in A.4 so all cables are still worked from the right side. SLEEVE CAP: On the next round bind off 16 stitches under the sleeve but, to avoid cutting the strand, begin the round 7 stitches before the marker-thread, bind off 16 stitches (the 2 cable-stitches are in the middle of these 16 stitches) and work to end of round = 62-68-72-76-84-86-90 stitches. Continue the pattern back and forth, binding off for the sleeve cap at the beginning of each row as follows: Bind off 4-4-4-4-5-5-6 stitches 2 times on each side, then 3-3-3-3-4-4-4 stitches 1 time on each side = 40-46-50-54-56-58-58 stitches. Bind off 4-4-4-4-5-5-6 stitches on each side until the sleeve measures 52-50-49-50-48-46-45 cm = 20½"-19¾"-19¼"-19¾"-19"-18"-17¾". Bind off the remaining stitches at the same time as knitting together all knitted stitches, 2 and 2. NECK: Use circular needle size 3 MM = US 2.5. Start from the right side on one shoulder-line and knit up 96-100-100-104-104-108-108 stitches, inside 1 stitch around the neckline. The stitch count must be divisible by 4. Work rib in the round (knit 2, purl 2) for 4-4-4-4-5-5-5 cm = 1½"-1½"-1½"-1½"-2"-2"-2". Bind off a little loosely. ASSEMBLY: Sew the sleeves into the armholes, inside 1 stitch. |
||||||||||||||||
Diagram explanations |
||||||||||||||||
|
||||||||||||||||
 |
||||||||||||||||
 |
||||||||||||||||
 |
||||||||||||||||
 |
||||||||||||||||
Have you finished this pattern?Tag your pictures with #dropspattern #wintersketchsweater or submit them to the #dropsfan gallery. Do you need help with this pattern?You'll find 30 tutorial videos, a Comments/Questions area and more by visiting the pattern on garnstudio.com. © 1982-2026 DROPS Design A/S. We reserve all rights. This document, including all its sub-sections, has copyrights. Read more about what you can do with our patterns at the bottom of each pattern on our site. |
||||||||||||||||


With over 40 years in knitting and crochet design, DROPS Design offers one of the most extensive collections of free patterns on the internet - translated to 17 languages. As of today we count 325 catalogs and 12298 patterns - 12288 of which are translated into English (US/in).
We work hard to bring you the best knitting and crochet have to offer, inspiration and advice as well as great quality yarns at incredible prices! Would you like to use our patterns for other than personal use? You can read what you are allowed to do in the Copyright text at the bottom of all our patterns. Happy crafting!
Post a comment to pattern DROPS 264-1
We would love to hear what you have to say about this pattern!
If you want to leave a question, please make sure you select the correct category in the form below, to speed up the answering process. Required fields are marked *.