
Popular categories
Looking for a yarn?


Comments / Questions (9)
![]() Gunilla wrote:
Gunilla wrote:
Jag har beställt garn efter anvisningar till mönstret och kommit en bit med stickningen. När jag börjar på diagram A2 inser jag att färgmarkeringen på diagrammen inte stämmer med bilden av den färdiga koftan. Följer jag diagrammet blir koftan övervägande naturfärgad istället för blå och garnet kommer inte att räcka.
25.11.2025 - 16:35DROPS Design answered:
Hei Gunilla. Har hadde diagram ikonene byttet plass, dette vil vi ordne asap. Tusen takk for at du gjorde oss oppmerksom på dette. mvh DROPS Design
01.12.2025 - 11:49
![]() Evie wrote:
Evie wrote:
In maat S loopt het patroon door als je voorpanden en achterpand samenvoegt. Je kan dan verder breien met alleen A5 of alleen A3. Het is een kwestie van goed uittellen en werken met steekmarkeerders. Het is een heel mooi patroon.
26.03.2025 - 16:57
![]() Evie wrote:
Evie wrote:
In het patroon staat bij het lijf: "brei over de 54-58-62-66-74-82 steken van het rechter voorpand (ga verder met A.5 op dezelfde manier als hiervoor)" Moet dat niet A3 zijn voor het rechtervoorpandgedeelte? Dan brei je linkervoorpand A5, achterpand A2 en rechtervoorpand A3.
19.02.2025 - 06:16
![]() Evie wrote:
Evie wrote:
De kleuraanduiding staat omgekeerd: de lege vakjes zijn de hoofdkleur en de donkere kleur is de contrastkleur.
15.02.2025 - 09:26
![]() Evie wrote:
Evie wrote:
Patroon A1 kent bij de start 2 nld blauw heen en terug, dan 1 nld neutraal heen en een nld blauw terug. Is het de bedoeling dat de blauwe draad wordt meegenomen als de neutrale naald wordt gebreid? Er wordt heen en weer gebreid, bij rondbreien is het geen probleem.
14.02.2025 - 15:23DROPS Design answered:
Dag Evie,Je kunt doen wat je zelf het handigst vindt, dus helemaal meenemen of afknippen opnieuw aanhechten.
15.02.2025 - 10:42
![]() Suzanne wrote:
Suzanne wrote:
Heirloom quality cardigan that would require about a year for me to complete. My granddaughters love this pattern.
12.08.2024 - 00:01
![]() Celina wrote:
Celina wrote:
Cold cardi
10.08.2024 - 22:03
![]() Barisca wrote:
Barisca wrote:
Cosy cardigan
10.08.2024 - 09:20
![]() Veela wrote:
Veela wrote:
Vuoret / Mountains
08.08.2024 - 13:41
|
|||||||
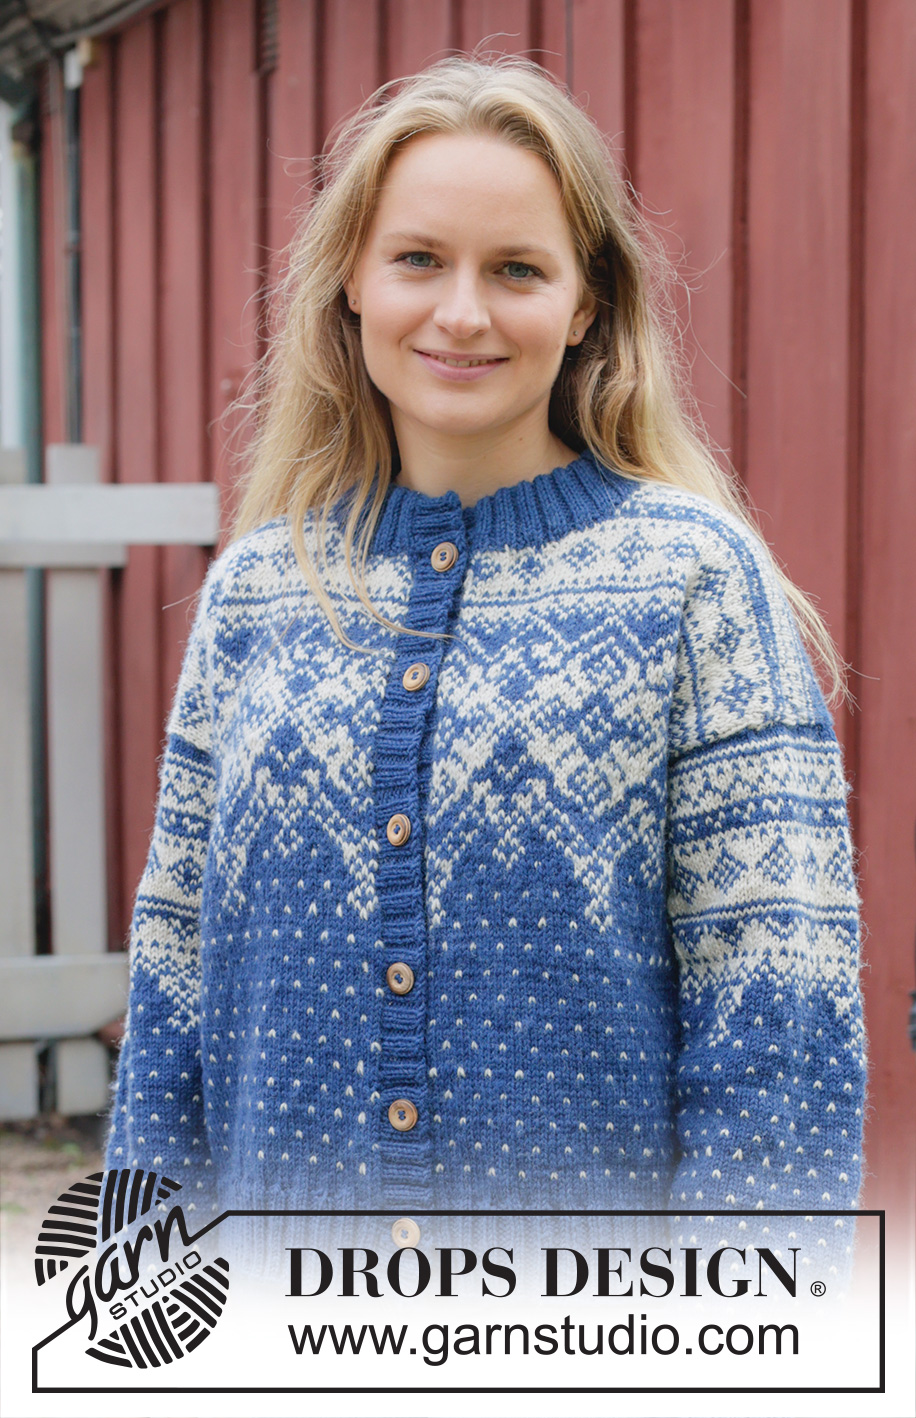
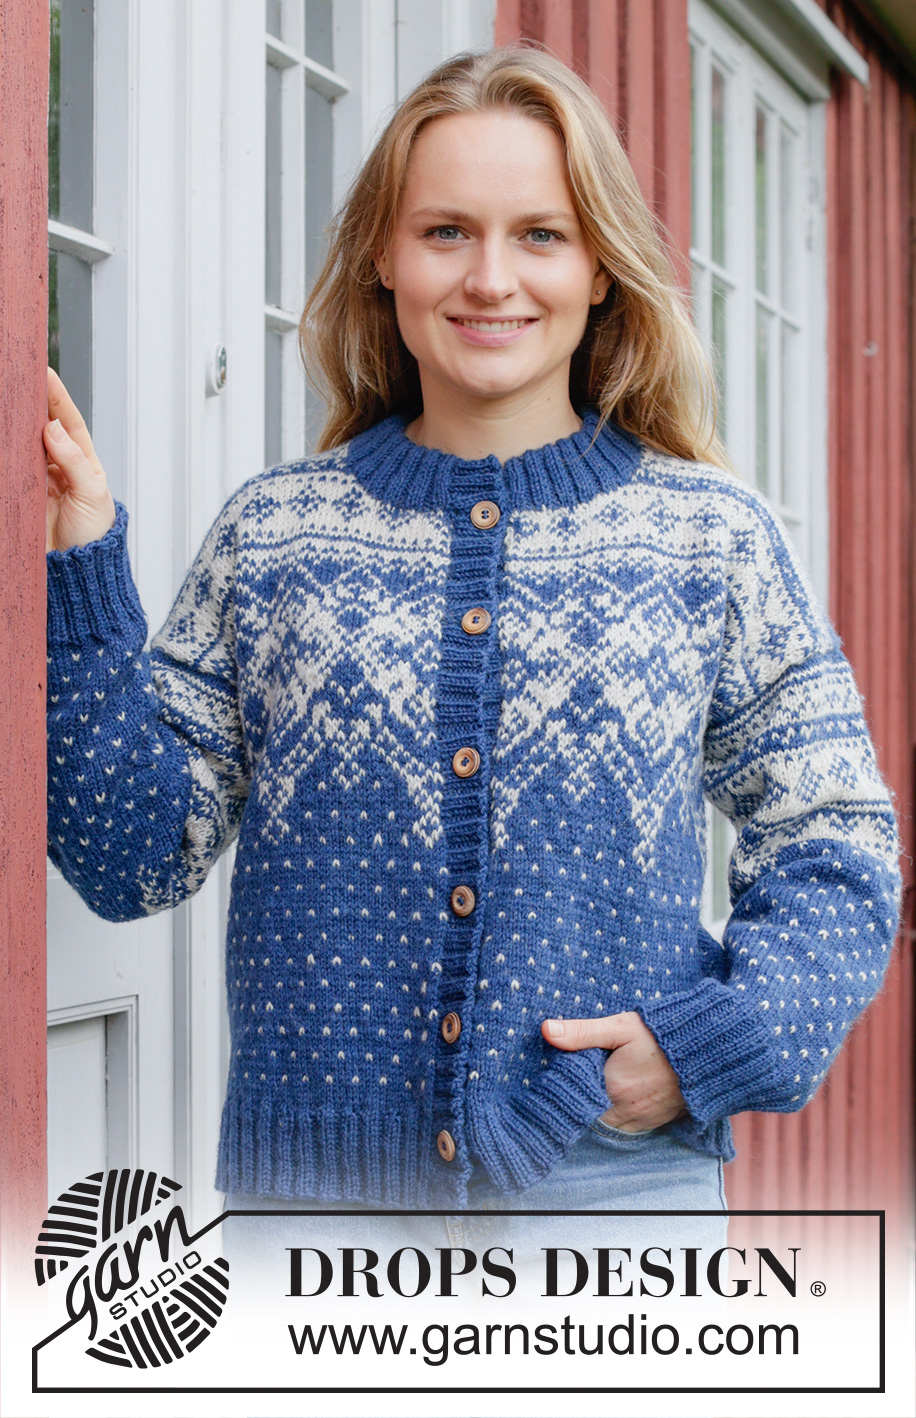
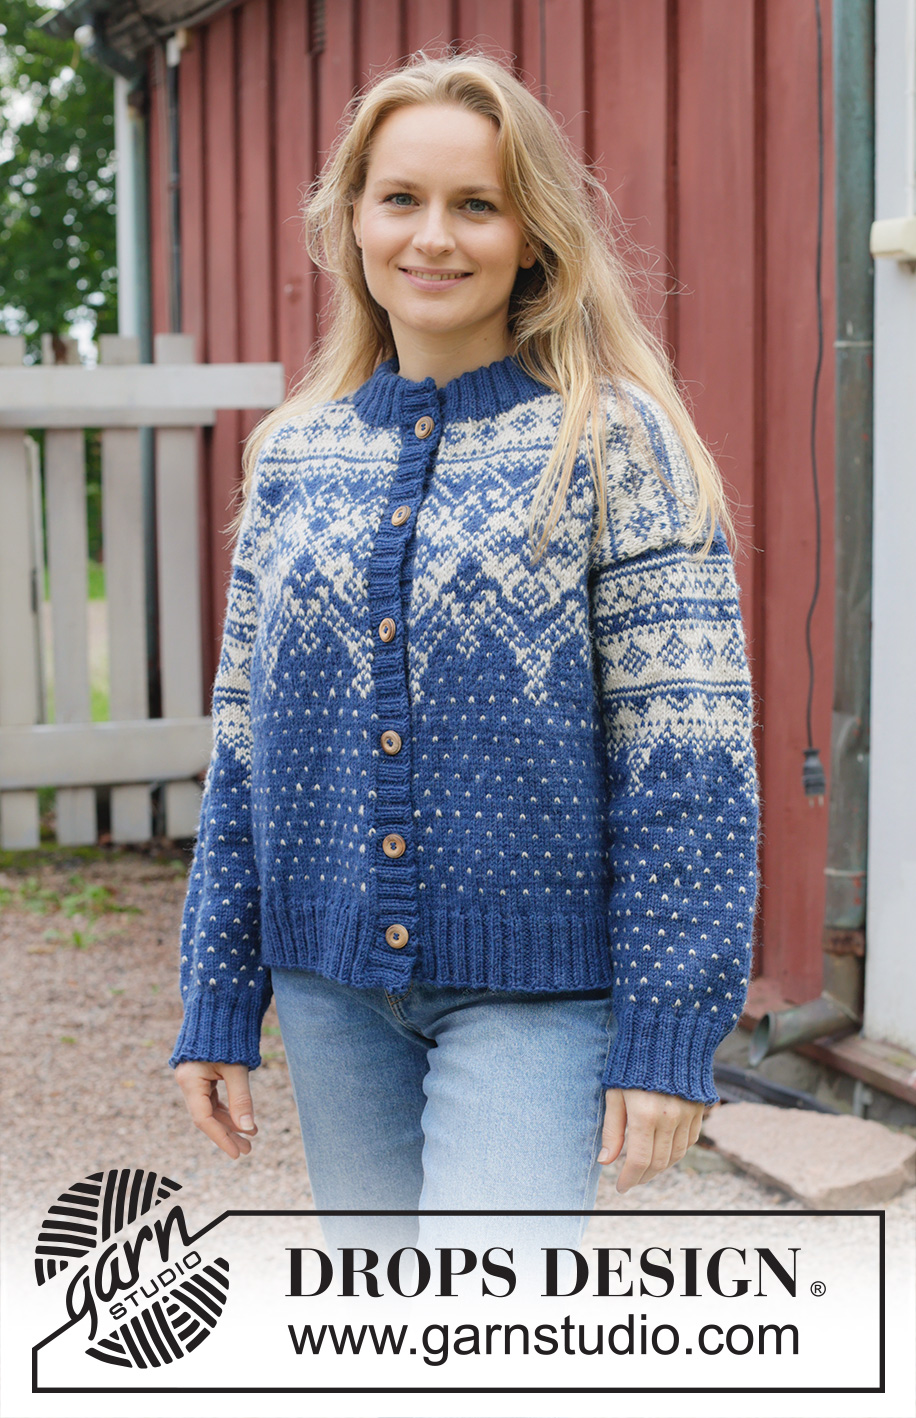
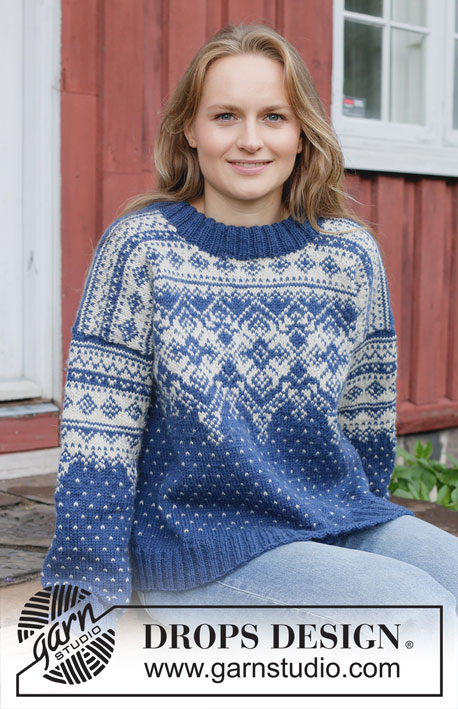
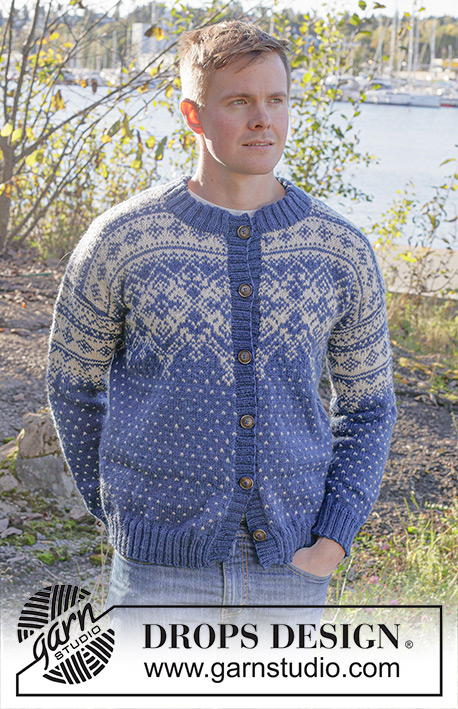
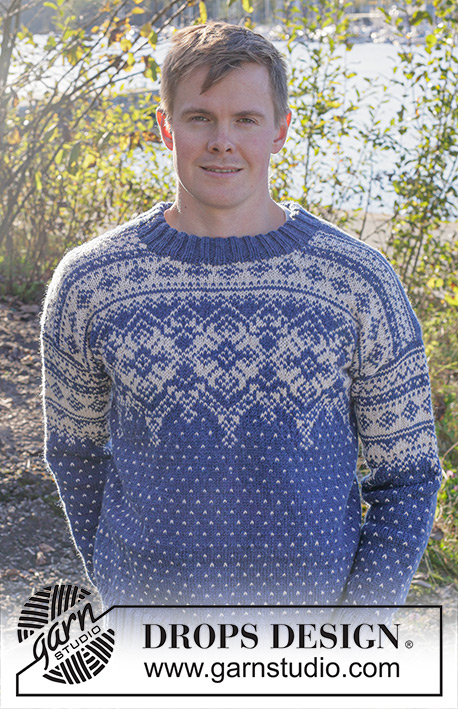
Evening Star Cardigan#eveningstarcardigan |
|||||||
 |
 |
||||||
Knitted jacket in DROPS Karisma or DROPS Daisy. Piece is knitted top down with Nordic pattern and double neck edge. Size: S - XXXL
DROPS 254-24 |
|||||||
|
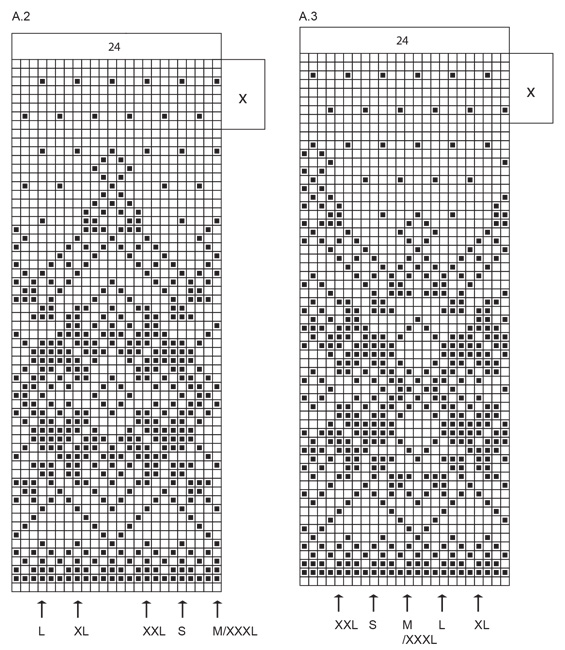
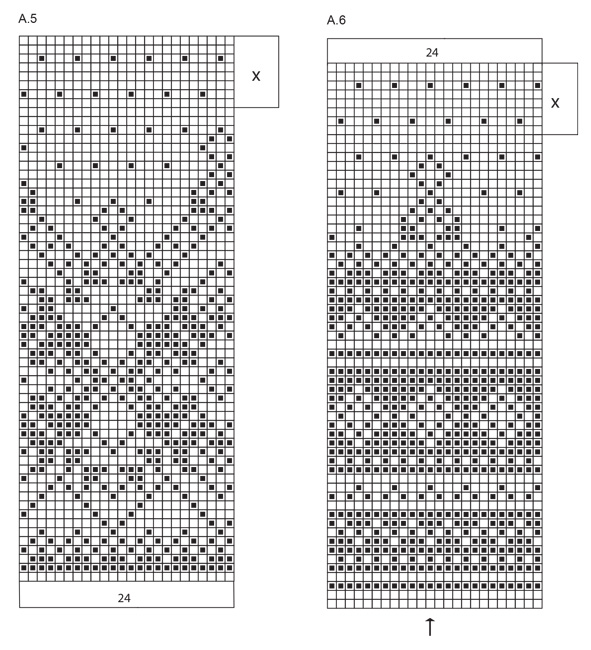
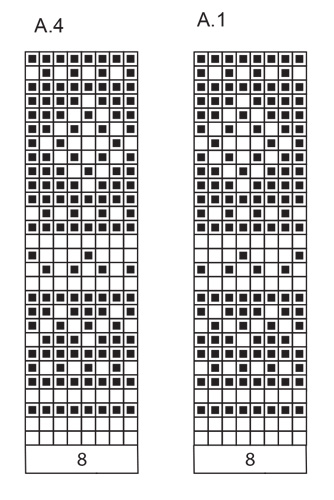
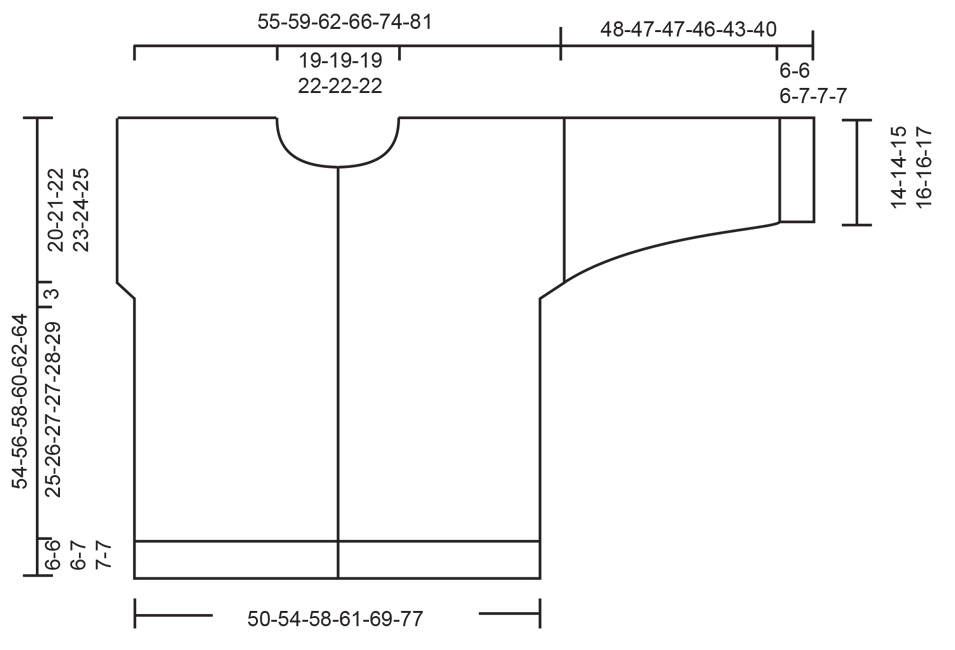
---------------------------------------------------------- EXPLANATION FOR THE PATTERN: ---------------------------------------------------------- GARTER STITCH (when working back and forth): Knit on all rows, i.e. knit from right side and knit from wrong side. 1 ridge vertically = knit 2 rows. PATTERN: See diagrams A.1 to A.6. Diagrams show all rows in pattern seen from the right side. Work pattern in stockinette stitch. INCREASE TIP: Increase 1 stitch by making 1 yarn over, on next row/round work yarn over knit/purl yarn over twisted to avoid holes. Then work the new stitches in stockinette stitch. DECREASE TIP: Decrease 1 stitch on each side of marker thread as follows: Work until 3 stitches remain before marker thread and knit 2 together, knit 2 (marker thread is in the middle of these 2 stitches), slip 1 stitch knitwise, knit 1, pass slipped stitch over stitch worked (= 2 stitches decreased). KNITTING TIP: To avoid the knitting gauge to tighten when working pattern, it is important not to tighten the strands on back side of piece. Use a larger needle size when working pattern try needed. When there are large gaps in the pattern, twine the yarn on the back of piece. BUTTONHOLES: Decrease for 6-6-6-7-7-7 button holes on right front band. 1 buttonhole = work 2 stitches together, and make 1 yarn over – NOTE: Decrease for buttonholes will look better by purling 2 together in a section with 2 purl stitches (seen from right side). On next row knit yarn over to make holes. Place top buttonhole in the transition between neck edge and front piece, bottom buttonhole approx. in the transition between body and rib. Place the remaining 4-4-4-5-5-5 buttonholes evenly approx. 8-8½-9-7½-7½-8 cm = 3⅛"-3¼"-3½"-2⅞"-2⅞"-3⅛" apart. ---------------------------------------------------------- START THE PIECE HERE: ---------------------------------------------------------- JACKET - SHORT OVERVIEW OF THE PIECE: In this pattern needles of different length have been used, begin with fitting length for number of stitches and switch as needed. Work piece back and forth on needle. Work front pieces and back piece separately. Work top down, down to armholes, slip parts together and work back and forth from mid front. Pick up stitches for sleeves around the armholes. Then work sleeves downwards in the round on needle. Pick up stitches around the neck and work a neck edge, then pick up stitches along front piece and work bands. BACK PIECE: RIGHT SHOULDER: Work back and forth on circular needle. Cast on 38-42-46-46-54-62 stitches on circular needle size 4 MM = US 6 with DROPS Karisma in color dark grey blue or DROPS Daisy in color navy blue. Purl 1 row from wrong side, then work 4 rows pattern as shown in A.1 with 1 edge stitch in GARTER STITCH in each side - read explanation above. Put piece aside, and work the left shoulder. LEFT SHOULDER: Cast on 38-42-46-46-54-62 stitches on circular needle size 4 MM = US 6 with DROPS Karisma in color dark grey blue or DROPS Daisy in color navy blue. Purl 1 row from wrong side, then work 4 rows pattern as shown in A.1, with 1 edge stitch in garter stitch in each side. On next row slip shoulders together for back piece as explained below. Work next row as follows from right side: Work 5th row in A.1 over stitches from left shoulder, cast on 39-39-39-47-47-47 new stitches on row with color off white/off white, work 5th row in A.1 over stitches on right shoulder = 115-123-131-139-155-171 stitches. Read KNITTING TIP! Work 1 edge stitch, A.1 until 2 stitches remain, work first stitch in A.1 (so that pattern begins and ends the same), 1 edge stitch in garter stitch. When A.1 has been worked, continue as follows: 1 edge stitch, see start arrow in A.2 for your size and work A.2 until 1 stitch remains, work 1 edge stitch. Pattern will not fit one whole repetition in the sides but there is one whole repetition of A.2 in the middle of row. When piece measures 20-21-22-23-24-25 cm = 8"-8¼"-8¾"-9"-9½"-9¾" from cast-on edge, insert 1 marker in each side of piece. Note which row in pattern this is. Continue A.2 and bind off at the beginning of every row in each side: 2 stitches 1 time, and 1 stitch 3 times = 105-113-121-129-145-161 stitches. Finish with 1 row from wrong side, cut the yarn and put piece aside, and work front pieces as explained below. RIGHT FRONT PIECE: Cast on 38-42-46-46-54-62 stitches on circular needle size 4 MM = US 6 with DROPS Karisma in color dark grey blue or DROPS Daisy in color navy blue. Purl 1 row from wrong side, then work as follows from right side: 1 edge stitch, A.1 over the next 32-40-40-40-48-56 stitches, work the first 4 stitches in A.1 1-0-1-1-1-1 time, finish with 1 edge stitch. On 13th-13th-15th-15th-17th-17th row in diagram begin increase for neck, cast on new stitches at the end of every row from right side as follows: 1 stitch 1 time, 2 stitches 2 times and 3 stitches 1 time = 46-50-54-54-62-70 stitches, work the increased stitches in the pattern. At the end of next row from right side cast on 13-13-13-17-17-17 new stitches = 59-63-67-71-79-87 stitches. Continue with A.1 with 1 edge stitch in each side. Make sure that the pattern fits the established pattern, the pattern will not fit one whole repetition towards mid front, but will fit towards the side. When A.1 has been worked 1 time vertically, continue as follows: 1 edge stitch, work the last 9-13-17-21-5-13 stitches in A.3 - see start arrow for your size - work A.3 over the next 48-48-48-48-72-72 stitches, finish with 1 edge stitch. When piece measures 20-21-22-23-24-25 cm = 8"-8¼"-8¾"-9"-9½"-9¾", insert 1 marker at the end of row from right side, make sure that this is the same row as on back piece. Continue A.3 and bind off at the beginning of every row from right side as follows: 2 stitches 1 time, and 1 stitch 3 times = 54-58-62-66-74-82 stitches. Finish with a row from wrong side. Fasten off. LEFT FRONT PIECE: Cast on 38-42-46-46-54-62 stitches on circular needle size 4 MM = US 6 with DROPS Karisma in color dark grey blue or DROPS Daisy in color navy blue. Purl 1 row from wrong side, then work as follows from right side: 1 edge stitch, work the last 4 stitches in A.4 1-0-1-1-1-1 time in total, work A.4 over the next 32-40-40-40-48-56 stitches and finish with 1 edge stitch. On 14th-14th-16th-16th-18th-18th row in diagram begin increase for neck, cast on new stitches at the end of every row from wrong side as follows: 1 stitch 1 time, 2 stitches 2 times and 3 stitches 1 time = 46-50-54-54-62-70 stitches, work the increased stitches in the pattern. At the end of next row from wrong side cast on 13-13-13-17-17-17 new stitches = 59-63-67-71-79-87 stitches. Continue with A.4 with 1 edge stitch in each side. Make sure that the pattern fits the established pattern, the pattern will not fit one whole repetition towards mid front, but will fit towards the side. When A.4 has been worked 1 time vertically, continue as follows: 1 edge stitch, A.5 over the next 48-48-48-48-72-72 stitches, work the first 9-13-17-21-5-13 stitches in A.5 and finish with 1 edge stitch. When piece measures 20-21-22-23-24-25 cm = 8"-8¼"-8¾"-9"-9½"-9¾", insert 1 marker at the end of row from right side, make sure that this is the same row as on back piece. Continue A.5 and bind off at the beginning of every row from wrong side as follows: 2 stitches 1 time, and 1 stitch 3 times = 54-58-62-66-74-82 stitches. Finish with a row from wrong side, do not cut the yarn, now work the parts together. BODY: On next row from right side work the parts together: Work as follows: Work over the 54-58-62-66-74-82 stitches from left front piece (continue A.5 as before as far as the pattern), work the next 105-113-121-129-145-161 stitches from back piece (continue pattern as shown in A.2, make sure that the pattern fits the established pattern), work over the 54-58-62-66-74-82 stitches from right front piece (continue A.5 the same way as before). There are now 213-229-245-261-293-325 stitches on needle. Continue back and forth with pattern and 1 edge stitch in each side as before until A.2, A.3 and A.5 have been worked. NOTE! The pattern will not fit in each side but work pattern as far as possible out towards each side, make sure that there is at least 1 stitch with color dark grey blue/navy blue in each side when working dots. When the pattern is done, repeat the last 8 rows in pattern (marked with X). Work as before until piece measures 25-26-27-27-28-29 cm = 9¾"-10¼"-10⅝"-10⅝"-11"-11⅜" from where the parts were put together, finish with a few rows without dots. Now finish the piece with color dark grey blue/navy blue. On next row from right side begin rib while AT THE SAME TIME increasing 39-43-47-47-59-63 stitches evenly on needle = 252-272-292-308-352-388 stitches. Switch to circular needle size 3 MM = US 2.5 and work 1 edge stitch, work rib (= knit 2/purl 2 - remember increase) until 3 stitches remain, knit 2 and 1 edge stitch. Bind off when rib measures 6-6-6-7-7-7 cm = 2⅜"-2⅜"-2⅜"-2¾"-2¾"-2¾". Jacket measures 54-56-58-60-62-64 cm = 21¼"-22"-22¾"-23⅝"-24⅜"-25¼". ASSEMBLY: Sew the shoulder seams. SLEEVES: Work sleeves in the round from armhole and downwards on circular needle size 4 MM = US 6. Pick up from right side 84-88-92-96-100-106 stitches along armhole – use color dark grey blue/navy blue, begin at the marker at the bottom of armhole and pick up stitches until marker in the other side. Stitch bind off in each side are sewn together when finish. Insert 1 marker thread at beginning of row. Insert in addition 1 marker in one of the 2 middle stitches on round (= mid on top of sleeve). Marker thread mid under sleeve is used when decreasing under sleeve and marker mid on top of sleeve should be used to count where to begin pattern under sleeve. Work 1 round in stockinette stitch with color dark grey blue/navy blue. Then work pattern, i.e. work A.6 around the sleeve - stitch with arrow in A.6 should fit stitch with marker mid on top of sleeve - count out towards marker thread where pattern should begin mid under sleeve (the pattern will not fit mid under sleeve). When sleeve measures 3 cm = 1⅛" from marker on the shoulder, decrease mid under sleeve – read DECREASE TIP and decrease as follows: Decrease 2 stitches every 3-2½-2½-2-2-1½ cm = 1⅛"-1"-1"-¾"-¾"-½" 13-14-14-15-16-18 times in total = 58-60-64-66-68-70 stitches. When A.6 has been worked one time vertically, repeat the last 8 rounds (marked with x in diagram) Work until sleeve measures 42-41-41-39-36-33 cm = 16½"-16⅛"-16⅛"-15¼"-14¼"-13" from marker, finish with a few rows without dots. Now finish the piece with color dark grey blue/navy blue. Switch to double pointed needles size 3 MM = US 2.5 and work rib (= knit 2/purl 2) while AT THE SAME TIME increasing 10-12-12-10-12-14 stitches evenly on 1st round = 68-72-76-76-80-84 stitches. When rib measures 6-6-6-7-7-7 cm = 2⅜"-2⅜"-2⅜"-2¾"-2¾"-2¾" bind off. DOUBLE NECK EDGE: Use circular needle size 3 MM = US 2.5 and color dark grey blue/navy blue. Begin from right side mid front and pick up approx. 120 to 136 stitches around the neck, number of stitches must be divisible by 4. Work first row as follows from wrong side: 1 edge stitch, work rib (= purl 2, knit 2) until 3 stitches remain, purl 2 and 1 edge stitch. Continue rib back and forth like this for 9 cm = 3½". Switch to circular needle size 4 MM = US 6 and bind off. RIGHT BAND: Use circular needle size 3 MM = US 2.5 and color dark grey blue/navy blue. Begin at the bottom along opening on jacket and pick up approx. 120 to 140 stitches inside 1 edge stitch until 5 cm = 2" remain at the top on neck edge (the last 5 cm = 2" are folded in later) - number of stitches must be divisible by 4. Work rib back and forth as follows (first row is from wrong side): Work 1 edge stitch, * purl 2, knit 2 *, work from *-* until 3 stitches remain, purl 2 and 1 edge stitch. Continue rib until band measures 1½ cm = ½". Now decrease for 6-6-6-7-7-7 BUTTONHOLES evenly – read explanation above. Bind off when band measures 3 cm = 1⅛". LEFT BAND: Use circular needle size 3 MM = US 2.5 and color dark grey blue/navy blue. Begin at the top along opening on jacket, 4 cm = 1½" down from cast-on edge on neck edge (the top 5 cm = 2" of neck edge are folded in later) and pick up approx. 120 to 140 stitches inside 1 edge stitch down to the end of body - number of stitches must be divisible 4. Work the same way as right band but do not decrease for buttonholes ASSEMBLY: Sew the buttons on to the left band. Fold the rib down on inside of garment. Fasten rib to get a double neck edge. To avoid a tight neck edge that sticks out it is important to keep the seam elastic. Sew opening towards mid front together on bands with neat little stitches. Sew the opening under each sleeve. |
|||||||
Diagram explanations |
|||||||
|
|||||||
 |
|||||||
 |
|||||||
 |
|||||||
 |
|||||||
Have you finished this pattern?Tag your pictures with #dropspattern #eveningstarcardigan or submit them to the #dropsfan gallery. Do you need help with this pattern?You'll find 35 tutorial videos, a Comments/Questions area and more by visiting the pattern on garnstudio.com. © 1982-2026 DROPS Design A/S. We reserve all rights. This document, including all its sub-sections, has copyrights. Read more about what you can do with our patterns at the bottom of each pattern on our site. |
|||||||


With over 40 years in knitting and crochet design, DROPS Design offers one of the most extensive collections of free patterns on the internet - translated to 17 languages. As of today we count 324 catalogs and 12290 patterns - 12280 of which are translated into English (US/in).
We work hard to bring you the best knitting and crochet have to offer, inspiration and advice as well as great quality yarns at incredible prices! Would you like to use our patterns for other than personal use? You can read what you are allowed to do in the Copyright text at the bottom of all our patterns. Happy crafting!
Post a comment to pattern DROPS 254-24
We would love to hear what you have to say about this pattern!
If you want to leave a question, please make sure you select the correct category in the form below, to speed up the answering process. Required fields are marked *.