
Popular categories
Looking for a yarn?


Comments / Questions (72)
![]() Krystyna wrote:
Krystyna wrote:
Sam schemat A3 jest czytelny, chodzi mi o scieg francuski na poczstku i koncu okrazenia. Czy wszystkie rzedy zaczynamy i konczymy sciegiem francuskim?
13.09.2023 - 09:31DROPS Design answered:
Witaj Krysiu, przerabiamy 1 oczko brzegowe z każdej strony ściegiem francuskim, gdy jest to zaznaczone w opisie. Przy podkrojach rękawów kilka oczek brzegowych w pewnym momencie jest przerabianych dżersejem (patrz opis). Przy swetrze wykonywanym w częściach i zszywanym na końcu, to oczko ściegiem francuskim na brzegu ułatwia wykonanie estetycznego i niewidocznego szwu. Zobacz video TUTAJ. Pozdrawiamy!
13.09.2023 - 09:52
![]() Krystyna wrote:
Krystyna wrote:
Dzień dobry? Czy robiąc schemat A3 zaczynac rząd od oczka prawgo czy narzutu?
12.09.2023 - 16:52DROPS Design answered:
Witam, 1-szy i 9-ty rząd od narzutu. Pozostałe rzędy od oczka prawego. Pozdrawiam!
12.09.2023 - 21:44
![]() Susanna Kihlberg wrote:
Susanna Kihlberg wrote:
Kan man inte sticka fram och bakstycke samtidigt på rundsticka så slipper man montera dem senare?
25.08.2023 - 09:45DROPS Design answered:
Hei Susanna For å tilfredstille alle våre brukere, skrives det oppskrifter der man både kan strikke frem & tilbake og rundt. Denne er valg til å strikkes frem &tilbake. Du kan fint strikke denne oppskriften rundt, bare husk å tilpasse den, f.eks kantmaske, diagrammet ses kun fra retten osv. mvh DROPS Design
04.09.2023 - 11:58
![]() Charlotte Tielrooij wrote:
Charlotte Tielrooij wrote:
Ik zie dat er een correctie is geplaatst voor dit patroon. Ik zie echter geen verschil tussen het patroon en de correctie. Bvd hartelijk dank.
30.07.2023 - 13:45DROPS Design answered:
Dag Charlotte,
De correctie is al doorgevoerd in het online patroon op het moment dat de correctie geplaatst is. Als je het patroon voor de datum van de correctie had uitgeprint, dan is de correctie nog niet doorgevoerd in de afdruk.
08.08.2023 - 11:40
![]() HARMAND Corinne wrote:
HARMAND Corinne wrote:
Bonsoir Serait-il possible de disposer des explications corrigées de ce modèle ? J’ai suivi le rectificatif mais je n’obtiens pas pour le modèle XL le résultat attendu sur les 129 mailles du dos Ayant acheté la laine nécessaire chez Kalidou j’aimerais pouvoir tricoter ce modèle
26.07.2023 - 22:09DROPS Design answered:
Bonjour Corinne, a quel point sur le dos avez -vous ce probleme?
27.07.2023 - 09:16
![]() Mercedes wrote:
Mercedes wrote:
No logro entender como disminuir párala sisa
14.06.2023 - 20:37DROPS Design answered:
Hola Mercedes. cierras 3-5-6-7-8-11 puntos (dependiendo de la talla) al inicio de cada una de las 2 siguientes filas (1 fila por el lado derecho y 1 fila por el lado revés). Es decir, si estuvieras trabajando la talla más pequeña, disminuyes 3 puntos al principio de la fila por el lado derecho (un lado de la espalda) y 3 puntos al inicio de la siguiente fila, por el lado revés (el otro lado de la espalda).
17.06.2023 - 17:36
![]() Annette wrote:
Annette wrote:
Kann ich das Vorder und Rückenteil nicht auch in einem Rund stricken?
17.05.2023 - 13:08DROPS Design answered:
Liebe Annette, wahrscheinlich, beachten Sie nur, daß die unteren ersten 8-10 cm (siehe Größe) separat wegen Seitenschlizen an beiden Seiten gestrickt werden. Viel Spaß beim stricken!
17.05.2023 - 13:27
![]() Michele Fletcher wrote:
Michele Fletcher wrote:
I could not determine how many skeins to purchase for this sweater. For a woman with a 44" bust??
23.04.2023 - 16:28DROPS Design answered:
Dear Michele, the chest measurements in inches are indicated at the materials section; 44" is for size L (the 3rd number). So you will need 350gr of Drops Air. Since Air comes in balls of 50gr, you will need 7 balls of Drops Air. Since 44" is the measurement of the garment, you may need to work the XL size, which will require 400gr or 8 balls of DROPS Air. Happy knitting!
23.04.2023 - 18:01
![]() Anna Fidrmucová wrote:
Anna Fidrmucová wrote:
Dobrý den, když jsem vypracovala stojáček podle návodu, byl moc široký a vlnil se. nebylo to hezké. Vůbec nevypadal jako stojáček na modelce. Chtěla bych se zeptat proč se k původně nahozeným okům průkrčníku nahazují další oka? V mém případě 90 ok. Když jsem spočítala oka na modelce příjde mi že se tam oka navíc nenahazovala. Svetr je jinak nádherný a celý postup byl super. Moc děkuji za odpověď. Anna
08.03.2023 - 22:34DROPS Design answered:
Dobrý den, Anno, oka se přidávájí kvůli tomu, že stojáček pleteme pružným vzorem, který se hodně stáhne. Abychom předešli tomu, že budeme mít moc stažený a těsný i samotný průkrčník, nabíráme z jeho okraje dodatková oka. Pokud ale máte stojáček moc široký, zkuste si počet nabraných ok upravit (snížit) - celkový počet ok by ale každopádně měl zůstat sudý, aby vám vycházelo střídání pružného vzoru. Hodně zdaru! Hana
09.03.2023 - 09:32
![]() Susana Araujo wrote:
Susana Araujo wrote:
Hi there, I am very confused with this tip : "If the decrease ends up in a symbol which covers 3 stitches, replace this symbol with ‘knit 2 twisted together’. Then keep the one yarn over." 1. If I get to 3 stitches in the pattern for example with 1 YO in the middle, shall I ignore that the YO is in the middle and do the knit 2 twisted together first and YO as last? 2. If I get to the 3 stitches with the triangle shall I only do 2 twisted together?
24.02.2023 - 10:28DROPS Design answered:
Dear Susana, in these cases, the yo is kept in its place but instead of working slip 1, knit 1 and pass over you work knit 2 twisted together. Happy knitting!
26.02.2023 - 23:07
|
|||||||||||||||||||
Forest Embrace#forestembracesweater |
|||||||||||||||||||
 |
 |
||||||||||||||||||
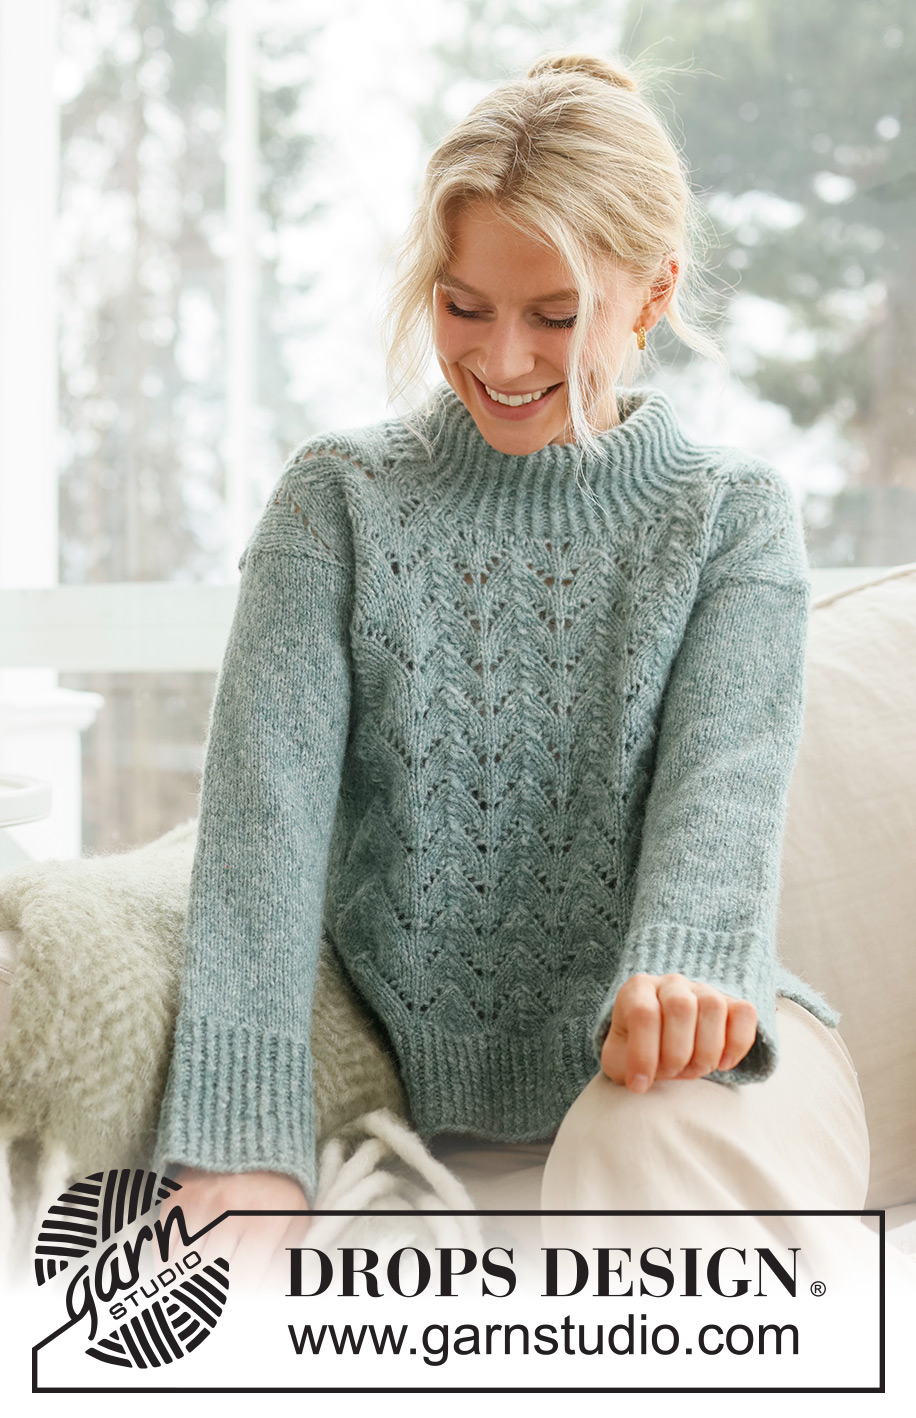
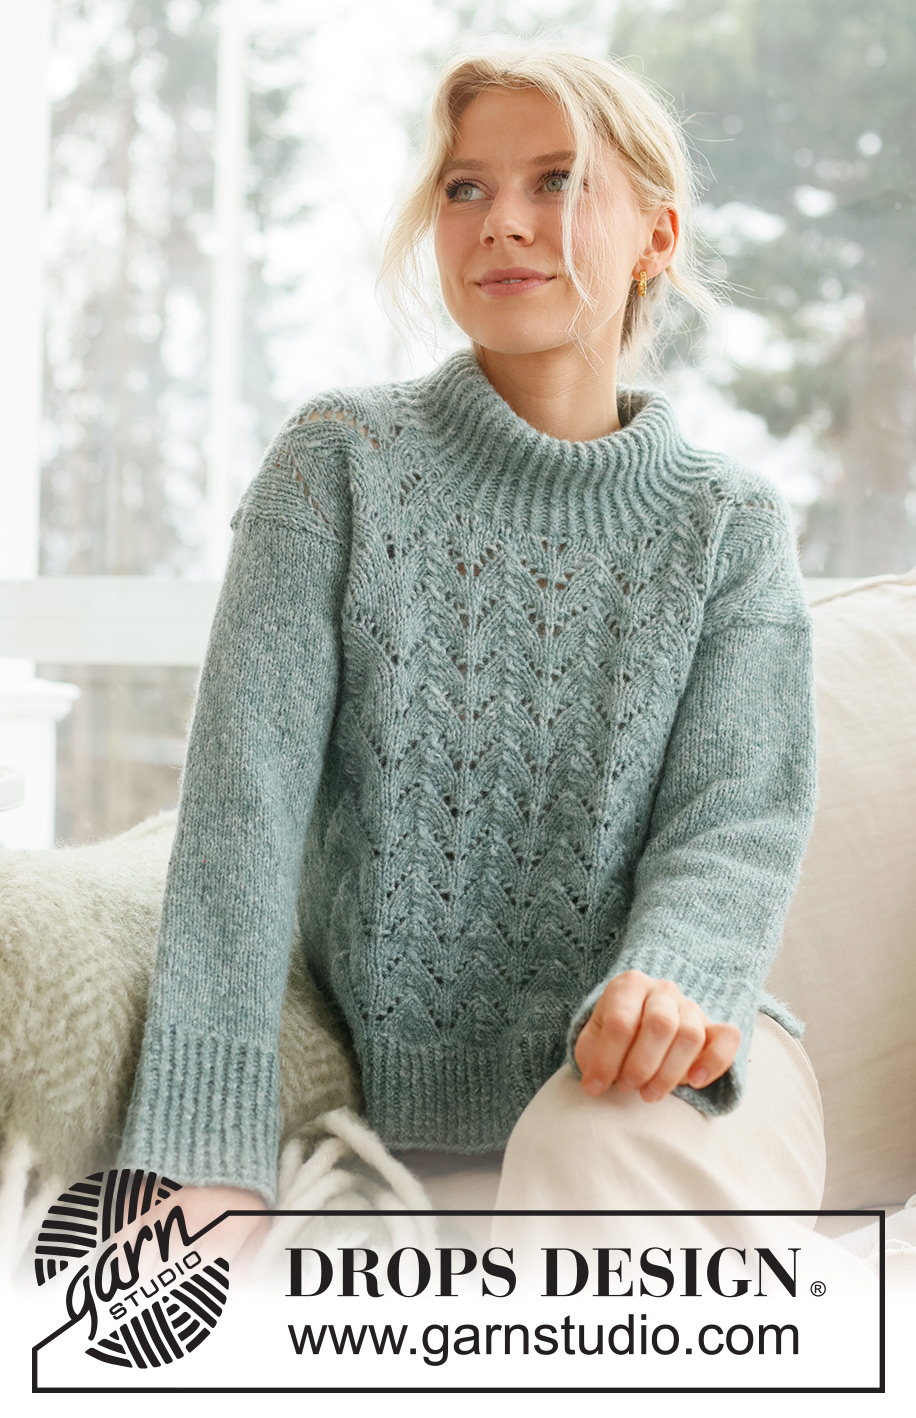
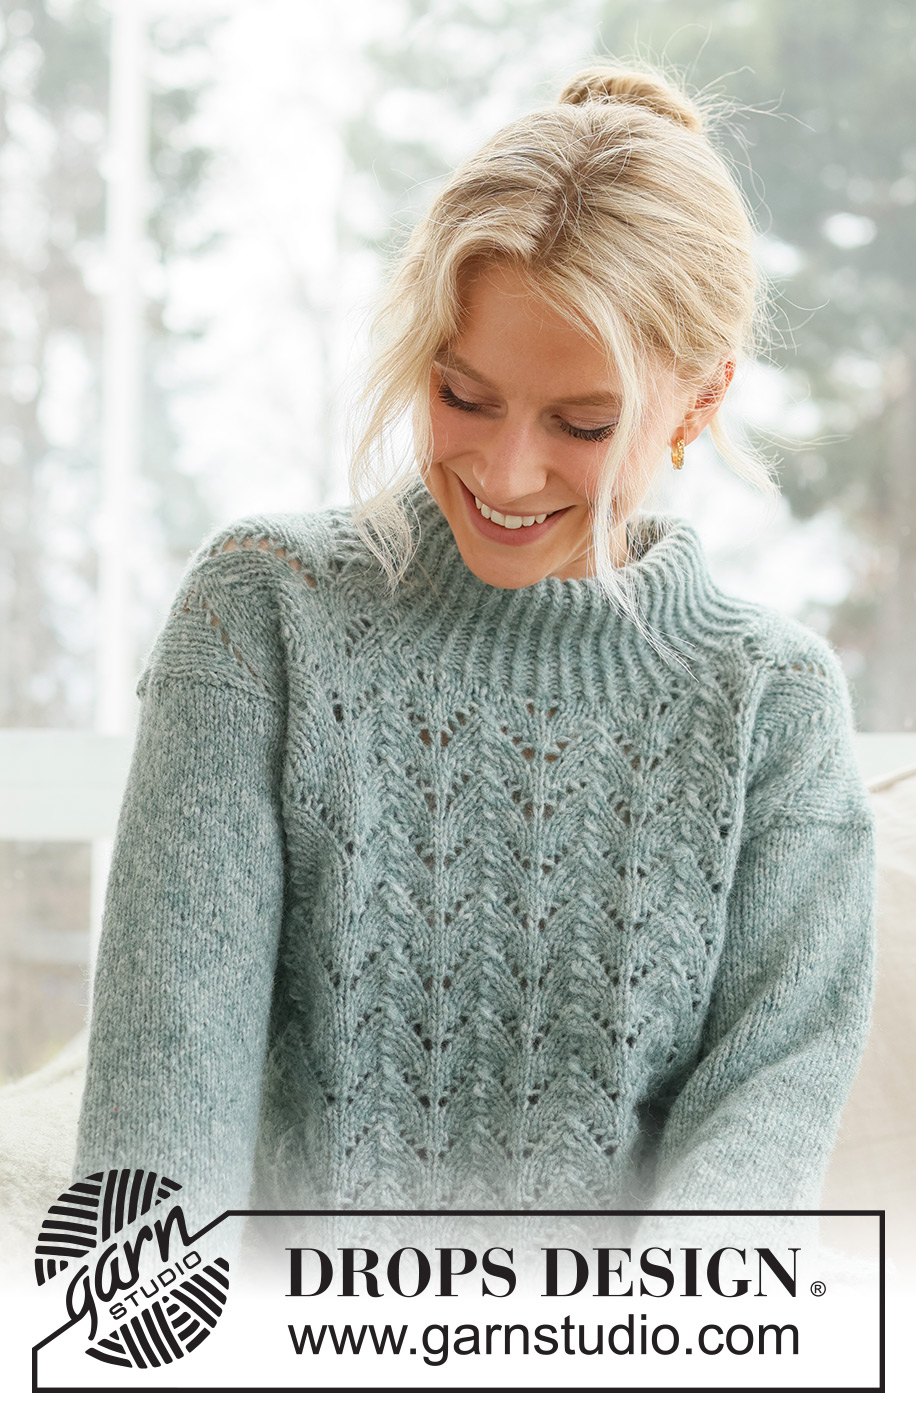
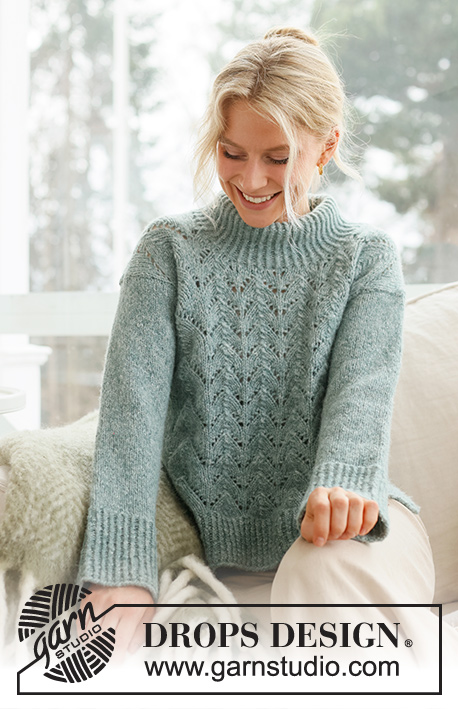
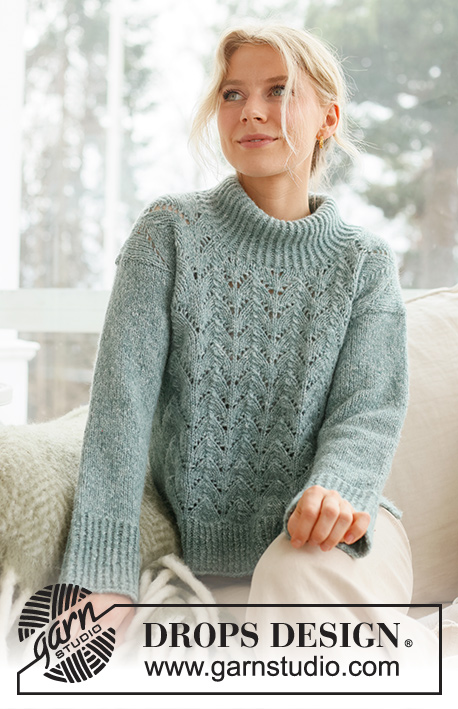
Knitted sweater in DROPS Air. The piece is worked bottom up, with lace pattern, split in the sides and high neck. Sizes S - XXXL.
DROPS 237-1 |
|||||||||||||||||||
|
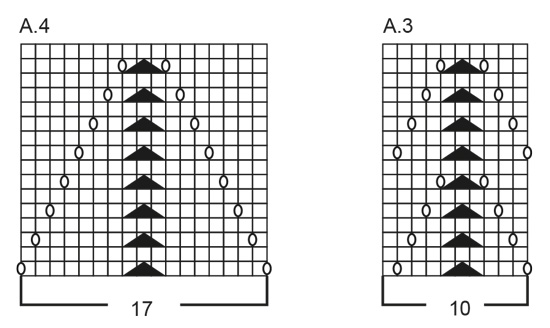
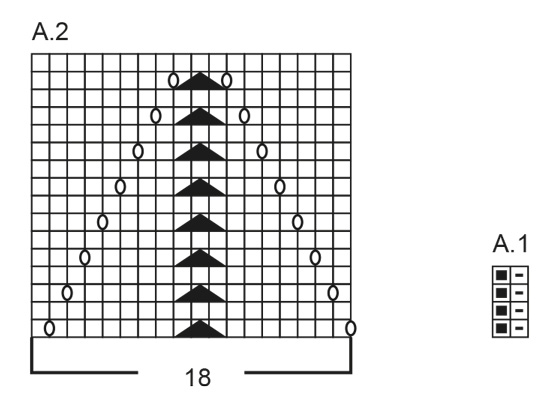
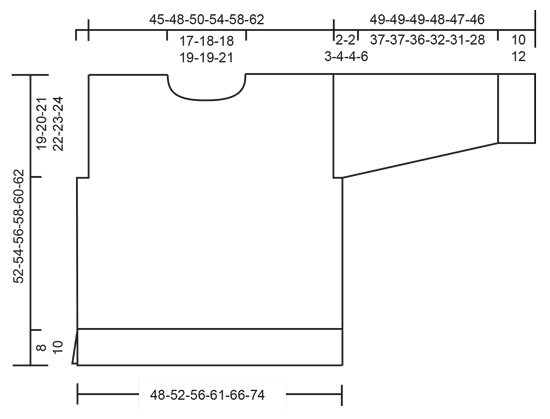
------------------------------------------------------- EXPLANATIONS FOR THE PATTERN: ------------------------------------------------------- RIDGE/GARTER STITCH (worked back and forth): Knit all rows. 1 ridge = knit 2 rows. PATTERN: See diagrams A.1 to A.4. The diagrams show all rows in the pattern from the right side. KNITTING TIP: When decreasing for the neck, the lace pattern will be affected. Take care to count the yarn overs and decreases in the lace pattern when working the neck so the number of stitches is correct. If the decrease ends up in a symbol which covers 3 stitches, replace this symbol with ‘knit 2 twisted together’. Then keep the one yarn over. ------------------------------------------------------- START THE PIECE HERE: ------------------------------------------------------- SWEATER- SHORT OVERVIEW OF THE PIECE: The sections are worked separately, back and forth with circular needle, bottom up. The piece is sewn together and the neck worked to finish. BACK PIECE: Cast on 101-111-119-129-141-157 stitches with circular needle size 3.5 MM = US 4 and DROPS Air. Purl 1 row from the wrong side. Work as follows from the right side: 1 stitch in GARTER STITCH – read description above, work A.1 until there are 2 stitches left, work the first stitch in A.1 (so the pattern is symmetrical) and 1 stitch in garter stitch. Continue this rib for 8-8-8-10-10-10 cm = 3⅛"-3⅛"-3⅛"-4"-4"-4" – finish after a row from the wrong side. Knit 1 row and decrease 20-22-24-26-28-32 stitches evenly spaced = 81-89-95-103-113-125 stitches. Cast on 1 stitch at the end of the row. Change to circular needle size 5 MM = US 8, purl 1 row from the wrong side and cast on 1 stitch at the end of the row = 83-91-97-105-115-127 stitches. Work pattern as follows: 1 stitch in garter stitch, 3-7-10-9-9-15 stitches in stockinette stitch, A.2, work A.3 4-4-4-5-6-6 times, A.4, then 3-7-10-9-9-15 stitches in stockinette stitch and 1 stitch in garter stitch. Continue this pattern. REMEMBER THE KNITTING GAUGE! When the piece measures 33-34-35-36-37-38 cm = 13"-13⅜"-13¾"-14¼"-14½"-15", bind off 3-5-6-7-8-11 stitches at the beginning of the next 2 rows for the armholes = 77-81-85-91-99-105 stitches. Continue the pattern, with 1-3-5-3-2-5 stitches in stockinette stitch on each side. NOTE: Stop working the lace pattern after a complete repeat in height, when the piece is nearly finished (see measurement chart), continue with stockinette stitch to finished length. When the piece measures 50-52-54-56-58-60 cm = 19¾"-20½"-21¼"-22"-22¾"-23⅝", bind off the middle 27-29-29-31-31-33 stitches for the neck and finish each shoulder separately – read KNITTING TIP (if you haven’t already finished the lace pattern). Bind off 1 stitch on the next row from the neck = 24-25-27-29-33-35 stitches on the shoulder. Work until the piece measures 52-54-56-58-60-62 cm = 20½"-21¼"-22"-22¾"-23⅝"-24⅜". Bind off. Work the other shoulder in the same way. FRONT PIECE: Cast on and work in the same way as the back until the front piece measures 45-47-48-50-51-53 cm = 17¾"-18½"-19"-19¾"-20"-21". Place the middle 15-17-17-19-19-21 stitches on a thread for the neck and finish each shoulder separately. NOTE: Stop working the lace pattern after a complete repeat in height, when the piece is nearly finished (in the same way as the back), continue with stockinette stitch to finished length. Bind off at the beginning of each row from the neck as follows – remember KNITTING TIP: 2 stitches 2 times and 1 stitch 3 times = 24-25-27-29-33-35 stitches on the shoulder. Work until the piece measures 52-54-56-58-60-62 cm = 20½"-21¼"-22"-22¾"-23⅝"-24⅜". Bind off. Work the other shoulder in the same way. SLEEVES: Cast on 56-58-60-64-66-66 stitches with circular needle size 3.5 MM = US 4 and DROPS Air. Purl 1 row from the wrong side. Work as follows from the right side: 1 stitch in garter stitch, work A.1 until there are 2 stitches left, work the first stitch in A.1 (so the pattern is symmetrical) and 1 stitch in garter stitch. Continue this rib for 10-10-10-12-12-12 cm = 4"-4"-4"-4¾"-4¾"-4¾" – finish after a row from the wrong side. Knit 1 row and decrease 10-10-10-12-12-12 stitches evenly spaced = 46-48-50-52-54-54 stitches. Change to circular needle size 5 MM = US 8. Work stockinette stitch with 1 stitch in garter stitch on each side. When the sleeve measures 12-13-11-13-15-15 cm = 4¾"-5⅛"-4⅜"-5⅛"-6"-6" from the cast-on edge, increase 1 stitch each side on the next row from the right side (increase by making 1 yarn over inside the 2 outermost stitches on each side – on the next row purl the yarn overs twisted to avoid holes). Increase like this every 3½-3-3-2½-2-1½ cm = 1¼"-1⅛"-1⅛"-1"-¾"-½" a total of 10-11-12-12-13-15 times = 66-70-74-76-80-84 stitches. When the sleeve measures 47-47-46-44-43-40 cm = 18½"-18½"-18"-17¼"-17"-15¾", insert 1 marker in each side – they mark the bottom of the armholes. Continue working until the sleeve measures 49-49-49-48-47-46 cm = 19¼"-19¼"-19¼"-19"-18½"-18". Bind off a little loosely. Work the other sleeve in the same way. ASSEMBLY: Sew the shoulder seams. Sew in the sleeves and sew the bottom of the armholes – The markers on the sleeves should match the sides of the body – see sketch. Sew the sleeve and side seams in one go, inside the 1 edge stitch, down to where the new stitches were cast on in each side (8-8-8-10-10-10 cm = 3⅛"-3⅛"-3⅛"-4"-4"-4" split). HIGH NECK: Knit up 70 to 86 stitches around the neck (including the stitches on the thread in front) with short circular needle size 3.5 MM = US 4. Knit 1 round and increase evenly to 90-92-94-98-100-108 stitches. Work A.1 in the round for 14-14-15-15-16-16 cm = 5½"-5½"-6"-6"-6¼"-6¼" – or to desired length. Loosely bind off. You can fold the neck to the inside if you wish and fasten with a stitch at each shoulder seam. |
|||||||||||||||||||
Diagram explanations |
|||||||||||||||||||
|
|||||||||||||||||||
 |
|||||||||||||||||||
 |
|||||||||||||||||||
 |
|||||||||||||||||||
 |
|||||||||||||||||||
Have you finished this pattern?Tag your pictures with #dropspattern #forestembracesweater or submit them to the #dropsfan gallery. Do you need help with this pattern?You'll find 30 tutorial videos, a Comments/Questions area and more by visiting the pattern on garnstudio.com. © 1982-2026 DROPS Design A/S. We reserve all rights. This document, including all its sub-sections, has copyrights. Read more about what you can do with our patterns at the bottom of each pattern on our site. |
|||||||||||||||||||


With over 40 years in knitting and crochet design, DROPS Design offers one of the most extensive collections of free patterns on the internet - translated to 17 languages. As of today we count 324 catalogs and 12290 patterns - 12280 of which are translated into English (US/in).
We work hard to bring you the best knitting and crochet have to offer, inspiration and advice as well as great quality yarns at incredible prices! Would you like to use our patterns for other than personal use? You can read what you are allowed to do in the Copyright text at the bottom of all our patterns. Happy crafting!
Post a comment to pattern DROPS 237-1
We would love to hear what you have to say about this pattern!
If you want to leave a question, please make sure you select the correct category in the form below, to speed up the answering process. Required fields are marked *.