
Popular categories
Looking for a yarn?


Comments / Questions (15)
![]() Nadège wrote:
Nadège wrote:
Bonjour et merci pour ce magnifique modèle. Je suis arrivée à la séparation, j\'ai le bon nombre de mailles mais je ne comprends avec les A.5E, A.5A, A5C, A.5B, A5D. Merci à vous d\'y voir plus clair.
15.03.2026 - 16:55DROPS Design answered:
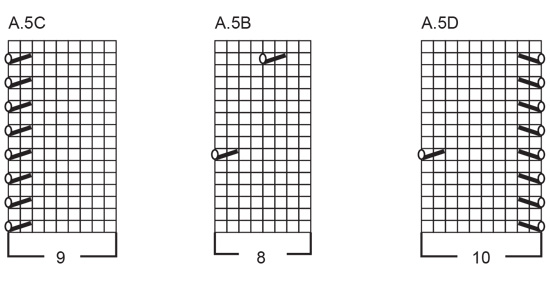
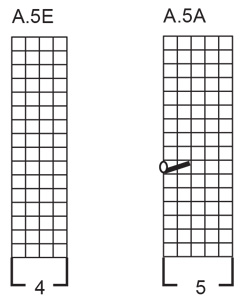
Bonjour Nadège, quand les augmentations du raglan sont terminées, on ne va plus tricoter A.1 ni A.4 car on ne doit plus augmenter, à la place, on va terminer le devant par A.5C (avant A.2), puis on va tricoter A.5D au début du dos (après A.2) et A.5C à la fin du dos (avant A.2) et A.5D au début du devant (après A.2). En même temps, vous tricotez A.5B pour continuer le point ajouré comme avant. Bon tricot!
16.03.2026 - 10:28
![]() Linda wrote:
Linda wrote:
Hej! Jag ska börja med oket, men får inte till det med raglanökningarna. Jag undrar: - finns det en video för hur raglan ska stickas - eller ska det vara vanliga omslag, så att det blir hål? - vilka maskor är raglanökningarna - jag läser a1, a3 (2 maskor) och a4 - men det står att det är 8 ökningar per varv. Är alla de raglan, eller bara de fyra ovan? Med vänlig hälsning, Linda
30.03.2025 - 11:02DROPS Design answered:
Hei Linda. Pr. øke pinne økes det 8 steder. Før og etter glattstrikk/erm maskene = 4 steder + A.1, A.3 (2 steder) og A.4 = 4 steder . Kastene i diagrammene strikkes vanlig = det skal bli hull, mens kastene før og etter glattstrikk/erm strikkes vridd vrang, slik at det ikke blir hull. mvh DROPS Design
31.03.2025 - 14:11
![]() Ksenia wrote:
Ksenia wrote:
Thank you for the pattern! I don't understand why I need to make decreases in the first row just after having cast on? Why can't I cast on the lesser number of stitches right away(111 instead of 131)? Another question is what "1 stitch in garter stitch in each side" means exactly? Does it mean that I have to knit the first and the last stitch of each row? Thank you for your help!
01.03.2025 - 00:46DROPS Design answered:
Dear Ksenia, we cast on with a larger number of stitches so that the cast on edge is less tight and the neck is slightly elastic, so that the head will fit through but the neck won't be too loose either and lose its shape. 1 garter stitch on each side means that the first and last stitch of each row is worked in garter stitch; since you work back and forth this means that this stitch is always knitted, both in right side rows and wrong side rows. Happy knitting!
02.03.2025 - 20:22
![]() Barbara wrote:
Barbara wrote:
Hallo! Ich werde jetzt die Passe teilen. Ich habe aber noch nicht die erforderliche Länge (meine Maschenprobe ist geringfügig kleiner). Kann ich dann noch in der neuen Musteraufteilung weiterstricken, bis ich die erforderliche Länge erreicht habe? Es ist mein erstes Raglan-Model. Vielen Dank im Voraus
31.01.2025 - 16:55DROPS Design answered:
Liebe Barbara, ja genau, stricken Sie einfach im Muster wie beschrieben (dh ohne weiter Zunahmen), bis Sie die richtige Länge erreichen. Viel Spaß beim Stricken!
03.02.2025 - 07:29
![]() Michele wrote:
Michele wrote:
Hello, I am sorry. Now I see what you meant and understand what I did wrong. Thanks so much.
22.11.2024 - 15:25
![]() Michele wrote:
Michele wrote:
Hello again and thank you for your fast response. I did notice the video indicated that the eyelets were followed by a row of ktog. So it seems I have too many sets on my needle at the point of following the yolk instructions since the pattern is supposed to fit between the two markers where the two edges of 6 sts. I think it was because of the yos I completed when I did the eyelets. Thanks.
22.11.2024 - 15:12DROPS Design answered:
Dear Michele, the eyelet row is worked with the K2 tog, YO, so that the number of stitches is not supposed to increase, you should keep same number as before. Happy knitting!
22.11.2024 - 15:56
![]() Michele wrote:
Michele wrote:
Hi, I completed the neck edge but seem to have too many stitches on my needles because the yolk instructors do not bring me to the marker where the last 6 stitches. Could u tell me how many stitches there should be after adding the YO every second stitch when completing the neck edge? Or if I was supposed to decrease stitches prior to starting the yolk? Thank you.
22.11.2024 - 13:44DROPS Design answered:
Dear Michelle, after 3 cm on neck edge you will work an eyelet row where you are not supposed to decrease nor to increase stitches as each decrease will be compensate with a yarn over, this means you will work the edge like as in this video. The marker inserterd inside the 6 front band stitches is just to measure from. Happy knitting!
22.11.2024 - 14:19
![]() Elizabeth Hayes wrote:
Elizabeth Hayes wrote:
Thank you once again for your quick and helpful response. I really appreciate that you offer this service.
20.03.2024 - 21:29
![]() Elizabeth Hayes wrote:
Elizabeth Hayes wrote:
In the yoke instructions, there is a yarn over before and after the stocking stitches. Are those yarn overs worked on the right side and on the wrong side or only on the right side?
20.03.2024 - 19:15DROPS Design answered:
Dear Elizabeth, those yarnovers are done on the RS rows only. Happy Knitting!
20.03.2024 - 21:26
![]() Elizabeth Hayes wrote:
Elizabeth Hayes wrote:
Thank you so much for your quick and helpful response. I didn't realize that "A.5" referred to the whole set of A.5 patterns.
18.03.2024 - 22:42
|
||||||||||||||||||||||
New Land Cardigan#newlandcardigan |
||||||||||||||||||||||
 |
 |
|||||||||||||||||||||
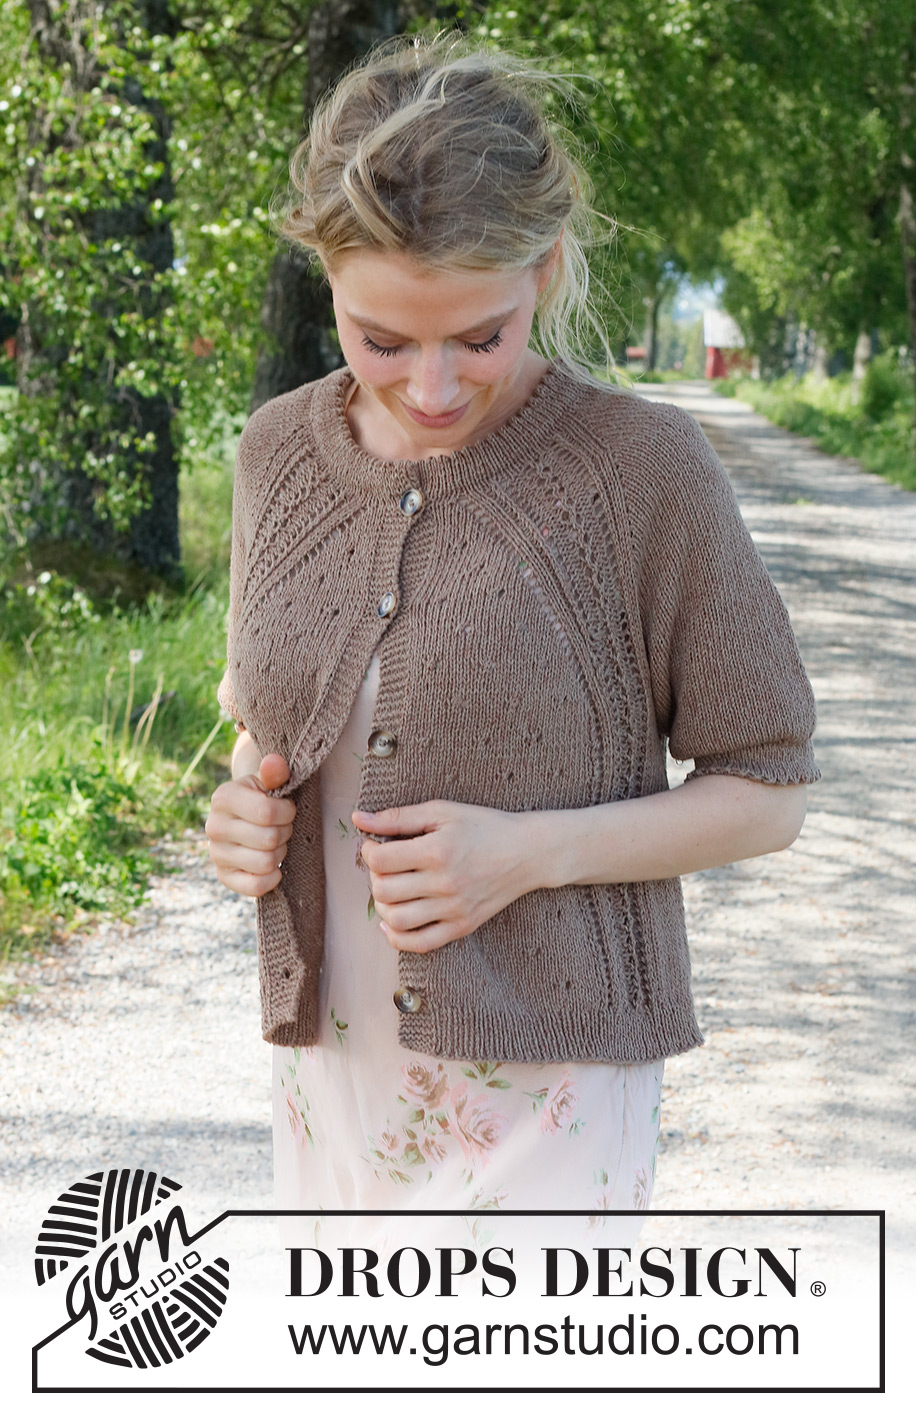
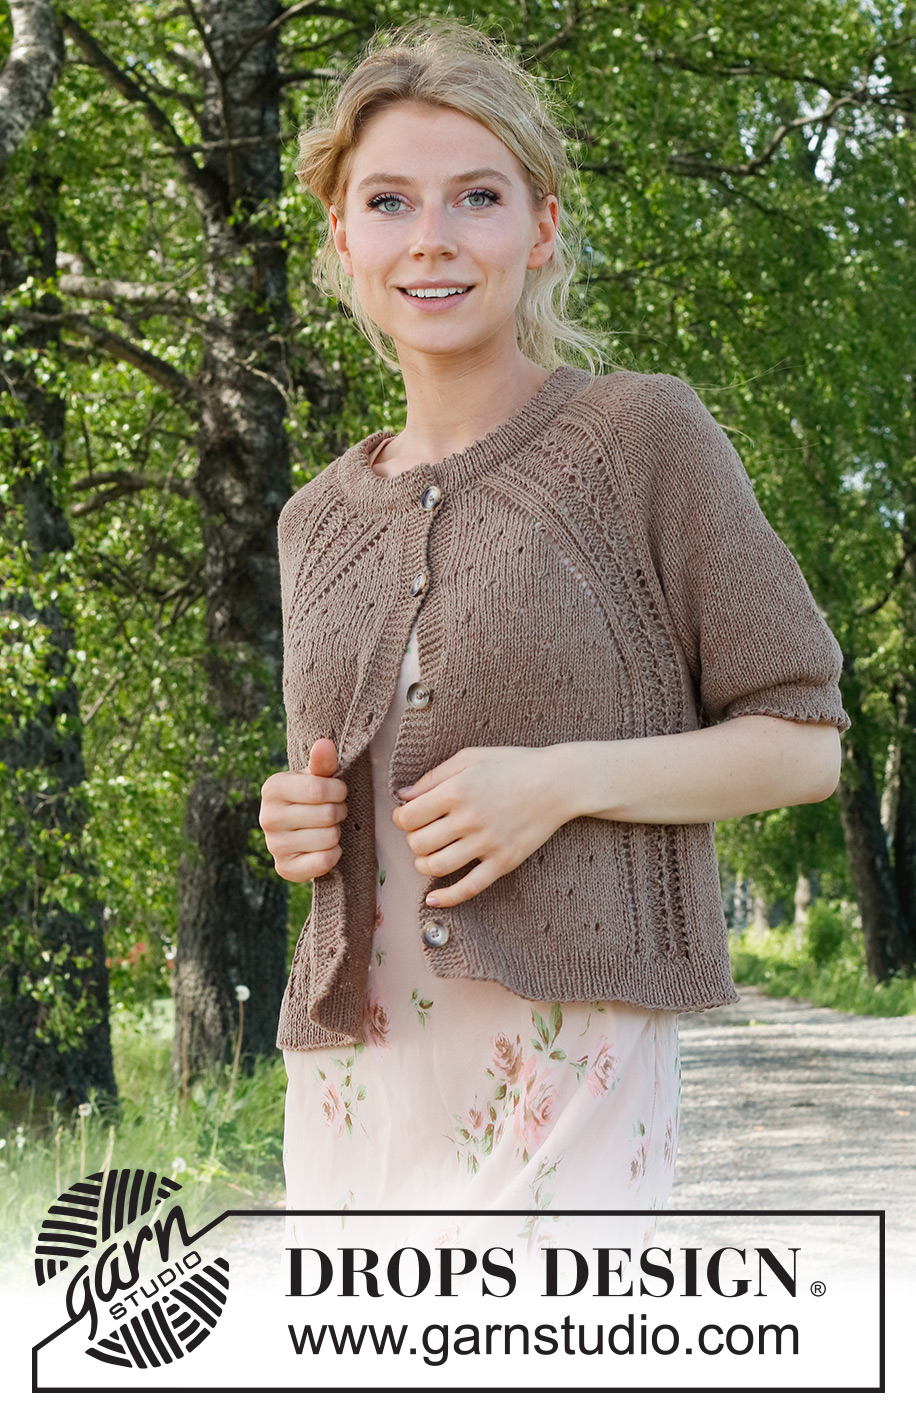
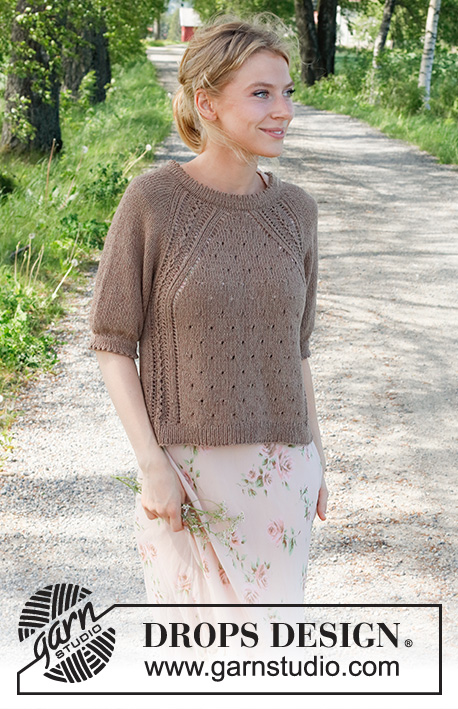
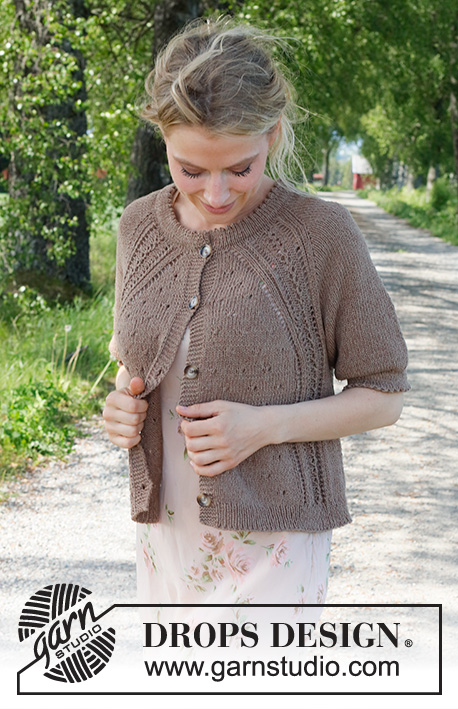
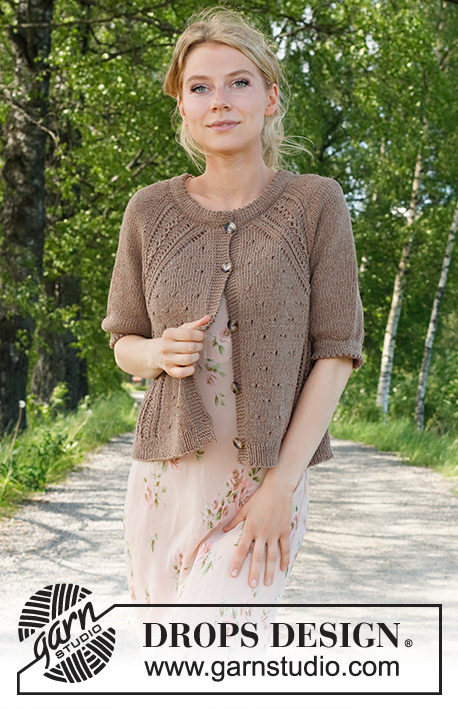
Knitted jacket in DROPS Belle. Piece is knitted top down with raglan, lace pattern, double edges and short sleeves. Size: S - XXXL
DROPS 232-10 |
||||||||||||||||||||||
|
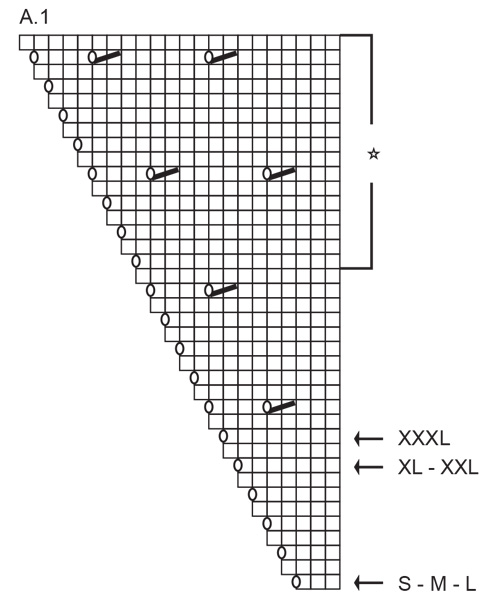
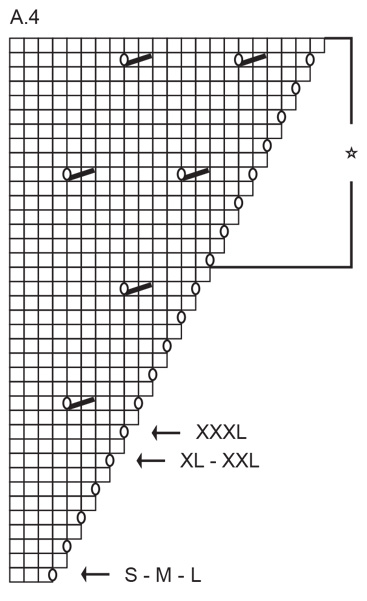
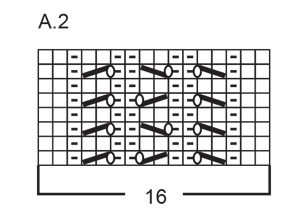
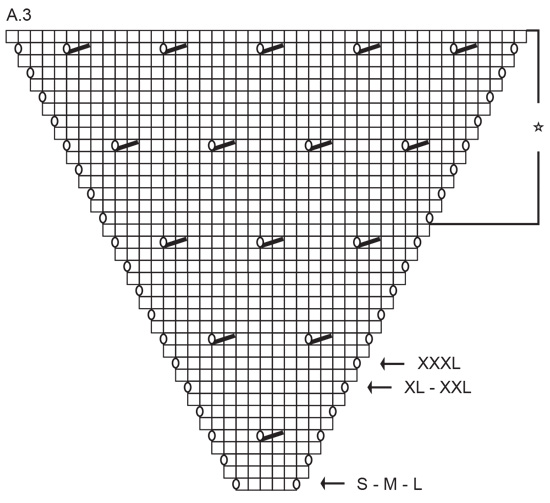
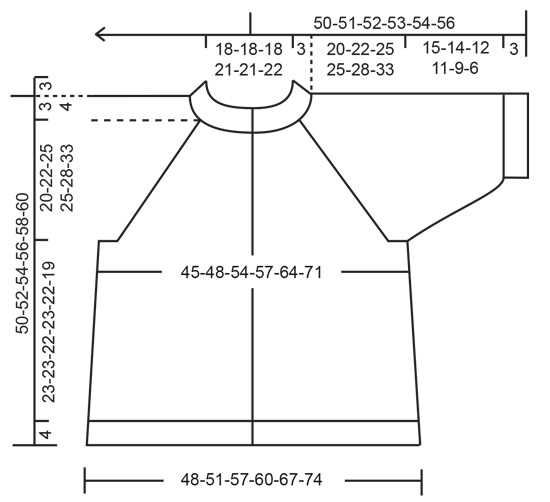
---------------------------------------------------------- EXPLANATION FOR THE PATTERN: ---------------------------------------------------------- GARTER STITCH (back and forth): Knit all rows. 1 ridge vertically = knit 2 rows. PATTERN: See diagrams A.1 to A.5. Diagrams show all rows in pattern seen from the right side. INCREASE TIP (applies to sides of body): Work until 2 stitches remain before marker thread, make 1 yarn over, knit 4 (marker thread is in the middle of these 4 stitches), make 1 yarn over. On next row work yarn overs twisted to avoid holes. Then work the new stitches in stockinette stitch. DECREASE TIP (applies to mid under sleeves): Decrease 1 stitch on each side of marker thread as follows: Work until 3 stitches remain before marker thread and knit 2 together, knit 2 (marker thread is between these 2 stitches), slip 1 stitch knitwise, knit 1, pass slipped stitch over stitch worked. BUTTONHOLES: Decrease for buttonholes on right band (when garment is worn). Decrease from right side when 4 stitches remain on row as follows: Make 1 yarn over, knit the next 2 stitches together, knit the last 2 stitches. On next row (wrong side) knit the yarn over to make a hole. Decrease first buttonhole when neck edge has been worked Then decrease the next 4-4-5-5-5-5 buttonholes, approx. 10-10½-9-9-9½-9½ cm = 4"-4⅛"-3½"-3½"-3⅝"-3⅝" apart. ---------------------------------------------------------- START THE PIECE HERE: ---------------------------------------------------------- JACKET - SHORT OVERVIEW OF THE PIECE: Work double neck edge and yoke back and forth on circular needle from mid front, work top down. Now divide yoke for body and sleeves. Work body back and forth on circular needle. Work sleeves in the round on double pointed needles/a short circular needle. DOUBLE NECK EDGE: Cast on 131-131-131-159-159-165 stitches on circular needle size 3 MM = US 2.5 with DROPS Belle. Purl 1 row from wrong side while decreasing 20-20-20-24-24-26 stitches evenly (do not decrease over the 6 outermost stitches in each side)= 111-111-111-135-135-139 stitches. Then work in stockinette stitch back and forth with 1 stitch in GARTER STITCH in each side – read explanation above. When piece measures 3 cm = 1⅛", work next row as follows from right side: 1 stitch in garter stitch, * knit 2 together, make 1 yarn over *, work from *-* until 2 stitches remain, knit 1, 1 stitch in garter stitch (folding edge). Continue with stockinette stitch and 1 stitch in garter stitch in each side until piece measures 3 cm = 1⅛" from folding edge. Insert 1 marker after the outermost 6 stitches towards mid front. Work yoke as explained below - measure yoke from this marker! YOKE: Switch to circular needle size 4 MM = US 6. Work first row as follows from right side: 6 band stitches in garter stitch, A.1 (start at the arrow for your size), A.2, make 1 yarn over, 12-12-12-16-16-16 stitches in stockinette stitch, make 1 yarn over, work A.2, A.3 (start at the arrow for your size), A.2, make 1 yarn over, 12-12-12-16-16-16 stitches in stockinette stitch, make 1 yarn over, A.2, A.4 (start at the arrow for your size), and 6 band stitches in garter stitch – decrease for BUTTONHOLE on right band – read explanation above. 1 increase for raglan has been done, and there are 119-119-119-143-143-147 stitches on needle. Continue the pattern like this, and increase for raglan the same way on every row from right side, i.e. on front pieces and back piece increase for raglan with yarn overs as shown in A.1, A.3 and A.4. On sleeves increase with 1 yarn over on each side of stitches in stockinette stitch (purl yarn overs on sleeves twisted to avoid holes). REMEMBER THE KNITTING GAUGE! When A.1. A.3 and A.4 have been worked vertically, increases have been worked a total of 19-19-19-15-15-14 times for raglan and there are 263-263-263-255-255-251 stitches on needle. Continue the pattern the same way (pattern is repeated as shown in A.1, A.3 and A.4), continue the increases for raglan as follows: SIZE S - M - L - XL: Front pieces, back piece and sleeves: Increase the same way as before 8-8-16-16 more times (27-27-35-31 times in total vertically). SIZE XXL - XXXL: Front pieces/back piece: Increase the same way as before 24-32 more times (39-46 times in total vertically). Sleeve: Increase the same way as before every other row 13-14 more times, then every 4th row 6-9 times in total (34-37 times in total vertically). After last increase for raglan there are 327-327-391-383-427-471 stitches on needle. Then work A.5 instead of A.1, A.3 and A.4. In addition divide yoke for body and sleeves as explained under. Read PATTERN and DIVISION before continuing. PATTERN: Work first row as follows from right side: 6 band stitches in garter stitch, A.5A, work A.5B 2-2-3-3-4-5 times in total, A.5C, A.2, 66-66-82-78-84-90 stitches in stockinette stitch, A.2, A.5D, work A.5B 5-5-7-7-9-11 times in total, A.5C, A.2, 66-66-82-78-84-90 stitches in stockinette stitch, A.2, A.5D, work A.5B 2-2-3-3-4-5 times in total, A.5E, and 6 band stitches in garter stitch. Continue pattern like this. DIVISION: When piece measures approx. 20-22-25-25-28-33 cm = 8"-8¾"-9¾"-9¾"-11"-13" from marker at the neck (increases for raglan should now be done, and 1 row pattern must have been worked as explained above), divide yoke for body and sleeves, i.e. work next row as follows: Work 52-52-60-60-68-76 stitches as before, slip the next 66-66-82-78-84-90 stitches on a thread for sleeve, cast on 4-10-6-12-12-10 new stitches on needle (in the side under sleeve), work 91-91-107-107-123-139 stitches as before, slip the next 66-66-82-78-84-90 stitches on a thread for sleeve, cast on 4-10-6-12-12-10 new stitches on needle (in the side under sleeve), and work the last 52-52-60-60-68-76 stitches as before. Finish body and sleeves separately. Now measure the piece from here. BODY: = 203-215-239-251-283-311 stitches. Insert 1 marker thread 54-57-63-66-74-81 stitches in from each side (there are 95-101-113-119-135-149 stitches between marker threads on back piece - marker thread is in the middle of the new stitches under each sleeve). Move the marker threads upwards when working - they should be used for increase. Continue the pattern back and forth as before – work the 4-10-6-12-12-10 stitches cast on in each side in stockinette stitch. When piece measures 5 cm = 2" from division, increase 1 stitch on each side of both marker threads - read INCREASE TIP. Increase like this every 6-6-6-6-6-5 cm = 2⅜"-2⅜"-2⅜"-2⅜"-2⅜"-2" 3 times in total = 215-227-251-263-295-323 stitches. Work until piece measures approx. 23-23-22-23-22-19 cm = 9"-9"-8¾"-9"-8¾"-7½" from division, but adjust to have worked at least 5 rows in stockinette stitch after a row with holes. Knit 1 row from right side while increasing 54-56-62- 66-74-80 stitches evenly (do not increase over bands) = 269-283-313-329-369-403 stitches. Switch to circular needle size 3 MM = US 2.5. Work next row as follows from wrong side: 6 band stitches in garter stitch, * purl 1, knit 1 *, repeat from *-* until 7 stitches remain, purl 1, and 6 band stitches in garter stitch. Continue rib like this for 4 cm = 1½". Loosely bind off. Jacket measures approx. 50-52-54-56-58-60 cm = 19¾"-20½"-21¼"-22"-22¾"-23⅝" from shoulder. SLEEVE: Slip the 66-66-82-78-84-90 stitches from stitch holder in one side of piece double pointed needles/a short circular needle size 4 MM = US 6– pick in addition up 1 stitch in each of the 4-10-6-12-12-10 new stitches cast on under sleeve = 70-76-88-90-96-100 stitches. Insert 1 marker thread in the middle of the 4-10-6-12-12-10 stitches under sleeve and move the marker thread upwards when working- it is used when decreasing. Begin round at the marker thread and work stockinette stitch in the round. When piece measures 3-3-2-2-2-2 cm = 1⅛"-1⅛"-¾"-¾"-¾"-¾" from division, decrease 2 stitches mid under sleeve - read DECREASE TIP. Decrease like this every 4-4-2½-2-2-1 cm = 1½"-1½"-1"-¾"-¾"-⅜" 3-3-4-4-4-4 times in total = 64-70-80-82-88-92 stitches. Work in stockinette stitch until sleeve measures 15-14-12-11-9-6 cm = 6"-5½"-4¾"-4⅜"-3½"-2⅜" from division. Now work a double edge the same way as in the neck. Knit 1 round while decreasing 10-12-16-12-12-10 stitches evenly = 54-58-64-70-76-82 stitches. Switch to double pointed needles size 3 MM = US 2.5. Work stockinette stitch in the round for 3 cm = 1⅛". Work next round as follows: * Knit 2 together, 1 yarn over *, work from *-* around the sleeve (folding edge). Work in stockinette stitch until piece measures 3 cm = 1⅛" from folding edge. Switch to double pointed needles size 4 MM = US 6, and loosely bind off. Work the other sleeve the same way. ASSEMBLY: Fold edge at the top of neck down on the inside of garment. Fasten edge to get a double neck edge. To avoid a tight neck edge that sticks out it is important to keep the seam elastic. Sew opening towards mid front together on bands with neat little stitches. Fold the edge at the bottom of sleeve in towards the wrong side and fasten the same way. Sew the buttons on to the left band. |
||||||||||||||||||||||
Diagram explanations |
||||||||||||||||||||||
|
||||||||||||||||||||||
 |
||||||||||||||||||||||
 |
||||||||||||||||||||||
 |
||||||||||||||||||||||
 |
||||||||||||||||||||||
 |
||||||||||||||||||||||
 |
||||||||||||||||||||||
 |
||||||||||||||||||||||
Have you finished this pattern?Tag your pictures with #dropspattern #newlandcardigan or submit them to the #dropsfan gallery. Do you need help with this pattern?You'll find 27 tutorial videos, a Comments/Questions area and more by visiting the pattern on garnstudio.com. © 1982-2026 DROPS Design A/S. We reserve all rights. This document, including all its sub-sections, has copyrights. Read more about what you can do with our patterns at the bottom of each pattern on our site. |
||||||||||||||||||||||


With over 40 years in knitting and crochet design, DROPS Design offers one of the most extensive collections of free patterns on the internet - translated to 17 languages. As of today we count 324 catalogs and 12290 patterns - 12280 of which are translated into English (US/in).
We work hard to bring you the best knitting and crochet have to offer, inspiration and advice as well as great quality yarns at incredible prices! Would you like to use our patterns for other than personal use? You can read what you are allowed to do in the Copyright text at the bottom of all our patterns. Happy crafting!
Post a comment to pattern DROPS 232-10
We would love to hear what you have to say about this pattern!
If you want to leave a question, please make sure you select the correct category in the form below, to speed up the answering process. Required fields are marked *.